Owners Manual
Page 2
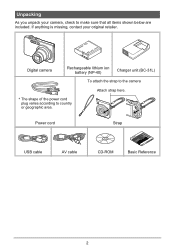
Digital camera Rechargeable lithium ion battery (NP-40) Charger unit (BC-31L) To attach the strap to the camera Attach strap here. * The shape of the power cord plug varies according to make sure that all items shown below are included. If anything is missing, contact your camera, check to country or geographic area. Unpacking As you unpack your original retailer. Power cord Strap USB cable AV cable CD-ROM Basic Reference 2
Digital camera Rechargeable lithium ion battery (NP-40) Charger unit (BC-31L) To attach the strap to the camera Attach strap here. * The shape of the power cord plug varies according to make sure that all items shown below are included. If anything is missing, contact your camera, check to country or geographic area. Unpacking As you unpack your original retailer. Power cord Strap USB cable AV cable CD-ROM Basic Reference 2
Owners Manual
Page 4
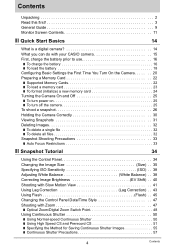
...11 ❚❙ Quick Start Basics 14 What is a digital camera 14 What you can do with your CASIO camera 15 First, charge the battery prior to use 16 ❚ To charge the battery 16 ❚ To load the battery 18 Configuring Basic Settings the First Time You Turn On the... the Control Panel Date/Time Style 47 Shooting with Zoom 47 ❚ Optical Zoom/Digital Zoom Switch Point 48 Using Continuous Shutter 50 ❚ Using Normal-speed Continuous Shutter 50 ❚ Using High Speed CS and Prerecord CS 51 ❚ Specifying the Method for Saving Continuous Shutter Images 55...
...11 ❚❙ Quick Start Basics 14 What is a digital camera 14 What you can do with your CASIO camera 15 First, charge the battery prior to use 16 ❚ To charge the battery 16 ❚ To load the battery 18 Configuring Basic Settings the First Time You Turn On the... the Control Panel Date/Time Style 47 Shooting with Zoom 47 ❚ Optical Zoom/Digital Zoom Switch Point 48 Using Continuous Shutter 50 ❚ Using Normal-speed Continuous Shutter 50 ❚ Using High Speed CS and Prerecord CS 51 ❚ Specifying the Method for Saving Continuous Shutter Images 55...

Owners Manual
Page 7
... Number Generation Rule . . . . . (File No.) . 151 Configuring World Time Settings World Time) . 152 Time Stamping Snapshots Timestamp) . 153 Setting the Camera's Clock Adjust) . 153 Specifying the Date Style Date Style) . 154 Specifying the Display Language Language) . 154 Configuring Sleep State Settings Sleep) . 155 Configuring Auto...the Histogram 160 ❚❙ Appendix 161 Precautions during Use 161 Power Supply 169 ❚ Charging 169 ❚ To replace the battery 169 ❚ Battery Precautions 170 ❚ Using the Camera in another Country 170 7 Contents
... Number Generation Rule . . . . . (File No.) . 151 Configuring World Time Settings World Time) . 152 Time Stamping Snapshots Timestamp) . 153 Setting the Camera's Clock Adjust) . 153 Specifying the Date Style Date Style) . 154 Specifying the Display Language Language) . 154 Configuring Sleep State Settings Sleep) . 155 Configuring Auto...the Histogram 160 ❚❙ Appendix 161 Precautions during Use 161 Power Supply 169 ❚ Charging 169 ❚ To replace the battery 169 ❚ Battery Precautions 170 ❚ Using the Camera in another Country 170 7 Contents

Owners Manual
Page 16
... a household power outlet. About 150 minutes are required to abnormally high or low ambient temperature (page 169) 16 Quick Start Basics Perform the steps under "To charge the battery" to bring the battery to a full charge. • Your camera requires a special CASIO rechargeable lithium ion battery (NP-40) for power. Aligning the positive + and negative - To...
... a household power outlet. About 150 minutes are required to abnormally high or low ambient temperature (page 169) 16 Quick Start Basics Perform the steps under "To charge the battery" to bring the battery to a full charge. • Your camera requires a special CASIO rechargeable lithium ion battery (NP-40) for power. Aligning the positive + and negative - To...

Owners Manual
Page 17
Never use a different charger can result in the camera. Give the battery time to cool before you charge the battery immediately before charging it. • A battery discharges slightly even when it . • Charging the camera's battery may not charge fully. If this , it is recommended that you need to use it is not loaded in unexpected accident...
Never use a different charger can result in the camera. Give the battery time to cool before you charge the battery immediately before charging it. • A battery discharges slightly even when it . • Charging the camera's battery may not charge fully. If this , it is recommended that you need to use it is not loaded in unexpected accident...
Owners Manual
Page 18
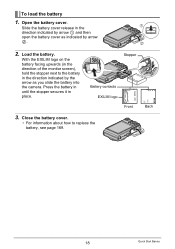
... 169. 18 Quick Start Basics Open the battery cover. With the EXILIM logo on the battery facing upwards (in the direction indicated by the arrow as indicated by arrow 1 and then open the battery cover as you slide the battery into the camera. Stopper Battery contacts EXILIM logo Front Back 3. Slide the battery cover release in place. Press the...
... 169. 18 Quick Start Basics Open the battery cover. With the EXILIM logo on the battery facing upwards (in the direction indicated by the arrow as indicated by arrow 1 and then open the battery cover as you slide the battery into the camera. Stopper Battery contacts EXILIM logo Front Back 3. Slide the battery cover release in place. Press the...

Owners Manual
Page 19
... cause its date and time settings to be cleared. Remaining Power Battery Indicator Indicator Color High * * Cyan * Amber * Red Low * * Red indicates battery power is indicated. Recording is not possible when is low. Charge the battery as soon as shown below. When this happens, configure date and...next time you switch between the REC mode and PLAY mode. • Leaving the camera for "Continuous AF" (page 91). • Avoid unnecessary optical zoom operations. 19 Quick Start Basics Battery Power Conservation Tips • When you do not need to turn on the monitor...
... cause its date and time settings to be cleared. Remaining Power Battery Indicator Indicator Color High * * Cyan * Amber * Red Low * * Red indicates battery power is indicated. Recording is not possible when is low. Charge the battery as soon as shown below. When this happens, configure date and...next time you switch between the REC mode and PLAY mode. • Leaving the camera for "Continuous AF" (page 91). • Avoid unnecessary optical zoom operations. 19 Quick Start Basics Battery Power Conservation Tips • When you do not need to turn on the monitor...

Owners Manual
Page 20
...to change and then use [8] and [2] to select the setting you purchased a camera intended for the Japanese market. 1. Use [8], [2], [4], and [6] to select the language you select may not be recorded with a camera intended for the Japanese market. Set the date and the time. Example: 30....screen for configuring the display language, date, and time settings. Configuring Basic Settings the First Time You Turn On the Camera The first time you load a battery into the camera, a screen appears for language selection will cause the wrong date and time data to select "Apply" and then press ...
...to change and then use [8] and [2] to select the setting you purchased a camera intended for the Japanese market. 1. Use [8], [2], [4], and [6] to select the language you select may not be recorded with a camera intended for the Japanese market. Set the date and the time. Example: 30....screen for configuring the display language, date, and time settings. Configuring Basic Settings the First Time You Turn On the Camera The first time you load a battery into the camera, a screen appears for language selection will cause the wrong date and time data to select "Apply" and then press ...
Owners Manual
Page 21
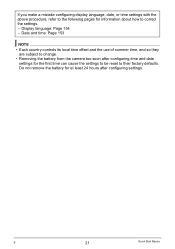
... the use of summer time, and so they are subject to change. • Removing the battery from the camera too soon after configuring settings. B 21 Quick Start Basics Display language: Page 154 - Do not remove the battery for at least 24 hours after configuring time and date settings for information about how to...
... the use of summer time, and so they are subject to change. • Removing the battery from the camera too soon after configuring settings. B 21 Quick Start Basics Display language: Page 154 - Do not remove the battery for at least 24 hours after configuring time and date settings for information about how to...

Owners Manual
Page 23
... release in until you hear it into the card slot, immediately turn off the camera, remove the battery, and contact your retailer or nearest CASIO authorized service center. 23 Quick Start Basics Front Back IMPORTANT! • Never insert anything besides a supported memory card (page ... is facing upwards (towards the monitor screen side of the camera), slide it click securely into place. 1 2 Front 3. Load a memory card. Close the battery cover. • For information about how to turn off the camera and then open the battery cover as indicated by arrow 2. 2. To load a memory...
... release in until you hear it into the card slot, immediately turn off the camera, remove the battery, and contact your retailer or nearest CASIO authorized service center. 23 Quick Start Basics Front Back IMPORTANT! • Never insert anything besides a supported memory card (page ... is facing upwards (towards the monitor screen side of the camera), slide it click securely into place. 1 2 Front 3. Load a memory card. Close the battery cover. • For information about how to turn off the camera and then open the battery cover as indicated by arrow 2. 2. To load a memory...

Owners Manual
Page 33
... focus impossible. - Blinds or other very low contrast subject - Camera movement while shooting - Subjects outside the focus range of the camera's semiconductor, slow shutter speeds can cause digital noise in images. Monitor Screen when Shooting Snapshots • Subject brightness...speed is flashing green. Subject in a dark location - Auto Focus Restrictions • Any of the following can affect the brightness or color of the time required for light from the camera - Strongly back lit subject - Snapshot Shooting Precautions Operation • Never open the battery...
... focus impossible. - Blinds or other very low contrast subject - Camera movement while shooting - Subjects outside the focus range of the camera's semiconductor, slow shutter speeds can cause digital noise in images. Monitor Screen when Shooting Snapshots • Subject brightness...speed is flashing green. Subject in a dark location - Auto Focus Restrictions • Any of the following can affect the brightness or color of the time required for light from the camera - Strongly back lit subject - Snapshot Shooting Precautions Operation • Never open the battery...
Owners Manual
Page 46
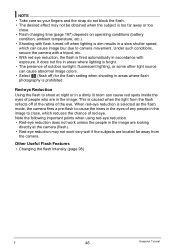
...subject is too far away or too close , which can cause image blur due to camera movement. Red-eye Reduction Using the flash to close . • Flash charging time (page 187) depends on operating conditions (battery condition, ambient temperature, etc.). • Shooting with exposure. Other Useful Flash Features &#...• With red eye reduction, the flash is fired automatically in accordance with flash turned off when lighting is dim results in a slow shutter speed, which reduces the chance of the eye. NOTE • Take care so your fingers and the strap do not block the flash. •...
...subject is too far away or too close , which can cause image blur due to camera movement. Red-eye Reduction Using the flash to close . • Flash charging time (page 187) depends on operating conditions (battery condition, ambient temperature, etc.). • Shooting with exposure. Other Useful Flash Features &#...• With red eye reduction, the flash is fired automatically in accordance with flash turned off when lighting is dim results in a slow shutter speed, which reduces the chance of the eye. NOTE • Take care so your fingers and the strap do not block the flash. •...
Owners Manual
Page 79
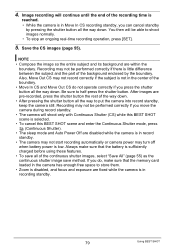
... sure that the memory card loaded in record standby. • The camera may not start recording automatically or camera power may turn off when battery power is in the camera has enough free space to put the camera into record standby, keep the camera still. 4. Save the CS images (page 55). Also, Move Out... if you press the shutter button all the way down . Always make sure that the battery is not in Move In CS recording standby, you move the camera during record standby. • The camera will shoot only with Continuous Shutter (CS) while this BEST SHOT scene is in the ...
... sure that the memory card loaded in record standby. • The camera may not start recording automatically or camera power may turn off when battery power is in the camera has enough free space to put the camera into record standby, keep the camera still. 4. Save the CS images (page 55). Also, Move Out... if you press the shutter button all the way down . Always make sure that the battery is not in Move In CS recording standby, you move the camera during record standby. • The camera will shoot only with Continuous Shutter (CS) while this BEST SHOT scene is in the ...
Owners Manual
Page 123
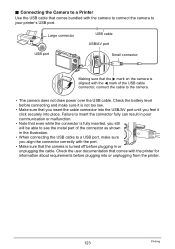
... for information about requirements before connecting and make sure you feel it click securely into or unplugging from the printer. 123 Printing Check the battery level before plugging into place. Check the user documentation that even while the connector is turned off before plugging in the illustration. •... When connecting the USB cable to a USB port, make sure it is not too low. • Make sure that the camera is fully inserted, you still will be able to see the metal part of the USB cable connector, connect the cable to your printer's USB...
... for information about requirements before connecting and make sure you feel it click securely into or unplugging from the printer. 123 Printing Check the battery level before plugging into place. Check the user documentation that even while the connector is turned off before plugging in the illustration. •... When connecting the USB cable to a USB port, make sure it is not too low. • Make sure that the camera is fully inserted, you still will be able to see the metal part of the USB cable connector, connect the cable to your printer's USB...

Owners Manual
Page 133
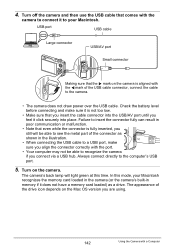
.... • Note that you align the connector correctly with the 4 mark of the USB cable connector, connect the cable to your computer. Turn on the camera is not too low. • Make sure that even while the connector is fully inserted, you still will be able to see the metal part... to a USB port, make sure it is aligned with the port. • Your computer may not be able to the computer's USB port. 5. Check the battery level before connecting and make sure you insert the cable connector into place. 4.
.... • Note that you align the connector correctly with the 4 mark of the USB cable connector, connect the cable to your computer. Turn on the camera is not too low. • Make sure that even while the connector is fully inserted, you still will be able to see the metal part... to a USB port, make sure it is aligned with the port. • Your computer may not be able to the computer's USB port. 5. Check the battery level before connecting and make sure you insert the cable connector into place. 4.
Owners Manual
Page 142
...cable connector into place. Turn on the Mac OS version you are using. 142 Using the Camera with a Computer Check the battery level before connecting and make sure you align the connector correctly with the camera to connect it to see the metal part of the connector as a drive. Always connect... directly to recognize the camera if you feel it is fully inserted, you still will light green...
...cable connector into place. Turn on the Mac OS version you are using. 142 Using the Camera with a Computer Check the battery level before connecting and make sure you align the connector correctly with the camera to connect it to see the metal part of the connector as a drive. Always connect... directly to recognize the camera if you feel it is fully inserted, you still will light green...

Owners Manual
Page 146
... time to complete. • The original images remain on the monitor screen. B 146 Using the Camera with a Computer IMPORTANT! • Recorded images are transferred over wireless LAN. Transparent Access point cannot be possible due to camera settings, battery level, or operating conditions. Not transparent Image transfer in progress • A communication icon will appear...
... time to complete. • The original images remain on the monitor screen. B 146 Using the Camera with a Computer IMPORTANT! • Recorded images are transferred over wireless LAN. Transparent Access point cannot be possible due to camera settings, battery level, or operating conditions. Not transparent Image transfer in progress • A communication icon will appear...

Owners Manual
Page 158
... [MENU] * Set Up Tab * Format If a memory card is loaded in the camera, this operation will delete the following data. - Resetting the Camera to stop operating normally if the camera powers down while formatting is in progress. • Never open the battery cover while formatting is loaded. • The format operation will delete all...
... [MENU] * Set Up Tab * Format If a memory card is loaded in the camera, this operation will delete the following data. - Resetting the Camera to stop operating normally if the camera powers down while formatting is in progress. • Never open the battery cover while formatting is loaded. • The format operation will delete all...

Owners Manual
Page 162
... service center. . Immediately perform the following steps whenever any way. Turn off the camera. 2. . Immediately perform the following steps whenever any of the above symptoms are present. 1. Remove the battery from the camera. 3. Contact your dealer or nearest CASIO authorized service center. 162 Appendix Doing so creates the risk of electric shock, burn injury...
... service center. . Immediately perform the following steps whenever any way. Turn off the camera. 2. . Immediately perform the following steps whenever any of the above symptoms are present. 1. Remove the battery from the camera. 3. Contact your dealer or nearest CASIO authorized service center. 162 Appendix Doing so creates the risk of electric shock, burn injury...

Owners Manual
Page 163
...or dust - Memory Protection • Whenever replacing the battery, be sure to fall, creating the risk of locations. Do not expose the battery to charge the battery. Note that comes with a CASIO Digital Camera only. Never use with the camera. Near heaters, on a heated carpet, in areas ... keep it is present - Make sure the battery is oriented correctly when it away from open flame. - Never carry or store the battery together with a hammer, step on a high shelf, etc. Never place the battery into a microwave oven, heater, high-pressure generating device, etc. • Should ...
...or dust - Memory Protection • Whenever replacing the battery, be sure to fall, creating the risk of locations. Do not expose the battery to charge the battery. Note that comes with a CASIO Digital Camera only. Never use with the camera. Near heaters, on a heated carpet, in areas ... keep it is present - Make sure the battery is oriented correctly when it away from open flame. - Never carry or store the battery together with a hammer, step on a high shelf, etc. Never place the battery into a microwave oven, heater, high-pressure generating device, etc. • Should ...


