User Guide
Page 1
E CW-L300 User's Guide • We recommend that you print on a disc* before trying to become corrupted. • Note that already has data recorded on hand for the first time, and always keep this printer. * CD-R, CD-RW, DVD-R, etc. Be sure to read the Safety Precautions contained in this manual before you record anything on it can cause the data to use of data on discs arising through the use the printer for future reference. RJA514733-10 Printing on a disc that CASIO COMPUTER CO., LTD. shall not be held liable for any loss or corruption of this manual on it .
E CW-L300 User's Guide • We recommend that you print on a disc* before trying to become corrupted. • Note that already has data recorded on hand for the first time, and always keep this printer. * CD-R, CD-RW, DVD-R, etc. Be sure to read the Safety Precautions contained in this manual before you record anything on it can cause the data to use of data on discs arising through the use the printer for future reference. RJA514733-10 Printing on a disc that CASIO COMPUTER CO., LTD. shall not be held liable for any loss or corruption of this manual on it .

User Guide
Page 74
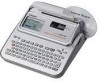
Tape Width (mm) User's 6 9 12 18, 24 Guide page Maximum Normal 1 line 1 line 2 lines 4 lines 23 Number Font of print lines and the vertical character size depends on the tape width and format ... to 2* Up to 4* 31 vertical Small 34 size Font Up to 2* Up to 3* Up to 5* Up to 8* 50 * Total when there are multiple lines ■ DISC 6 Case Label × ■ TAPE 6 Free Design Frame Enlarged Label × Bar Code × Numbering Logo × Tape Width (mm) 9 12 18 24 × ×...
Tape Width (mm) User's 6 9 12 18, 24 Guide page Maximum Normal 1 line 1 line 2 lines 4 lines 23 Number Font of print lines and the vertical character size depends on the tape width and format ... to 2* Up to 4* 31 vertical Small 34 size Font Up to 2* Up to 3* Up to 5* Up to 8* 50 * Total when there are multiple lines ■ DISC 6 Case Label × ■ TAPE 6 Free Design Frame Enlarged Label × Bar Code × Numbering Logo × Tape Width (mm) 9 12 18 24 × ×...

Startup Guide
Page 1
Be sure to read the Safety Precautions contained in the User's Guide before you print on hand for the first time, and always keep this printer. * CD-R, CD-RW, DVD-R, etc. shall not be held liable for any loss or corruption of data on discs arising through the use of this manual on a disc* before trying to become corrupted. • Note that you record anything on it. RJA514733-9 Printing on a disc that already has data recorded on it can cause the data to use the printer for future reference. E CW-L300 Startup Guide • We recommend that CASIO COMPUTER CO., LTD.
Be sure to read the Safety Precautions contained in the User's Guide before you print on hand for the first time, and always keep this printer. * CD-R, CD-RW, DVD-R, etc. shall not be held liable for any loss or corruption of data on discs arising through the use of this manual on a disc* before trying to become corrupted. • Note that you record anything on it. RJA514733-9 Printing on a disc that already has data recorded on it can cause the data to use the printer for future reference. E CW-L300 Startup Guide • We recommend that CASIO COMPUTER CO., LTD.

Startup Guide
Page 9
... the USB cable to connect the printer to a computer without installing the printer software on commercially available alkaline batteries. • For information about loading alkaline batteries, see page 57 of printer malfunction. 1. Doing so creates the risk of the User's Guide. Connect the power cord to the... AC adaptor. 2. It can run on the computer first. 1. Connect the AC adaptor plug to the printer's AC adaptor terminal (1), and then...
... the USB cable to connect the printer to a computer without installing the printer software on commercially available alkaline batteries. • For information about loading alkaline batteries, see page 57 of printer malfunction. 1. Doing so creates the risk of the User's Guide. Connect the power cord to the... AC adaptor. 2. It can run on the computer first. 1. Connect the AC adaptor plug to the printer's AC adaptor terminal (1), and then...

Startup Guide
Page 11
... examples in this Startup Guide and the User's Guide use English as pressing a button. Press the button to perform. • See "Mode Selection Basics" on a disc. DISC mode icon TAPE mode icon Last Data icon Selection boundary Currently selected function (icon) Shows the function of printing operation you want to turn the printer on. • This...
... examples in this Startup Guide and the User's Guide use English as pressing a button. Press the button to perform. • See "Mode Selection Basics" on a disc. DISC mode icon TAPE mode icon Last Data icon Selection boundary Currently selected function (icon) Shows the function of printing operation you want to turn the printer on. • This...

Startup Guide
Page 12
... is identical. Operation in the TAPE mode is selected on the Main Menu, producing a demo print (User's Guide, page 55) or initializing printer memory will delete any data you were last working on. See the User's Guide for the DISC mode only. Mode Selection Basics The illustration below shows operation for details on how to use...
... is identical. Operation in the TAPE mode is selected on the Main Menu, producing a demo print (User's Guide, page 55) or initializing printer memory will delete any data you were last working on. See the User's Guide for the DISC mode only. Mode Selection Basics The illustration below shows operation for details on how to use...

Startup Guide
Page 17
...0 5 Press to the operation before it. 15 E Press to execute a command of the User's Guide. Press to shift the keyboard between uppercase and lowercase for input of one character only. For... Press to print. 8 Use these keys to move the cursor on a computer. 2 Press to enter the DISC mode. 12345 6 7 8 3 Press to enter the TAPE mode. 4 COPY • Pastes previously copied... text. • To copy, input the text to be copied. Using the Printer's Keys 1 Press to print data created on the display. 9 CLS 0 q w e r t Press to delete...
...0 5 Press to the operation before it. 15 E Press to execute a command of the User's Guide. Press to shift the keyboard between uppercase and lowercase for input of one character only. For... Press to print. 8 Use these keys to move the cursor on a computer. 2 Press to enter the DISC mode. 12345 6 7 8 3 Press to enter the TAPE mode. 4 COPY • Pastes previously copied... text. • To copy, input the text to be copied. Using the Printer's Keys 1 Press to print data created on the display. 9 CLS 0 q w e r t Press to delete...

Startup Guide
Page 20
... load batteries into the printer. (Page 57 of text have been input. Label Printing Basics This section contains general procedures for important information about creating labels, see the separate User's Guide. DISC Mode This section describes the general steps you plan to also print a disc case label, load a...For full details about how various format conditions are multiple blocks in the text. Select the DISC Mode (Page 19). See page 23 of the User's Guide for laying out and printing disc labels and tape labels. Select the format and input its text. ■ TAPE Mode...
... load batteries into the printer. (Page 57 of text have been input. Label Printing Basics This section contains general procedures for important information about creating labels, see the separate User's Guide. DISC Mode This section describes the general steps you plan to also print a disc case label, load a...For full details about how various format conditions are multiple blocks in the text. Select the DISC Mode (Page 19). See page 23 of the User's Guide for laying out and printing disc labels and tape labels. Select the format and input its text. ■ TAPE Mode...

Startup Guide
Page 21
... PROFILE DATA PROFILE DATA PROFILE DATA 4. Controlling the Appearance of Your Disc Label When creating a disc label, you can preview your disc label ("To check the appearance of a disc label layout", page 20) or print it without previewing ("To print a disc label in the upper label area", page 20). AREA A AREA... SET. • Now you want . • Here we will also appear on page 41 of the User's Guide 19 E 1. Use and to select the label format you can use the following procedures to turn on the printer. • A LAST DATA icon will select print area A (upper only). 5.
... PROFILE DATA PROFILE DATA PROFILE DATA 4. Controlling the Appearance of Your Disc Label When creating a disc label, you can preview your disc label ("To check the appearance of a disc label layout", page 20) or print it without previewing ("To print a disc label in the upper label area", page 20). AREA A AREA... SET. • Now you want . • Here we will also appear on page 41 of the User's Guide 19 E 1. Use and to select the label format you can use the following procedures to turn on the printer. • A LAST DATA icon will select print area A (upper only). 5.
Startup Guide
Page 24
...area" on page 21 for details. 4. This printer supports printing on such discs can damage the printer. When the screen shown above screen. Use and press SET. will display the initial DISC mode screen. • See page 54 of the User's Guide for information about using the STORE option on ...After printing is in progress. Rotate the disc and reinsert it is performing a print operation. • Never touch the disc while a print operation is recommended that you print on a disc before you record anything on page 19, select the icon that CASIO COMPUTER CO., LTD. Press SET to ...
...area" on page 21 for details. 4. This printer supports printing on such discs can damage the printer. When the screen shown above screen. Use and press SET. will display the initial DISC mode screen. • See page 54 of the User's Guide for information about using the STORE option on ...After printing is in progress. Rotate the disc and reinsert it is performing a print operation. • Never touch the disc while a print operation is recommended that you print on a disc before you record anything on page 19, select the icon that CASIO COMPUTER CO., LTD. Press SET to ...

Startup Guide
Page 25
... printing" on page 24. • To print without previewing label contents, perform the procedure under "To print a tape label" on page 41 of the User's Guide). What you should do next depends on whether you want . • Here we will also appear on label tape. TAPE Mode This section describes the... and to print on the Main Menu if there is input data left over from the last time you used the printer. 2. Or load batteries into the printer (Page 57 of the User's Guide for information about inputting text. 6. Select the TAPE Mode (Page 23). Select the tape label mode you want, and ...
... printing" on page 24. • To print without previewing label contents, perform the procedure under "To print a tape label" on page 41 of the User's Guide). What you should do next depends on whether you want . • Here we will also appear on label tape. TAPE Mode This section describes the... and to print on the Main Menu if there is input data left over from the last time you used the printer. 2. Or load batteries into the printer (Page 57 of the User's Guide for information about inputting text. 6. Select the TAPE Mode (Page 23). Select the tape label mode you want, and ...

Startup Guide
Page 26
... if you do this: Select this tape cut mode: See this page of the User's Guide: Print without cutting the CONT HALF CUT 38 backing paper between labels Cut between labels FULL+HALF CUT 39 Print on iron transfer FULL CUT 39 tape Print on the preview screen. ■ To print a tape...100. • Here we will specify one copy. • You can also use the number keys to do not have a tape cartridge loaded in the printer. 2. Use and to resume scrolling. • To stop the preview, press ESC. Note • Characters or illustrations with very fine lines may not appear...
... if you do this: Select this tape cut mode: See this page of the User's Guide: Print without cutting the CONT HALF CUT 38 backing paper between labels Cut between labels FULL+HALF CUT 39 Print on iron transfer FULL CUT 39 tape Print on the preview screen. ■ To print a tape...100. • Here we will specify one copy. • You can also use the number keys to do not have a tape cartridge loaded in the printer. 2. Use and to resume scrolling. • To stop the preview, press ESC. Note • Characters or illustrations with very fine lines may not appear...

Startup Guide
Page 27
... at the position where the tape is overheated. Before printing, make sure that are wet, oily, dusty, etc. • Surfaces made of the User's Guide. ■ To affix a tape label to cancel the print operation. • Make sure that contains large areas of the tape and peel off ... Do not touch the tape coming out of the label and affix it is performing a print operation. • Never open the cassette cover while the printer is complete. 6. Press SET to normal temperature. • If the message " NOW PRINTING " appears and printing stops frequently, try making the print ...
... at the position where the tape is overheated. Before printing, make sure that are wet, oily, dusty, etc. • Surfaces made of the User's Guide. ■ To affix a tape label to cancel the print operation. • Make sure that contains large areas of the tape and peel off ... Do not touch the tape coming out of the label and affix it is performing a print operation. • Never open the cassette cover while the printer is complete. 6. Press SET to normal temperature. • If the message " NOW PRINTING " appears and printing stops frequently, try making the print ...

Startup Guide
Page 28
...select EXIT, and then press SET twice. • This will display the initial TAPE mode screen. • See page 54 of the User's Guide for information about using the STORE option on the above is complete, press FUNCTION CUT. Before text is printed or after text printing is ... tape approximately 23.5 millimeters (15/16"). ■ To cut a tape when "NONE" is selected for the margins setting (User's Guide, page 27). Important! • Make sure that the printer is selected for the "MARGINS" setting Automatic tape cutting is not performed at the end of label text 1. After printing is...
...select EXIT, and then press SET twice. • This will display the initial TAPE mode screen. • See page 54 of the User's Guide for information about using the STORE option on the above is complete, press FUNCTION CUT. Before text is printed or after text printing is ... tape approximately 23.5 millimeters (15/16"). ■ To cut a tape when "NONE" is selected for the margins setting (User's Guide, page 27). Important! • Make sure that the printer is selected for the "MARGINS" setting Automatic tape cutting is not performed at the end of label text 1. After printing is...