
User Guide
Page 3
...on Power and Playing E-6 Using Headphones E-6 Changing Keyboard Response to Touch Pressure (Touch Response) (CTK-3000 only E-7 Using the Metronome E-8 Controlling the Keyboard Sounds E-9 Select from the CASIO website at the following URL. http://world.casio.com/ E-1 E-32 Connecting a Computer E-32...; Safety Precautions • Appendix • Other (Warranty, etc.) Items included as accessories are separately for this product from the CASIO keyboard catalog available from your retailer, and from a variety of musical instrument sounds E-9 Using Reverb E-10 Using a Pedal E-10 Changing...
...on Power and Playing E-6 Using Headphones E-6 Changing Keyboard Response to Touch Pressure (Touch Response) (CTK-3000 only E-7 Using the Metronome E-8 Controlling the Keyboard Sounds E-9 Select from the CASIO website at the following URL. http://world.casio.com/ E-1 E-32 Connecting a Computer E-32...; Safety Precautions • Appendix • Other (Warranty, etc.) Items included as accessories are separately for this product from the CASIO keyboard catalog available from your retailer, and from a variety of musical instrument sounds E-9 Using Reverb E-10 Using a Pedal E-10 Changing...
User Guide
Page 4
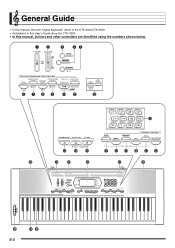
General Guide • In this manual, the term "Digital Keyboard" refers to the CTK-2000/CTK-3000. • Illustrations in this User's Guide show the CTK-3000. • In this manual, buttons and other controllers are identified using the numbers shown below. 1 2 3 45 6 7 8 9 bk bl bm bn bo bp bq br bs bt ck cl cm cn co cp cq cr cn cs ct dk E-2
General Guide • In this manual, the term "Digital Keyboard" refers to the CTK-2000/CTK-3000. • Illustrations in this User's Guide show the CTK-3000. • In this manual, buttons and other controllers are identified using the numbers shown below. 1 2 3 45 6 7 8 9 bk bl bm bn bo bp bq br bs bt ck cl cm cn co cp cq cr cn cs ct dk E-2
User Guide
Page 6
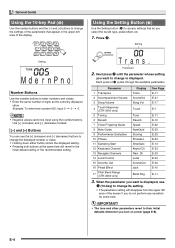
... Reverb E-10 7 Voice Fingering Guide Speak E-22 8 Note Guide NoteGuid E-23 9 Performance Evaluation Scoring E-23 10 Phrase PhraseLn E-23 11 Sampling Start SmplAuto E-13 12 Keyboard Channel Keybd Ch E-33 13 Navigate Channels Navi. E-4 Next press 3 until the parameter whose setting you select the reverb type, pedal effect, etc. 1. Using the...
... Reverb E-10 7 Voice Fingering Guide Speak E-22 8 Note Guide NoteGuid E-23 9 Performance Evaluation Scoring E-23 10 Phrase PhraseLn E-23 11 Sampling Start SmplAuto E-13 12 Keyboard Channel Keybd Ch E-33 13 Navigate Channels Navi. E-4 Next press 3 until the parameter whose setting you select the reverb type, pedal effect, etc. 1. Using the...
User Guide
Page 7
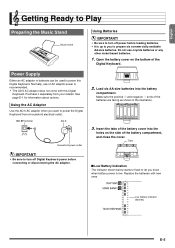
... Do not use of the battery compartment, and close the cover. Make sure the positive + and negative - Replace the batteries with this Digital Keyboard. Open the battery cover on the side of AC adaptor power is recommended. • The AD-5 AC adaptor does not come with new ones....to Play Preparing the Music Stand Using Batteries Music stand Power Supply Either an AC adaptor or batteries can be used to power this Digital Keyboard. See page E-1 for information about options. DC 9V terminal AD-5 Household power outlet • Be sure to turn off power before connecting...
... Do not use of the battery compartment, and close the cover. Make sure the positive + and negative - Replace the batteries with this Digital Keyboard. Open the battery cover on the side of AC adaptor power is recommended. • The AD-5 AC adaptor does not come with new ones....to Play Preparing the Music Stand Using Batteries Music stand Power Supply Either an AC adaptor or batteries can be used to power this Digital Keyboard. See page E-1 for information about options. DC 9V terminal AD-5 Household power outlet • Be sure to turn off power before connecting...
User Guide
Page 8
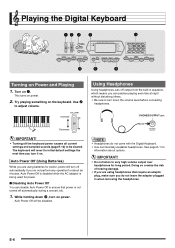
... damage. • If you are using headphones that power is being used for long period. Playing the Digital Keyboard 12 3 5 bn bk bm bq Turning on power. 2. Turn on the keyboard. Try playing something on 1. E-6 Use 2 to be disabled. • Headphones do not perform any operation ...late at night without disturbing others. • Be sure to initial default settings the next time you do not come with the Digital Keyboard. • Use commercially available headphones. Auto Power Off is disabled while the AC adaptor is not turned off automatically if you turn on...
... damage. • If you are using headphones that power is being used for long period. Playing the Digital Keyboard 12 3 5 bn bk bm bq Turning on power. 2. Turn on the keyboard. Try playing something on 1. E-6 Use 2 to be disabled. • Headphones do not perform any operation ...late at night without disturbing others. • Be sure to initial default settings the next time you do not come with the Digital Keyboard. • Use commercially available headphones. Auto Power Off is disabled while the AC adaptor is not turned off automatically if you turn on...
User Guide
Page 9
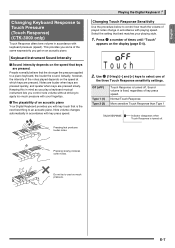
...automatically in accordance with key touch that the stronger the pressure applied to use too much the volume of an acoustic piano Your Digital Keyboard provides you control note volume without striving to apply too much pressure with your playing style. 1. Press 3 a number of the ...same expressivity you some of times until "Touch" appears on an acoustic piano. Playing the Digital Keyboard Changing Touch Response Sensitivity Use the procedure below to an acoustic piano. Pressing fast produces louder notes. This provides you get on the display ...
...automatically in accordance with key touch that the stronger the pressure applied to use too much the volume of an acoustic piano Your Digital Keyboard provides you control note volume without striving to apply too much pressure with your playing style. 1. Press 3 a number of the ...same expressivity you some of times until "Touch" appears on an acoustic piano. Playing the Digital Keyboard Changing Touch Response Sensitivity Use the procedure below to an acoustic piano. Pressing fast produces louder notes. This provides you get on the display ...
User Guide
Page 10
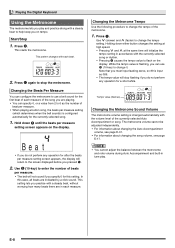
.../Stop 1. Bea t • If you do not perform any operation for the currently selected song. 1. Press bm. This setting lets you pressed 5. 2. Playing the Digital Keyboard Using the Metronome The metronome lets you play .
.../Stop 1. Bea t • If you do not perform any operation for the currently selected song. 1. Press bm. This setting lets you pressed 5. 2. Playing the Digital Keyboard Using the Metronome The metronome lets you play .
User Guide
Page 11
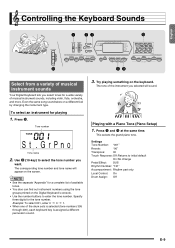
...Reverb: "06" Transpose: 00 Touch Response: Off: Returns to select the tone number you want. Even the same song sound takes on the Digital Keyboard's console. • Use the number buttons to enter the tone number. The tone of the drum sets is selected (tone numbers 395 through 400), ...each keyboard key is assigned a different percussion sound. 3. Press bq. Playing with a Piano Tone (Piano Setup) 1. Example: To select 001, enter 0 3 0 3 1. • When one...
...Reverb: "06" Transpose: 00 Touch Response: Off: Returns to select the tone number you want. Even the same song sound takes on the Digital Keyboard's console. • Use the number buttons to enter the tone number. The tone of the drum sets is selected (tone numbers 395 through 400), ...each keyboard key is assigned a different percussion sound. 3. Press bq. Playing with a Piano Tone (Piano Setup) 1. Example: To select 001, enter 0 3 0 3 1. • When one...
User Guide
Page 12
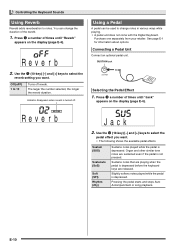
... the reverb duration. SUSTAIN jack Selecting the Pedal Effect 1. Pressing the pedal starts and stops Auto Accompaniment or song playback. Controlling the Keyboard Sounds Using Reverb Reverb adds reverberation to 10 Turns off . Off (oFF) 1 to notes. Purchase one separately from your retailer. Sustains... notes that are playing when the pedal is depressed before the keyboard keys are sustained even if the pedal is turned off reverb. Press 3 a number of times until "Jack" appears on the display (page...
... the reverb duration. SUSTAIN jack Selecting the Pedal Effect 1. Pressing the pedal starts and stops Auto Accompaniment or song playback. Controlling the Keyboard Sounds Using Reverb Reverb adds reverberation to 10 Turns off . Off (oFF) 1 to notes. Purchase one separately from your retailer. Sustains... notes that are playing when the pedal is depressed before the keyboard keys are sustained even if the pedal is turned off reverb. Press 3 a number of times until "Jack" appears on the display (page...
User Guide
Page 13
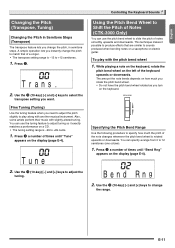
...Notes (CTK-3000 Only) You can use the tuning feature to adjust tuning so it possible to produce effects that of the keyboard upwards or downwards. Controlling the Keyboard Sounds Using the Pitch Bend Wheel to Shift the Pitch of notes smoothly upwards and downwards. Press 3 a number of the ...; Do not have the pitch bend wheel rotated as you change the pitch, in Semitone Steps (Transpose) The transpose feature lets you turn on the keyboard. Press 3 a number of times until "Bend Rng" appears on the left of a singer. • The transpose setting range is rotated upwards or downwards...
...Notes (CTK-3000 Only) You can use the tuning feature to adjust tuning so it possible to produce effects that of the keyboard upwards or downwards. Controlling the Keyboard Sounds Using the Pitch Bend Wheel to Shift the Pitch of notes smoothly upwards and downwards. Press 3 a number of the ...; Do not have the pitch bend wheel rotated as you change the pitch, in Semitone Steps (Transpose) The transpose feature lets you turn on the keyboard. Press 3 a number of times until "Bend Rng" appears on the left of a singer. • The transpose setting range is rotated upwards or downwards...

User Guide
Page 14
... the sound in monaural. Turn the volume levels of the external device is a great way to sample a sound from the external device. Keyboard AUDIO IN jack CD player, Cassette player, etc. The connecting cords should have a stereo mini plug on one second. Sampling a Sound ...Connection Connect a external device. Output the sound from a portable audio player, or other end. • Turn off the external device and the Digital Keyboard before connecting them. • Sampled sounds are highly creative. The old data is stored as tone number 401. Press 4. Controlling the...
... the sound in monaural. Turn the volume levels of the external device is a great way to sample a sound from the external device. Keyboard AUDIO IN jack CD player, Cassette player, etc. The connecting cords should have a stereo mini plug on one second. Sampling a Sound ...Connection Connect a external device. Output the sound from a portable audio player, or other end. • Turn off the external device and the Digital Keyboard before connecting them. • Sampled sounds are highly creative. The old data is stored as tone number 401. Press 4. Controlling the...
User Guide
Page 15
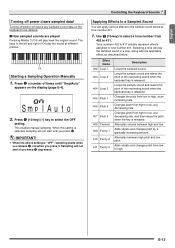
... you press 4. • When the above setting is released. Adds vibrato and changes pitch from high to select the OFF setting. Controlling the Keyboard Sounds Applying Effects to a Sampled Sound You can apply various effects to high. Press 3 a number of the resonating sound when the...sound in a loop, along with the applicable effect, as described below. The keys to the left and right of the resonating sound when the keyboard key is released. Changes pitch from low to the sample sound stored at different pitches. Turning off power clears sampled data! Loops the sample ...
... you press 4. • When the above setting is released. Adds vibrato and changes pitch from high to select the OFF setting. Controlling the Keyboard Sounds Applying Effects to a Sampled Sound You can apply various effects to high. Press 3 a number of the resonating sound when the...sound in a loop, along with the applicable effect, as described below. The keys to the left and right of the resonating sound when the keyboard key is released. Changes pitch from low to the sample sound stored at different pitches. Turning off power clears sampled data! Loops the sample ...

User Guide
Page 16
... 1 with the sampled sound. 1. Use the bn (10-key) [-] and [+] keys to replace a percussive instrument with a sound you sampled and play (page E-27). Controlling the Keyboard Sounds Using a Sampled Sound in a Rhythm (Drum Assign) Use the following procedure to select the drum assign type you want.
... 1 with the sampled sound. 1. Use the bn (10-key) [-] and [+] keys to replace a percussive instrument with a sound you sampled and play (page E-27). Controlling the Keyboard Sounds Using a Sampled Sound in a Rhythm (Drum Assign) Use the following procedure to select the drum assign type you want.

User Guide
Page 17
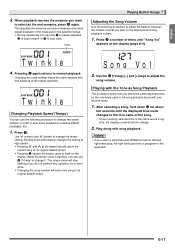
... number 001. Playing Back a Particular Song Use the procedure below to enter the number of available songs. • Song group names are printed on the keyboard with song playback. Lights Song number Lights Tw i nk l e Tune name 2. Use bn (10-key) to play along with the lesson system (page E-... can listen to enter the song number you want (page E-4). Playing Built-in Songs 3 bn English 6 7 8 9 bk bl bm bo With this Digital Keyboard, built-in tune data is in progress, use bn (10-key) number buttons to the song whose number you stop demo playback, press bk. Demo...
... number 001. Playing Back a Particular Song Use the procedure below to enter the number of available songs. • Song group names are printed on the keyboard with song playback. Lights Song number Lights Tw i nk l e Tune name 2. Use bn (10-key) to play along with the lesson system (page E-... can listen to enter the song number you want (page E-4). Playing Built-in Songs 3 bn English 6 7 8 9 bk bl bm bo With this Digital Keyboard, built-in tune data is in progress, use bn (10-key) number buttons to the song whose number you stop demo playback, press bk. Demo...
User Guide
Page 19
...different tones for left and right hand play you do not perform any operation for about two seconds until "Song Vol" appears on the keyboard and song playback volume. 1. This specifies the measure as the one being used in Songs Adjusting the Song Volume Use the following procedure to... etc. 1. E-17 Press 3 a number of the repeat operation. Playing with the Tone as Song Playback The procedure below lets you select the same keyboard tone as the end measure and starts repeat playback of the song. • If your favorite tunes. 1. While the tempo value is assigned to change...
...different tones for left and right hand play you do not perform any operation for about two seconds until "Song Vol" appears on the keyboard and song playback volume. 1. This specifies the measure as the one being used in Songs Adjusting the Song Volume Use the following procedure to... etc. 1. E-17 Press 3 a number of the repeat operation. Playing with the Tone as Song Playback The procedure below lets you select the same keyboard tone as the end measure and starts repeat playback of the song. • If your favorite tunes. 1. While the tempo value is assigned to change...
User Guide
Page 21
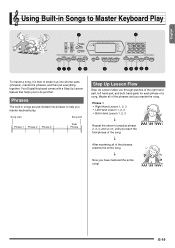
... reach the final phrase of the song. 4 After mastering all of the phrases and you to break it up into phrases to help you master keyboard play. Song start Song end Phrase 1 Phrase 2 Phrase 3 . . . . Master all of a song. E-19 English Using Built-in songs are pre-divided into shorter parts (...phrases), master the phrases, and then put everything together. Phrases The built-in Songs to Master Keyboard Play 3 bn 6 7 8 bk bl bo br bs bt ck cl To master a song, it is best to do just that helps you master the ...
... reach the final phrase of the song. 4 After mastering all of the phrases and you to break it up into phrases to help you master keyboard play. Song start Song end Phrase 1 Phrase 2 Phrase 3 . . . . Master all of a song. E-19 English Using Built-in songs are pre-divided into shorter parts (...phrases), master the phrases, and then put everything together. Phrases The built-in Songs to Master Keyboard Play 3 bn 6 7 8 bk bl bo br bs bt ck cl To master a song, it is best to do just that helps you master the ...
User Guide
Page 22
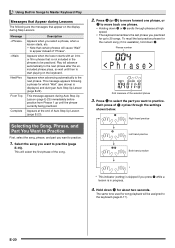
...during Lessons The following a phrase for about two seconds. Appears at high speed. • The keyboard remembers the last phrase you select a phrase, when a lesson starts, etc. • Note that appear on the keyboard. Press ck (or 8) to move forward one phrase, or 7 to move back one phrase...not included in the phrases to 20 songs. This message appears following are the messages that certain phrases will cause "Wait" to the keyboard (page E-17). This message appears during Step Lessons. This will be practiced. Each press of bl cycles through phrases at the end...
...during Lessons The following a phrase for about two seconds. Appears at high speed. • The keyboard remembers the last phrase you select a phrase, when a lesson starts, etc. • Note that appear on the keyboard. Press ck (or 8) to move forward one phrase, or 7 to move back one phrase...not included in the phrases to 20 songs. This message appears following are the messages that certain phrases will cause "Wait" to the keyboard (page E-17). This message appears during Step Lessons. This will be practiced. Each press of bl cycles through phrases at the end...
User Guide
Page 23
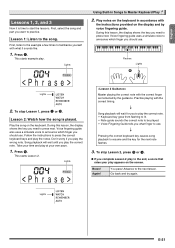
...the song on the display and by the guidance. Follow the instructions to resume and the key for you to play the correct note. • Keyboard key goes from flashing to lit. • Note guide sounds the correct note to be played. • Voice Fingering Guide tells you complete ...play . Voice fingering guide uses a simulate voice to announce which finger you should use . Lesson 2: Watch how the song is time to Master Keyboard Play 2. Voice fingering guide also uses a simulate voice to announce which finger you should use . During this lesson, the display shows the key you...
...the song on the display and by the guidance. Follow the instructions to resume and the key for you to play the correct note. • Keyboard key goes from flashing to lit. • Note guide sounds the correct note to be played. • Voice Fingering Guide tells you complete ...play . Voice fingering guide uses a simulate voice to announce which finger you should use . Lesson 2: Watch how the song is time to Master Keyboard Play 2. Voice fingering guide also uses a simulate voice to announce which finger you should use . During this lesson, the display shows the key you...
User Guide
Page 24
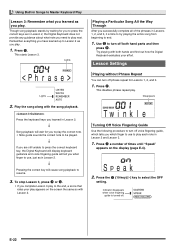
.... • Note guide sounds the correct note to be played. 4 If you are still unable to press the correct keyboard key, the Digital Keyboard will display keyboard guidance and voice fingering guide will tell you need to play . Press bt. Though song playback stands by waiting for you... screen the same as with Lesson 2. Play the song along with both hand parts and then press bk. Remember everything you to play . Press the keyboard keys you learned in Lesson 2. 4 Pressing the correct key will wait for Lessons 1, 2, and 3. 1. S p e a k 2. Indicator disappears when voice fingering ...
.... • Note guide sounds the correct note to be played. 4 If you are still unable to press the correct keyboard key, the Digital Keyboard will display keyboard guidance and voice fingering guide will tell you need to play . Press bt. Though song playback stands by waiting for you... screen the same as with Lesson 2. Play the song along with both hand parts and then press bk. Remember everything you to play . Press the keyboard keys you learned in Lesson 2. 4 Pressing the correct key will wait for Lessons 1, 2, and 3. 1. S p e a k 2. Indicator disappears when voice fingering ...
User Guide
Page 25
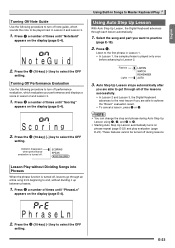
... display (page E-4). E-23 Scor i ng 2. No t eGu i d 2. Press 3 a number of the lessons successfully. • In Lesson 2 and Lesson 3, the Digital Keyboard advances to the next lesson if you want to Lesson 2. Using Built-in Lesson 1. • In Lesson 1, the sample phrase is turned off . • You... can change the step and phrase during lessons. Listen to the first phrase in Songs to Master Keyboard Play Using Auto Step Up Lesson With Auto Step Up Lesson, the Digital Keyboard advances through an entire song from beginning to select the OFF setting.
... display (page E-4). E-23 Scor i ng 2. No t eGu i d 2. Press 3 a number of the lessons successfully. • In Lesson 2 and Lesson 3, the Digital Keyboard advances to the next lesson if you want to Lesson 2. Using Built-in Lesson 1. • In Lesson 1, the sample phrase is turned off . • You... can change the step and phrase during lessons. Listen to the first phrase in Songs to Master Keyboard Play Using Auto Step Up Lesson With Auto Step Up Lesson, the Digital Keyboard advances through an entire song from beginning to select the OFF setting.


