User Guide
Page 3
... first. This mark is not a toy. • Be sure to check the AC Adaptor for future reference. Important! CASIO ELECTRONICS CO., LTD. To the happy family of the keyboard, be sure to carefully read this product. • Before using the optional AD-5 Adaptor to power the unit, be ...getting weak. • Do not short-circuit the battery terminals. • The product is not intended for children under 3 years. • Use only CASIO AD-5 adaptor. • The AC adaptor is valid in the EU countries only. Carefully check the power cord for future reference. 703A-E-003A E-1 Unit...
... first. This mark is not a toy. • Be sure to check the AC Adaptor for future reference. Important! CASIO ELECTRONICS CO., LTD. To the happy family of the keyboard, be sure to carefully read this product. • Before using the optional AD-5 Adaptor to power the unit, be ...getting weak. • Do not short-circuit the battery terminals. • The product is not intended for children under 3 years. • Use only CASIO AD-5 adaptor. • The AC adaptor is valid in the EU countries only. Carefully check the power cord for future reference. 703A-E-003A E-1 Unit...

User Guide
Page 4
.... ❐ Synthesizer Mode Edit built in sounds to produce your own original creations. This keyboard provides you with the following features and functions. ❐ 348 tones, including 100 "Advanced... settings. ❐ 100 Preset Rhythms + 4 User Rhythms A selection of all your keyboard play. Realistic ensemble play automatically. You can also be stored in memory for everything from...A big built-in display shows chord names, tempo setting, keyboard information, staff notation of them as user rhythms in keyboard memory. ❐ Auto Accompaniment Simply play a chord and the...
.... ❐ Synthesizer Mode Edit built in sounds to produce your own original creations. This keyboard provides you with the following features and functions. ❐ 348 tones, including 100 "Advanced... settings. ❐ 100 Preset Rhythms + 4 User Rhythms A selection of all your keyboard play. Realistic ensemble play automatically. You can also be stored in memory for everything from...A big built-in display shows chord names, tempo setting, keyboard information, staff notation of them as user rhythms in keyboard memory. ❐ Auto Accompaniment Simply play a chord and the...
User Guide
Page 5
...10064; Mixer You can specify tone, volume, pan position, and other parameters for each channel during MIDI input. ❐ Registration Memory Keyboard setups can also control the same parameters for later recall and instant settings whenever you connect to a personal computer to enjoy "desktop music" capabilities...; Data download from your computer You can be stored in memory for each built-in Auto Accompaniment part. Up to download data from the CASIO MUSIC SITE. 703A-E-005A E-3 You can even change the parameters of an effect to create your computer to 16 setups (4 setups x ...
...10064; Mixer You can specify tone, volume, pan position, and other parameters for each channel during MIDI input. ❐ Registration Memory Keyboard setups can also control the same parameters for later recall and instant settings whenever you connect to a personal computer to enjoy "desktop music" capabilities...; Data download from your computer You can be stored in memory for each built-in Auto Accompaniment part. Up to download data from the CASIO MUSIC SITE. 703A-E-005A E-3 You can even change the parameters of an effect to create your computer to 16 setups (4 setups x ...

User Guide
Page 12
...Accompaniment ......... E-45 To Recall a Setup from Registration Memory E-45 E-10 703A-E-012A Contents Welcome E-1 Introduction E-2 Safety Precautions E-4 Care of your keyboard .......... E-9 Contents E-10 General Guide E-12 About the display E-14 Playing a Demo Tune E-15 Power Supply E-16 Using batteries E-16 Using ...Adaptor E-17 Auto Power Off E-17 Memory Contents E-18 Connections E-19 Basic Operations E-21 To play the keyboard E-21 Selecting a Tone E-21 Using an Advanced Tone E-22 Applying Effects to Tones ... E-23 Effect Blocks E-23 Selecting REVERB and ...
...Accompaniment ......... E-45 To Recall a Setup from Registration Memory E-45 E-10 703A-E-012A Contents Welcome E-1 Introduction E-2 Safety Precautions E-4 Care of your keyboard .......... E-9 Contents E-10 General Guide E-12 About the display E-14 Playing a Demo Tune E-15 Power Supply E-16 Using batteries E-16 Using ...Adaptor E-17 Auto Power Off E-17 Memory Contents E-18 Connections E-19 Basic Operations E-21 To play the keyboard E-21 Selecting a Tone E-21 Using an Advanced Tone E-22 Applying Effects to Tones ... E-23 Effect Blocks E-23 Selecting REVERB and ...

User Guide
Page 13
... Step Recording E-49 Recording Multiple Tracks E-52 Correcting Mistakes While Step Recording E-54 Editing Memory Contents E-55 Editing a Song E-57 Keyboard Settings E-59 Using Layer E-59 Using Split E-59 Using Layer and Split Together E-60 Using Touch Response E-61 Transposing the... Keyboard E-62 Tuning the Keyboard E-62 Changing Other Settings E-63 MIDI E-66 What is MIDI E-66 General MIDI E-66 Sending and Receiving MIDI Messages .... Song Memory Function ...
... Step Recording E-49 Recording Multiple Tracks E-52 Correcting Mistakes While Step Recording E-54 Editing Memory Contents E-55 Editing a Song E-57 Keyboard Settings E-59 Using Layer E-59 Using Split E-59 Using Layer and Split Together E-60 Using Touch Response E-61 Transposing the... Keyboard E-62 Tuning the Keyboard E-62 Changing Other Settings E-63 MIDI E-66 What is MIDI E-66 General MIDI E-66 Sending and Receiving MIDI Messages .... Song Memory Function ...

User Guide
Page 15
... switch c) SYNCHRO/FILL-IN NEXT I J K LM c * Attaching of the Score Stand Firmly press the music stand provided with the keyboard all the way into the groove on the top of the keyboard. • Key, button, and other names are indicated in the text of this manual using [+] and [-] to change displayed settings...
... switch c) SYNCHRO/FILL-IN NEXT I J K LM c * Attaching of the Score Stand Firmly press the music stand provided with the keyboard all the way into the groove on the top of the keyboard. • Key, button, and other names are indicated in the text of this manual using [+] and [-] to change displayed settings...
User Guide
Page 16
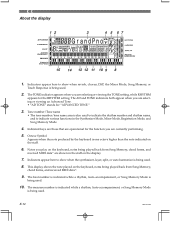
...Song Memory, chord forms, and received MIDI data*. 9. E-14 703A-E-016A Indicators appear here to indicate various functions in the staff on the keyboard, notes being played back from Song Memory, chord forms, and received MIDI data* are currently performing. 5. Indicated keys are those that are ...Mode, and Song Memory Mode. 4. This display shows the note played on the display. 7. Octave Symbol Appears when the note produced by the keyboard is being used . The measure number is indicated while a rhythm, Auto-accompaniment, or Song Memory Mode is one octave higher than the note...
...Song Memory, chord forms, and received MIDI data*. 9. E-14 703A-E-016A Indicators appear here to indicate various functions in the staff on the keyboard, notes being played back from Song Memory, chord forms, and received MIDI data* are currently performing. 5. Indicated keys are those that are ...Mode, and Song Memory Mode. 4. This display shows the note played on the display. 7. Octave Symbol Appears when the note produced by the keyboard is being used . The measure number is indicated while a rhythm, Auto-accompaniment, or Song Memory Mode is one octave higher than the note...

User Guide
Page 17
... in progress. STEP is in sequence. REC flashes on the metronome to the next demo tune. • MIDI, Layer, and Split are intended for your keyboard play . You can turn on the display during step recording. 13. 11. Playing a Demo Tune Pressing the DEMO button starts demo tune play . 14...
... in progress. STEP is in sequence. REC flashes on the metronome to the next demo tune. • MIDI, Layer, and Split are intended for your keyboard play . You can turn on the display during step recording. 13. 11. Playing a Demo Tune Pressing the DEMO button starts demo tune play . 14...
User Guide
Page 18
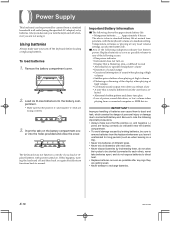
... negative (-) ends are facing correctly. 3. Load six D-size batteries into the holes provided and close the cover. If this happens, turning the keyboard off whenever you leave it . Be sure to note the following important precautions. • Always make sure you turn on • Display that...facing correctly as indicated near the battery compartment. • To avoid damage caused by leaking batteries, be sure to remove batteries from the keyboard whenever you are getting weak. • Never attempt to normal. Improper handling of batteries can cause them , do not allow their poles...
... negative (-) ends are facing correctly. 3. Load six D-size batteries into the holes provided and close the cover. If this happens, turning the keyboard off whenever you leave it . Be sure to note the following important precautions. • Always make sure you turn on • Display that...facing correctly as indicated near the battery compartment. • To avoid damage caused by leaking batteries, be sure to remove batteries from the keyboard whenever you are getting weak. • Never attempt to normal. Improper handling of batteries can cause them , do not allow their poles...
User Guide
Page 19
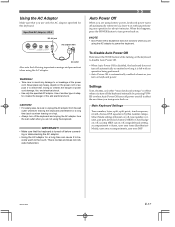
...; Auto Power Off is disabled (it does not function) when you leave it on without performing any operation for about 6 minutes. When this keyboard. Use of another type of adaptor creates the danger of power cord damage, fire, and electrical shock. • Use only the specified AC ...before connecting or disconnecting the AC adaptor. • Using the AC adaptor for a long time can cause it to become warm to the touch. Main Keyboard Settings Tone number, layer, split, split point, touch response, reverb, chorus, DSP, equalizer, rhythm number, tempo, Mixer Mode settings (channel on/off...
...; Auto Power Off is disabled (it does not function) when you leave it on without performing any operation for about 6 minutes. When this keyboard. Use of another type of adaptor creates the danger of power cord damage, fire, and electrical shock. • Use only the specified AC ...before connecting or disconnecting the AC adaptor. • Using the AC adaptor for a long time can cause it to become warm to the touch. Main Keyboard Settings Tone number, layer, split, split point, touch response, reverb, chorus, DSP, equalizer, rhythm number, tempo, Mixer Mode settings (channel on/off...

User Guide
Page 20
... Before unplugging the AC adaptor, make sure that fresh batteries are loaded in the keyboard. • Make sure that current keyboard settings and memory contents are not lost. • Make sure the keyboard is being supplied with electrical power. ing batteries or unplugging the AC adaptor. E-...Requirements Note the following precautions whenever you want to ensure that keyboard power is turned off the keyboard's electrical power supply. Memory Contents In addition to the above are retained as long as the keyboard is being supplied power through the AC adaptor before replac- ...
... Before unplugging the AC adaptor, make sure that fresh batteries are loaded in the keyboard. • Make sure that current keyboard settings and memory contents are not lost. • Make sure the keyboard is being supplied with electrical power. ing batteries or unplugging the AC adaptor. E-...Requirements Note the following precautions whenever you want to ensure that keyboard power is turned off the keyboard's electrical power supply. Memory Contents In addition to the above are retained as long as the keyboard is being supplied power through the AC adaptor before replac- ...

User Guide
Page 21
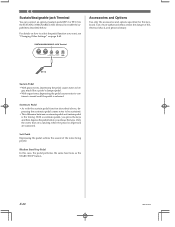
... LEFT RIGHT AUX IN or similar terminal of audio amplifier When connected to a musical instrument amplifier, set the input selector of the keyboard to a relatively low level and make output volume adjustments using a commercially available connecting cord with your audio equipment for details. See ...The wrong type of stereo channels. Connections Phones/Output Terminal Before connecting phones or other end. In this configuration, you connect to the keyboard, and a connector that comes with a standard plug on one end and two PIN plugs on page E-66 for full details. See ...
... LEFT RIGHT AUX IN or similar terminal of audio amplifier When connected to a musical instrument amplifier, set the input selector of the keyboard to a relatively low level and make output volume adjustments using a commercially available connecting cord with your audio equipment for details. See ...The wrong type of stereo channels. Connections Phones/Output Terminal Before connecting phones or other end. In this configuration, you connect to the keyboard, and a connector that comes with a standard plug on one end and two PIN plugs on page E-66 for full details. See ...
User Guide
Page 22
... Settings" on page E-63. Soft Pedal Depressing the pedal softens the sound of fire, electrical shock, and personal injury. Rhythm Start/Stop Pedal In this keyboard. Sostenuto Pedal • As with the sustain pedal function described above, de- For details on how to sound until the pedal is released. ger, much...
... Settings" on page E-63. Soft Pedal Depressing the pedal softens the sound of fire, electrical shock, and personal injury. Rhythm Start/Stop Pedal In this keyboard. Sostenuto Pedal • As with the sustain pedal function described above, de- For details on how to sound until the pedal is released. ger, much...
User Guide
Page 23
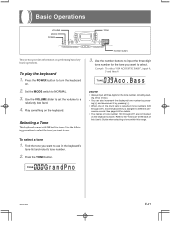
...to use . Refer to select. To play the keyboard 1. Play something on . 2. Find the tone you want to turn the keyboard on the keyboard. Set the MODE switch to a relatively low level. 4. Selecting a Tone This keyboard comes with 348 built-in the keyboard's tone list and note its tone number. 2....Aco .Bass ❚ NOTE • Always input all three digits for details. • The names of tone number 100 through 237), each keyboard key is assigned a different percussion sound. Gr andPno Number buttons 3. Press the POWER button to use in tones. Use the VOLUME slider to set...
...to use . Refer to select. To play the keyboard 1. Play something on . 2. Find the tone you want to turn the keyboard on the keyboard. Set the MODE switch to a relatively low level. 4. Selecting a Tone This keyboard comes with 348 built-in the keyboard's tone list and note its tone number. 2....Aco .Bass ❚ NOTE • Always input all three digits for details. • The names of tone number 100 through 237), each keyboard key is assigned a different percussion sound. Gr andPno Number buttons 3. Press the POWER button to use in tones. Use the VOLUME slider to set...
User Guide
Page 24
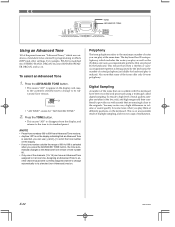
... means that when a rhythm or autoaccompaniment pattern is selected when you press the ADVANCED TONE button, the tone automatically changes to appear on the keyboard. To ensure a high level of tonal quality, samples are taken in volume or sound quality for some of the tones offer only 16-note... and returns to the tone to its standard preset. ❚ NOTE • Preset tone numbers 000 to scroll the tone number on . The keyboard has 32-note polyphony, which are variations of standard tones created by programming in effects (DSP) and other settings. Digital Sampling A number of the...
... means that when a rhythm or autoaccompaniment pattern is selected when you press the ADVANCED TONE button, the tone automatically changes to appear on the keyboard. To ensure a high level of tonal quality, samples are taken in volume or sound quality for some of the tones offer only 16-note... and returns to the tone to its standard preset. ❚ NOTE • Preset tone numbers 000 to scroll the tone number on . The keyboard has 32-note polyphony, which are variations of standard tones created by programming in effects (DSP) and other settings. Digital Sampling A number of the...

User Guide
Page 25
...is turned off on page E-26 for more information. [+]/[-] Selecting REVERB and CHORUS Perform the following shows how the effects of this keyboard are applied to the connection between the sound source and output. See "Changing the Settings of REVERB and CHORUS Parameters" for more ...information. 703A-E-025A E-23 Applying Effects to Tones REVERB CHORUS Number buttons DSP This keyboard provides you with a selection of effects that you can store. CHORUS The chorus effect gives sound greater depth by causing it to a...
...is turned off on page E-26 for more information. [+]/[-] Selecting REVERB and CHORUS Perform the following shows how the effects of this keyboard are applied to the connection between the sound source and output. See "Changing the Settings of REVERB and CHORUS Parameters" for more ...information. 703A-E-025A E-23 Applying Effects to Tones REVERB CHORUS Number buttons DSP This keyboard provides you with a selection of effects that you can store. CHORUS The chorus effect gives sound greater depth by causing it to a...

User Guide
Page 26
After selecting the effect you can control the relative strength of an effect and how it is output by this keyboard. Use the [̇] and [̈] (CURSOR) buttons to the effect selection screen. Use the [+] and [-] buttons or the number but- Press the [̆] (EXIT) button. &#...
After selecting the effect you can control the relative strength of an effect and how it is output by this keyboard. Use the [̇] and [̈] (CURSOR) buttons to the effect selection screen. Use the [+] and [-] buttons or the number but- Press the [̆] (EXIT) button. &#...

User Guide
Page 28
... only. 3. You cannot change or cancel a demo tune effect. • Changing the effect setting while sound is being output by the keyboard causes a slight break in accordance with the settings of tones, called "Advanced tones," automatically turn DSP back on the display, followed by ... DSP line setting is automatically turned off setting for more information. • Playing a demo tune (page E-15) automatically changes the effect to a keyboard part (Channels 1 through 4), the DSP line turns on automatically and the DSP selection changes in the sound when the effect changes. • A ...
... only. 3. You cannot change or cancel a demo tune effect. • Changing the effect setting while sound is being output by the keyboard causes a slight break in accordance with the settings of tones, called "Advanced tones," automatically turn DSP back on the display, followed by ... DSP line setting is automatically turned off setting for more information. • Playing a demo tune (page E-15) automatically changes the effect to a keyboard part (Channels 1 through 4), the DSP line turns on automatically and the DSP selection changes in the sound when the effect changes. • A ...

User Guide
Page 29
... Number buttons The equalizer is another equalizer type causes the band gain settings to change to select the equalizer type you want to se- This keyboard has a built-in tone quality. You can adjust the gain (volume) of all four equalizer bands within the range of effect that you want . S t anda...
... Number buttons The equalizer is another equalizer type causes the band gain settings to change to select the equalizer type you want to se- This keyboard has a built-in tone quality. You can adjust the gain (volume) of all four equalizer bands within the range of effect that you want . S t anda...

User Guide
Page 30
... : Increments displayed value (increases tempo) ̄ : Decrements displayed value (decreases tempo) E-28 703A-E-030A Use the number buttons to use in the keyboard's rhythm list and note its rhythm number. 2. To adjust the tempo Press one -person ensemble. ❚ NOTE • You can also increment the...t 1 Appears when RHYTHM button is set to select. Playing a Rhythm Selecting a Rhythm This keyboard provides you with the chords you finger. Number and name of them as user rhythms in keyboard memory. Press VARIATION/FILL-IN button 1 or 2. • This starts the play of the...
... : Increments displayed value (increases tempo) ̄ : Decrements displayed value (decreases tempo) E-28 703A-E-030A Use the number buttons to use in the keyboard's rhythm list and note its rhythm number. 2. To adjust the tempo Press one -person ensemble. ❚ NOTE • You can also increment the...t 1 Appears when RHYTHM button is set to select. Playing a Rhythm Selecting a Rhythm This keyboard provides you with the chords you finger. Number and name of them as user rhythms in keyboard memory. Press VARIATION/FILL-IN button 1 or 2. • This starts the play of the...


