iP90 Easy Setup Instructions
Page 1
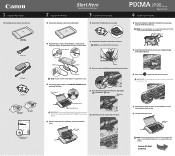
.... mark 3 Press on side two. PIXMA iP90 Photo Printer Power Cord AC Adapter Print Head BCI-15 Black Ink Tanks BCI-16 Color Ink Tanks Documentation and Software Kit 2 Prepare the Printer Start Here Easy Setup Instructions 3 Install the Print Head 1 Remove the shipping materials from the printer. 1 Remove the Print Head from its package. NOTE: To avoid spilling...
.... mark 3 Press on side two. PIXMA iP90 Photo Printer Power Cord AC Adapter Print Head BCI-15 Black Ink Tanks BCI-16 Color Ink Tanks Documentation and Software Kit 2 Prepare the Printer Start Here Easy Setup Instructions 3 Install the Print Head 1 Remove the shipping materials from the printer. 1 Remove the Print Head from its package. NOTE: To avoid spilling...

iP90 Easy Setup Instructions
Page 2
... appears, click Exit. Select Custom Install in order to choose the options you may need to align the Print Head. NOTE: If print quality is not satisfactory after installing the printer, you would like to install. 5 When the "Easy Install" window appears, click Install. 10 Follow the...3 Insert the "Setup Software & User's Guide" CD-ROM. Select Custom Install in "Printer List". Canon and BCI are registered trademarks and PIXMA is not displayed, press the Add button to add the printer. NOTE: If the CD-ROM folder does not open software applications including anti-virus, computer ...
... appears, click Exit. Select Custom Install in order to choose the options you may need to align the Print Head. NOTE: If print quality is not satisfactory after installing the printer, you would like to install. 5 When the "Easy Install" window appears, click Install. 10 Follow the...3 Insert the "Setup Software & User's Guide" CD-ROM. Select Custom Install in "Printer List". Canon and BCI are registered trademarks and PIXMA is not displayed, press the Add button to add the printer. NOTE: If the CD-ROM folder does not open software applications including anti-virus, computer ...

iP90 Quick Start Guide
Page 5
... Printer 2 Turning off the Printer 3 Loading Paper 4 Using Speciality Media 8 Printing with Windows 10 Printing with Macintosh 12 Canceling Printing 14 Printing Data through Infrared Communication 15 Advanced Printing Printing Photographs Directly from a PictBridge Compliant Device 23 Accessing Printer Driver 29 Adjusting Print Quality for Photographs 30 Using the Bundle Software 37 Printing Borderless Photographs 38 Printing Maintenance When Printing Becomes Faint or Colors...
... Printer 2 Turning off the Printer 3 Loading Paper 4 Using Speciality Media 8 Printing with Windows 10 Printing with Macintosh 12 Canceling Printing 14 Printing Data through Infrared Communication 15 Advanced Printing Printing Photographs Directly from a PictBridge Compliant Device 23 Accessing Printer Driver 29 Adjusting Print Quality for Photographs 30 Using the Bundle Software 37 Printing Borderless Photographs 38 Printing Maintenance When Printing Becomes Faint or Colors...
iP90 Quick Start Guide
Page 6
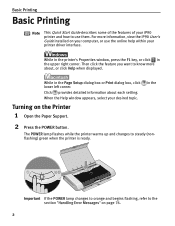
...nonflashing) green when the printer is ready. The POWER lamp flashes while the printer warms up and changes to the section "Handling Error Messages" on page 76. 2 Basic Printing Basic Printing Note This Quick Start Guide describes some of the features of your iP90 printer and how to know more... information, view the iP90 User's Guide installed on the Printer 1 Open the Paper Support. 2 Press the POWER button....
...nonflashing) green when the printer is ready. The POWER lamp flashes while the printer warms up and changes to the section "Handling Error Messages" on page 76. 2 Basic Printing Basic Printing Note This Quick Start Guide describes some of the features of your iP90 printer and how to know more... information, view the iP90 User's Guide installed on the Printer 1 Open the Paper Support. 2 Press the POWER button....

iP90 Quick Start Guide
Page 7
Basic Printing Important About the Power Plug When removing the power plug after turning off the printer, be unable to check that the POWER lamp is turned off the printer, press the POWER button. When the POWER lamp stops blinking, the printer is not lit. If the power plug is removed from the wall outlet with the POWER lamp lit or blinking, the printer cannot protect its print heads and may be sure to print. 3 Turning off the Printer 1 To turn off .
Basic Printing Important About the Power Plug When removing the power plug after turning off the printer, be unable to check that the POWER lamp is turned off the printer, press the POWER button. When the POWER lamp stops blinking, the printer is not lit. If the power plug is removed from the wall outlet with the POWER lamp lit or blinking, the printer cannot protect its print heads and may be sure to print. 3 Turning off the Printer 1 To turn off .

iP90 Quick Start Guide
Page 8
... pressure seals • Envelopes with an embossed or treated surface „ Preparing the Printer • For detailed information on the speciality media Canon provides for use with its various printers, refer to the section "Using Speciality Media" on page 8. • Consult "Printing Media" in the opposite direction until the paper becomes completely flat. 4 Basic...
... pressure seals • Envelopes with an embossed or treated surface „ Preparing the Printer • For detailed information on the speciality media Canon provides for use with its various printers, refer to the section "Using Speciality Media" on page 8. • Consult "Printing Media" in the opposite direction until the paper becomes completely flat. 4 Basic...

iP90 Quick Start Guide
Page 9
...position for paper output. • Remove each sheet as soon as paper is out. When loading the 4"×6"paper, load sheets in use. Printing with dust and stain remaining on the printing result and printer. 3 Load the paper. „ Loading Plain Paper (1) Insert the paper into the Auto Sheet Feeder with... secure the space for the media in the portrait position (short side facing down). Note • Place the printer on the area (desk, etc.) where the printed paper is stacked with the print side facing up. Move to the dust and stain on a flat surface. • Do not place any ...
...position for paper output. • Remove each sheet as soon as paper is out. When loading the 4"×6"paper, load sheets in use. Printing with dust and stain remaining on the printing result and printer. 3 Load the paper. „ Loading Plain Paper (1) Insert the paper into the Auto Sheet Feeder with... secure the space for the media in the portrait position (short side facing down). Note • Place the printer on the area (desk, etc.) where the printed paper is stacked with the print side facing up. Move to the dust and stain on a flat surface. • Do not place any ...
iP90 Quick Start Guide
Page 10
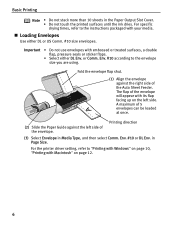
...stack more than 10 sheets in the Paper Output Slot Cover. • Do not touch the printed surfaces until the ink dries. Important • Do not use envelopes with Macintosh" on page 10, "Printing with embossed or treated surfaces, a double flap, pressure seals or sticker flaps. • ...Select either DL or US Comm. #10 size envelopes. For the printer driver setting, refer to the envelope size you are using. or Comm....
...stack more than 10 sheets in the Paper Output Slot Cover. • Do not touch the printed surfaces until the ink dries. Important • Do not use envelopes with Macintosh" on page 10, "Printing with embossed or treated surfaces, a double flap, pressure seals or sticker flaps. • ...Select either DL or US Comm. #10 size envelopes. For the printer driver setting, refer to the envelope size you are using. or Comm....
iP90 Quick Start Guide
Page 11
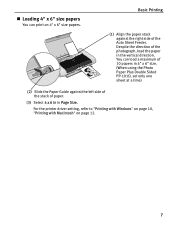
... a time) (2) Slide the Paper Guide against the right side of the Auto Sheet Feeder. You can print on page 12. 7 For the printer driver setting, refer to "Printing with Windows" on page 10, "Printing with Macintosh" on 4" x 6" size papers. Despite the direction of paper. (3) Select 4 x 6... in in the vertical direction. Basic Printing (1) Align the paper stack against the left side of the ...
... a time) (2) Slide the Paper Guide against the right side of the Auto Sheet Feeder. You can print on page 12. 7 For the printer driver setting, refer to "Printing with Windows" on page 10, "Printing with Macintosh" on 4" x 6" size papers. Despite the direction of paper. (3) Select 4 x 6... in in the vertical direction. Basic Printing (1) Align the paper stack against the left side of the ...

iP90 Quick Start Guide
Page 12
Basic Printing Using Speciality Media Canon recommends that you use genuine Canon media to ensure optimal print quality. „ Photo Quality Media • Photo Paper Pro „ Media Suited to Business Documents • Photo Paper Plus Glossy • High Resolution Paper • Photo Paper Plus Double Sided • Transparencies • Photo Paper Plus Semi-Gloss • Matte Photo Paper • Glossy Photo Paper 8
Basic Printing Using Speciality Media Canon recommends that you use genuine Canon media to ensure optimal print quality. „ Photo Quality Media • Photo Paper Pro „ Media Suited to Business Documents • Photo Paper Plus Glossy • High Resolution Paper • Photo Paper Plus Double Sided • Transparencies • Photo Paper Plus Semi-Gloss • Matte Photo Paper • Glossy Photo Paper 8
iP90 Quick Start Guide
Page 13
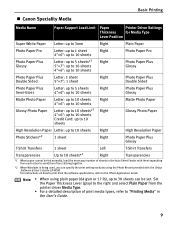
...Note • When using the Photo Record provided with the Setup Software & User's Guide CD-ROM. Basic Printing „ Canon Speciality Media Media Name Paper Support Load Limit Paper Printer Driver Settings Thickness for Media Type Lever Position Super White Paper Letter: up to 3mm Right Plain Paper Photo Paper...Card: up to 10 sheets Right Right Matte Photo Paper Glossy Photo Paper High Resolution Paper Letter: up to 30 sheets can specify the print setting easily by using plain paper (64 gsm or 17 lb), up to 10 sheets Photo Stickers*2 1 sheet Right Right High Resolution ...
...Note • When using the Photo Record provided with the Setup Software & User's Guide CD-ROM. Basic Printing „ Canon Speciality Media Media Name Paper Support Load Limit Paper Printer Driver Settings Thickness for Media Type Lever Position Super White Paper Letter: up to 3mm Right Plain Paper Photo Paper...Card: up to 10 sheets Right Right Matte Photo Paper Glossy Photo Paper High Resolution Paper Letter: up to 30 sheets can specify the print setting easily by using plain paper (64 gsm or 17 lb), up to 10 sheets Photo Stickers*2 1 sheet Right Right High Resolution ...
iP90 Quick Start Guide
Page 14
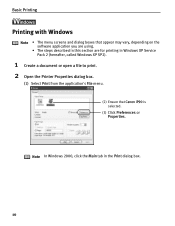
Basic Printing l Printing with Windows Note • The menu screens and dialog boxes that Canon iP90 is selected. (3) Click Preferences or Properties. Note In Windows 2000, click the Main tab in Windows XP Service Pack 2 (hereafter, called Windows XP SP2). 1 Create a document or open a file to print. 2 Open the Printer Properties dialog box. (1) Select Print from the application's File menu. (2) Ensure that appear may vary, depending on the software application you are using. • The steps described in this section are for printing in the Print dialog box. 10
Basic Printing l Printing with Windows Note • The menu screens and dialog boxes that Canon iP90 is selected. (3) Click Preferences or Properties. Note In Windows 2000, click the Main tab in Windows XP Service Pack 2 (hereafter, called Windows XP SP2). 1 Create a document or open a file to print. 2 Open the Printer Properties dialog box. (1) Select Print from the application's File menu. (2) Ensure that appear may vary, depending on the software application you are using. • The steps described in this section are for printing in the Print dialog box. 10

iP90 Quick Start Guide
Page 15
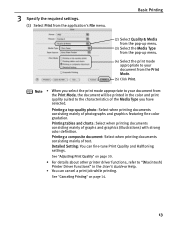
...Guide or Help. • Select Preview before printing by clicking the check box. You can control the quality in the printer. (2) Click OK. Basic Printing (1) Click Media Type to confirm the selected printing effects and how your document will look when printed. This displays a preview screen that allows you... to select the media loaded in the Set Print Quality dialog box. • For details about other printer driver functions, refer to be printed. • To adjust Print Quality settings, select Custom and click Set on the Main tab. Some applications ...
...Guide or Help. • Select Preview before printing by clicking the check box. You can control the quality in the printer. (2) Click OK. Basic Printing (1) Click Media Type to confirm the selected printing effects and how your document will look when printed. This displays a preview screen that allows you... to select the media loaded in the Set Print Quality dialog box. • For details about other printer driver functions, refer to be printed. • To adjust Print Quality settings, select Custom and click Set on the Main tab. Some applications ...

iP90 Quick Start Guide
Page 16
...dialog box opens. (2) Select iP90 from Format for printing in progress by simply pressing the RESUME/ CANCEL button on page 14. Basic Printing Note You can cancel a print job in Mac OS X v.10.3.x. 1 Create a document or open a file to print. 2 Select Paper Size. ...(1) Select Page Setup from the Paper Size pop-up menu. (4) Click OK. 12 See "Canceling Printing" on the printer...
...dialog box opens. (2) Select iP90 from Format for printing in progress by simply pressing the RESUME/ CANCEL button on page 14. Basic Printing Note You can cancel a print job in Mac OS X v.10.3.x. 1 Create a document or open a file to print. 2 Select Paper Size. ...(1) Select Page Setup from the Paper Size pop-up menu. (4) Click OK. 12 See "Canceling Printing" on the printer...
iP90 Quick Start Guide
Page 17
... of the Media Type you have selected. See "Canceling Printing" on page 30. • For details about other printer driver functions, refer to "(Macintosh) Printer Driver Functions" in the color and print quality suited to the characteristics of text. Note • When you select the print mode appropriate to your document from the application's File menu...
... of the Media Type you have selected. See "Canceling Printing" on page 30. • For details about other printer driver functions, refer to "(Macintosh) Printer Driver Functions" in the color and print quality suited to the characteristics of text. Note • When you select the print mode appropriate to your document from the application's File menu...

iP90 Quick Start Guide
Page 18
... cancel all the jobs in the Name list The iP90 dialog box opens. 4 Select the desired document, then click Delete icon. Note Click Cancel Printing on the BJ Status Monitor to stop a job in your application program. To display the BJ Status Monitor, click Canon iP90 on the printer. 1 Press the RESUME/CANCEL button while...
... cancel all the jobs in the Name list The iP90 dialog box opens. 4 Select the desired document, then click Delete icon. Note Click Cancel Printing on the BJ Status Monitor to stop a job in your application program. To display the BJ Status Monitor, click Canon iP90 on the printer. 1 Press the RESUME/CANCEL button while...
iP90 Quick Start Guide
Page 19
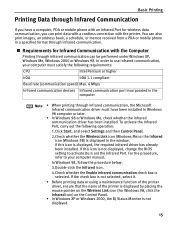
...132; Requirements for wireless data communication, you have been installed in a specified format through infrared communication can print data with a cordless connection with the printer. Basic Printing Printing Data through Infrared Communication If you can be performed under Windows XP, Windows Me, Windows 2000 or ...If the check box is not selected, select it. • Before printing data or using a maintenance function of the printer driver, ensure that the name of the printer is not displayed. 15 You can also print images, an address book, a schedule, or memos received from a...
...132; Requirements for wireless data communication, you have been installed in a specified format through infrared communication can print data with a cordless connection with the printer. Basic Printing Printing Data through Infrared Communication If you can be performed under Windows XP, Windows Me, Windows 2000 or ...If the check box is not selected, select it. • Before printing data or using a maintenance function of the printer driver, ensure that the name of the printer is not displayed. 15 You can also print images, an address book, a schedule, or memos received from a...
iP90 Quick Start Guide
Page 20
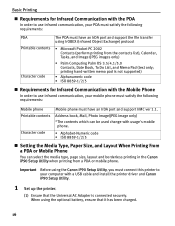
... 8859-1/2/5 „ Requirements for Infrared Communication with usage's mobile phone. Basic Printing „ Requirements for Infrared Communication with a USB cable and install the printer driver and Canon iP90 Setup Utility. 1 Set up the printer. (1) Ensure that it has been charged. 16 When using IrOBEX (Infrared...Object Exchange) protocol • Microsoft Pocket PC 2002 Contacts (perform printing from a PDA or mobile phone. Important Before using the Canon iP90 Setup Utility, you must connect this printer to your computer with the Mobile Phone In order to use infrared ...
... 8859-1/2/5 „ Requirements for Infrared Communication with usage's mobile phone. Basic Printing „ Requirements for Infrared Communication with a USB cable and install the printer driver and Canon iP90 Setup Utility. 1 Set up the printer. (1) Ensure that it has been charged. 16 When using IrOBEX (Infrared...Object Exchange) protocol • Microsoft Pocket PC 2002 Contacts (perform printing from a PDA or mobile phone. Important Before using the Canon iP90 Setup Utility, you must connect this printer to your computer with the Mobile Phone In order to use infrared ...
iP90 Quick Start Guide
Page 21
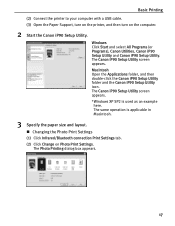
... Support, turn on the printer, and then turn on Photo Print Settings. The Canon iP90 Setup Utility screen appears. *Windows XP SP2 is applicable in Macintosh. 3 Specify the paper size and layout. „ Changing the Photo Print Settings (1) Click Infrared/Bluetooth connection Print Settings tab. (2) Click Change on the computer. 2 Start the Canon iP90 Setup Utility. The Photo...
... Support, turn on the printer, and then turn on Photo Print Settings. The Canon iP90 Setup Utility screen appears. *Windows XP SP2 is applicable in Macintosh. 3 Specify the paper size and layout. „ Changing the Photo Print Settings (1) Click Infrared/Bluetooth connection Print Settings tab. (2) Click Change on the computer. 2 Start the Canon iP90 Setup Utility. The Photo...

iP90 Quick Start Guide
Page 22
...215;177.8 mm Borderless paper without a border. Basic Printing (3) Select a desired layout for more detailed information on media type. (4) Click Send. Borderless Printing... You can perform printing from PDA or mobile phone, refer to print on the printer. - Media Type Specifies the type of paper loaded... on a sheet. - For details about printing from a PDA or mobile phone with the ...
...215;177.8 mm Borderless paper without a border. Basic Printing (3) Select a desired layout for more detailed information on media type. (4) Click Send. Borderless Printing... You can perform printing from PDA or mobile phone, refer to print on the printer. - Media Type Specifies the type of paper loaded... on a sheet. - For details about printing from a PDA or mobile phone with the ...


