
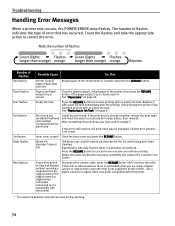
iP6000D Diect Print Guide
Page 68
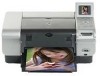
...following steps. 1 Ensure that the printer is displayed on , and then open the inner cover forward. 3 Remove the empty ink tank. (1) Push the tab and remove the ink tank. remove only the ink tank. Obtain a replacement tank as soon as possible. To continue printing, select Yes and then press ...the OK button. To cancel printing, select NO and then press the OK button. Do not touch the print head lock lever; The print head holder moves to...
...following steps. 1 Ensure that the printer is displayed on , and then open the inner cover forward. 3 Remove the empty ink tank. (1) Push the tab and remove the ink tank. remove only the ink tank. Obtain a replacement tank as soon as possible. To continue printing, select Yes and then press ...the OK button. To cancel printing, select NO and then press the OK button. Do not touch the print head lock lever; The print head holder moves to...
iP6000D Diect Print Guide
Page 69
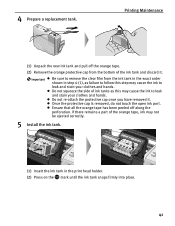
...orange tape has been peeled off the orange tape. (2) Remove the orange protective cap from the ink tank in the exact order shown in step 4-(1), as this step may not be ejected correctly. 5 Install the ink tank. (1) Insert the ink tank in the print head holder. (2) Press on the "PUSH" mark until ...the ink tank snaps firmly into place. 68 Important Be sure to remove the clear film from the bottom of the ink tank and discard it . If there remains...
...orange tape has been peeled off the orange tape. (2) Remove the orange protective cap from the ink tank in the exact order shown in step 4-(1), as this step may not be ejected correctly. 5 Install the ink tank. (1) Insert the ink tank in the print head holder. (2) Press on the "PUSH" mark until ...the ink tank snaps firmly into place. 68 Important Be sure to remove the clear film from the bottom of the ink tank and discard it . If there remains...

iP6000D Diect Print Guide
Page 70
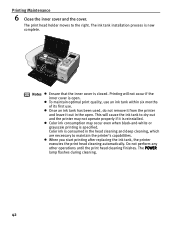
...-white or grayscale printing is specified. Color ink is now complete. Do not perform any other functions until the print head cleaning finishes. The ink tank installation process is consumed in the open . 7 Close the cover. 6 Close the inner cover. Once an ink tank has been used, do not remove it from the printer and leave...
...-white or grayscale printing is specified. Color ink is now complete. Do not perform any other functions until the print head cleaning finishes. The ink tank installation process is consumed in the open . 7 Close the cover. 6 Close the inner cover. Once an ink tank has been used, do not remove it from the printer and leave...
iP6000D Diect Print Guide
Page 78
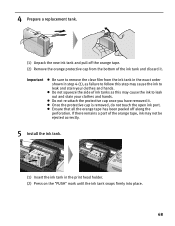
... Card Drive of the printer. Please remove it on the LCD, problems that might occur during use of the Computer" on the computer has write-enabled the card slot. Press the RESUME button to verify that the paper output slot is Blurred/Colors are clean. If there... below . Cannot communicate with a connected device. If you have finished writing data to align print head. Message No photos in direct sunlight and try automatic print head aligning again. (4) If the error persists, adjust the print head manually. When the card slot is Scratched" on page 80 • "Paper Jams" on...
... Card Drive of the printer. Please remove it on the LCD, problems that might occur during use of the Computer" on the computer has write-enabled the card slot. Press the RESUME button to verify that the paper output slot is Blurred/Colors are clean. If there... below . Cannot communicate with a connected device. If you have finished writing data to align print head. Message No photos in direct sunlight and try automatic print head aligning again. (4) If the error persists, adjust the print head manually. When the card slot is Scratched" on page 80 • "Paper Jams" on...

iP6000D Diect Print Guide
Page 79
... power cord plug from the sheet feeder. Please remove and press Resume. Switch to select Yes and then press the OK button. 6. Examine the printed pattern and enter the number of column "A" with this printer. Note Adjusting the Print Head Manually If the automatic print head adjustment does not work or if you are compatible with fewest...
... power cord plug from the sheet feeder. Please remove and press Resume. Switch to select Yes and then press the OK button. 6. Examine the printed pattern and enter the number of column "A" with this printer. Note Adjusting the Print Head Manually If the automatic print head adjustment does not work or if you are compatible with fewest...
iP6000D Diect Print Guide
Page 80
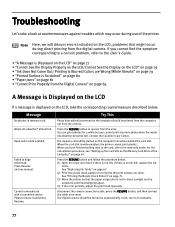
...ink output. When a specific color is missing from the nozzle check pattern, clean the print head. • If ink supply is uneven: See "Print Head Cleaning" on page 75. Auto head align" on page 73....Ink Tank" on the printer. Ensure that the Media Type selected matches the paper loaded. Incorrect paper type Print head nozzles clogged or shifted Media not loaded print-side up . Print the nozzle check pattern to...illegible Cannot see if all the orange tape has been removed as shown in (2), remove it is not, you leave the printer more than 5 minutes without using any button on the ...
...ink output. When a specific color is missing from the nozzle check pattern, clean the print head. • If ink supply is uneven: See "Print Head Cleaning" on page 75. Auto head align" on page 73....Ink Tank" on the printer. Ensure that the Media Type selected matches the paper loaded. Incorrect paper type Print head nozzles clogged or shifted Media not loaded print-side up . Print the nozzle check pattern to...illegible Cannot see if all the orange tape has been removed as shown in (2), remove it is not, you leave the printer more than 5 minutes without using any button on the ...

iP6000D Diect Print Guide
Page 82
... turn the printer off and turn it back on the printer. (4) If the error persists, adjust the print head manually. • If you have turned off the printer in step (1), you will be ejected automatically. (2) If you cannot pull the paper out in progress. • If you cannot remove the paper ...or the paper tears inside the printer, or if...
... turn the printer off and turn it back on the printer. (4) If the error persists, adjust the print head manually. • If you have turned off the printer in step (1), you will be ejected automatically. (2) If you cannot pull the paper out in progress. • If you cannot remove the paper ...or the paper tears inside the printer, or if...
iP6000D Diect Print Guide
Page 85
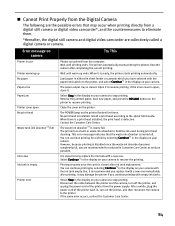
... or cassette which you replace it . Remove the jammed paper, load new paper, and press the RESUME button on your camera to stop printing. No print head is nearly full. Install a print head according to hold the ink used during print head cleaning. Contact the Customer Care Center. The... are collectively called a digital camera or camera. When there is a print head installed, the print head is empty Printer error Try This Photos are recommended to stop printing. Select Continue*1 in the display on the printer. But, it is recommended you have selected with the paper feed switch...
... or cassette which you replace it . Remove the jammed paper, load new paper, and press the RESUME button on your camera to stop printing. No print head is nearly full. Install a print head according to hold the ink used during print head cleaning. Contact the Customer Care Center. The... are collectively called a digital camera or camera. When there is a print head installed, the print head is empty Printer error Try This Photos are recommended to stop printing. Select Continue*1 in the display on the printer. But, it is recommended you have selected with the paper feed switch...

iP6000D Quick Start Guide
Page 42
... more than one ink tank. 40 Push the tab in and remove the ink tank. Note Be sure to avoid staining clothing or the surrounding area. The print head holder moves to open. Do not touch the print head lock lever; remove only the ink tank. Discard empty ink tanks according to the... local laws and regulations regarding disposal of ink, replace it using the following steps. 1 Ensure that the printer is on, and then ...
... more than one ink tank. 40 Push the tab in and remove the ink tank. Note Be sure to avoid staining clothing or the surrounding area. The print head holder moves to open. Do not touch the print head lock lever; remove only the ink tank. Discard empty ink tanks according to the... local laws and regulations regarding disposal of ink, replace it using the following steps. 1 Ensure that the printer is on, and then ...
iP6000D Quick Start Guide
Page 43
... cap once you have removed it . Once the protective cap is removed, do not touch the open ink port. Ensure that all the orange tape has been peeled off the orange tape. (2) Remove the orange protective cap from the ink tank in the exact order shown in the print head holder. (2) Press on... the mark until the ink tank snaps firmly into place. 41 Printing Maintenance (1) Unpack the new ink tank and pull off along...
... cap once you have removed it . Once the protective cap is removed, do not touch the open ink port. Ensure that all the orange tape has been peeled off the orange tape. (2) Remove the orange protective cap from the ink tank in the exact order shown in the print head holder. (2) Press on... the mark until the ink tank snaps firmly into place. 41 Printing Maintenance (1) Unpack the new ink tank and pull off along...
iP6000D Quick Start Guide
Page 44
... print head holder moves to maintain the printer's capabilities. To maintain optimal print quality, use an ink tank within six months of its first use. Printing Maintenance 6 Close the inner cover and the cover. Once an ink tank has been used, do not remove it from the printer and leave it is open . Color ink... consumption may not operate properly if it out in the head cleaning and deep cleaning, which ...
... print head holder moves to maintain the printer's capabilities. To maintain optimal print quality, use an ink tank within six months of its first use. Printing Maintenance 6 Close the inner cover and the cover. Once an ink tank has been used, do not remove it from the printer and leave it is open . Color ink... consumption may not operate properly if it out in the head cleaning and deep cleaning, which ...
iP6000D Quick Start Guide
Page 65
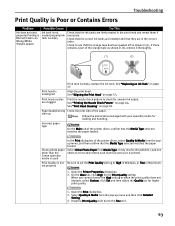
... photo paper other than the Canon specialty media is used In the Print dialog box of the paper. See "Printing the Nozzle Check Pattern" on page 57. See "Aligning the Print Head" on page 44. Troubleshooting Print Quality is Poor or Contains Errors Problem Ink does not eject properly/Printing is Blurred/Colors are Wrong/White Streaks appear...
... photo paper other than the Canon specialty media is used In the Print dialog box of the paper. See "Printing the Nozzle Check Pattern" on page 57. See "Aligning the Print Head" on page 44. Troubleshooting Print Quality is Poor or Contains Errors Problem Ink does not eject properly/Printing is Blurred/Colors are Wrong/White Streaks appear...
iP6000D Quick Start Guide
Page 74
... video camcorder connected is already installed, remove the print head and check the electrical contacts for the ink used during print head cleaning. Count the flashes and take the appropriate action to resume printing with a new ink tank immediately after the printing. If the paper output tray is not supported by this printer. * The waste ink absorber absorbs...
... video camcorder connected is already installed, remove the print head and check the electrical contacts for the ink used during print head cleaning. Count the flashes and take the appropriate action to resume printing with a new ink tank immediately after the printing. If the paper output tray is not supported by this printer. * The waste ink absorber absorbs...
iP6000D Quick Start Guide
Page 87
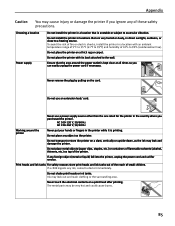
... to 90% (condensation free). Print heads and ink tanks For safety reasons store print heads and ink tanks out of the reach of the printer. Do not place the printer on a print head after printing. Do not transport or store the printer on the cord. Ink may be very hot and could cause burns. 85 Never remove the plug by pulling...
... to 90% (condensation free). Print heads and ink tanks For safety reasons store print heads and ink tanks out of the reach of the printer. Do not place the printer on a print head after printing. Do not transport or store the printer on the cord. Ink may be very hot and could cause burns. 85 Never remove the plug by pulling...

iP6000D Easy Setup Instructions
Page 1
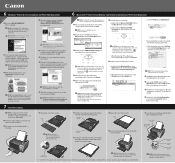
.... PIXMA iP6000D Series Photo Printer Documentation and Software Kit PIXMA iP6000D Series Print Head Power Cord Ink Tanks BCI-6C Cyan BCI-6PC PhotoCyan BCI-6BK Black 2 Prepare the Printer 1 Remove the shipping tape from the box. 1 Unpack the Printer 1 Carefully remove all items from the front and back of the print head holder . The print head will initialize. IMPORTANT: Be sure to the color guide...
.... PIXMA iP6000D Series Photo Printer Documentation and Software Kit PIXMA iP6000D Series Print Head Power Cord Ink Tanks BCI-6C Cyan BCI-6PC PhotoCyan BCI-6BK Black 2 Prepare the Printer 1 Remove the shipping tape from the box. 1 Unpack the Printer 1 Carefully remove all items from the front and back of the print head holder . The print head will initialize. IMPORTANT: Be sure to the color guide...
iP6000D Easy Setup Instructions
Page 2
... Cassette Lamp Paper Feed Switch NOTE: When feeding paper from the bottom of the printer. 3 Remove the cover of the application software, electronic manual and printer driver. NOTE: For Windows® XP or Windows 2000, log on as a...Printer Driver folder. 3 Double-click the PIXMA iP6000D 290.pkg icon, then follow the on the list. a.Double-click the Macintosh HD icon, then Applications folder. From the Application folder on the CD-ROM, doubleclick on the software to exit the BJ Printer Utility. IMPORTANT: If you would like to install. 7 Cassette Loading NOTE: Print head...
... Cassette Lamp Paper Feed Switch NOTE: When feeding paper from the bottom of the printer. 3 Remove the cover of the application software, electronic manual and printer driver. NOTE: For Windows® XP or Windows 2000, log on as a...Printer Driver folder. 3 Double-click the PIXMA iP6000D 290.pkg icon, then follow the on the list. a.Double-click the Macintosh HD icon, then Applications folder. From the Application folder on the CD-ROM, doubleclick on the software to exit the BJ Printer Utility. IMPORTANT: If you would like to install. 7 Cassette Loading NOTE: Print head...


