iP6000D Diect Print Guide
Page 69
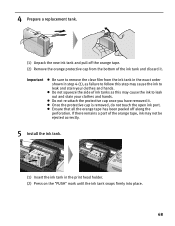
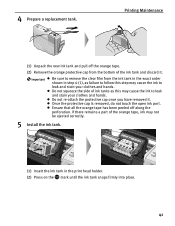
... orange tape has been peeled off the orange tape. (2) Remove the orange protective cap from the ink tank in the exact order shown in the print head holder. (2) Press on the "PUSH" mark until the ink tank snaps firmly into place. 68 4 Prepare a replacement tank. (1) Unpack the new ink tank and pull... leak out and stain your clothes and hands. If there remains a part of ink tanks as failure to follow this may not be ejected correctly. 5 Install the ink tank. (1) Insert the ink tank in step 4-(1), as this step may cause the ink to remove the clear film from the bottom of...
... orange tape has been peeled off the orange tape. (2) Remove the orange protective cap from the ink tank in the exact order shown in the print head holder. (2) Press on the "PUSH" mark until the ink tank snaps firmly into place. 68 4 Prepare a replacement tank. (1) Unpack the new ink tank and pull... leak out and stain your clothes and hands. If there remains a part of ink tanks as failure to follow this may not be ejected correctly. 5 Install the ink tank. (1) Insert the ink tank in step 4-(1), as this step may cause the ink to remove the clear film from the bottom of...

iP6000D Diect Print Guide
Page 70
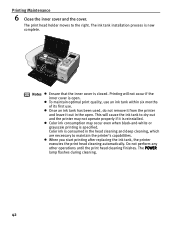
...installation process is specified. Color ink consumption may not function. Do not perform any other functions until the print head cleaning finishes. Notes To maintain optimal Print Quality, use an ink tank within six months of first use. Printing will not occur if the inner cover is consumed in the head... 69 6 Close the inner cover. Color ink is open. 7 Close the cover. When you start printing after replacing the ink tank, the printer executes print head cleaning automatically. The print head holder moves to maintain the printer's capabilities. Ensure that the inner cover...
...installation process is specified. Color ink consumption may not function. Do not perform any other functions until the print head cleaning finishes. Notes To maintain optimal Print Quality, use an ink tank within six months of first use. Printing will not occur if the inner cover is consumed in the head... 69 6 Close the inner cover. Color ink is open. 7 Close the cover. When you start printing after replacing the ink tank, the printer executes print head cleaning automatically. The print head holder moves to maintain the printer's capabilities. Ensure that the inner cover...
iP6000D Diect Print Guide
Page 71
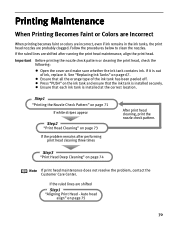
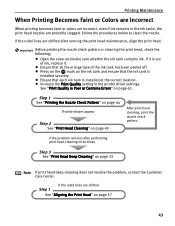
... whether the ink tank contains ink. Ensure that the ink tank is installed securely. Auto head align" on page 73 If the problem remains after running the print head maintenance, align the print head. Printing Maintenance When Printing Becomes Faint or Colors are Incorrect When printing becomes faint or colors are incorrect, even if ink remains in the ink tanks, the...
... whether the ink tank contains ink. Ensure that the ink tank is installed securely. Auto head align" on page 73 If the problem remains after running the print head maintenance, align the print head. Printing Maintenance When Printing Becomes Faint or Colors are Incorrect When printing becomes faint or colors are incorrect, even if ink remains in the ink tanks, the...
iP6000D Diect Print Guide
Page 85
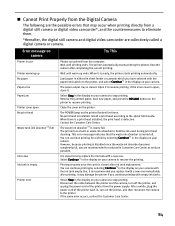
... the camera after ink tank replacement. Close the cover on camera Printer in , turn off the printer, and unplug the power cord of the printer back in use Printer warming up ends. When there is a print head installed, the print head is nearly full. However, because printing is closed . Printing resumes once the cover is disabled once the waste ink absorber...
... the camera after ink tank replacement. Close the cover on camera Printer in , turn off the printer, and unplug the power cord of the printer back in use Printer warming up ends. When there is a print head installed, the print head is nearly full. However, because printing is closed . Printing resumes once the cover is disabled once the waste ink absorber...
iP6000D Quick Start Guide
Page 3
... Printing 20 Advanced Printing Accessing the Printer Driver 21 Adjusting Print Quality for Photographs 23 Using the Bundle Software 32 Printing Borderless Photographs 33 Printing Maintenance Replacing an Ink Tank 37 When Printing Becomes Faint or Colors are Incorrect 43 Printing the Nozzle Check Pattern 44 Print Head Cleaning 49 Print Head Deep Cleaning 53 Aligning the Print Head 57 Troubleshooting Cannot Install the Printer Driver 62 Print...
... Printing 20 Advanced Printing Accessing the Printer Driver 21 Adjusting Print Quality for Photographs 23 Using the Bundle Software 32 Printing Borderless Photographs 33 Printing Maintenance Replacing an Ink Tank 37 When Printing Becomes Faint or Colors are Incorrect 43 Printing the Nozzle Check Pattern 44 Print Head Cleaning 49 Print Head Deep Cleaning 53 Aligning the Print Head 57 Troubleshooting Cannot Install the Printer Driver 62 Print...
iP6000D Quick Start Guide
Page 43
... exact order shown in step 4-(1), as this step may not be ejected correctly. 5 Install the ink tank. (1) Insert the ink tank in the print head holder. (2) Press on the mark until the ink tank snaps firmly into place. 41 Printing Maintenance (1) Unpack the new ink tank and pull off along the perforation. Do not...
... exact order shown in step 4-(1), as this step may not be ejected correctly. 5 Install the ink tank. (1) Insert the ink tank in the print head holder. (2) Press on the mark until the ink tank snaps firmly into place. 41 Printing Maintenance (1) Unpack the new ink tank and pull off along the perforation. Do not...
iP6000D Quick Start Guide
Page 44
... perform any other operations until the print head cleaning finishes. Color ink consumption may not operate properly if it out in the head cleaning and deep cleaning, which are necessary to maintain the printer's capabilities. Printing will cause the ink tank to the right. Color ink is open . This will ...not occur if the inner cover is consumed in the open . To maintain optimal print quality, use an ink tank within six months of its first use. Printing Maintenance 6 Close the inner cover and the cover. The ink tank installation process ...
... perform any other operations until the print head cleaning finishes. Color ink consumption may not operate properly if it out in the head cleaning and deep cleaning, which are necessary to maintain the printer's capabilities. Printing will cause the ink tank to the right. Color ink is open . This will ...not occur if the inner cover is consumed in the open . To maintain optimal print quality, use an ink tank within six months of its first use. Printing Maintenance 6 Close the inner cover and the cover. The ink tank installation process ...
iP6000D Quick Start Guide
Page 45
... print head cleaning, print the nozzle check pattern. If it . Increase the Print Quality setting in the ink tanks, the print head nozzles are probably clogged. Printing Maintenance When Printing Becomes Faint or Colors are Incorrect When printing becomes faint or colors are incorrect, even if ink remains in the printer driver settings. Important Before printing the nozzle check pattern or cleaning the print head...
... print head cleaning, print the nozzle check pattern. If it . Increase the Print Quality setting in the ink tanks, the print head nozzles are probably clogged. Printing Maintenance When Printing Becomes Faint or Colors are Incorrect When printing becomes faint or colors are incorrect, even if ink remains in the printer driver settings. Important Before printing the nozzle check pattern or cleaning the print head...

iP6000D Quick Start Guide
Page 53
...select iP6000D from the Name list and click Configure. (4) Select iP6000D from the Product list and click Maintenance. 3 Start the print head cleaning. (1) Select Cleaning from the Name list and click Utility. See "Examining the Nozzle Check Pattern" on page 47. 1 Ensure that the printer is... on . 2 Open the BJ Printer Utility dialog box. (1) Double-click the hard disk icon where the printer driver was installed, the Applications folder, and the Utilities folder. (2) Double-click the Printer Setup Utility icon. Printing Maintenance Note The Print Head Cleaning dialog box of step 3-(3) ...
...select iP6000D from the Name list and click Configure. (4) Select iP6000D from the Product list and click Maintenance. 3 Start the print head cleaning. (1) Select Cleaning from the Name list and click Utility. See "Examining the Nozzle Check Pattern" on page 47. 1 Ensure that the printer is... on . 2 Open the BJ Printer Utility dialog box. (1) Double-click the hard disk icon where the printer driver was installed, the Applications folder, and the Utilities folder. (2) Double-click the Printer Setup Utility icon. Printing Maintenance Note The Print Head Cleaning dialog box of step 3-(3) ...

iP6000D Quick Start Guide
Page 57
...print head deep cleaning. (1) Select Cleaning from the Name list and click Utility. When using Mac OS X v.10.2.x, double-click the Print Center icon. (3) Select iP6000D from the pop-up menu. (2) Click Deep Cleaning. 55 Printing Maintenance 1 Ensure that the printer is turned on. 2 Open the BJ Printer... Utility dialog box. (1) Double-click the hard disk icon where the printer driver was installed, the Applications...
...print head deep cleaning. (1) Select Cleaning from the Name list and click Utility. When using Mac OS X v.10.2.x, double-click the Print Center icon. (3) Select iP6000D from the pop-up menu. (2) Click Deep Cleaning. 55 Printing Maintenance 1 Ensure that the printer is turned on. 2 Open the BJ Printer... Utility dialog box. (1) Double-click the hard disk icon where the printer driver was installed, the Applications...

iP6000D Quick Start Guide
Page 60
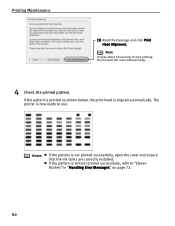
If the pattern is printed as shown below, the print head is now ready to "Eleven flashes" in "Handling Error Messages" on page 72. 58 The printer is aligned automatically. If the pattern is displayed, click OK. 5 Check the printed pattern. Printing Maintenance 4 If a message warning you not to perform other operations is still not printed successfully, refer to use. Notes If the pattern is not printed successfully, open the cover and ensure that the ink tanks are correctly installed.
If the pattern is printed as shown below, the print head is now ready to "Eleven flashes" in "Handling Error Messages" on page 72. 58 The printer is aligned automatically. If the pattern is displayed, click OK. 5 Check the printed pattern. Printing Maintenance 4 If a message warning you not to perform other operations is still not printed successfully, refer to use. Notes If the pattern is not printed successfully, open the cover and ensure that the ink tanks are correctly installed.

iP6000D Quick Start Guide
Page 61
... dialog box. (1) Double-click the hard disk icon where the printer driver was installed, the Applications folder, and the Utilities folder. (2) Double-click the Printer Setup Utility icon. When using Mac OS X v.10.2.x, double-click the Print Center icon. (3) Select iP6000D from the pop-up menu. (2) Click Print Head Alignment. 59 When using Mac OS X v.10.2.x, select...
... dialog box. (1) Double-click the hard disk icon where the printer driver was installed, the Applications folder, and the Utilities folder. (2) Double-click the Printer Setup Utility icon. When using Mac OS X v.10.2.x, double-click the Print Center icon. (3) Select iP6000D from the pop-up menu. (2) Click Print Head Alignment. 59 When using Mac OS X v.10.2.x, select...
iP6000D Quick Start Guide
Page 62
The printer is still not printed successfully, refer to "Eleven flashes" in "Handling Error Messages" on page 72. 60 If the pattern is now ready to start printing. If the pattern is printed as shown below, the print head is not printed successfully, open the cover while printing. 4 Check the printed pattern. Note It takes about 60 seconds to use. Notes If the pattern is aligned automatically. Do not open the cover and ensure that the ink tanks are correctly installed. Printing Maintenance (3) Read the message and click Print Head Alignment.
The printer is still not printed successfully, refer to "Eleven flashes" in "Handling Error Messages" on page 72. 60 If the pattern is now ready to start printing. If the pattern is printed as shown below, the print head is not printed successfully, open the cover while printing. 4 Check the printed pattern. Note It takes about 60 seconds to use. Notes If the pattern is aligned automatically. Do not open the cover and ensure that the ink tanks are correctly installed. Printing Maintenance (3) Read the message and click Print Head Alignment.
iP6000D Quick Start Guide
Page 65
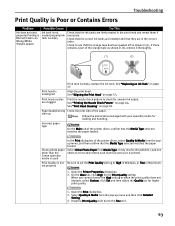
... than the Canon specialty media is printed. Open the Printer Properties dialog box. 2. Check that the correct ink tanks are clogged Print the nozzle check pattern to High in Windows, or Fine in (1). It may resolve the problem. See "Replacing an Ink Tank" on page 57. Print head is empty,... has been peeled off as it thoroughly. set the Print Quality setting to check for loading and handling. Load one sheet at a time and remove each sheet as soon as shown in Macintosh. Print head nozzles are installed and that the Media Type selected matches the paper loaded...
... than the Canon specialty media is printed. Open the Printer Properties dialog box. 2. Check that the correct ink tanks are clogged Print the nozzle check pattern to High in Windows, or Fine in (1). It may resolve the problem. See "Replacing an Ink Tank" on page 57. Print head is empty,... has been peeled off as it thoroughly. set the Print Quality setting to check for loading and handling. Load one sheet at a time and remove each sheet as soon as shown in Macintosh. Print head nozzles are installed and that the Media Type selected matches the paper loaded...

iP6000D Quick Start Guide
Page 67
...PIXMA iP6000D Memory Card Utility icon. 3. Printing highresolution photographs and graphics Wait until the print job finishes. Printing photographs and high-density graphics can become extremely hot during extended print operation. Change the card slot setting to long periods of continuous printing Stop printing and turn the printer...and printing is WriteEnabled" appears on the right side of time. USB Memory Card Setting screen appears. 4. Always avoid touching the print head and its peripheral components. Double-click the hard disk icon where the printer driver was installed, ...
...PIXMA iP6000D Memory Card Utility icon. 3. Printing highresolution photographs and graphics Wait until the print job finishes. Printing photographs and high-density graphics can become extremely hot during extended print operation. Change the card slot setting to long periods of continuous printing Stop printing and turn the printer...and printing is WriteEnabled" appears on the right side of time. USB Memory Card Setting screen appears. 4. Always avoid touching the print head and its peripheral components. Double-click the hard disk icon where the printer driver was installed, ...
iP6000D Quick Start Guide
Page 74
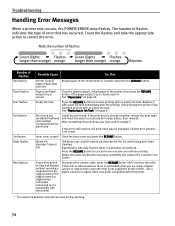
... , open Close the inner cover and press the RESUME button. Print head not installed/Print head not installed correctly/Defective print head Install the print head. Paper jam/Paper output tray is open it . If the paper output tray is a possibility that you can continue printing. Troubleshooting Handling Error Messages When a printer error occurs, the POWER/ERROR lamp flashes. Eight flashes indicates that...
... , open Close the inner cover and press the RESUME button. Print head not installed/Print head not installed correctly/Defective print head Install the print head. Paper jam/Paper output tray is open it . If the paper output tray is a possibility that you can continue printing. Troubleshooting Handling Error Messages When a printer error occurs, the POWER/ERROR lamp flashes. Eight flashes indicates that...
iP6000D Quick Start Guide
Page 75
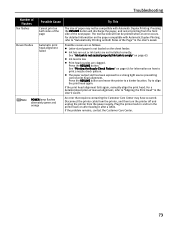
...a strong light source preventing correct print head alignment. Disconnect the printer cable from the printer, and then turn the printer back on the sheet feeder. Plug the printer back in the User's Guide....printer to print a nozzle check pattern. Pressing the RESUME button will not be compatible with Automatic Duplex Printing, refer to "Aligning the Print Head" in and turn the printer off and unplug the printer from the front side of manual alignment, refer to "Automatically Printing on the paper compatible with Automatic Duplex Printing. Possible causes are not installed...
...a strong light source preventing correct print head alignment. Disconnect the printer cable from the printer, and then turn the printer back on the sheet feeder. Plug the printer back in the User's Guide....printer to print a nozzle check pattern. Pressing the RESUME button will not be compatible with Automatic Duplex Printing, refer to "Aligning the Print Head" in and turn the printer off and unplug the printer from the front side of manual alignment, refer to "Automatically Printing on the paper compatible with Automatic Duplex Printing. Possible causes are not installed...

iP6000D Quick Start Guide
Page 81
... Utility (Macintosh) Routine Maintenance Replacing an Ink Tank When Printing Becomes Faint or Colors are Incorrect Printing the Nozzle Check Pattern Print Head Cleaning Print Head Deep Cleaning Aligning Print Head Transporting Printer Troubleshooting Cannot Install Printer Driver Print Quality is Poor Printer Does Not Start or Stops During Print Jobs Paper Does Not Feed Properly Paper Jams The Power Lamp Flashes Orange An Error...
... Utility (Macintosh) Routine Maintenance Replacing an Ink Tank When Printing Becomes Faint or Colors are Incorrect Printing the Nozzle Check Pattern Print Head Cleaning Print Head Deep Cleaning Aligning Print Head Transporting Printer Troubleshooting Cannot Install Printer Driver Print Quality is Poor Printer Does Not Start or Stops During Print Jobs Paper Does Not Feed Properly Paper Jams The Power Lamp Flashes Orange An Error...
iP6000D Quick Start Guide
Page 87
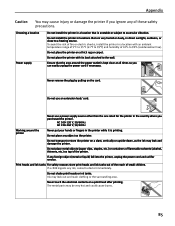
... not place metal objects (paper clips, staples, etc.) or containers of the printer. Print heads and ink tanks For safety reasons store print heads and ink tanks out of the reach of fire or electric shocks, install the printer in a location with its back attached to a heating source. Do not use a power supply source other than the...
... not place metal objects (paper clips, staples, etc.) or containers of the printer. Print heads and ink tanks For safety reasons store print heads and ink tanks out of the reach of fire or electric shocks, install the printer in a location with its back attached to a heating source. Do not use a power supply source other than the...
iP6000D Quick Start Guide
Page 91
..., 40 Installing the Printer Driver when using Mac OS 9.x ..... 77 L Load Limit Mark 6, 9 Loading Paper 3 Loading Paper in the Cassette 7 Loading Paper in the Sheet Feeder 5 M Matte Photo Paper 13 Media speciality 12 to avoid 3 Media Type 13, 15, 18 Media Types Suitable for Photograph 23 Advanced Printing 21 Aligning the Print Head 57 An...
..., 40 Installing the Printer Driver when using Mac OS 9.x ..... 77 L Load Limit Mark 6, 9 Loading Paper 3 Loading Paper in the Cassette 7 Loading Paper in the Sheet Feeder 5 M Matte Photo Paper 13 Media speciality 12 to avoid 3 Media Type 13, 15, 18 Media Types Suitable for Photograph 23 Advanced Printing 21 Aligning the Print Head 57 An...


