iP5000 Quick Start Guide
Page 5
...37 Printing Borderless Photographs 38 Printing Maintenance Replacing an Ink Tank 42 When Printing Becomes Faint or Colors are Incorrect 48 Printing the Nozzle Check Pattern 49 Print Head Cleaning 53 Print Head Deep Cleaning 57 Aligning the Print Head 61 Troubleshooting Cannot Install the Printer Driver 66 Print ... on the Screen 77 Cannot Print Properly from the Digital Camera 80 Appendix Installing the Printer Driver When Using Mac OS 9 82 User's Guide Table of Contents 84 Specifications 85 Safety Precautions 88 Regulatory Information 90 CANON U.S.A., INC. LIMITED WARRANTY ---...
...37 Printing Borderless Photographs 38 Printing Maintenance Replacing an Ink Tank 42 When Printing Becomes Faint or Colors are Incorrect 48 Printing the Nozzle Check Pattern 49 Print Head Cleaning 53 Print Head Deep Cleaning 57 Aligning the Print Head 61 Troubleshooting Cannot Install the Printer Driver 66 Print ... on the Screen 77 Cannot Print Properly from the Digital Camera 80 Appendix Installing the Printer Driver When Using Mac OS 9 82 User's Guide Table of Contents 84 Specifications 85 Safety Precautions 88 Regulatory Information 90 CANON U.S.A., INC. LIMITED WARRANTY ---...

iP5000 Quick Start Guide
Page 49
Push the tab and remove the ink tank. Be sure to open. Printing Maintenance „ Replacing Ink Tanks When an ink tank runs out of ink, replace it using the following steps. 1 Ensure that the printer is on, and then push the upper center ( Front Cover to open the Paper Output Tray. ) of...down the Inner Cover forward to replace ink tanks one by one when replacing more than one ink tank. 45 Do not touch the lock lever; remove only the ink tank. z Discard empty ink tanks according to avoid staining clothing or the surrounding area. The Print Head Holder moves to the center. ...
Push the tab and remove the ink tank. Be sure to open. Printing Maintenance „ Replacing Ink Tanks When an ink tank runs out of ink, replace it using the following steps. 1 Ensure that the printer is on, and then push the upper center ( Front Cover to open the Paper Output Tray. ) of...down the Inner Cover forward to replace ink tanks one by one when replacing more than one ink tank. 45 Do not touch the lock lever; remove only the ink tank. z Discard empty ink tanks according to avoid staining clothing or the surrounding area. The Print Head Holder moves to the center. ...
iP5000 Quick Start Guide
Page 51
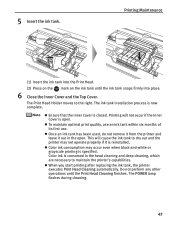
...Color ink is specified. The POWER lamp flashes during cleaning. 47 Do not perform any other operations until the ink tank snaps firmly into the Print Head. (2) Press on the mark on the ink tank until the Print Head Cleaning finishes. z Once an ink tank has been used, do not remove it from the printer... and leave it is closed. z When you start printing after replacing the ink tank, the printer executes Print Head Cleaning automatically. 5 Insert the ink tank. The Print Head Holder moves to maintain the printer's capabilities. This will not ...
...Color ink is specified. The POWER lamp flashes during cleaning. 47 Do not perform any other operations until the ink tank snaps firmly into the Print Head. (2) Press on the mark on the ink tank until the Print Head Cleaning finishes. z Once an ink tank has been used, do not remove it from the printer... and leave it is closed. z When you start printing after replacing the ink tank, the printer executes Print Head Cleaning automatically. 5 Insert the ink tank. The Print Head Holder moves to maintain the printer's capabilities. This will not ...
iP5000 Quick Start Guide
Page 52
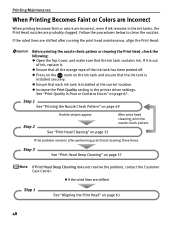
... has been peeled off. z Ensure that the ink tank contains ink. See "Print Quality is installed securely. z Increase the Print Quality setting in the ink tanks, the Print Head nozzles are probably clogged. Printing Maintenance When Printing Becomes Faint or Colors are Incorrect When printing becomes faint or colors are incorrect, even if ink remains in the printer driver settings.
... has been peeled off. z Ensure that the ink tank contains ink. See "Print Quality is installed securely. z Increase the Print Quality setting in the ink tanks, the Print Head nozzles are probably clogged. Printing Maintenance When Printing Becomes Faint or Colors are Incorrect When printing becomes faint or colors are incorrect, even if ink remains in the printer driver settings.
iP5000 Quick Start Guide
Page 56
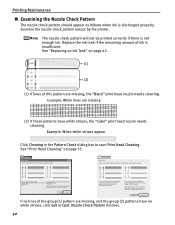
... stripes appear Click Cleaning in the Pattern Check dialog box to start Print Head Cleaning. Examine the nozzle check pattern output by the printer. Replace the ink tank if the remaining amount of ink is not enough ink. See "Print Head Cleaning" on page 42. (1) (2) (1) If lines of the ..., and the group (2) patterns have white stripes, the "Color" print head nozzle needs cleaning. Printing Maintenance „ Examining the Nozzle Check Pattern The nozzle check pattern should appear as follows when ink is discharged properly. See "Replacing an Ink Tank" on page 53. Example: When lines ...
... stripes appear Click Cleaning in the Pattern Check dialog box to start Print Head Cleaning. Examine the nozzle check pattern output by the printer. Replace the ink tank if the remaining amount of ink is not enough ink. See "Print Head Cleaning" on page 42. (1) (2) (1) If lines of the ..., and the group (2) patterns have white stripes, the "Color" print head nozzle needs cleaning. Printing Maintenance „ Examining the Nozzle Check Pattern The nozzle check pattern should appear as follows when ink is discharged properly. See "Replacing an Ink Tank" on page 53. Example: When lines ...
iP5000 Quick Start Guide
Page 58
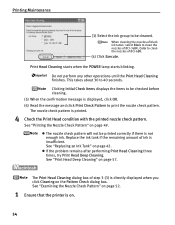
... 52. 1 Ensure that the printer is not enough ink. Replace the ink tank if the remaining amount of BCI-3eBK, Color to be printed correctly if there is on page 42. Printing Maintenance (3) Select the ink group to 40 seconds. Do not perform any other operations until the Print Head Cleaning finishes. See "Replacing an Ink Tank" on...
... 52. 1 Ensure that the printer is not enough ink. Replace the ink tank if the remaining amount of BCI-3eBK, Color to be printed correctly if there is on page 42. Printing Maintenance (3) Select the ink group to 40 seconds. Do not perform any other operations until the Print Head Cleaning finishes. See "Replacing an Ink Tank" on...
iP5000 Quick Start Guide
Page 60
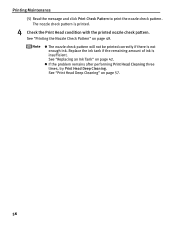
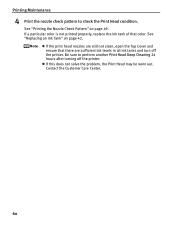
... Print Head Deep Cleaning. Printing Maintenance (5) Read the message and click Print Check Pattern to print the nozzle check pattern. See "Printing the Nozzle Check Pattern" on page 42. z The nozzle check pattern will not be printed correctly if there is insufficient. The nozzle check pattern is printed. 4 Check the Print Head condition with the printed nozzle check pattern. See "Replacing an...
... Print Head Deep Cleaning. Printing Maintenance (5) Read the message and click Print Check Pattern to print the nozzle check pattern. See "Printing the Nozzle Check Pattern" on page 42. z The nozzle check pattern will not be printed correctly if there is insufficient. The nozzle check pattern is printed. 4 Check the Print Head condition with the printed nozzle check pattern. See "Replacing an...
iP5000 Quick Start Guide
Page 62
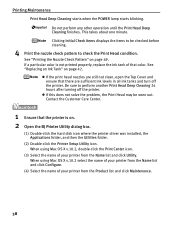
... not clean, open the Top Cover and ensure that color. See "Replacing an Ink Tank" on page 49. Printing Maintenance Print Head Deep Cleaning starts when the POWER lamp starts blinking. Contact the Customer Care Center. 1 Ensure that the printer is not printed properly, replace the ink tank of your printer from the Name list and click Utility. This...
... not clean, open the Top Cover and ensure that color. See "Replacing an Ink Tank" on page 49. Printing Maintenance Print Head Deep Cleaning starts when the POWER lamp starts blinking. Contact the Customer Care Center. 1 Ensure that the printer is not printed properly, replace the ink tank of your printer from the Name list and click Utility. This...
iP5000 Quick Start Guide
Page 64
..., open the Top Cover and ensure that color. If a particular color is not printed properly, replace the ink tank of that there are sufficient ink levels in all ink tanks and turn off the printer. z If this does not solve the problem, the Print Head may be worn out. Printing Maintenance 4 Print the nozzle check pattern to perform another...
..., open the Top Cover and ensure that color. If a particular color is not printed properly, replace the ink tank of that there are sufficient ink levels in all ink tanks and turn off the printer. z If this does not solve the problem, the Print Head may be worn out. Printing Maintenance 4 Print the nozzle check pattern to perform another...
iP5000 Quick Start Guide
Page 71
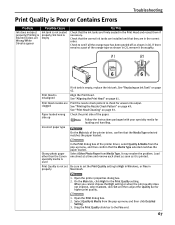
...the Quality bar for the Print Quality setting. Drag the Print Quality slide bar to check for loading and handling. See "Print Head Cleaning" on page 42. Glossy photo paper other than the Canon specialty media is used In the Print dialog box of the printer driver, confirm that the ... been peeled off as it thoroughly. (1) (2) If ink tank is empty, replace the ink tank. Troubleshooting Print Quality is Poor or Contains Errors Problem Ink does not eject properly/Printing is Blurred/Colors are Wrong/White Streaks appear Possible Cause Ink tank is not seated properly/Ink...
...the Quality bar for the Print Quality setting. Drag the Print Quality slide bar to check for loading and handling. See "Print Head Cleaning" on page 42. Glossy photo paper other than the Canon specialty media is used In the Print dialog box of the printer driver, confirm that the ... been peeled off as it thoroughly. (1) (2) If ink tank is empty, replace the ink tank. Troubleshooting Print Quality is Poor or Contains Errors Problem Ink does not eject properly/Printing is Blurred/Colors are Wrong/White Streaks appear Possible Cause Ink tank is not seated properly/Ink...
iP5000 Quick Start Guide
Page 79
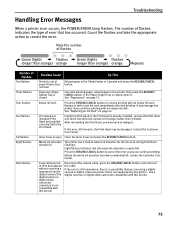
... flashes Six flashes Eight flashes Nine flashes Possible Cause Try This Printer is already installed, remove the Print Head and check the electrical contacts for the ink used during Print Head Cleaning. If this printer. 75 See "Replacing an Ink Tank" on page 72. After reinstalling the Print Head, you are using a digital camera or digital video camcorder that...
... flashes Six flashes Eight flashes Nine flashes Possible Cause Try This Printer is already installed, remove the Print Head and check the electrical contacts for the ink used during Print Head Cleaning. If this printer. 75 See "Replacing an Ink Tank" on page 72. After reinstalling the Print Head, you are using a digital camera or digital video camcorder that...

iP5000 Quick Start Guide
Page 82
... with the device. Double-click Printer Setup Utility in the Print dialog box, and then clear the Automatic check box. Ensure that the printer is securely connected to the computer. Press the RESUME/CANCEL button to hold the ink used during print head cleaning. Check whether the General ...Setup tab, clear the Automatic check box. The POWER lamp will flash green when the printer is flashing orange, an error may have been with the cable(s). Replace the cable(s) and try printing again. Select Application from within your application to ensure that the POWER lamp lights green...
... with the device. Double-click Printer Setup Utility in the Print dialog box, and then clear the Automatic check box. Ensure that the printer is securely connected to the computer. Press the RESUME/CANCEL button to hold the ink used during print head cleaning. Check whether the General ...Setup tab, clear the Automatic check box. The POWER lamp will flash green when the printer is flashing orange, an error may have been with the cable(s). Replace the cable(s) and try printing again. Select Application from within your application to ensure that the POWER lamp lights green...
iP5000 Quick Start Guide
Page 84
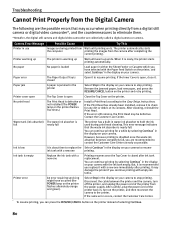
... the waste ink absorber becomes completely full, you replace it is defective or not installed (The POWER lamp on your camera. However, because printing is closed after completing the current printing. Select Stop in the display on the printer flashes five times.) Install a Print Head according to resume printing. Remove the jammed paper, load new paper, and...
... the waste ink absorber becomes completely full, you replace it is defective or not installed (The POWER lamp on your camera. However, because printing is closed after completing the current printing. Select Stop in the display on the printer flashes five times.) Install a Print Head according to resume printing. Remove the jammed paper, load new paper, and...
iP5000 Quick Start Guide
Page 88
... T-Shirt Transfers Envelopes Checking the Status of the Printer BJ Status Monitor Functions (Windows) Printer Setup Utility (Macintosh) Routine Maintenance Replacing an Ink Tank When Printing Becomes Faint or Colors are Incorrect Printing the Nozzle Check Pattern Print Head Cleaning Print Head Deep Cleaning Aligning the Print Head Cleaning the Inside of Contents Your printer's electronic User's Guide, located on the Setup Software...
... T-Shirt Transfers Envelopes Checking the Status of the Printer BJ Status Monitor Functions (Windows) Printer Setup Utility (Macintosh) Routine Maintenance Replacing an Ink Tank When Printing Becomes Faint or Colors are Incorrect Printing the Nozzle Check Pattern Print Head Cleaning Print Head Deep Cleaning Aligning the Print Head Cleaning the Inside of Contents Your printer's electronic User's Guide, located on the Setup Software...
iP5000 Quick Start Guide
Page 98
Index Print Head Deep Cleaning 57 Print Head Holder 45 Print Media to Avoid 3 Print Quality 17, 29, 67 Print Quality is Poor or Contains Errors 67 Printer Driver Setting for Media Type 14 Printer Properties dialog box 16, 28, 49, 68 Printing Borderless Photographs 38 Printing Photographs Directly from a Digital Camera .... 22 Printing the Nozzle Check Pattern 49 Printing with Macintosh 18 Printing with...
Index Print Head Deep Cleaning 57 Print Head Holder 45 Print Media to Avoid 3 Print Quality 17, 29, 67 Print Quality is Poor or Contains Errors 67 Printer Driver Setting for Media Type 14 Printer Properties dialog box 16, 28, 49, 68 Printing Borderless Photographs 38 Printing Photographs Directly from a Digital Camera .... 22 Printing the Nozzle Check Pattern 49 Printing with Macintosh 18 Printing with...
iP5000 Easy Setup Instructions
Page 2
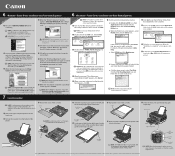
... instructions. 5 Follow the on -screen instructions. NOTE: Print head alignment will begin identifying the printer port being used. Double-click the Macintosh HD icon, then Applications folder. When the Printer List screen appears, select iP5000, then click the Utility icon. Ensure that letter size paper... X folder, then the Printer Driver folder. 3 Double-click the PIXMA iP5000 290.pkg icon, then follow on . If the printer is completed" screen appears, click OK. 10 Double-click on -screen instructions to change without notice. Long Edge Guide 6 Replace the cover of the cassette...
... instructions. 5 Follow the on -screen instructions. NOTE: Print head alignment will begin identifying the printer port being used. Double-click the Macintosh HD icon, then Applications folder. When the Printer List screen appears, select iP5000, then click the Utility icon. Ensure that letter size paper... X folder, then the Printer Driver folder. 3 Double-click the PIXMA iP5000 290.pkg icon, then follow on . If the printer is completed" screen appears, click OK. 10 Double-click on -screen instructions to change without notice. Long Edge Guide 6 Replace the cover of the cassette...


