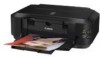
iP4700 series Getting Started
Page 2
...and other countries. • Macintosh and Mac are trademarks of Microsoft Corporation in the U.S. ■ Symbols Used in Windows. and/or other countries. • Windows Vista is a trademark or registered trademark of Apple Inc., registered in the U.S. and/or other countries. •... U.S. Be sure to complete. Indicates operations in Macintosh. • Microsoft is a registered trademark of Microsoft Corporation. • Windows is a trademark or registered trademark of Microsoft Corporation in the U.S. Instructions as notes for operations that take some time to read...
...and other countries. • Macintosh and Mac are trademarks of Microsoft Corporation in the U.S. ■ Symbols Used in Windows. and/or other countries. • Windows Vista is a trademark or registered trademark of Apple Inc., registered in the U.S. and/or other countries. •... U.S. Be sure to complete. Indicates operations in Macintosh. • Microsoft is a registered trademark of Microsoft Corporation. • Windows is a trademark or registered trademark of Microsoft Corporation in the U.S. Instructions as notes for operations that take some time to read...
iP4700 series Getting Started
Page 12
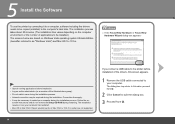
... instructions and do not remove the Setup CD-ROM during the installation process. In this screen appears. 1 Remove the USB cable connected to the printer before installation. • Log on - The installation resumes once your computer has restarted. • Mac OS 9, Mac OS X Classic environments..., or Mac OS X v.10.3.8 or earlier are based on Windows Vista operating system Ultimate Edition (hereafter referred to as the administrator (or a member of the drivers, this case, proceed from . 10 5 Install...
... instructions and do not remove the Setup CD-ROM during the installation process. In this screen appears. 1 Remove the USB cable connected to the printer before installation. • Log on - The installation resumes once your computer has restarted. • Mac OS 9, Mac OS X Classic environments..., or Mac OS X v.10.3.8 or earlier are based on Windows Vista operating system Ultimate Edition (hereafter referred to as the administrator (or a member of the drivers, this case, proceed from . 10 5 Install...
iP4700 series Getting Started
Page 13
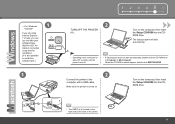
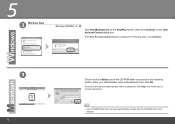
...Port is located on the computer, then insert the Setup CD-ROM into the CDROM drive. Make sure the printer is also possible to the computer with a USB cable. □ For Windows 1 Vista/XP If you are using Internet Explorer 7 or later, you can use the Web print software ...EasyWebPrint EX. When the CD-ROM contents appear, double-click MSETUP4.EXE. 2 Connect the printer to install this software later.) 1 1 2 3 456 2 ...
...Port is located on the computer, then insert the Setup CD-ROM into the CDROM drive. Make sure the printer is also possible to the computer with a USB cable. □ For Windows 1 Vista/XP If you are using Internet Explorer 7 or later, you can use the Web print software ...EasyWebPrint EX. When the CD-ROM contents appear, double-click MSETUP4.EXE. 2 Connect the printer to install this software later.) 1 1 2 3 456 2 ...
iP4700 series Getting Started
Page 14
5 3 Windows Vista Windows XP/2000 Click Run Msetup4.exe on the AutoPlay screen, then click Continue on the desktop. Enter your administrator name or password, click Help, then follow the onscreen instructions. • If the CD-ROM folder does not open automatically, double-click the CD-ROM icon on the User Account Control dialog box. If you do not know your administrator name and password, then click OK. If the User Account Control dialog box reappears in following steps, click Continue. 3 12 Double-click the Setup icon of the CD-ROM folder to proceed to the following screen.
5 3 Windows Vista Windows XP/2000 Click Run Msetup4.exe on the AutoPlay screen, then click Continue on the desktop. Enter your administrator name or password, click Help, then follow the onscreen instructions. • If the CD-ROM folder does not open automatically, double-click the CD-ROM icon on the User Account Control dialog box. If you do not know your administrator name and password, then click OK. If the User Account Control dialog box reappears in following steps, click Continue. 3 12 Double-click the Setup icon of the CD-ROM folder to proceed to the following screen.
iP4700 series Getting Started
Page 15
For Windows Vista/XP • If you are installed all together. Click Install. An internet connection is required for installation. (It is also possible to install, click Custom Install. The drivers, application software, and on -screen instructions to proceed with the installation. • If you can use the Web print software Easy-WebPrint EX. Follow any on -screen manuals are using Internet Explorer 7 or later, you want to select particular items to install this software later.) 13 1 2 3 456 4 5 Click Easy Install.
For Windows Vista/XP • If you are installed all together. Click Install. An internet connection is required for installation. (It is also possible to install, click Custom Install. The drivers, application software, and on -screen instructions to proceed with the installation. • If you can use the Web print software Easy-WebPrint EX. Follow any on -screen manuals are using Internet Explorer 7 or later, you want to select particular items to install this software later.) 13 1 2 3 456 4 5 Click Easy Install.
iP4700 series Getting Started
Page 16
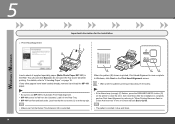
...Alignment is at the top right. • If the Alarm lamp (orange) (F) flashes, press the RESUME/CANCEL button (G) on the printer to "When Printing Becomes Faint or Colors Are Incorrect" in the on page 16. Load it so that the Output Tray Extension (D) is extended. • The pattern is... and load the MP-101 paper. After the installation is complete, perform Print Head Alignment by referring to clear the error, then click Next. In Windows, click Next on the Print Head Alignment screen. • Wait until the pattern printing ends (about 5 minutes). • Be sure to "6 ...
...Alignment is at the top right. • If the Alarm lamp (orange) (F) flashes, press the RESUME/CANCEL button (G) on the printer to "When Printing Becomes Faint or Colors Are Incorrect" in the on page 16. Load it so that the Output Tray Extension (D) is extended. • The pattern is... and load the MP-101 paper. After the installation is complete, perform Print Head Alignment by referring to clear the error, then click Next. In Windows, click Next on the Print Head Alignment screen. • Wait until the pattern printing ends (about 5 minutes). • Be sure to "6 ...
iP4700 series Getting Started
Page 22
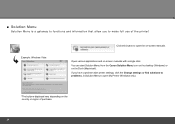
... Click this button to open My Printer (Windows only). *The buttons displayed vary depending on the country or region of the printer! ■ Solution Menu Solution Menu is a gateway to functions and information that allow you have a problem with a single click. If you to open the ...on the Dock (Macintosh). Open various applications and on-screen manuals with printer settings, click the Change settings or find solutions to problems. in Solution Menu to make full use of purchase. 20 You can start Solution Menu...
... Click this button to open My Printer (Windows only). *The buttons displayed vary depending on the country or region of the printer! ■ Solution Menu Solution Menu is a gateway to functions and information that allow you have a problem with a single click. If you to open the ...on the Dock (Macintosh). Open various applications and on-screen manuals with printer settings, click the Change settings or find solutions to problems. in Solution Menu to make full use of purchase. 20 You can start Solution Menu...

iP4700 series Getting Started
Page 24
..., the number of photo paper in the Rear Tray (A) in portrait orientation. Load a sheet of paper with the printing side facing up. For Windows: Printing will start printing. • For details on starting Solution Menu, refer to "Solution Menu" on page 20. • For more information..., refer to the on-screen manual: Advanced Guide. 22 • For details, refer to "6 Loading Paper" on Windows Vista. 1 2 3 4 A In Solution Menu, click OneClick to print borderless photos using 4" x 6" size Photo Paper Plus Glossy II. The screens are based ...
..., the number of photo paper in the Rear Tray (A) in portrait orientation. Load a sheet of paper with the printing side facing up. For Windows: Printing will start printing. • For details on starting Solution Menu, refer to "Solution Menu" on page 20. • For more information..., refer to the on-screen manual: Advanced Guide. 22 • For details, refer to "6 Loading Paper" on Windows Vista. 1 2 3 4 A In Solution Menu, click OneClick to print borderless photos using 4" x 6" size Photo Paper Plus Glossy II. The screens are based ...
iP4700 series Getting Started
Page 25
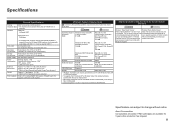
... 6 or later must Note: The on-screen manual may be displayed properly depending on a PC with Windows Vista, XP or 2000 pre-installed. • To upgrade from Windows XP to Windows Vista, first uninstall software bundled with the Canon inkjet printer. • Macintosh: Hard Disk must be formatted as Mac OS Extended (Journaled) or Mac OS...
... 6 or later must Note: The on-screen manual may be displayed properly depending on a PC with Windows Vista, XP or 2000 pre-installed. • To upgrade from Windows XP to Windows Vista, first uninstall software bundled with the Canon inkjet printer. • Macintosh: Hard Disk must be formatted as Mac OS Extended (Journaled) or Mac OS...


