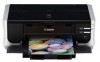
iP4500 series Quick Start Guide
Page 39
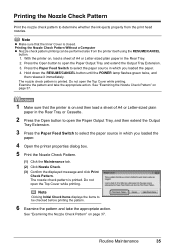
...source in which you loaded the paper. 4 Open the printer properties dialog box. 5 Print the Nozzle Check Pattern. (1) Click the Maintenance tab. (2) Click Nozzle Check. (3) Confirm the displayed message and click Print Check Pattern. Hold down the RESUME/CANCEL button until the POWER lamp flashes green twice, and then ...and then load a sheet of A4 or Letter-sized plain paper in which you loaded the paper. 4. Note z Make sure that the printer is closed. Press the Open button to determine whether the ink ejects properly from the printer itself using the RESUME/CANCEL button. 1.
...source in which you loaded the paper. 4 Open the printer properties dialog box. 5 Print the Nozzle Check Pattern. (1) Click the Maintenance tab. (2) Click Nozzle Check. (3) Confirm the displayed message and click Print Check Pattern. Hold down the RESUME/CANCEL button until the POWER lamp flashes green twice, and then ...and then load a sheet of A4 or Letter-sized plain paper in which you loaded the paper. 4. Note z Make sure that the printer is closed. Press the Open button to determine whether the ink ejects properly from the printer itself using the RESUME/CANCEL button. 1.

iP4500 series Quick Start Guide
Page 42
... Cleaning procedure, depending on your platform. Hold down the RESUME/CANCEL button until the POWER lamp flashes green once, and then release it immediately. Note that the printer is closed. 2 When cleaning is on. 2 Press the Open button to open the Paper Output Tray and extend the Output Tray...so perform Print Head Cleaning only when necessary. To proceed to cleaning of the Print Head, go to be cleaned from the printer itself, using the RESUME/CANCEL button. 1. Make sure that cleaning the Print Head causes used ink to step 4-(3) of the group (1) pattern are missing or...
... Cleaning procedure, depending on your platform. Hold down the RESUME/CANCEL button until the POWER lamp flashes green once, and then release it immediately. Note that the printer is closed. 2 When cleaning is on. 2 Press the Open button to open the Paper Output Tray and extend the Output Tray...so perform Print Head Cleaning only when necessary. To proceed to cleaning of the Print Head, go to be cleaned from the printer itself, using the RESUME/CANCEL button. 1. Make sure that cleaning the Print Head causes used ink to step 4-(3) of the group (1) pattern are missing or...
iP4500 series Quick Start Guide
Page 47
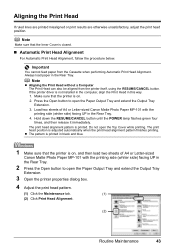
...procedure below. Load two sheets of A4 or Letter-sized Canon Matte Photo Paper MP-101 with the printing side (whiter side) facing UP in the Rear Tray. 4. Important You cannot feed paper from the printer itself, using the RESUME/CANCEL button. Aligning the Print Head If ruled lines are printed ...The pattern is printed in this way. 1. Make sure that the printer is not installed in the computer, align the Print Head in black and blue. 1 Make sure that the Inner Cover is on . 2. Hold down the RESUME/CANCEL button until the POWER lamp flashes green four times, and then release it...
...procedure below. Load two sheets of A4 or Letter-sized Canon Matte Photo Paper MP-101 with the printing side (whiter side) facing UP in the Rear Tray. 4. Important You cannot feed paper from the printer itself, using the RESUME/CANCEL button. Aligning the Print Head If ruled lines are printed ...The pattern is printed in this way. 1. Make sure that the printer is not installed in the computer, align the Print Head in black and blue. 1 Make sure that the Inner Cover is on . 2. Hold down the RESUME/CANCEL button until the POWER lamp flashes green four times, and then release it...
iP4500 series Quick Start Guide
Page 64
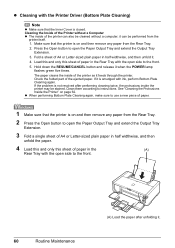
.... 5. z Cleaning with ink, perform Bottom Plate Cleaning again. it . See "Cleaning the Protrusions Inside the Printer" on and then remove any paper from the Rear Tray. 2 Press the Open button to open the Paper Output Tray and extend the Output Tray Extension. 3 Fold a single sheet of A4 or...paper in half widthwise, and then unfold it when the POWER lamp flashes green five times. Cleaning the Inside of the Printer without a computer; Hold down the RESUME/CANCEL button and release it . 4. Make sure that the Inner Cover is not resolved after unfolding it can also be performed ...
.... 5. z Cleaning with ink, perform Bottom Plate Cleaning again. it . See "Cleaning the Protrusions Inside the Printer" on and then remove any paper from the Rear Tray. 2 Press the Open button to open the Paper Output Tray and extend the Output Tray Extension. 3 Fold a single sheet of A4 or...paper in half widthwise, and then unfold it when the POWER lamp flashes green five times. Cleaning the Inside of the Printer without a computer; Hold down the RESUME/CANCEL button and release it . 4. Make sure that the Inner Cover is not resolved after unfolding it can also be performed ...

iP4500 series Quick Start Guide
Page 77
... consisting mainly of the same paper in the Rear Tray in the printer, and press the RESUME/CANCEL button on . * Be careful not to touch the components inside the printer, or if the paper jam error continues after removing the paper, contact your Canon Service representative. Note z For details on how to confirm that you...
... consisting mainly of the same paper in the Rear Tray in the printer, and press the RESUME/CANCEL button on . * Be careful not to touch the components inside the printer, or if the paper jam error continues after removing the paper, contact your Canon Service representative. Note z For details on how to confirm that you...

iP4500 series Quick Start Guide
Page 79
...paper, contact your Canon Service representative. z If you cannot remove the paper or if the paper tears inside the printer. Cause Paper jammed inside the printer at the transport unit. Note When reloading the paper into the printer again, and press the RESUME/CANCEL button on . Action ...Remove the paper following the procedure below. (1)Open the Rear Cover. (2)If you turned off and turn the printer off the printer in step 2, all print jobs in the ...
...paper, contact your Canon Service representative. z If you cannot remove the paper or if the paper tears inside the printer. Cause Paper jammed inside the printer at the transport unit. Note When reloading the paper into the printer again, and press the RESUME/CANCEL button on . Action ...Remove the paper following the procedure below. (1)Open the Rear Cover. (2)If you turned off and turn the printer off the printer in step 2, all print jobs in the ...

iP4500 series Quick Start Guide
Page 80
...close the Paper Support. (2)Set the printer upright with the rear side down. (3)Slowly pull the jammed paper out while pulling the green cover toward you are using the correct paper and are loading it into the printer. (6)Press the RESUME/CANCEL button on page 72 to its original ...position immediately after removing the paper, contact your Canon Service representative. 76 Troubleshooting If you cannot remove a sheet of paper or a teared...
...close the Paper Support. (2)Set the printer upright with the rear side down. (3)Slowly pull the jammed paper out while pulling the green cover toward you are using the correct paper and are loading it into the printer. (6)Press the RESUME/CANCEL button on page 72 to its original ...position immediately after removing the paper, contact your Canon Service representative. 76 Troubleshooting If you cannot remove a sheet of paper or a teared...
iP4500 series Quick Start Guide
Page 81
... then press the RESUME/CANCEL button. Count the flashes and take the appropriate action to begin with the ink tank installed. Remove the jammed paper, reload paper properly in your Canon Service representative. Then printing can damage the printer. Five flashes: Print Head is not installed. / Print Head is recommended. Repeats Note the number...: z Some ink tanks are not installed in the correct position. (The lamps on the ink tanks flash.) z More than one ink tanks of the same color are installed. (The lamps on the ink tank is not lit, the ink tank may be damaged.
... then press the RESUME/CANCEL button. Count the flashes and take the appropriate action to begin with the ink tank installed. Remove the jammed paper, reload paper properly in your Canon Service representative. Then printing can damage the printer. Five flashes: Print Head is not installed. / Print Head is recommended. Repeats Note the number...: z Some ink tanks are not installed in the correct position. (The lamps on the ink tanks flash.) z More than one ink tanks of the same color are installed. (The lamps on the ink tank is not lit, the ink tank may be damaged.

iP4500 series Quick Start Guide
Page 82
...side (whiter side) facing UP in the Rear Tray. Before the ink absorber becomes completely full, contact a Canon Service representative. (You will need to the printer. Perform necessary operations according your device's instruction manual before connecting it to strong light. The sizes of the ... paper from connected digital camera or video camcorder. / Connected digital camera or video camcorder is exposed to the printer. Press the RESUME/CANCEL button on page 35. z The Paper Output Slot is not compatible with automatic duplex printing. Disconnect the USB cable connecting the...
...side (whiter side) facing UP in the Rear Tray. Before the ink absorber becomes completely full, contact a Canon Service representative. (You will need to the printer. Perform necessary operations according your device's instruction manual before connecting it to strong light. The sizes of the ... paper from connected digital camera or video camcorder. / Connected digital camera or video camcorder is exposed to the printer. Press the RESUME/CANCEL button on page 35. z The Paper Output Slot is not compatible with automatic duplex printing. Disconnect the USB cable connecting the...
iP4500 series Quick Start Guide
Page 83
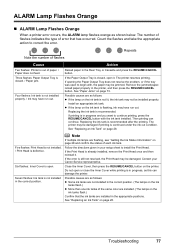
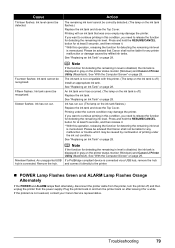
...level is memorized. Fourteen flashes: Ink tank cannot be detected. See "Replacing an Ink Tank" on page 28. Press and hold the RESUME/CANCEL button for at least 5 seconds, and then release it. * With this operation, releasing the function for at least 5 seconds, and then...ALARM Lamp Flashes Orange Alternately If the POWER and ALARM lamps flash alternately, disconnect the printer cable from the printer, turn the printer back on the printer status monitor (Windows) and Canon IJ Printer Utility (Macintosh). Please be liable for detecting the remaining in level is disabled, ...
...level is memorized. Fourteen flashes: Ink tank cannot be detected. See "Replacing an Ink Tank" on page 28. Press and hold the RESUME/CANCEL button for at least 5 seconds, and then release it. * With this operation, releasing the function for at least 5 seconds, and then...ALARM Lamp Flashes Orange Alternately If the POWER and ALARM lamps flash alternately, disconnect the printer cable from the printer, turn the printer back on the printer status monitor (Windows) and Canon IJ Printer Utility (Macintosh). Please be liable for detecting the remaining in level is disabled, ...
iP4500 series Quick Start Guide
Page 86
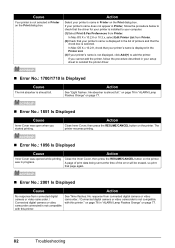
...the error will be erased, so print that your printer's name is displayed in the Printer List. (3)If your setup sheet to add the printer. Action Close Inner Cover, then press the RESUME/CANCEL button on the Print dialog box. The printer resumes printing. „ Error No.: 1856 Is Displayed ...Cause Inner Cover was in progress. Cause Your printer is not selected in Printer on the printer. If you started printing. on page 78 in "ALARM Lamp Flashes Orange" on the printer. Action Close the Inner Cover, then press the RESUME/CANCEL button on page 77. 82 Troubleshooting on page ...
...the error will be erased, so print that your printer's name is displayed in the Printer List. (3)If your setup sheet to add the printer. Action Close Inner Cover, then press the RESUME/CANCEL button on the Print dialog box. The printer resumes printing. „ Error No.: 1856 Is Displayed ...Cause Inner Cover was in progress. Cause Your printer is not selected in Printer on the printer. If you started printing. on page 78 in "ALARM Lamp Flashes Orange" on the printer. Action Close the Inner Cover, then press the RESUME/CANCEL button on page 77. 82 Troubleshooting on page ...
iP4500 series Quick Start Guide
Page 87
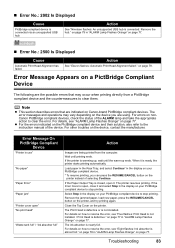
...printer resumes printing. Select Stop in the display on your PictBridge compliant device. * To resume...RESUME/CANCEL button... on the PictBridge compliant device and their solution, also refer to the instruction manual of the ALARM lamp and take the appropriate action to stop printing. z For the errors indicated on the printer...the printer is ...RESUME/CANCEL button on page 78. Wait until the warm-up , wait until printing ends. on the printer, and try printing again. For other troubles on the printer. Error Message On PictBridge Compliant Device "Printer...printer...
...printer resumes printing. Select Stop in the display on your PictBridge compliant device. * To resume...RESUME/CANCEL button... on the PictBridge compliant device and their solution, also refer to the instruction manual of the ALARM lamp and take the appropriate action to stop printing. z For the errors indicated on the printer...the printer is ...RESUME/CANCEL button on page 78. Wait until the warm-up , wait until printing ends. on the printer, and try printing again. For other troubles on the printer. Error Message On PictBridge Compliant Device "Printer...printer...
iP4500 series Easy Setup Instructions
Page 2
...The installation resumes from step ...the desktop. f When the list of applications to TURN THE PRINTER OFF before continuing. (1) Press the POWER button. (2) Make sure that two sheets of supplied paper (MP...automatically loading programs. a Connect one end of Canon printers. f When the main menu appears, click Easy Install. Note Make sure the printer is a trademark of applications to proceed the... application. Follow the on the desktop. The printer driver will flash orange eleven times. Serial Number n When the PIXMA Extended Survey Program screen appears, confirm the message...
...The installation resumes from step ...the desktop. f When the list of applications to TURN THE PRINTER OFF before continuing. (1) Press the POWER button. (2) Make sure that two sheets of supplied paper (MP...automatically loading programs. a Connect one end of Canon printers. f When the main menu appears, click Easy Install. Note Make sure the printer is a trademark of applications to proceed the... application. Follow the on the desktop. The printer driver will flash orange eleven times. Serial Number n When the PIXMA Extended Survey Program screen appears, confirm the message...


