iP4500 series Quick Start Guide
Page 5
... Routine Maintenance 28 Replacing an Ink Tank 28 Keeping the Best Printing Results 33 When Printing Becomes Faint or Colors Are Incorrect 34 Printing the Nozzle Check Pattern 35 Examining the Nozzle Check Pattern ...........37 Print Head Cleaning 38 Print Head Deep Cleaning 41 Aligning the Print Head 43 Cleaning Your Printer 57 Troubleshooting 63...
... Routine Maintenance 28 Replacing an Ink Tank 28 Keeping the Best Printing Results 33 When Printing Becomes Faint or Colors Are Incorrect 34 Printing the Nozzle Check Pattern 35 Examining the Nozzle Check Pattern ...........37 Print Head Cleaning 38 Print Head Deep Cleaning 41 Aligning the Print Head 43 Cleaning Your Printer 57 Troubleshooting 63...
iP4500 series Quick Start Guide
Page 32
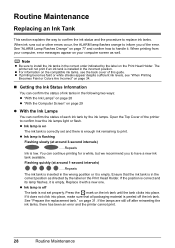
...Computer Screen" on The ink tank is correctly set properly. Routine Maintenance Replacing an Ink Tank This section explains the way to confirm the ink status and the procedure to have a new ink tank available. The printer will not print if an ink tank is not set and...ink tanks, see "When Printing Becomes Faint or Colors Are Incorrect" on the ink tank until the tank clicks into place, make sure that the ink tank is enough ink remaining to confirm how the ink lamps light or flash. When ink runs out or other errors occur, the ALARM lamp flashes orange to inform you to replace ink tanks...
...Computer Screen" on The ink tank is correctly set properly. Routine Maintenance Replacing an Ink Tank This section explains the way to confirm the ink status and the procedure to have a new ink tank available. The printer will not print if an ink tank is not set and...ink tanks, see "When Printing Becomes Faint or Colors Are Incorrect" on the ink tank until the tank clicks into place, make sure that the ink tank is enough ink remaining to confirm how the ink lamps light or flash. When ink runs out or other errors occur, the ALARM lamp flashes orange to inform you to replace ink tanks...
iP4500 series Quick Start Guide
Page 34
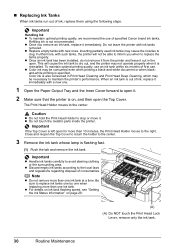
... the Inner Cover forward to replace the tanks properly. z Replace empty tanks with ink tanks removed. Color ink is on page 28. (A) (A) Do NOT touch the Print Head Lock Lever; „ Replacing Ink Tanks When ink tanks run out of consumables. Important Handling Ink z To maintain optimal printing quality, we recommend the use . z Discard empty ink tanks according to maintain the printer's performance. Important If the Top...
... the Inner Cover forward to replace the tanks properly. z Replace empty tanks with ink tanks removed. Color ink is on page 28. (A) (A) Do NOT touch the Print Head Lock Lever; „ Replacing Ink Tanks When ink tanks run out of consumables. Important Handling Ink z To maintain optimal printing quality, we recommend the use . z Discard empty ink tanks according to maintain the printer's performance. Important If the Top...
iP4500 series Quick Start Guide
Page 35
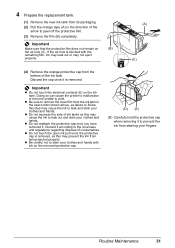
.... (3) Remove the film (B) completely. Important Make sure that the protective film does not remain on the ink tank. 4 Prepare the replacement tank. (1) Remove the new ink tank from its packaging. (2) Pull the orange tape (A) in the exact order shown above, as this step may ...cause the ink to leak out and stain your fingers. Important z Do not touch the electrical contacts (E) on (B) the air hole (C). Doing so can cause the printer...
.... (3) Remove the film (B) completely. Important Make sure that the protective film does not remain on the ink tank. 4 Prepare the replacement tank. (1) Remove the new ink tank from its packaging. (2) Pull the orange tape (A) in the exact order shown above, as this step may ...cause the ink to leak out and stain your fingers. Important z Do not touch the electrical contacts (E) on (B) the air hole (C). Doing so can cause the printer...
iP4500 series Quick Start Guide
Page 36
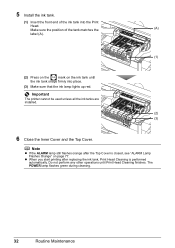
... during cleaning. 32 Routine Maintenance Important The printer cannot be used unless all the ink tanks are installed. (2) (3) 6 Close the Inner Cover and the Top Cover. z When you start printing after the Top Cover is performed automatically. Note z If the ALARM lamp still flashes orange after replacing the ink tank, Print Head Cleaning is closed, see...
... during cleaning. 32 Routine Maintenance Important The printer cannot be used unless all the ink tanks are installed. (2) (3) 6 Close the Inner Cover and the Top Cover. z When you start printing after the Top Cover is performed automatically. Note z If the ALARM lamp still flashes orange after replacing the ink tank, Print Head Cleaning is closed, see...
iP4500 series Quick Start Guide
Page 38
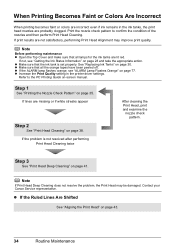
...sure that all the orange tapes have been peeled off. See "Replacing Ink Tanks" on page 35. Step 1 See "Printing the Nozzle Check...ink tanks are lit red. When Printing Becomes Faint or Colors Are Incorrect When printing becomes faint or colors are incorrect even if ink remains in the printer... driver settings. If print results are not satisfactory, performing Print Head Alignment may be damaged. Refer to confirm the condition of the nozzles and then perform Print Head Cleaning. If the problem is set properly. Contact your Canon...
...sure that all the orange tapes have been peeled off. See "Replacing Ink Tanks" on page 35. Step 1 See "Printing the Nozzle Check...ink tanks are lit red. When Printing Becomes Faint or Colors Are Incorrect When printing becomes faint or colors are incorrect even if ink remains in the printer... driver settings. If print results are not satisfactory, performing Print Head Alignment may be damaged. Refer to confirm the condition of the nozzles and then perform Print Head Cleaning. If the problem is set properly. Contact your Canon...
iP4500 series Quick Start Guide
Page 41
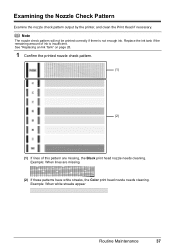
...by the printer, and clean the Print Head if necessary. Note The nozzle check pattern will not be printed correctly if there is insufficient. Replace the ink tank if the remaining amount of this pattern are missing (2) If these patterns have white streaks, the Color print head ...nozzle needs cleaning. Example: When white streaks appear Routine Maintenance 37 See "Replacing an Ink Tank" on page 28. 1 Confirm...
...by the printer, and clean the Print Head if necessary. Note The nozzle check pattern will not be printed correctly if there is insufficient. Replace the ink tank if the remaining amount of this pattern are missing (2) If these patterns have white streaks, the Color print head ...nozzle needs cleaning. Example: When white streaks appear Routine Maintenance 37 See "Replacing an Ink Tank" on page 28. 1 Confirm...

iP4500 series Quick Start Guide
Page 43
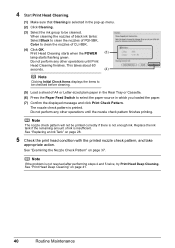
.... Replace the ink tank if the remaining amount of ink is printed. Note Clicking Initial Check Items displays the items to be printed correctly if there is not enough ink. See "Replacing an Ink Tank" on... takes about 60 seconds. When cleaning the nozzles of black ink tanks: Select Black to clean the nozzles of PGI-5BK, Color to be cleaned. See "Print Head Deep Cleaning" on page...Feed Switch to open the Paper Output Tray and extend the Output Tray Extension. 3 Open the Canon IJ Printer Utility dialog box. See "Examining the Nozzle Check Pattern" on page 41. 4 Start Print Head...
.... Replace the ink tank if the remaining amount of ink is printed. Note Clicking Initial Check Items displays the items to be printed correctly if there is not enough ink. See "Replacing an Ink Tank" on... takes about 60 seconds. When cleaning the nozzles of black ink tanks: Select Black to clean the nozzles of PGI-5BK, Color to be cleaned. See "Print Head Deep Cleaning" on page...Feed Switch to open the Paper Output Tray and extend the Output Tray Extension. 3 Open the Canon IJ Printer Utility dialog box. See "Examining the Nozzle Check Pattern" on page 41. 4 Start Print Head...
iP4500 series Quick Start Guide
Page 44
... of PGI-5BK, Color to be checked before cleaning. (5) Load a sheet of ink is not resolved after performing steps 4 and 5 twice, try Print Head Deep Cleaning. This takes about 60 seconds. (4) Note Clicking Initial Check Items displays the items to be cleaned. See "Replacing an Ink Tank" on page 28.... 5 Check the print head condition with the printed nozzle check pattern, and take appropriate action. Note If the problem is insufficient. Replace the ink tank if the remaining amount of A4 or Letter-sized plain paper in the Rear Tray or Cassette. (6) Press the Paper Feed Switch...
... of PGI-5BK, Color to be checked before cleaning. (5) Load a sheet of ink is not resolved after performing steps 4 and 5 twice, try Print Head Deep Cleaning. This takes about 60 seconds. (4) Note Clicking Initial Check Items displays the items to be cleaned. See "Replacing an Ink Tank" on page 28.... 5 Check the print head condition with the printed nozzle check pattern, and take appropriate action. Note If the problem is insufficient. Replace the ink tank if the remaining amount of A4 or Letter-sized plain paper in the Rear Tray or Cassette. (6) Press the Paper Feed Switch...
iP4500 series Quick Start Guide
Page 45
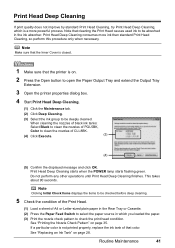
...POWER lamp starts flashing green. See "Printing the Nozzle Check Pattern" on page 28. If a particular color is not printed properly, replace the ink tank of that the printer is a more ink than standard Print Head Cleaning, so perform this procedure only when necessary. Note that cleaning the Print ...Deep Cleaning consumes more powerful process. This takes about 90 seconds. See "Replacing an Ink Tank" on page 35. When cleaning the nozzles of black ink tanks: Select Black to clean the nozzles of PGI-5BK, Color to clean the nozzles of A4 or Letter-sized plain paper in the...
...POWER lamp starts flashing green. See "Printing the Nozzle Check Pattern" on page 28. If a particular color is not printed properly, replace the ink tank of that the printer is a more ink than standard Print Head Cleaning, so perform this procedure only when necessary. Note that cleaning the Print ...Deep Cleaning consumes more powerful process. This takes about 90 seconds. See "Replacing an Ink Tank" on page 35. When cleaning the nozzles of black ink tanks: Select Black to clean the nozzles of PGI-5BK, Color to clean the nozzles of A4 or Letter-sized plain paper in the...
iP4500 series Quick Start Guide
Page 46
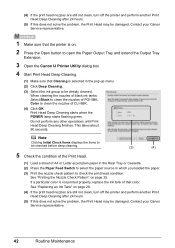
... When cleaning the nozzles of black ink tanks: Select Black to clean the nozzles of PGI-5BK, Color to check the print head condition. See "Replacing an Ink Tank" on page 28. (4) If the print head nozzles are still not clean, turn off the printer and perform another Print Head Deep ... the nozzles of that Cleaning is not printed properly, replace the ink tank of CLI-8BK. (4) Click OK. Print Head Deep Cleaning starts when the POWER lamp starts flashing green. Contact your Canon Service representative. 1 Make sure that the printer is on page 35. This takes about 90 seconds....
... When cleaning the nozzles of black ink tanks: Select Black to clean the nozzles of PGI-5BK, Color to check the print head condition. See "Replacing an Ink Tank" on page 28. (4) If the print head nozzles are still not clean, turn off the printer and perform another Print Head Deep ... the nozzles of that Cleaning is not printed properly, replace the ink tank of CLI-8BK. (4) Click OK. Print Head Deep Cleaning starts when the POWER lamp starts flashing green. Contact your Canon Service representative. 1 Make sure that the printer is on page 35. This takes about 90 seconds....
iP4500 series Quick Start Guide
Page 74
.... Make sure that the ink tanks are deleted. (1)Click the printer icon in the Dock to "Opening the Printer Properties Dialog Box Directly from Control Panel" in the appropriate positions. Open the Top Cover and check the ink lamps. Confirm that the power cord is no connected. See "Replacing an Ink Tank" on page 28. Ink tank is fully inserted...
.... Make sure that the ink tanks are deleted. (1)Click the printer icon in the Dock to "Opening the Printer Properties Dialog Box Directly from Control Panel" in the appropriate positions. Open the Top Cover and check the ink lamps. Confirm that the power cord is no connected. See "Replacing an Ink Tank" on page 28. Ink tank is fully inserted...
iP4500 series Quick Start Guide
Page 81
...to install the Print Head. Four flashes: Ink tank is not lit, the ink tank may be damaged if printing is in your Canon Service representative. If the Paper Output Tray is flashing, ink may be damaged. The printer resumes printing. Remove the jammed paper, ... the lamp on the ink tanks flash.) z More than one ink tanks of each ink tank. Replacing the ink tank is closed , open . Replacing the ink tank is not installed in the correct position. (The lamps on the ink tank is closed . / Paper jam. The printer may have run out. See "Replacing an Ink Tank" on page 73. ...
...to install the Print Head. Four flashes: Ink tank is not lit, the ink tank may be damaged if printing is in your Canon Service representative. If the Paper Output Tray is flashing, ink may be damaged. The printer resumes printing. Remove the jammed paper, ... the lamp on the ink tanks flash.) z More than one ink tanks of each ink tank. Replacing the ink tank is closed , open . Replacing the ink tank is not installed in the correct position. (The lamps on the ink tank is closed . / Paper jam. The printer may have run out. See "Replacing an Ink Tank" on page 73. ...
iP4500 series Quick Start Guide
Page 83
... you want to release the function for detecting the remaining ink level is displayed in level is disabled, the ink tank is memorized. See "Replacing an Ink Tank" on page 29. Fourteen flashes: Ink tank cannot be correctly detected. (The lamp on the printer status monitor (Windows) and Canon IJ Printer Utility (Macintosh). See "With the Computer Screen" on page 28...
... you want to release the function for detecting the remaining ink level is displayed in level is disabled, the ink tank is memorized. See "Replacing an Ink Tank" on page 29. Fourteen flashes: Ink tank cannot be correctly detected. (The lamp on the printer status monitor (Windows) and Canon IJ Printer Utility (Macintosh). See "With the Computer Screen" on page 28...

iP4500 series Quick Start Guide
Page 88
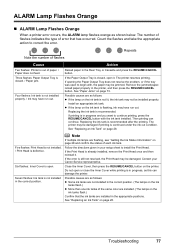
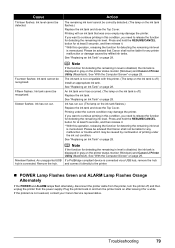
... PictBridge compliant device to resolve the error, see "Thirteen flashes: Ink level cannot be detected." If the same error occurs, contact your Canon Service representative. 84 Troubleshooting Replace the ink tank. An ink tank that was once empty is not installed properly or empty. Ink tank errors have occurred. (Printer POWER lamp flashes green and ALARM lamp flashes orange alternately...
... PictBridge compliant device to resolve the error, see "Thirteen flashes: Ink level cannot be detected." If the same error occurs, contact your Canon Service representative. 84 Troubleshooting Replace the ink tank. An ink tank that was once empty is not installed properly or empty. Ink tank errors have occurred. (Printer POWER lamp flashes green and ALARM lamp flashes orange alternately...
iP4500 series Quick Start Guide
Page 98
... Center or ASF technician will be corrected over the telephone, and you elect the InstantExchange option, a reference number will attempt to change without charge by Canon USA. If the problem cannot be issued to you receive may be a refurbished or reconditioned unit and will be obtained from state to state. * Support... its reasonable control. DO NOT INCLUDE ANY OTHER ITEMS WITH THE YOUR PRODUCT IN THE RETURN SHIPPING CARTON, AND BE SURE TO RETAIN YOUR PRINTHEAD, INK CARTRIDGE(S) AND TANK(S). NOTE THAT BY USING THIS SERVICE YOU WILL KEEP THE REPLACEMENT PRODUCT THAT IS SENT TO YOU.
... Center or ASF technician will be corrected over the telephone, and you elect the InstantExchange option, a reference number will attempt to change without charge by Canon USA. If the problem cannot be issued to you receive may be a refurbished or reconditioned unit and will be obtained from state to state. * Support... its reasonable control. DO NOT INCLUDE ANY OTHER ITEMS WITH THE YOUR PRODUCT IN THE RETURN SHIPPING CARTON, AND BE SURE TO RETAIN YOUR PRINTHEAD, INK CARTRIDGE(S) AND TANK(S). NOTE THAT BY USING THIS SERVICE YOU WILL KEEP THE REPLACEMENT PRODUCT THAT IS SENT TO YOU.

iP4500 series Quick Start Guide
Page 100
...Limited Warranty - Only 92 Cleaning exterior 57 inside 59 protrusions inside the printer 62 roller 57 I Ink Lamp ink level indication on the computer 29 ink level indication on the printer 28 L Loading Printing Paper Cassette 14 envelopes 17 Rear Tray 12 ... Replacing Ink Tanks 30 ink status information 28 Routine Maintenance 28 replacing ink tanks 30 S Safety Precautions 89 Specialty Media 4 Specifications general 87 PictBridge 87 System Requirements 88 T Troubleshooting 63 Turning off the Printer 3 Turning on the Printer 2 96 U.S. Index A Appendix 85 B Before Using the Printer 2 C Canon ...
...Limited Warranty - Only 92 Cleaning exterior 57 inside 59 protrusions inside the printer 62 roller 57 I Ink Lamp ink level indication on the computer 29 ink level indication on the printer 28 L Loading Printing Paper Cassette 14 envelopes 17 Rear Tray 12 ... Replacing Ink Tanks 30 ink status information 28 Routine Maintenance 28 replacing ink tanks 30 S Safety Precautions 89 Specialty Media 4 Specifications general 87 PictBridge 87 System Requirements 88 T Troubleshooting 63 Turning off the Printer 3 Turning on the Printer 2 96 U.S. Index A Appendix 85 B Before Using the Printer 2 C Canon ...


