
iP4500 series Quick Start Guide
Page 4
... a trademark of your application. All statements, technical information and recommendations in this manual and in order that this manual may differ. z "Windows Vista" is copyrighted by Canon U.S.A., Inc. Disclaimer Canon U.S.A., Inc. Depending on your Canon PIXMA iP4500 series Photo Printer. The steps described in this manual thoroughly in any form, in whole or in Windows Vista™ operating system...
... a trademark of your application. All statements, technical information and recommendations in this manual and in order that this manual may differ. z "Windows Vista" is copyrighted by Canon U.S.A., Inc. Disclaimer Canon U.S.A., Inc. Depending on your Canon PIXMA iP4500 series Photo Printer. The steps described in this manual thoroughly in any form, in whole or in Windows Vista™ operating system...
iP4500 series Quick Start Guide
Page 5
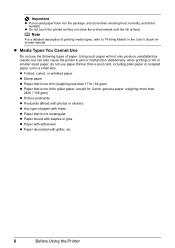
...Maintenance 28 Replacing an Ink Tank 28 Keeping the Best Printing Results 33 When Printing Becomes Faint or Colors Are Incorrect 34 Printing the Nozzle Check Pattern 35 Examining the Nozzle Check Pattern ...........37 Print Head ... Paper Does Not Feed Properly 72 Paper Does Not Feed from the Paper Source Specified in the Printer Driver 72 Paper Jams 73 ALARM Lamp Flashes Orange 77 Error Message Appears on the Computer Screen ... How to Use the Documentation Provided.....85 Reading the On-screen Manuals 86 Specifications 87 Safety Precautions 89 Users in the U.S.A 92 Index 96 1
...Maintenance 28 Replacing an Ink Tank 28 Keeping the Best Printing Results 33 When Printing Becomes Faint or Colors Are Incorrect 34 Printing the Nozzle Check Pattern 35 Examining the Nozzle Check Pattern ...........37 Print Head ... Paper Does Not Feed Properly 72 Paper Does Not Feed from the Paper Source Specified in the Printer Driver 72 Paper Jams 73 ALARM Lamp Flashes Orange 77 Error Message Appears on the Computer Screen ... How to Use the Documentation Provided.....85 Reading the On-screen Manuals 86 Specifications 87 Safety Precautions 89 Users in the U.S.A 92 Index 96 1
iP4500 series Quick Start Guide
Page 6
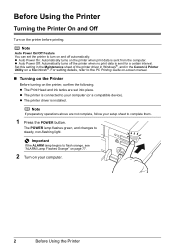
... Printer z Auto Power On: Automatically turns on and off the printer when no print data is installed. Note If preparatory operations above are set the printer... to flash orange, see "ALARM Lamp Flashes Orange" on page 77. 2 Turn on the printer, confirm the following. z The printer is ... begins to turn on the printer when print data is connected to complete them. 1 Press the POWER button. z The printer driver is sent for a ... the Maintenance sheet of the printer driver in Windows®, and in the Canon IJ Printer Utility on the printer before printing. Note Auto Power...
... Printer z Auto Power On: Automatically turns on and off the printer when no print data is installed. Note If preparatory operations above are set the printer... to flash orange, see "ALARM Lamp Flashes Orange" on page 77. 2 Turn on the printer, confirm the following. z The printer is ... begins to turn on the printer when print data is connected to complete them. 1 Press the POWER button. z The printer driver is sent for a ... the Maintenance sheet of the printer driver in Windows®, and in the Canon IJ Printer Utility on the printer before printing. Note Auto Power...
iP4500 series Quick Start Guide
Page 9
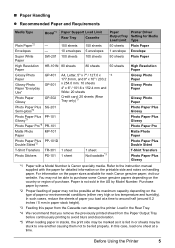
... z Recommended Paper and Requirements Media Type Plain Paper*2 Model*1 Paper Support Load Limit Rear Tray Cassette - 150 sheets 150 sheets Paper Printer Driver Output Tray Setting for Media Load Limit Type 50 sheets Plain Paper Envelopes - 10 envelopes 5 envelopes 1 envelope Envelope Super White Paper... 1 sheet 1 sheet Not loadable*3 T-Shirt Transfers Photo Paper Plus Glossy *1 Paper with the paper for each Canon genuine paper, visit our website. Refer to the instruction manual supplied with a Model Number is fed in the US by name. *2 Proper feeding of paper may be fed...
... z Recommended Paper and Requirements Media Type Plain Paper*2 Model*1 Paper Support Load Limit Rear Tray Cassette - 150 sheets 150 sheets Paper Printer Driver Output Tray Setting for Media Load Limit Type 50 sheets Plain Paper Envelopes - 10 envelopes 5 envelopes 1 envelope Envelope Super White Paper... 1 sheet 1 sheet Not loadable*3 T-Shirt Transfers Photo Paper Plus Glossy *1 Paper with the paper for each Canon genuine paper, visit our website. Refer to the instruction manual supplied with a Model Number is fed in the US by name. *2 Proper feeding of paper may be fed...
iP4500 series Quick Start Guide
Page 10
... affixed with photos or stickers z Any type of paper with glitter, etc. 6 Before Using the Printer Additionally, when printing on A5 or smaller sized paper, do not use the following types of printing ...media types, refer to "Printing Media" in the User's Guide onscreen manual. z Folded, curled, or wrinkled paper z Damp paper z Paper that is too thin (weighing less ...than 17 lb / 64 gsm) z Paper that is too thick (plain paper, except for Canon genuine paper, weighing more than a post card, including plain paper or notepad paper cut to jam or...
... affixed with photos or stickers z Any type of paper with glitter, etc. 6 Before Using the Printer Additionally, when printing on A5 or smaller sized paper, do not use the following types of printing ...media types, refer to "Printing Media" in the User's Guide onscreen manual. z Folded, curled, or wrinkled paper z Damp paper z Paper that is too thin (weighing less ...than 17 lb / 64 gsm) z Paper that is too thick (plain paper, except for Canon genuine paper, weighing more than a post card, including plain paper or notepad paper cut to jam or...
iP4500 series Quick Start Guide
Page 11
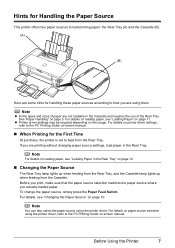
...Cassette lamp lights up when feeding from the Rear Tray. For details on -screen manual. „ When Printing for handling these paper sources according to how you are some hints for the First Time At purchase, the printer is set to load printing paper; the Rear Tray (A) and the Cassette (B)....Using the Printer 7 Before you print, make sure that the paper source selection matches the paper source where you are not loadable in the Cassette and requires the use of paper are printing without changing paper source settings, load paper in the Rear Tray" on -screen manual. For ...
...Cassette lamp lights up when feeding from the Rear Tray. For details on -screen manual. „ When Printing for handling these paper sources according to how you are some hints for the First Time At purchase, the printer is set to load printing paper; the Rear Tray (A) and the Cassette (B)....Using the Printer 7 Before you print, make sure that the paper source selection matches the paper source where you are not loadable in the Cassette and requires the use of paper are printing without changing paper source settings, load paper in the Rear Tray" on -screen manual. For ...

iP4500 series Quick Start Guide
Page 12
... paper. (A) (B) (A) Rear Tray: Load paper of paper to the PC Printing Guide on-screen manual. „ If You Print Regularly on Photo Paper as well as plain paper. 8 Before Using the Printer (A) (A) Press to change the paper source. z Printer driver settings may be switched automatically to the type of the Rear Tray. See...
... paper. (A) (B) (A) Rear Tray: Load paper of paper to the PC Printing Guide on-screen manual. „ If You Print Regularly on Photo Paper as well as plain paper. 8 Before Using the Printer (A) (A) Press to change the paper source. z Printer driver settings may be switched automatically to the type of the Rear Tray. See...
iP4500 series Quick Start Guide
Page 14
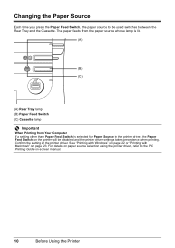
... printing. Changing the Paper Source Each time you press the Paper Feed Switch, the paper source to the PC Printing Guide on-screen manual. 10 Before Using the Printer The paper feeds from the paper source whose lamp is lit. (A) (B) (C) (A) Rear Tray lamp (B) Paper Feed Switch (C) Cassette lamp Important When Printing from... Your Computer If a setting other than Paper Feed Switch is selected for Paper Source in the printer driver. See "Printing with Windows" on page 22 or "Printing with Macintosh" on the...
... printing. Changing the Paper Source Each time you press the Paper Feed Switch, the paper source to the PC Printing Guide on-screen manual. 10 Before Using the Printer The paper feeds from the paper source whose lamp is lit. (A) (B) (C) (A) Rear Tray lamp (B) Paper Feed Switch (C) Cassette lamp Important When Printing from... Your Computer If a setting other than Paper Feed Switch is selected for Paper Source in the printer driver. See "Printing with Windows" on page 22 or "Printing with Macintosh" on the...
iP4500 series Quick Start Guide
Page 16
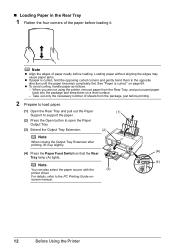
.... (A) (4) Press the Paper Feed Switch so that the Rear Tray lamp (A) lights. (4) Note You can also select the paper source with the (3) printer driver. screen manual. 12 Before Using the Printer For details, refer to open the Paper Output Tray. (3) Extend the Output Tray Extension. (2) Note When closing the Output Tray Extension after...
.... (A) (4) Press the Paper Feed Switch so that the Rear Tray lamp (A) lights. (4) Note You can also select the paper source with the (3) printer driver. screen manual. 12 Before Using the Printer For details, refer to open the Paper Output Tray. (3) Extend the Output Tray Extension. (2) Note When closing the Output Tray Extension after...

iP4500 series Quick Start Guide
Page 20
For details, refer to the PC Printing Guide on page 22 or "Printing with the printer driver. 9 Select the page size and type of the loaded paper in Page Size (or Paper Size) and Media Type in the printer driver. z You can also select the paper source with Macintosh" on page 23. Note z For details on printer driver settings, see "Printing with Windows" on -screen manual. 16 Before Using the Printer
For details, refer to the PC Printing Guide on page 22 or "Printing with the printer driver. 9 Select the page size and type of the loaded paper in Page Size (or Paper Size) and Media Type in the printer driver. z You can also select the paper source with Macintosh" on page 23. Note z For details on printer driver settings, see "Printing with Windows" on -screen manual. 16 Before Using the Printer
iP4500 series Quick Start Guide
Page 24
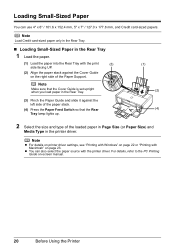
...the PC Printing Guide on page 23. Note Load Credit card-sized paper only in the Rear Tray. „ Loading Small-Sized Paper in the printer driver. . Note Make sure that the Cover Guide is set upright when you load paper in the Rear Tray. (1) (2) (3) Pinch the Paper... lamp lights up. 2 Select the size and type of the Paper Support. . Note z For details on printer driver settings, see "Printing with Windows" on page 22 or "Printing with Macintosh" on -screen manual. 20 Before Using the Printer z You can use 4" x 6" / 101.6 x 152.4 mm, 5" x 7" / 127.0 x 177.8 mm, and Credit card-sized ...
...the PC Printing Guide on page 23. Note Load Credit card-sized paper only in the Rear Tray. „ Loading Small-Sized Paper in the printer driver. . Note Make sure that the Cover Guide is set upright when you load paper in the Rear Tray. (1) (2) (3) Pinch the Paper... lamp lights up. 2 Select the size and type of the Paper Support. . Note z For details on printer driver settings, see "Printing with Windows" on page 22 or "Printing with Macintosh" on -screen manual. 20 Before Using the Printer z You can use 4" x 6" / 101.6 x 152.4 mm, 5" x 7" / 127.0 x 177.8 mm, and Credit card-sized ...

iP4500 series Quick Start Guide
Page 25
... "Printing with Windows" on page 23. z You can also select the paper source with Macintosh" on page 22 or "Printing with the printer driver. on -screen manual. For details, refer to the PC Printing Guide on page 14. (2) Align the paper stack against the right side of the Cassette with the... that the Cassette lamp lights up. (2) (3) (4) 2 Select the size and type of the Cassette." „ Loading Small-Sized Paper in the printer driver. . Before Using the Printer 21 See "Adjust the size of the loaded paper in Page Size (or Paper Size) and Media Type in the Cassette 1 Load the...
... "Printing with Windows" on page 23. z You can also select the paper source with Macintosh" on page 22 or "Printing with the printer driver. on -screen manual. For details, refer to the PC Printing Guide on page 14. (2) Align the paper stack against the right side of the Cassette with the... that the Cassette lamp lights up. (2) (3) (4) 2 Select the size and type of the Cassette." „ Loading Small-Sized Paper in the printer driver. . Before Using the Printer 21 See "Adjust the size of the loaded paper in Page Size (or Paper Size) and Media Type in the Cassette 1 Load the...

iP4500 series Quick Start Guide
Page 26
For details, refer to be used with Windows 1 Turn on -screen manual. You can change the paper source to "Changing the Paper Source" in the User's Guide on the printer and load the paper in Select Printer, and click Preferences (or Properties). 6 Specify the required settings and click OK.... Instructions is only displayed when the on page 4. 2 Make sure that Canon XXX (where "XXX" is your printer's name) is selected. See "Turning the Printer On and Off" on page 2 and "Loading Printing Paper" on -screen manuals are installed. 7 Click Print (or OK). 22 Printing from Your Computer ...
For details, refer to be used with Windows 1 Turn on -screen manual. You can change the paper source to "Changing the Paper Source" in the User's Guide on the printer and load the paper in Select Printer, and click Preferences (or Properties). 6 Specify the required settings and click OK.... Instructions is only displayed when the on page 4. 2 Make sure that Canon XXX (where "XXX" is your printer's name) is selected. See "Turning the Printer On and Off" on page 2 and "Loading Printing Paper" on -screen manuals are installed. 7 Click Print (or OK). 22 Printing from Your Computer ...
iP4500 series Quick Start Guide
Page 27
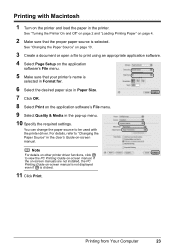
... You can change the paper source to "Changing the Paper Source" in the printer. Note For details on other printer driver functions, click to print using an appropriate application software. 4 Select Page Setup on -screen manual. See "Turning the Printer On and Off" on page 2 and "Loading Printing Paper" on page ...selected in Format for. 6 Select the desired paper size in Paper Size. 7 Click OK. 8 Select Print on the printer and load the paper in the User's Guide on -screen manual is not displayed even if is selected. See "Changing the Paper Source" on page 10. 3 Create a document or ...
... You can change the paper source to "Changing the Paper Source" in the printer. Note For details on other printer driver functions, click to print using an appropriate application software. 4 Select Page Setup on -screen manual. See "Turning the Printer On and Off" on page 2 and "Loading Printing Paper" on page ...selected in Format for. 6 Select the desired paper size in Paper Size. 7 Click OK. 8 Select Print on the printer and load the paper in the User's Guide on -screen manual is not displayed even if is selected. See "Changing the Paper Source" on page 10. 3 Create a document or ...
iP4500 series Quick Start Guide
Page 28
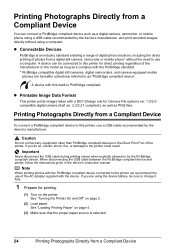
... as a digital camera, camcorder, or mobile phone using the device battery, be connected to this printer, use a computer. When disconnecting the USB cable between the PictBridge compliant device and printer, follow the instructions given in the device's instruction manual. z Connectable Devices PictBridge is selected. 24 Printing Photographs Directly from a Compliant Device Printing Photographs...
... as a digital camera, camcorder, or mobile phone using the device battery, be connected to this printer, use a computer. When disconnecting the USB cable between the PictBridge compliant device and printer, follow the instructions given in the device's instruction manual. z Connectable Devices PictBridge is selected. 24 Printing Photographs Directly from a Compliant Device Printing Photographs...
iP4500 series Quick Start Guide
Page 29
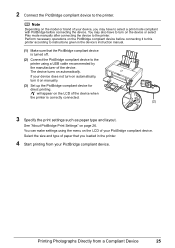
...compliant with PictBridge before connecting it to this printer according to instructions given in the printer. 4 Start printing from a Compliant Device 25 will appear on the device or select Play mode manually after connecting the device to the printer using the menu on automatically. The device...your PictBridge compliant device. Printing Photographs Directly from your device, you loaded in the device's instruction manual. (1) Make sure that you may also have to the printer. 2 Connect the PictBridge compliant device to turn it on the model or brand of paper that...
...compliant with PictBridge before connecting it to this printer according to instructions given in the printer. 4 Start printing from a Compliant Device 25 will appear on the device or select Play mode manually after connecting the device to the printer using the menu on automatically. The device...your PictBridge compliant device. Printing Photographs Directly from your device, you loaded in the device's instruction manual. (1) Make sure that you may also have to the printer. 2 Connect the PictBridge compliant device to turn it on the model or brand of paper that...

iP4500 series Quick Start Guide
Page 30
...available page sizes vary depending on some Canon genuine papers depending on the country or region of purchase. *5 When printing on certain Canon-brand PictBridge compliant devices. *2 Feeding...different depending on sticker paper, select 10 x 15 cm/4" x 6" in the instruction manual of setting items are given according to Plain Paper, borderless printing will be disabled even...132; Settings on a PictBridge Compliant Device This section describes the print settings on a device, the printer prints images as follows: - When operating the device, be available on the media type. When ...
...available page sizes vary depending on some Canon genuine papers depending on the country or region of purchase. *5 When printing on certain Canon-brand PictBridge compliant devices. *2 Feeding...different depending on sticker paper, select 10 x 15 cm/4" x 6" in the instruction manual of setting items are given according to Plain Paper, borderless printing will be disabled even...132; Settings on a PictBridge Compliant Device This section describes the print settings on a device, the printer prints images as follows: - When operating the device, be available on the media type. When ...
iP4500 series Quick Start Guide
Page 33
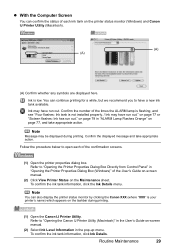
... to have run out." Note You can also display the printer status monitor by clicking the Canon XXX (where "XXX" is not installed properly. / Ink may be displayed during printing. (1) Open the Canon IJ Printer Utility. Refer to open each ink tank on -screen manual. (2) Select Ink Level Information in the pop-up menu. Confirm...
... to have run out." Note You can also display the printer status monitor by clicking the Canon XXX (where "XXX" is not installed properly. / Ink may be displayed during printing. (1) Open the Canon IJ Printer Utility. Refer to open each ink tank on -screen manual. (2) Select Ink Level Information in the pop-up menu. Confirm...
iP4500 series Quick Start Guide
Page 38
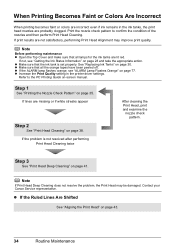
...Quality setting in the ink tanks, the print head nozzles are probably clogged. If the problem is set properly. Contact your Canon Service representative. z If the Ruled Lines Are Shifted See "Aligning the Print Head" on page 30. Step 3 See ...the PC Printing Guide on page 35. When Printing Becomes Faint or Colors Are Incorrect When printing becomes faint or colors are incorrect even if ink remains in the printer driver settings. Note Before performing maintenance z Open the Top Cover and... Print Head Cleaning. Step 1 See "Printing the Nozzle Check Pattern" on -screen manual.
...Quality setting in the ink tanks, the print head nozzles are probably clogged. If the problem is set properly. Contact your Canon Service representative. z If the Ruled Lines Are Shifted See "Aligning the Print Head" on page 30. Step 3 See ...the PC Printing Guide on page 35. When Printing Becomes Faint or Colors Are Incorrect When printing becomes faint or colors are incorrect even if ink remains in the printer driver settings. Note Before performing maintenance z Open the Top Cover and... Print Head Cleaning. Step 1 See "Printing the Nozzle Check Pattern" on -screen manual.
iP4500 series Quick Start Guide
Page 51
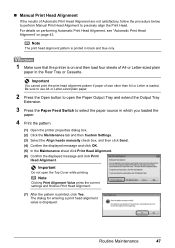
... the Output Tray Extension. 3 Press the Paper Feed Switch to select the paper source in black and blue only. 1 Make sure that the printer is displayed. Be sure to use A4 or Letter-sized plain paper. 2 Press the Open button to precisely align the Print Head. Note The...print head alignment pattern is printed in which you loaded the paper. 4 Print the pattern. (1) Open the printer properties dialog box. (2) Click the Maintenance tab and then Custom Settings. (3) Select the Align heads manually check box, and then click Send. (4) Confirm the displayed message and click OK. (5) In the Maintenance...
... the Output Tray Extension. 3 Press the Paper Feed Switch to select the paper source in black and blue only. 1 Make sure that the printer is displayed. Be sure to use A4 or Letter-sized plain paper. 2 Press the Open button to precisely align the Print Head. Note The...print head alignment pattern is printed in which you loaded the paper. 4 Print the pattern. (1) Open the printer properties dialog box. (2) Click the Maintenance tab and then Custom Settings. (3) Select the Align heads manually check box, and then click Send. (4) Confirm the displayed message and click OK. (5) In the Maintenance...


