iP4200 Easy Setup Instructions
Page 1
... serial number located inside of the paper. NOTE: Paper Output Tray · The printer will rest at a lower speed provided under USB 1.1. USB Port USB Cable USB Port Electrical Contacts ink port 3 Insert the ink tank into the holder. 1 Unpack the Printer 2 Prepare the Printer Start Here Easy Setup Instructions 3 Install the Print Head 4 Install the Ink Tanks Series Photo Printer 5 Connect the Printer and Load Paper 1 Carefully remove all items from the print head. The tape position is loaded in - Top Cover Inner Cover Front Cover Put your PC does not support USB...
... serial number located inside of the paper. NOTE: Paper Output Tray · The printer will rest at a lower speed provided under USB 1.1. USB Port USB Cable USB Port Electrical Contacts ink port 3 Insert the ink tank into the holder. 1 Unpack the Printer 2 Prepare the Printer Start Here Easy Setup Instructions 3 Install the Print Head 4 Install the Ink Tanks Series Photo Printer 5 Connect the Printer and Load Paper 1 Carefully remove all items from the print head. The tape position is loaded in - Top Cover Inner Cover Front Cover Put your PC does not support USB...

iP4200 Easy Setup Instructions
Page 2
... Setup Software & User's Guide CDROM. If a message asking for your administrator name or password, click on -screen manuals and printer driver. Select iP4200 and click Maintenance. Click the down-arrow to exit the Canon IJ Printer Utility. Do not start another operation here. · The pattern is a trademark of the Administrators group before continuing. 2 Double-click the Setup icon. 8 Start the print head alignment procedure. Cover 2 Remove the cover of the cassette. 3 For A5 or larger sized paper...
... Setup Software & User's Guide CDROM. If a message asking for your administrator name or password, click on -screen manuals and printer driver. Select iP4200 and click Maintenance. Click the down-arrow to exit the Canon IJ Printer Utility. Do not start another operation here. · The pattern is a trademark of the Administrators group before continuing. 2 Double-click the Setup icon. 8 Start the print head alignment procedure. Cover 2 Remove the cover of the cassette. 3 For A5 or larger sized paper...
iP4200 Quick Start Guide
Page 5
... 28 Accessing the Printer Driver (Windows 35 Using the Bundled Software 36 Printing Maintenance Replacing an Ink Tank 37 When Printing Becomes Faint or Colors are Incorrect 46 Printing the Nozzle Check Pattern 47 Print Head Cleaning 52 Print Head Deep Cleaning 56 Aligning the Print Head 60 Troubleshooting Cannot Install the Printer Driver 65 Cannot Connect to PC Properly 66 Print Results Not Satisfactory or Contains Errors 67 Troubleshooting Printer Hardware 70 Paper Does Not Feed Properly 72 Paper Jams 73 Handling Error Messages 77 An Error Message Appears on the Screen 79...
... 28 Accessing the Printer Driver (Windows 35 Using the Bundled Software 36 Printing Maintenance Replacing an Ink Tank 37 When Printing Becomes Faint or Colors are Incorrect 46 Printing the Nozzle Check Pattern 47 Print Head Cleaning 52 Print Head Deep Cleaning 56 Aligning the Print Head 60 Troubleshooting Cannot Install the Printer Driver 65 Cannot Connect to PC Properly 66 Print Results Not Satisfactory or Contains Errors 67 Troubleshooting Printer Hardware 70 Paper Does Not Feed Properly 72 Paper Jams 73 Handling Error Messages 77 An Error Message Appears on the Screen 79...
iP4200 Quick Start Guide
Page 29
...-screen Manual is not installed, the Printer Driver Guide is not displayed even if is clicked. Printing tables and charts: Select when printing documents consisting mainly of the Media Type you to confirm the selected printing effects and how your document from Print Type. Basic Printing z This section describes the procedure for selecting the paper source with strong color definition. - For a detailed description of the document from Print Mode, the document will be printed in color...
...-screen Manual is not installed, the Printer Driver Guide is not displayed even if is clicked. Printing tables and charts: Select when printing documents consisting mainly of the Media Type you to confirm the selected printing effects and how your document from Print Type. Basic Printing z This section describes the procedure for selecting the paper source with strong color definition. - For a detailed description of the document from Print Mode, the document will be printed in color...

iP4200 Quick Start Guide
Page 40
... prints that reproduce color more accurately. 36 Using the Bundled Software The Setup Software & User's Guide CD-ROM includes photo applications designed to the Windows documentation. z For details about these tabs, refer to edit the photographs taken by the camera's flash or smooth and beautify the facial skin. Advanced Printing 3 Open the File menu and select Printing Preferences (or Properties). Canon PIXMA Printers support ExifPrint and use the application(s) suitable for specific camera settings...
... prints that reproduce color more accurately. 36 Using the Bundled Software The Setup Software & User's Guide CD-ROM includes photo applications designed to the Windows documentation. z For details about these tabs, refer to edit the photographs taken by the camera's flash or smooth and beautify the facial skin. Advanced Printing 3 Open the File menu and select Printing Preferences (or Properties). Canon PIXMA Printers support ExifPrint and use the application(s) suitable for specific camera settings...
iP4200 Quick Start Guide
Page 50
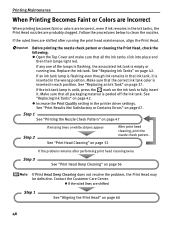
... low. z Open the Top Cover and make sure that the correct ink tank color is unlit, press the mark on page 56 If Print Head Deep Cleaning does not resolve the problem, the Print Head may be defective. See "Replacing Ink Tanks" on page 52 After print head cleaning, print the nozzle check pattern. Step 1 See "Printing the Nozzle Check Pattern" on page 47 Step 2 If missing lines or white stripes appear See "Print Head Cleaning" on page 42. If any one of the lamps is flashing, the associated ink tank...
... low. z Open the Top Cover and make sure that the correct ink tank color is unlit, press the mark on page 56 If Print Head Deep Cleaning does not resolve the problem, the Print Head may be defective. See "Replacing Ink Tanks" on page 52 After print head cleaning, print the nozzle check pattern. Step 1 See "Printing the Nozzle Check Pattern" on page 47 Step 2 If missing lines or white stripes appear See "Print Head Cleaning" on page 42. If any one of the lamps is flashing, the associated ink tank...
iP4200 Quick Start Guide
Page 71
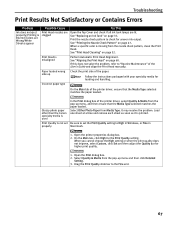
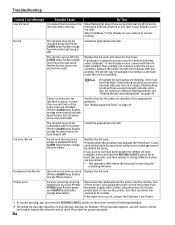
... Print Head" on page 37. Incorrect paper type On the Main tab of the printer driver, select Quality & Media from the nozzle check pattern, clean the Print Head. Open the Print dialog box. 2. See "Replacing an Ink Tank" on page 60. Paper loaded wrong side up Check the print side of the User's Guide and align the Print Head manually. Select Other Photo Paper from the pop-up menu, and then ensure that the Media Type selected matches the paper loaded. Print Quality is Blurred/Colors are Wrong/White Streaks appear Print Head nozzles are clogged Open the Top Cover and check...
... Print Head" on page 37. Incorrect paper type On the Main tab of the printer driver, select Quality & Media from the nozzle check pattern, clean the Print Head. Open the Print dialog box. 2. See "Replacing an Ink Tank" on page 60. Paper loaded wrong side up Check the print side of the User's Guide and align the Print Head manually. Select Other Photo Paper from the pop-up menu, and then ensure that the Media Type selected matches the paper loaded. Print Quality is Blurred/Colors are Wrong/White Streaks appear Print Head nozzles are clogged Open the Top Cover and check...
iP4200 Quick Start Guide
Page 72
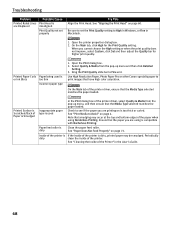
... print quality. Select Quality & Media from the pop-up menu and then click Detailed Setting. 3. Check to Fine end. Use High Resolution Paper, Photo Paper Pro or other Canon specialty paper to Avoid" on is or Ink Blots too thin Incorrect paper type 1. See "Print Media to print images that the Media Type selected matches the paper loaded. Troubleshooting Problem Possible Cause Printed Ruled Lines Print Head is dirty Clean the paper feed roller. Paper feed roller is are printing on page 4. See "Cleaning the Inside of the printer driver, select Quality & Media...
... print quality. Select Quality & Media from the pop-up menu and then click Detailed Setting. 3. Check to Fine end. Use High Resolution Paper, Photo Paper Pro or other Canon specialty paper to Avoid" on is or Ink Blots too thin Incorrect paper type 1. See "Print Media to print images that the Media Type selected matches the paper loaded. Troubleshooting Problem Possible Cause Printed Ruled Lines Print Head is dirty Clean the paper feed roller. Paper feed roller is are printing on page 4. See "Cleaning the Inside of the printer driver, select Quality & Media...

iP4200 Quick Start Guide
Page 75
... paper loaded. In the Print dialog box, select Duplex Printing & Margin from the Start Menu" on the Page Setup tab in the printer driver. Click Display Print Queue. 4. The print job is displayed, click Yes. Incorrect page size is set, the print quality may solve the problem. Delete an undesired print job, if there is too large Check the size of Job 1. Use Canon IJ Status Monitor in Windows or Printer Setup Utility (or Print Center) in the printer: z Check the Paper Size setting from the Go menu. 2. In Windows Me and Windows...
... paper loaded. In the Print dialog box, select Duplex Printing & Margin from the Start Menu" on the Page Setup tab in the printer driver. Click Display Print Queue. 4. The print job is displayed, click Yes. Incorrect page size is set, the print quality may solve the problem. Delete an undesired print job, if there is too large Check the size of Job 1. Use Canon IJ Status Monitor in Windows or Printer Setup Utility (or Print Center) in the printer: z Check the Paper Size setting from the Go menu. 2. In Windows Me and Windows...
iP4200 Quick Start Guide
Page 82
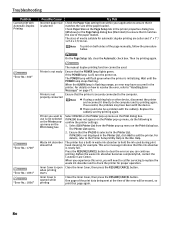
... this printer. Ten flashes Cannot print on page 37. Eleven flashes Automatic print head alignment failed Possible causes are Letter and 5" x 7"/ 127.0 x 177.8 mm. See "Printing the Nozzle Check Pattern" on page 47 for information on the Auto Sheet Feeder. Press the RESUME/CANCEL button to clear the error and move the printer to print a nozzle check pattern. Thirteen Flashes The remaining level of the ink tank cannot be recognized Replace the ink tank. See "Replacing an Ink Tank" on both sides of the page The size of paper may...
... this printer. Ten flashes Cannot print on page 37. Eleven flashes Automatic print head alignment failed Possible causes are Letter and 5" x 7"/ 127.0 x 177.8 mm. See "Printing the Nozzle Check Pattern" on page 47 for information on the Auto Sheet Feeder. Press the RESUME/CANCEL button to clear the error and move the printer to print a nozzle check pattern. Thirteen Flashes The remaining level of the ink tank cannot be recognized Replace the ink tank. See "Replacing an Ink Tank" on both sides of the page The size of paper may...
iP4200 Quick Start Guide
Page 83
... the POWER lamp stops flashing. If the port setting is not correct, change the port setting according to the computer and try printing again. Troubleshooting Number of Flashes Possible Cause Try This POWER (green) and ALARM (orange) lamps flash alternately An error that the paper source is selected correctly. Paper is not installed properly Uninstall then reinstall the printer driver. 1. If successful, the problem may have occurred. Replace the cable(s) and try printing again. Click Start, and...
... the POWER lamp stops flashing. If the port setting is not correct, change the port setting according to the computer and try printing again. Troubleshooting Number of Flashes Possible Cause Try This POWER (green) and ALARM (orange) lamps flash alternately An error that the paper source is selected correctly. Paper is not installed properly Uninstall then reinstall the printer driver. 1. If successful, the problem may have occurred. Replace the cable(s) and try printing again. Click Start, and...
iP4200 Quick Start Guide
Page 84
... lights green. If the POWER lamp is open Close the Inner Cover, then press the RESUME/CANCEL button. Replace the cable(s) and try printing again. z There could also be used during print head cleaning, for proper operation. This error message indicates that the iP4200 is nearly full. The POWER lamp will need to call for automatic duplex printing are Letter and 5" x 7"/ 127.0 x 177.8 mm. For details on the Page Setup tab in waste ink...
... lights green. If the POWER lamp is open Close the Inner Cover, then press the RESUME/CANCEL button. Replace the cable(s) and try printing again. z There could also be used during print head cleaning, for proper operation. This error message indicates that the iP4200 is nearly full. The POWER lamp will need to call for automatic duplex printing are Letter and 5" x 7"/ 127.0 x 177.8 mm. For details on the Page Setup tab in waste ink...
iP4200 Quick Start Guide
Page 85
.... Remove the jammed paper, load new paper, and press the RESUME/CANCEL button on the printer flashes orange five times.) Install a Print Head according to turn on page 77. You can continue printing for example. Paper jam A paper is jammed in the printer Select Stop in "Handling Error Messages" on the device or select Play mode manually after completing the current printing. Contact the Customer Care Center. This error message indicates that may have to the Easy Setup Instructions. The printer automatically starts the computer printing...
.... Remove the jammed paper, load new paper, and press the RESUME/CANCEL button on the printer flashes orange five times.) Install a Print Head according to turn on page 77. You can continue printing for example. Paper jam A paper is jammed in the printer Select Stop in "Handling Error Messages" on the device or select Play mode manually after completing the current printing. Contact the Customer Care Center. This error message indicates that may have to the Easy Setup Instructions. The printer automatically starts the computer printing...
iP4200 Quick Start Guide
Page 86
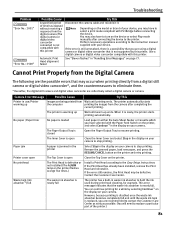
... the power cord of the printer back in the display on page 37. Then printing can press the RESUME/CANCEL button on page 38. Replace the empty ink tank immediately after the printing. The ink has run out (Printer ALARM lamp flashes orange four times/Ink tank lamp flashes fast (at about one second interval)) Replace the ink tank, and close the Top Cover. Troubleshooting Camera Error Message Low ink level Possible Cause It is about time to replace the ink tank with a new one...
... the power cord of the printer back in the display on page 37. Then printing can press the RESUME/CANCEL button on page 38. Replace the empty ink tank immediately after the printing. The ink has run out (Printer ALARM lamp flashes orange four times/Ink tank lamp flashes fast (at about one second interval)) Replace the ink tank, and close the Top Cover. Troubleshooting Camera Error Message Low ink level Possible Cause It is about time to replace the ink tank with a new one...
iP4200 Quick Start Guide
Page 99
... Help button 2 High Resolution Paper 19 Index I Ink tank lamp Ink Level Indication on the Screen 79 Automatic Duplex Printing 80 B Borderless Printing 68 C Camera Direct Print 87 Camera Error Message 81 Canceling Print Jobs (Windows 22 Canceling Printing 26 Cannot Connect to avoid 4 Media Type 19, 21, 24 N Nozzle Check 48, 49 Nozzle Check Pattern examining 50 printing 47 O Opening the Printer Properties Dialog Box Directly from the Start Menu (Windows 35 Opening the Printer Properties Dialog Box from the Digital Camera 81 Canon IJ Printer Utility...
... Help button 2 High Resolution Paper 19 Index I Ink tank lamp Ink Level Indication on the Screen 79 Automatic Duplex Printing 80 B Borderless Printing 68 C Camera Direct Print 87 Camera Error Message 81 Canceling Print Jobs (Windows 22 Canceling Printing 26 Cannot Connect to avoid 4 Media Type 19, 21, 24 N Nozzle Check 48, 49 Nozzle Check Pattern examining 50 printing 47 O Opening the Printer Properties Dialog Box Directly from the Start Menu (Windows 35 Opening the Printer Properties Dialog Box from the Digital Camera 81 Canon IJ Printer Utility...

iP4200 Quick Start Guide
Page 100
... 92 Replacing an Ink Tank 37 RESUME/CANCEL button 22 S Safety Precautions 90 Specialty Media 19 Specifications 86 Super White Paper 19 T Transparencies 19 Troubleshooting 64 Troubleshooting Printer Hardware 70 T-Shirt Transfers 19 Turning off the Printer 3 Turning on the Printer 2 U Uninstalling the printer driver (Windows 79 USB 2.0 Hi-speed Connection Does Not Work Properly.. 66 Using Specialty Media 18 Using the Auto Sheet Feeder and the Cassette 5 Using the Bundled Software 36 W Warranty 93 When Printing Becomes Faint or Colors...
... 92 Replacing an Ink Tank 37 RESUME/CANCEL button 22 S Safety Precautions 90 Specialty Media 19 Specifications 86 Super White Paper 19 T Transparencies 19 Troubleshooting 64 Troubleshooting Printer Hardware 70 T-Shirt Transfers 19 Turning off the Printer 3 Turning on the Printer 2 U Uninstalling the printer driver (Windows 79 USB 2.0 Hi-speed Connection Does Not Work Properly.. 66 Using Specialty Media 18 Using the Auto Sheet Feeder and the Cassette 5 Using the Bundled Software 36 W Warranty 93 When Printing Becomes Faint or Colors...
Service Manual
Page 10
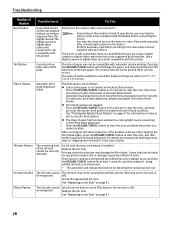
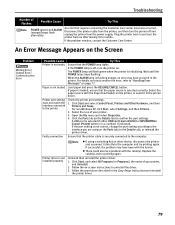
... properly installed (Print head temperature sensor error [1403] / Faulty EEPROM data of all the ink tanks light red. Pressing the Resume/Cancel button will exit the error without ink tank replacement, however, ink may run out during printing. 2. LIST OF ERROR DISPLAY / INDICATION Errors are displayed on the monitor of a print job, or while a print job is ejected at start of the computer connected to the printer. 2-1. No paper in the cassette. [1003] (No paper in the front paper feed cassette.) Set the paper...
... properly installed (Print head temperature sensor error [1403] / Faulty EEPROM data of all the ink tanks light red. Pressing the Resume/Cancel button will exit the error without ink tank replacement, however, ink may run out during printing. 2. LIST OF ERROR DISPLAY / INDICATION Errors are displayed on the monitor of a print job, or while a print job is ejected at start of the computer connected to the printer. 2-1. No paper in the cassette. [1003] (No paper in the front paper feed cassette.) Set the paper...

Service Manual
Page 16
Adjustment / Settings, (5) Service mode, for details.] *2: Replace the print head only after the print head deep cleaning is 7% or more, also replace the ink absorber kit (QY5-0146) when replacing the logic board ass'y. [See Section 3-3. If the waste ink amount is performed 2 times, and when the problem persists. *1: Before replacement of the logic board ass'y, check the waste ink amount (by service test print or EEPROM information print). To the top 1-11
Adjustment / Settings, (5) Service mode, for details.] *2: Replace the print head only after the print head deep cleaning is 7% or more, also replace the ink absorber kit (QY5-0146) when replacing the logic board ass'y. [See Section 3-3. If the waste ink amount is performed 2 times, and when the problem persists. *1: Before replacement of the logic board ass'y, check the waste ink amount (by service test print or EEPROM information print). To the top 1-11
Service Manual
Page 17
... charges), to prevent damages to be loosened. Printing via USB connection - Correct the CD / DVD and automatic print head alignment sensors. [See 3.3. Check the ink system function. [See 3.3. Set the destination in the user mode. - If the waste ink [See 3-3. EEPROM information print - Reset the waste ink counter. [See 3.3. Service test print - Perform the print head alignment in the EEPROM. Adjustment / Settings, (1) Paper feed motor adjustment.] - Before removal of the logic After replacement: board ass'y, remove the power cord, and allow for approx. 1 minute (for discharge...
... charges), to prevent damages to be loosened. Printing via USB connection - Correct the CD / DVD and automatic print head alignment sensors. [See 3.3. Check the ink system function. [See 3.3. Set the destination in the user mode. - If the waste ink [See 3-3. EEPROM information print - Reset the waste ink counter. [See 3.3. Service test print - Perform the print head alignment in the EEPROM. Adjustment / Settings, (1) Paper feed motor adjustment.] - Before removal of the logic After replacement: board ass'y, remove the power cord, and allow for approx. 1 minute (for discharge...
Service Manual
Page 27
...Power LED blinking Operation 1 time Print head manual cleaning Remarks 2 times Nozzle check pattern printing Set a sheet of the printer driver Maintenance tab, manual print head alignment (by service test print or EEPROM information print. [See 3.3. (3) Waste ink counter setting When the logic board ass'y is given in the table below. Adjustment / Settings, (5) Service mode, for waste ink absorber replacement is replaced, reset the waste ink counter. Cleaning of the platen ribs when the back side of times listed in the ASF or the cassette (according to the waste ink...
...Power LED blinking Operation 1 time Print head manual cleaning Remarks 2 times Nozzle check pattern printing Set a sheet of the printer driver Maintenance tab, manual print head alignment (by service test print or EEPROM information print. [See 3.3. (3) Waste ink counter setting When the logic board ass'y is given in the table below. Adjustment / Settings, (5) Service mode, for waste ink absorber replacement is replaced, reset the waste ink counter. Cleaning of the platen ribs when the back side of times listed in the ASF or the cassette (according to the waste ink...


