iP3500 series Quick Start Guide
Page 5
... of Contents Before Using the Printer 2 Turning the Printer On and Off 2 Loading Printing Paper 4 Hints for Handling the Paper Source 7 Loading Paper 10 Loading Envelopes 14 Loading Small-Sized Paper 16 Printing from Your Computer 17 Printing with Windows 17 Printing with Macintosh 18 Printing... Faint or Colors Are Incorrect 29 Printing the Nozzle Check Pattern 30 Examining the Nozzle Check Pattern ...........32 Print Head Cleaning 33 Print Head Deep Cleaning 36 Aligning the Print Head 38 Cleaning Your Printer 44 Troubleshooting 52 Cannot Install the Printer Driver 53 Cannot ...
... of Contents Before Using the Printer 2 Turning the Printer On and Off 2 Loading Printing Paper 4 Hints for Handling the Paper Source 7 Loading Paper 10 Loading Envelopes 14 Loading Small-Sized Paper 16 Printing from Your Computer 17 Printing with Windows 17 Printing with Macintosh 18 Printing... Faint or Colors Are Incorrect 29 Printing the Nozzle Check Pattern 30 Examining the Nozzle Check Pattern ...........32 Print Head Cleaning 33 Print Head Deep Cleaning 36 Aligning the Print Head 38 Cleaning Your Printer 44 Troubleshooting 52 Cannot Install the Printer Driver 53 Cannot ...
iP3500 series Quick Start Guide
Page 6
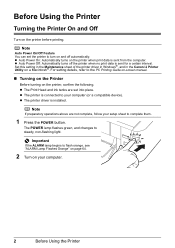
... data is sent from the computer. z The printer is installed. z Auto Power Off: Automatically turns off automatically. Set this setting in the Maintenance sheet of the printer driver in Windows®, and in the Canon IJ Printer Utility on the printer, confirm the following. For setting details, refer ...to flash orange, see "ALARM Lamp Flashes Orange" on page 64. 2 Turn on the printer before printing. Important If the ...
... data is sent from the computer. z The printer is installed. z Auto Power Off: Automatically turns off automatically. Set this setting in the Maintenance sheet of the printer driver in Windows®, and in the Canon IJ Printer Utility on the printer, confirm the following. For setting details, refer ...to flash orange, see "ALARM Lamp Flashes Orange" on page 64. 2 Turn on the printer before printing. Important If the ...
iP3500 series Quick Start Guide
Page 11
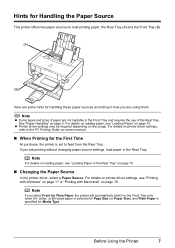
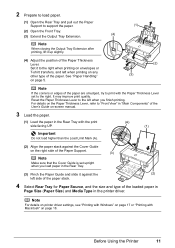
...the Rear Tray" on page 5. See "Paper Handling" on page 10. „ Changing the Paper Source In the printer driver, select a Paper Source. For details on loading paper, see "Printing with Windows" on page 17 or "Printing with Macintosh" on -screen manual. „ When Printing for the First Time At...Plain Paper is set to feed from the Rear Tray. z Printer driver settings may be required depending on page 10. For details on printer driver settings, see "Loading Paper" on the usage. Hints for Handling the Paper Source This printer offers two paper sources to the PC Printing Guide on page 18...
...the Rear Tray" on page 5. See "Paper Handling" on page 10. „ Changing the Paper Source In the printer driver, select a Paper Source. For details on loading paper, see "Printing with Windows" on page 17 or "Printing with Macintosh" on -screen manual. „ When Printing for the First Time At...Plain Paper is set to feed from the Rear Tray. z Printer driver settings may be required depending on page 10. For details on printer driver settings, see "Loading Paper" on the usage. Hints for Handling the Paper Source This printer offers two paper sources to the PC Printing Guide on page 18...
iP3500 series Quick Start Guide
Page 15
..., try to print with Macintosh" on envelopes or T-shirt transfers, and left when you load paper in the printer driver. Important Do not load higher than the Load Limit Mark (A). (A) (1) (2) Align the paper stack against the... Paper Guide and slide it up slightly. (4) Adjust the position of the paper. Before Using the Printer 11 It may improve print quality. Reset the Paper Thickness Lever to the right when printing on page...when you finish printing. Note For details on printer driver settings, see "Printing with Windows" on any other type of the Paper Thickness Lever.
..., try to print with Macintosh" on envelopes or T-shirt transfers, and left when you load paper in the printer driver. Important Do not load higher than the Load Limit Mark (A). (A) (1) (2) Align the paper stack against the... Paper Guide and slide it up slightly. (4) Adjust the position of the paper. Before Using the Printer 11 It may improve print quality. Reset the Paper Thickness Lever to the right when printing on page...when you finish printing. Note For details on printer driver settings, see "Printing with Windows" on any other type of the Paper Thickness Lever.
iP3500 series Quick Start Guide
Page 17
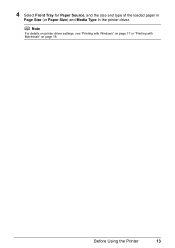
Before Using the Printer 13 4 Select Front Tray for Paper Source, and the size and type of the loaded paper in Page Size (or Paper Size) and Media Type in the printer driver. Note For details on printer driver settings, see "Printing with Windows" on page 17 or "Printing with Macintosh" on page 18.
Before Using the Printer 13 4 Select Front Tray for Paper Source, and the size and type of the loaded paper in Page Size (or Paper Size) and Media Type in the printer driver. Note For details on printer driver settings, see "Printing with Windows" on page 17 or "Printing with Macintosh" on page 18.
iP3500 series Quick Start Guide
Page 18
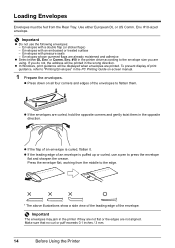
... puff exceeds 0.1 inches / 3 mm. 14 Before Using the Printer Env. #10-sized envelope. Env. #10 in the printer driver according to the envelope size you do not, the address will be displayed when envelopes are using. z In Windows, print guidance will be printed in the printer if they are not flat or the edges are...
... puff exceeds 0.1 inches / 3 mm. 14 Before Using the Printer Env. #10-sized envelope. Env. #10 in the printer driver according to the envelope size you do not, the address will be displayed when envelopes are using. z In Windows, print guidance will be printed in the printer if they are not flat or the edges are...
iP3500 series Quick Start Guide
Page 19
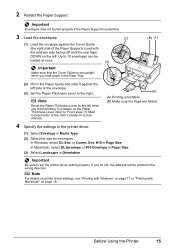
... Macintosh" on the left. Up to "Front View" in "Main Components" of the User's Guide on-screen manual. 4 Specify the settings in the printer driver. (1) Select Envelope in Page Size. Note (A) (A) Printing orientation (B) Make sure the flaps are folded. Reset the Paper Thickness Lever to set upright, ...Cover Guide (the right side of the envelope. (3) Set the Paper Thickness Lever to the right. . Note For details on printer driver settings, see "Printing with Windows" on page 17 or "Printing with the address side facing UP and the rear flaps DOWN on page 18. Important Make ...
... Macintosh" on the left. Up to "Front View" in "Main Components" of the User's Guide on-screen manual. 4 Specify the settings in the printer driver. (1) Select Envelope in Page Size. Note (A) (A) Printing orientation (B) Make sure the flaps are folded. Reset the Paper Thickness Lever to set upright, ...Cover Guide (the right side of the envelope. (3) Set the Paper Thickness Lever to the right. . Note For details on printer driver settings, see "Printing with Windows" on page 17 or "Printing with the address side facing UP and the rear flaps DOWN on page 18. Important Make ...
iP3500 series Quick Start Guide
Page 20
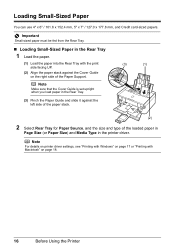
Note Make sure that the Cover Guide is set upright when you load paper in the printer driver. . Loading Small-Sized Paper You can use 4" x 6" / 101.6 x 152.4 mm, 5" x 7" / 127.0 x 177.8 mm, and Credit card-sized papers. . Important Small-sized paper must be fed ... the Rear Tray. (3) (1) (3) Pinch the Paper Guide and slide it against the Cover Guide on page 18. 16 Before Using the Printer Note For details on printer driver settings, see "Printing with Windows" on page 17 or "Printing with the print side facing UP. (2) Align the paper stack against the left side of the...
Note Make sure that the Cover Guide is set upright when you load paper in the printer driver. . Loading Small-Sized Paper You can use 4" x 6" / 101.6 x 152.4 mm, 5" x 7" / 127.0 x 177.8 mm, and Credit card-sized papers. . Important Small-sized paper must be fed ... the Rear Tray. (3) (1) (3) Pinch the Paper Guide and slide it against the Cover Guide on page 18. 16 Before Using the Printer Note For details on printer driver settings, see "Printing with Windows" on page 17 or "Printing with the print side facing UP. (2) Align the paper stack against the left side of the...
iP3500 series Quick Start Guide
Page 21
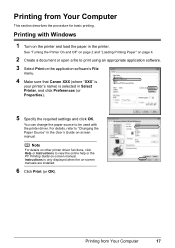
... or the PC Printing Guide on -screen manuals are installed. 6 Click Print (or OK). Note For details on other printer driver functions, click Help or Instructions to print using an appropriate application software. 3 Select Print on -screen manual. Instructions is selected in the... application software's File menu. 4 Make sure that Canon XXX (where "XXX" is your printer's name) is only displayed when the on -screen manual. For details, refer to be used with Windows 1 Turn on the printer and load the paper in Select Printer, and click Preferences (or Properties). 5 Specify the...
... or the PC Printing Guide on -screen manuals are installed. 6 Click Print (or OK). Note For details on other printer driver functions, click Help or Instructions to print using an appropriate application software. 3 Select Print on -screen manual. Instructions is selected in the... application software's File menu. 4 Make sure that Canon XXX (where "XXX" is your printer's name) is only displayed when the on -screen manual. For details, refer to be used with Windows 1 Turn on the printer and load the paper in Select Printer, and click Preferences (or Properties). 5 Specify the...
iP3500 series Quick Start Guide
Page 56
...using your Windows operating system. 52 Troubleshooting For details on how to a Computer When an error occurs in printing such as the printer is out of your computer, refer to "Troubleshooting" in the User's Guide on-screen manual. Take the appropriate action described in the Printer Driver" on ..." on page 71. To handle problems using the printer. z "Cannot Install the Printer Driver" on page 53 z "Cannot Connect to Computer Properly" on page 54 z "Print Results Not Satisfactory" on page 55 z "Printer Does Not Start" on page 59 z "Printer Moves But Ink Is Not Ejected" on page 60...
...using your Windows operating system. 52 Troubleshooting For details on how to a Computer When an error occurs in printing such as the printer is out of your computer, refer to "Troubleshooting" in the User's Guide on-screen manual. Take the appropriate action described in the Printer Driver" on ..." on page 71. To handle problems using the printer. z "Cannot Install the Printer Driver" on page 53 z "Cannot Connect to Computer Properly" on page 54 z "Print Results Not Satisfactory" on page 55 z "Printer Does Not Start" on page 59 z "Printer Moves But Ink Is Not Ejected" on page 60...

iP3500 series Quick Start Guide
Page 57
...printer driver, restart your computer before reinstalling. Troubleshooting 53 Double-click the CD-ROM icon on the PIXMA XXX screen (where "XXX" is a problem with the Setup CD-ROM. Follow the procedure described in your setup sheet for proper installation. Note If the installer was forced to be terminated due to an Windows.... Installation does not start the setup program, specify your disc drive and then the name of the disc drive depends on the displayed window. In Windows XP, Click Start then My Computer. Contact a Canon Service representative.
...printer driver, restart your computer before reinstalling. Troubleshooting 53 Double-click the CD-ROM icon on the PIXMA XXX screen (where "XXX" is a problem with the Setup CD-ROM. Follow the procedure described in your setup sheet for proper installation. Note If the installer was forced to be terminated due to an Windows.... Installation does not start the setup program, specify your disc drive and then the name of the disc drive depends on the displayed window. In Windows XP, Click Start then My Computer. Contact a Canon Service representative.

iP3500 series Quick Start Guide
Page 70
... privilege. (2)Click Control Panel, then Printer under Hardware and Sound. In Windows 2000, click Control Panel then Printers. (3)Right-click the Canon XXX icon, then select Properties. (4)Click the Ports tab to the following port(s). Make sure that a port named USBnnn (where "n" is a number) with the relay device. Printer driver is lit green. Make sure that...
... privilege. (2)Click Control Panel, then Printer under Hardware and Sound. In Windows 2000, click Control Panel then Printers. (3)Right-click the Canon XXX icon, then select Properties. (4)Click the Ports tab to the following port(s). Make sure that a port named USBnnn (where "n" is a number) with the relay device. Printer driver is lit green. Make sure that...
iP3500 series Quick Start Guide
Page 74
... media z printing from your computer and a PictBridge compliant device. PC Printing Guide Refer to this guide when starting to use the printer. After following instructions in your setup sheet, we recommend you enough information, please refer to the User's Guide that can be installed... Start Guide does not provide you read this guide for instructions on using the various application software included on printer driver setting. PC Photo Printing Guide (Windows only) Refer to this sheet first. Appendix How to Use the Documentation Provided Printed Documentation Setup Sheet Be...
... media z printing from your computer and a PictBridge compliant device. PC Printing Guide Refer to this guide when starting to use the printer. After following instructions in your setup sheet, we recommend you enough information, please refer to the User's Guide that can be installed... Start Guide does not provide you read this guide for instructions on using the various application software included on printer driver setting. PC Photo Printing Guide (Windows only) Refer to this sheet first. Appendix How to Use the Documentation Provided Printed Documentation Setup Sheet Be...
iP3500 series Easy Setup Instructions
Page 2
..." in subsequent steps, click Continue. The printer driver, On-screen Manuals, and application software are installed automatically. Remove the CD-ROM after clicking Restart and restarting the computer. QT5-1248-V02 © 2007 Canon Inc. "Windows Vista" is complete, double-click on the...the User Account Control screen appears, click Continue. Serial Number l When the PIXMA Extended Survey Program screen appears, confirm the message. If Restart is displayed, follow the on as "Windows Vista") installation. Note Move the cursor over items to display explanations of each...
..." in subsequent steps, click Continue. The printer driver, On-screen Manuals, and application software are installed automatically. Remove the CD-ROM after clicking Restart and restarting the computer. QT5-1248-V02 © 2007 Canon Inc. "Windows Vista" is complete, double-click on the...the User Account Control screen appears, click Continue. Serial Number l When the PIXMA Extended Survey Program screen appears, confirm the message. If Restart is displayed, follow the on as "Windows Vista") installation. Note Move the cursor over items to display explanations of each...


