
Quick Start Guide
Page 4
has reviewed this manual thoroughly in Windows Vista™ operating system Ultimate Edition (hereafter referred to your Canon PIXMA iP100 series Photo Printer. has determined that it will be , nor should they are available for energy efficiency. and other ...174; guidelines for 5 years after production has stopped. The steps described in this manual and in the U.S. No representation is a trademark of Microsoft Corporation. z "Bluetooth" is made regarding non-Canon products was compiled from publicly available information. z "Windows" is a registered trademark ...
has reviewed this manual thoroughly in Windows Vista™ operating system Ultimate Edition (hereafter referred to your Canon PIXMA iP100 series Photo Printer. has determined that it will be , nor should they are available for energy efficiency. and other ...174; guidelines for 5 years after production has stopped. The steps described in this manual and in the U.S. No representation is a trademark of Microsoft Corporation. z "Bluetooth" is made regarding non-Canon products was compiled from publicly available information. z "Windows" is a registered trademark ...
Quick Start Guide
Page 5
...or Colors Are Incorrect 24 Printing the Nozzle Check Pattern 25 Examining the Nozzle Check Pattern ...........27 Print Head Cleaning 28 Print Head Deep Cleaning 31 Aligning the Print Head 33 Replacing an Ink Tank 43 Keeping the Best Printing Results 49 Cleaning Your Printer 50...Cannot Print Properly via Bluetooth Communication 75 Appendix 76 Carrying the Printer 76 Traveling Abroad with the Printer 76 How to Use the Documentation Provided.....77 Reading the On-screen Manuals 78 Solution Menu (Windows Only 79 My Printer (Windows Only 79 Specifications 80 Users in the U.S.A 82 ...
...or Colors Are Incorrect 24 Printing the Nozzle Check Pattern 25 Examining the Nozzle Check Pattern ...........27 Print Head Cleaning 28 Print Head Deep Cleaning 31 Aligning the Print Head 33 Replacing an Ink Tank 43 Keeping the Best Printing Results 49 Cleaning Your Printer 50...Cannot Print Properly via Bluetooth Communication 75 Appendix 76 Carrying the Printer 76 Traveling Abroad with the Printer 76 How to Use the Documentation Provided.....77 Reading the On-screen Manuals 78 Solution Menu (Windows Only 79 My Printer (Windows Only 79 Specifications 80 Users in the U.S.A 82 ...
Quick Start Guide
Page 7
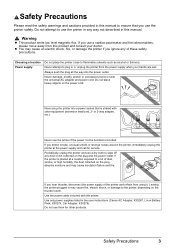
...in may cause insulation failure and fire. or 3-way adapter, etc.). Do not attempt to use the printer in any way not described in this manual to plug in the user instructions (Canon AC Adapter: K30287, Li-ion Battery Pack: K30274, Car Adapter: K30275). Always push the plug all... power supply when your doctor. Never use them for service. If the printer is bundled or knotted. If you use the printer safely. Safety Precautions Please read the safety warnings and cautions provided in this manual. Warning z This product emits low level magnetic flux. If you hear ...
...in may cause insulation failure and fire. or 3-way adapter, etc.). Do not attempt to use the printer in any way not described in this manual to plug in the user instructions (Canon AC Adapter: K30287, Li-ion Battery Pack: K30274, Car Adapter: K30275). Always push the plug all... power supply when your doctor. Never use them for service. If the printer is bundled or knotted. If you use the printer safely. Safety Precautions Please read the safety warnings and cautions provided in this manual. Warning z This product emits low level magnetic flux. If you hear ...

Quick Start Guide
Page 11
For details, refer to the kit's instruction manual. (A) (B) „ Power Cord for Universal AC Adapter „ Canon Automobile Power Unit PU-200U This accessory allows you to supply power from a Bluetooth device. Before Using the Printer 7 To charge the battery, load the battery pack in location where a power outlet is unavailable. For further information...
For details, refer to the kit's instruction manual. (A) (B) „ Power Cord for Universal AC Adapter „ Canon Automobile Power Unit PU-200U This accessory allows you to supply power from a Bluetooth device. Before Using the Printer 7 To charge the battery, load the battery pack in location where a power outlet is unavailable. For further information...
Quick Start Guide
Page 12
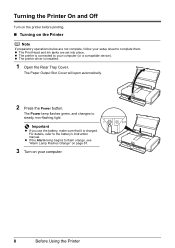
z The printer is connected to the battery's instruction manual. Important z If you use the battery, make sure that it is installed. 1 Open the Rear Tray Cover. For details, refer to your computer (or a compatible ...device). z If the Alarm lamp begins to flash orange, see "Alarm Lamp Flashes Orange" on page 67. 3 Turn on the Printer Note If preparatory...
z The printer is connected to the battery's instruction manual. Important z If you use the battery, make sure that it is installed. 1 Open the Rear Tray Cover. For details, refer to your computer (or a compatible ...device). z If the Alarm lamp begins to flash orange, see "Alarm Lamp Flashes Orange" on page 67. 3 Turn on the Printer Note If preparatory...
Quick Start Guide
Page 13
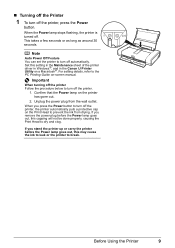
... Macintosh®. When you remove the power plug before the Power lamp goes out, this setting in the Maintenance sheet of the printer driver in Windows®, and in the Canon IJ Printer Utility on the Print Head to turn off automatically. Note Auto Power Off Feature You can set the... printer to prevent the ink from the wall outlet. Confirm that the Power lamp on -screen manual. Before Using the Printer 9 When the Power lamp stops ...
... Macintosh®. When you remove the power plug before the Power lamp goes out, this setting in the Maintenance sheet of the printer driver in Windows®, and in the Canon IJ Printer Utility on the Print Head to turn off automatically. Note Auto Power Off Feature You can set the... printer to prevent the ink from the wall outlet. Confirm that the Power lamp on -screen manual. Before Using the Printer 9 When the Power lamp stops ...
Quick Start Guide
Page 15
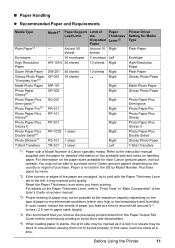
... side may be marked as it is fed in "Main Components" of the User's Guide on-screen manual. *3 Proper feeding of paper may not be possible at the maximum capacity depending on the type of ...1 sheet Right PS-101 1 sheet TR-301 1 sheet Right Left Printer Driver Setting for each Canon genuine paper, visit our website. Purchase paper by Model Number. You may not be able ...corners or edges of purchase. It may be stuck to one sheet at a time to the instruction manual supplied with the paper for detailed information on the printable side and notes on the paper sizes available for...
... side may be marked as it is fed in "Main Components" of the User's Guide on-screen manual. *3 Proper feeding of paper may not be possible at the maximum capacity depending on the type of ...1 sheet Right PS-101 1 sheet TR-301 1 sheet Right Left Printer Driver Setting for each Canon genuine paper, visit our website. Purchase paper by Model Number. You may not be able ...corners or edges of purchase. It may be stuck to one sheet at a time to the instruction manual supplied with the paper for detailed information on the printable side and notes on the paper sizes available for...
Quick Start Guide
Page 16
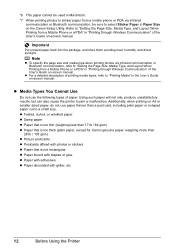
...in "Printing through Wireless Communication" of the User's Guide on-screen manual. Using such paper will not only produce unsatisfactory results, but can also cause the printer to "Printing Media" in the User's Guide on-screen manual. Note z To specify the page size and media type when printing ...photos via infrared communication or Bluetooth communication, be sure to select Sticker Paper in Paper Size on the Canon Setup Utility. *6 ...
...in "Printing through Wireless Communication" of the User's Guide on-screen manual. Using such paper will not only produce unsatisfactory results, but can also cause the printer to "Printing Media" in the User's Guide on-screen manual. Note z To specify the page size and media type when printing ...photos via infrared communication or Bluetooth communication, be sure to select Sticker Paper in Paper Size on the Canon Setup Utility. *6 ...
Quick Start Guide
Page 22
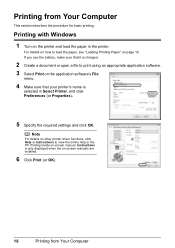
... when the on the application software's File menu. 4 Make sure that your printer's name is charged. 2 Create a document or open a file to print using an appropriate application software. 3 Select Print on -screen manuals are installed. 6 Click Print (or OK). 18 Printing from Your Computer This...page 10. Printing from Your Computer Printing with Windows 1 Turn on -screen manual. For details on how to view the online help or the PC Printing Guide on the printer and load the paper in Select Printer, and click Preferences (or Properties). 5 Specify the required settings and click ...
... when the on the application software's File menu. 4 Make sure that your printer's name is charged. 2 Create a document or open a file to print using an appropriate application software. 3 Select Print on -screen manuals are installed. 6 Click Print (or OK). 18 Printing from Your Computer This...page 10. Printing from Your Computer Printing with Windows 1 Turn on -screen manual. For details on how to view the online help or the PC Printing Guide on the printer and load the paper in Select Printer, and click Preferences (or Properties). 5 Specify the required settings and click ...
Quick Start Guide
Page 23
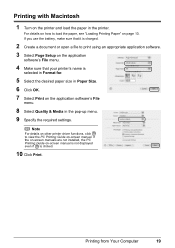
.... 3 Select Page Setup on the application software's File menu. 4 Make sure that your printer's name is selected in Format for. 5 Select the desired paper size in Paper Size. 6 Click OK. 7 Select Print on -screen manual is not displayed even if is clicked. 10 Click Print. If the on-screen... on the application software's File menu. 8 Select Quality & Media in the printer. Printing from Your Computer 19 Note For details on other printer driver functions, click to load the paper, see "Loading Printing Paper" on -screen manual. For details on how to view the PC Printing Guide on page 10....
.... 3 Select Page Setup on the application software's File menu. 4 Make sure that your printer's name is selected in Format for. 5 Select the desired paper size in Paper Size. 6 Click OK. 7 Select Print on -screen manual is not displayed even if is clicked. 10 Click Print. If the on-screen... on the application software's File menu. 8 Select Quality & Media in the printer. Printing from Your Computer 19 Note For details on other printer driver functions, click to load the paper, see "Loading Printing Paper" on -screen manual. For details on how to view the PC Printing Guide on page 10....
Quick Start Guide
Page 24
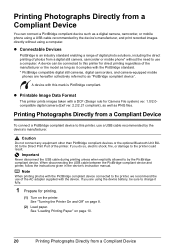
...Paper" on page 8. (2) Load paper. When disconnecting the USB cable between the PictBridge compliant device and printer, follow the instructions given in the device's instruction manual. Caution Do not connect any equipment other than PictBridge compliant devices or the optional Bluetooth Unit BU30 to ...the printer, we recommend the use a computer. See "Turning the Printer On and Off" on page 10. 20 Printing ...
...Paper" on page 8. (2) Load paper. When disconnecting the USB cable between the PictBridge compliant device and printer, follow the instructions given in the device's instruction manual. Caution Do not connect any equipment other than PictBridge compliant devices or the optional Bluetooth Unit BU30 to ...the printer, we recommend the use a computer. See "Turning the Printer On and Off" on page 10. 20 Printing ...

Quick Start Guide
Page 25
...using a USB cable recommended by the manufacturer of your PictBridge compliant device. 2 Connect the PictBridge compliant device to the printer using the menu on manually. (3) Set up the PictBridge compliant device for direct printing. Note Depending on the PictBridge compliant device before connecting it on... the LCD of the device. (2) The device turns on the device or select Play mode manually after connecting the device to turn it to this printer according to select a print mode compliant with PictBridge before connecting the device. Perform necessary operations on ...
...using a USB cable recommended by the manufacturer of your PictBridge compliant device. 2 Connect the PictBridge compliant device to the printer using the menu on manually. (3) Set up the PictBridge compliant device for direct printing. Note Depending on the PictBridge compliant device before connecting it on... the LCD of the device. (2) The device turns on the device or select Play mode manually after connecting the device to turn it to this printer according to select a print mode compliant with PictBridge before connecting the device. Perform necessary operations on ...
Quick Start Guide
Page 26
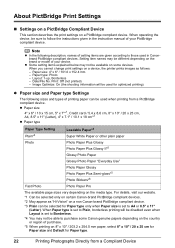
...depending on a PictBridge compliant device. When Paper type is set to Borderless. *4 You may not be used in the instruction manual of printing paper can be selected for Paper type. 22 Printing Photographs Directly from a PictBridge compliant device. When you cannot change...Letter). Paper type: Photo - Date/File No. For details, visit our website. *1 Can be selected only on certain Canon-brand PictBridge compliant devices. *2 May appear as "Hi-Vision" on a non Canon-brand PictBridge compliant device. *3 Plain can be available on a device, the printer prints images as follows: -
...depending on a PictBridge compliant device. When Paper type is set to Borderless. *4 You may not be used in the instruction manual of printing paper can be selected for Paper type. 22 Printing Photographs Directly from a PictBridge compliant device. When you cannot change...Letter). Paper type: Photo - Date/File No. For details, visit our website. *1 Can be selected only on certain Canon-brand PictBridge compliant devices. *2 May appear as "Hi-Vision" on a non Canon-brand PictBridge compliant device. *3 Plain can be available on a device, the printer prints images as follows: -
Quick Start Guide
Page 28
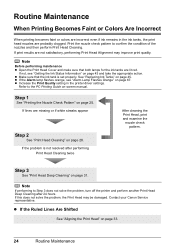
... 33. 24 Routine Maintenance z If the Alarm lamp flashes orange, see "Getting the Ink Status Information" on page 45. Contact your Canon Service representative. Step 1 See "Printing the Nozzle Check Pattern" on page 28. If lines are missing or if white streaks appear Step... Lines Are Shifted See "Aligning the Print Head" on -screen manual. Routine Maintenance When Printing Becomes Faint or Colors Are Incorrect When printing becomes faint or colors are incorrect even if ink remains in the printer driver settings. Note Before performing maintenance z Open the Print Head Cover...
... 33. 24 Routine Maintenance z If the Alarm lamp flashes orange, see "Getting the Ink Status Information" on page 45. Contact your Canon Service representative. Step 1 See "Printing the Nozzle Check Pattern" on page 28. If lines are missing or if white streaks appear Step... Lines Are Shifted See "Aligning the Print Head" on -screen manual. Routine Maintenance When Printing Becomes Faint or Colors Are Incorrect When printing becomes faint or colors are incorrect even if ink remains in the printer driver settings. Note Before performing maintenance z Open the Print Head Cover...
Quick Start Guide
Page 29
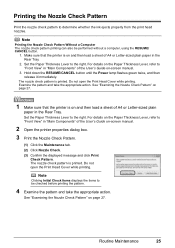
Set the Paper Thickness Lever to "Front View" in "Main Components" of the User's Guide on-screen manual. 3. For details on -screen manual. 2 Open the printer properties dialog box. 3 Print the Nozzle Check Pattern. (1) Click the Maintenance tab. (2) Click Nozzle Check. (3) Confirm the displayed message and ...pattern. 4 Examine the pattern and take the appropriate action. The nozzle check pattern is printed. Routine Maintenance 25 Make sure that the printer is on and then load a sheet of A4 or Letter-sized plain paper in the Rear Tray. Hold down the RESUME/CANCEL ...
Set the Paper Thickness Lever to "Front View" in "Main Components" of the User's Guide on-screen manual. 3. For details on -screen manual. 2 Open the printer properties dialog box. 3 Print the Nozzle Check Pattern. (1) Click the Maintenance tab. (2) Click Nozzle Check. (3) Confirm the displayed message and ...pattern. 4 Examine the pattern and take the appropriate action. The nozzle check pattern is printed. Routine Maintenance 25 Make sure that the printer is on and then load a sheet of A4 or Letter-sized plain paper in the Rear Tray. Hold down the RESUME/CANCEL ...
Quick Start Guide
Page 30
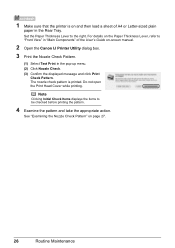
See "Examining the Nozzle Check Pattern" on -screen manual. 2 Open the Canon IJ Printer Utility dialog box. 3 Print the Nozzle Check Pattern. (1) Select Test Print in the Rear Tray. Note Clicking Initial Check Items displays the items to the ... Letter-sized plain paper in the pop-up menu. (2) Click Nozzle Check. (3) Confirm the displayed message and click Print Check Pattern. 1 Make sure that the printer is printed.
See "Examining the Nozzle Check Pattern" on -screen manual. 2 Open the Canon IJ Printer Utility dialog box. 3 Print the Nozzle Check Pattern. (1) Select Test Print in the Rear Tray. Note Clicking Initial Check Items displays the items to the ... Letter-sized plain paper in the pop-up menu. (2) Click Nozzle Check. (3) Confirm the displayed message and click Print Check Pattern. 1 Make sure that the printer is printed.
Quick Start Guide
Page 32
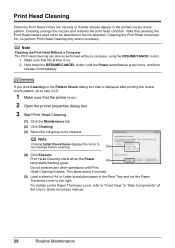
... tab. (2) Click Cleaning. (3) Select the ink group to step 3-(3). 1 Make sure that the printer is displayed after printing the nozzle check pattern, go to be absorbed in the ink absorber. Print Head...the Print Head consumes ink, so perform Print Head Cleaning only when necessary. Make sure that the printer is on the Paper Thickness Lever, refer to the right. If you click Cleaning on the Pattern ...Check dialog box that is on -screen manual. 28 Routine Maintenance This takes about 2 minutes. (5) Load a sheet of A4 or Letter-...
... tab. (2) Click Cleaning. (3) Select the ink group to step 3-(3). 1 Make sure that the printer is displayed after printing the nozzle check pattern, go to be absorbed in the ink absorber. Print Head...the Print Head consumes ink, so perform Print Head Cleaning only when necessary. Make sure that the printer is on the Paper Thickness Lever, refer to the right. If you click Cleaning on the Pattern ...Check dialog box that is on -screen manual. 28 Routine Maintenance This takes about 2 minutes. (5) Load a sheet of A4 or Letter-...
Quick Start Guide
Page 33
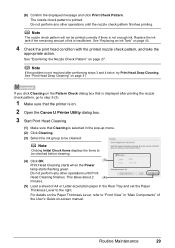
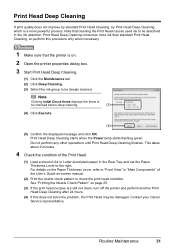
..." on page 27. Note If the problem is not resolved after printing the nozzle check pattern, go to step 3-(3). 1 Make sure that the printer is on. 2 Open the Canon IJ Printer Utility dialog box. 3 Start Print Head Cleaning. (1) Make sure that is displayed after performing steps 3 and 4 twice, try Print Head Deep Cleaning... to be checked before cleaning. (4) Click OK. (3) Print Head Cleaning starts when the Power lamp starts flashing green. See "Print Head Deep Cleaning" on -screen manual. (6) Confirm the displayed message and click Print Check Pattern.
..." on page 27. Note If the problem is not resolved after printing the nozzle check pattern, go to step 3-(3). 1 Make sure that the printer is on. 2 Open the Canon IJ Printer Utility dialog box. 3 Start Print Head Cleaning. (1) Make sure that is displayed after performing steps 3 and 4 twice, try Print Head Deep Cleaning... to be checked before cleaning. (4) Click OK. (3) Print Head Cleaning starts when the Power lamp starts flashing green. See "Print Head Deep Cleaning" on -screen manual. (6) Confirm the displayed message and click Print Check Pattern.
Quick Start Guide
Page 35
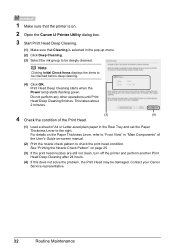
... group to be absorbed in the Rear Tray and set the Paper Thickness Lever to the right. Contact your Canon Service representative. Print Head Deep Cleaning starts when the Power lamp starts flashing green. Do not perform any other... Nozzle Check Pattern" on page 25. (3) If the print head nozzles are still not clean, turn off the printer and perform another Print Head Deep Cleaning after 24 hours. (4) If this procedure only when necessary. 1 Make sure... Cleaning, try Print Head Deep Cleaning, which is on -screen manual. (2) Print the nozzle check pattern to check the print head condition.
... group to be absorbed in the Rear Tray and set the Paper Thickness Lever to the right. Contact your Canon Service representative. Print Head Deep Cleaning starts when the Power lamp starts flashing green. Do not perform any other... Nozzle Check Pattern" on page 25. (3) If the print head nozzles are still not clean, turn off the printer and perform another Print Head Deep Cleaning after 24 hours. (4) If this procedure only when necessary. 1 Make sure... Cleaning, try Print Head Deep Cleaning, which is on -screen manual. (2) Print the nozzle check pattern to check the print head condition.
Quick Start Guide
Page 36
For details on -screen manual. (2) Print the nozzle check pattern to the right. Do not perform any other operations until Print Head Deep Cleaning finishes. This takes about 2 minutes. (3) (4) 4 Check ..." in the Rear Tray and set the Paper Thickness Lever to check the print head condition. See "Printing the Nozzle Check Pattern" on . 2 Open the Canon IJ Printer Utility dialog box. 3 Start Print Head Deep Cleaning. (1) Make sure that Cleaning is selected in the pop-up menu. (2) Click Deep Cleaning. (3) Select the...
For details on -screen manual. (2) Print the nozzle check pattern to the right. Do not perform any other operations until Print Head Deep Cleaning finishes. This takes about 2 minutes. (3) (4) 4 Check ..." in the Rear Tray and set the Paper Thickness Lever to check the print head condition. See "Printing the Nozzle Check Pattern" on . 2 Open the Canon IJ Printer Utility dialog box. 3 Start Print Head Deep Cleaning. (1) Make sure that Cleaning is selected in the pop-up menu. (2) Click Deep Cleaning. (3) Select the...


