i900D Quick Start Guide
Page 3
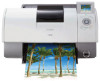
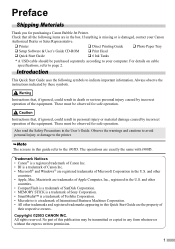
..., refer to your Canon Authorized Dealer or Sales Representative. ‰ Printer ‰ Direct Printing Guide ‰ Photo Paper Tray ‰ Setup Software & User's Guide CD-ROM ‰ Print Head ‰ Quick Start Guide ‰ 6 Ink Tanks * A USB... cable should be observed for safe operation. Also read the Safety Precautions in this Quick Start Guide are the property of Apple Computer, Inc., registered in the U.S. The operations are trademarks of their respective owners. and other countries. • Apple, Mac, Macintosh are exactly the same with i900D...
..., refer to your Canon Authorized Dealer or Sales Representative. ‰ Printer ‰ Direct Printing Guide ‰ Photo Paper Tray ‰ Setup Software & User's Guide CD-ROM ‰ Print Head ‰ Quick Start Guide ‰ 6 Ink Tanks * A USB... cable should be observed for safe operation. Also read the Safety Precautions in this Quick Start Guide are the property of Apple Computer, Inc., registered in the U.S. The operations are trademarks of their respective owners. and other countries. • Apple, Mac, Macintosh are exactly the same with i900D...
i900D Quick Start Guide
Page 8
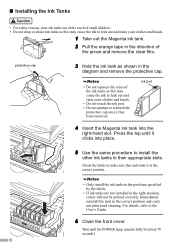
... cover. For details, refer to make sure that each tank is in the correct position. • Only install the ink tanks in the positions specified by the labels. • If ink tanks are not installed in the right position, colors will not be printed correctly. Wait until it has been removed...the protective cap. • Do not squeeze the sides of the arrow and remove the clear film. ink port 4 Insert the Magenta ink tank into place. 5 Use the same procedure to install the other ink tanks in their appropriate slots. Press the top until the POWER lamp remains fully lit (about 70 ...
... cover. For details, refer to make sure that each tank is in the correct position. • Only install the ink tanks in the positions specified by the labels. • If ink tanks are not installed in the right position, colors will not be printed correctly. Wait until it has been removed...the protective cap. • Do not squeeze the sides of the arrow and remove the clear film. ink port 4 Insert the Magenta ink tank into place. 5 Use the same procedure to install the other ink tanks in their appropriate slots. Press the top until the POWER lamp remains fully lit (about 70 ...
i900D Quick Start Guide
Page 17
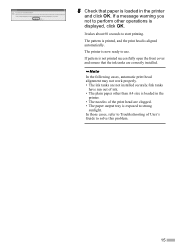
... OK. If pattern is not printed successfully open the front cover and ensure that paper is exposed to solve this problem. 15 5 Check that the ink tanks are correctly installed. It takes about 60 seconds to use. In the following cases, automatic print head alignment may not work properly. • The... are clogged. • The paper output tray is loaded in the printer. • The nozzles of the print head are not installed securely./Ink tanks have run out of User's Guide to strong sunlight. The printer is loaded in the printer and click OK. In those cases, refer to ...
... OK. If pattern is not printed successfully open the front cover and ensure that paper is exposed to solve this problem. 15 5 Check that the ink tanks are correctly installed. It takes about 60 seconds to use. In the following cases, automatic print head alignment may not work properly. • The... are clogged. • The paper output tray is loaded in the printer. • The nozzles of the print head are not installed securely./Ink tanks have run out of User's Guide to strong sunlight. The printer is loaded in the printer and click OK. In those cases, refer to ...
i900D Quick Start Guide
Page 18
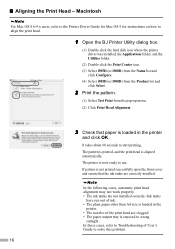
...was installed, the Applications folder, and the Utilities folder. (2) Double-click the Print Center icon. (3) Select i905D (or i900D) from the Name list and click Configure. (4) Select i905D (or i900D) from the Product list and click Select. 2 Print the pattern. (1) Select Test Print from the pop-up menu. (2)... Click Print Head Alignment. 3 Check that the ink tanks are clogged. • The paper output tray is loaded in ...
...was installed, the Applications folder, and the Utilities folder. (2) Double-click the Print Center icon. (3) Select i905D (or i900D) from the Name list and click Configure. (4) Select i905D (or i900D) from the Product list and click Select. 2 Print the pattern. (1) Select Test Print from the pop-up menu. (2)... Click Print Head Alignment. 3 Check that the ink tanks are clogged. • The paper output tray is loaded in ...
i900D Quick Start Guide
Page 19
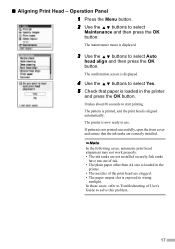
In the following cases, automatic print head alignment may not work properly. • The ink tanks are not installed securely./Ink tanks have run out of ink. • The plain paper other than A4 size is loaded in the printer. • The nozzles of User's Guide to solve this ...are correctly installed. In those cases, refer to strong sunlight. The confirmation screen is displayed. 4 Use the buttons to select Yes. 5 Check that the ink tanks are clogged. • The paper output slot is now ready to start printing. Operation Panel 1 Press the Menu button. 2 Use the buttons ...
In the following cases, automatic print head alignment may not work properly. • The ink tanks are not installed securely./Ink tanks have run out of ink. • The plain paper other than A4 size is loaded in the printer. • The nozzles of User's Guide to solve this ...are correctly installed. In those cases, refer to strong sunlight. The confirmation screen is displayed. 4 Use the buttons to select Yes. 5 Check that the ink tanks are clogged. • The paper output slot is now ready to start printing. Operation Panel 1 Press the Menu button. 2 Use the buttons ...
i900D Quick Start Guide
Page 24
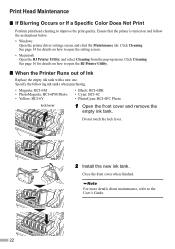
... on how to the User's Guide. 22 Ensure that the printer is turned on how to improve the print quality. Click Cleaning. Specify the following ink tanks when purchasing. • Magenta: BCI-6M • PhotoMagenta: BCI-6PM Photo • Yellow: BCI-6Y • Black: BCI-6BK • Cyan:... BCI-6C • PhotoCyan: BCI-6PC Photo lock lever 1 Open the front cover and remove the empty ink tank. Close the front cover when finished. Print Head Maintenance „ If Blurring Occurs or If a Specific Color Does Not Print Perform print head cleaning...
... on how to the User's Guide. 22 Ensure that the printer is turned on how to improve the print quality. Click Cleaning. Specify the following ink tanks when purchasing. • Magenta: BCI-6M • PhotoMagenta: BCI-6PM Photo • Yellow: BCI-6Y • Black: BCI-6BK • Cyan:... BCI-6C • PhotoCyan: BCI-6PC Photo lock lever 1 Open the front cover and remove the empty ink tank. Close the front cover when finished. Print Head Maintenance „ If Blurring Occurs or If a Specific Color Does Not Print Perform print head cleaning...
i900D Quick Start Guide
Page 26
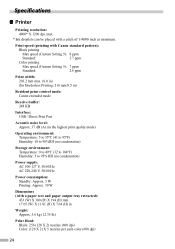
...Ink droplets can be placed with a paper rest and paper output tray retracted): 433 (W) X 300 (D) X 194 (H) mm 17.05 (W) X 11.81 (D) X 7.64 (H) in Weight: Approx. 5.6 kg (12.35 lb.) Print Head: Black: 256 (128 X 2) nozzles (600 dpi) Color: (128 X 2) X 5 nozzles per each color (600 dpi) 24 Print speed (printing with Canon... Standard: 2.6 ppm Print width: 203.2 mm max. (8.0 in) (for Borderless Printing: 216 mm/8.5 in) Resident print control mode: Canon extended mode Receive buffer: 248 KB Interface: USB / Direct Print Port Acoustic noise level: Approx. 37 dB (A) (in the highest print...
...Ink droplets can be placed with a paper rest and paper output tray retracted): 433 (W) X 300 (D) X 194 (H) mm 17.05 (W) X 11.81 (D) X 7.64 (H) in Weight: Approx. 5.6 kg (12.35 lb.) Print Head: Black: 256 (128 X 2) nozzles (600 dpi) Color: (128 X 2) X 5 nozzles per each color (600 dpi) 24 Print speed (printing with Canon... Standard: 2.6 ppm Print width: 203.2 mm max. (8.0 in) (for Borderless Printing: 216 mm/8.5 in) Resident print control mode: Canon extended mode Receive buffer: 248 KB Interface: USB / Direct Print Port Acoustic noise level: Approx. 37 dB (A) (in the highest print...

i900D Quick Start Guide
Page 27
Ink Tanks: Capacity (pages): Black (BCI-6BK) Cyan (BCI-6C) Magenta (BCI-6M) Yellow (BCI-6Y) PhotoCyan (BCI-6PC) PhotoMagenta (BCI-6PM ) approx. 520*1, approx. 540*2 ... which is compatible with the above.) Supported recording formats: JPEG (DCF/CIFF/Exif 2.2 or earlier/JFIF), TIFF (Exif compliant), DPOF compliant „ Camera Direct Print (Canon "Bubble Jet Direct") Compatible Paper: Card #1 (Photo Paper Pro 4" X 6"/101.6 X 152.4 mm), Card #2 (Photo Paper Plus Glossy 4" X 6"/ 101.6 X 152.4 mm), Card #3 (Photo Paper Plus Glossy...
Ink Tanks: Capacity (pages): Black (BCI-6BK) Cyan (BCI-6C) Magenta (BCI-6M) Yellow (BCI-6Y) PhotoCyan (BCI-6PC) PhotoMagenta (BCI-6PM ) approx. 520*1, approx. 540*2 ... which is compatible with the above.) Supported recording formats: JPEG (DCF/CIFF/Exif 2.2 or earlier/JFIF), TIFF (Exif compliant), DPOF compliant „ Camera Direct Print (Canon "Bubble Jet Direct") Compatible Paper: Card #1 (Photo Paper Pro 4" X 6"/101.6 X 152.4 mm), Card #2 (Photo Paper Plus Glossy 4" X 6"/ 101.6 X 152.4 mm), Card #3 (Photo Paper Plus Glossy...

i900D Quick Start Guide
Page 29
The following ink tanks are compatible with this guide. QA7-2790-V01 XX2003XX ©CANON INC.2003 PRINTED IN THAILAND For details on ink tank replacement, refer to "Print Head Maintenance" in this printer.
The following ink tanks are compatible with this guide. QA7-2790-V01 XX2003XX ©CANON INC.2003 PRINTED IN THAILAND For details on ink tank replacement, refer to "Print Head Maintenance" in this printer.
i900D Easy Setup Instructions
Page 1
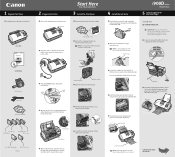
...paper output tray. NOTE: Do not touch the electrical contacts or the print head nozzles. 4 Install the Ink Tanks i 900D Series Photo Printer 5 Connect the Printer and Load Paper 1 Peel back the orange tab ...and completely remove the plastic wrapper from the Magenta Ink Tank (BCI-6M). 2 Twist off before the printer is ready. 2 Connect one end of the paper. ...Yellow BCI-6BK Black BCI-6M Magenta BCI-6C Cyan BCI-6PM Photo Magenta BCI-6PC Photo Cyan Ink Tanks 3 Press the POWER button. Slide the guide toward you as you lower it to the ...
...paper output tray. NOTE: Do not touch the electrical contacts or the print head nozzles. 4 Install the Ink Tanks i 900D Series Photo Printer 5 Connect the Printer and Load Paper 1 Peel back the orange tab ...and completely remove the plastic wrapper from the Magenta Ink Tank (BCI-6M). 2 Twist off before the printer is ready. 2 Connect one end of the paper. ...Yellow BCI-6BK Black BCI-6M Magenta BCI-6C Cyan BCI-6PM Photo Magenta BCI-6PC Photo Cyan Ink Tanks 3 Press the POWER button. Slide the guide toward you as you lower it to the ...
i900D Direct Printing Guide
Page 2
Print Index 19 Specifying the layout 20 Printing According to Replace an Ink Tank 35 Replacing Ink Tanks 36 Printing Maintenance When Printing Becomes Faint or Colors are Incorrect 38 Printing the Nozzle Check Pattern 39 Examining the Nozzle Check Pattern 39 ... Drive of the Computer 31 Changing the Language Displayed 32 Adjusting Contrast of the LCD 33 Reducing the Sound of Printer Operation 34 Replacing an Ink Tank Knowing When to the Settings Made on the LCD 43 An Error Message is Displayed While Using the Photo Viewer 47 Index 48 1
Print Index 19 Specifying the layout 20 Printing According to Replace an Ink Tank 35 Replacing Ink Tanks 36 Printing Maintenance When Printing Becomes Faint or Colors are Incorrect 38 Printing the Nozzle Check Pattern 39 Examining the Nozzle Check Pattern 39 ... Drive of the Computer 31 Changing the Language Displayed 32 Adjusting Contrast of the LCD 33 Reducing the Sound of Printer Operation 34 Replacing an Ink Tank Knowing When to the Settings Made on the LCD 43 An Error Message is Displayed While Using the Photo Viewer 47 Index 48 1
i900D Direct Printing Guide
Page 5
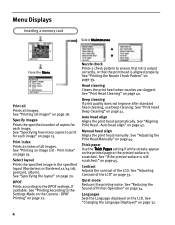
... noise. Select layout Prints the specified image in the specified layout (Borderless or Bordered x2/x4/x8, postcard, album). See "Printing According to ensure that ink is output correctly, or that the print head is aligned properly. See "Printing the Nozzle Check Pattern" on page 41. Contrast Adjusts the contrast of...
... noise. Select layout Prints the specified image in the specified layout (Borderless or Bordered x2/x4/x8, postcard, album). See "Printing According to ensure that ink is output correctly, or that the print head is aligned properly. See "Printing the Nozzle Check Pattern" on page 41. Contrast Adjusts the contrast of...
i900D Direct Printing Guide
Page 14
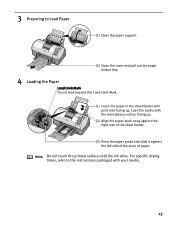
Note Do not touch the printed surface until the ink dries. 3 Preparing to the instructions packaged with the more glossy surface facing up . For specific drying times, refer to Load Paper (1) Open the paper support. (2) ...
Note Do not touch the printed surface until the ink dries. 3 Preparing to the instructions packaged with the more glossy surface facing up . For specific drying times, refer to Load Paper (1) Open the paper support. (2) ...

i900D Direct Printing Guide
Page 36
It is important to identify the empty tank using the LCD and replace it may cause a problem. The ink tank with an empty ink tank. Empty ink tank • Press the Cancel button to cancel the current print job. • Press the Resume button to orange and flash four times as soon ...as possible. If you continue printing with a new ink tank. z To cancel printing, select NO and then press the OK button. 35 See "When Printing Becomes Faint or Colors are Incorrect" on the LCD...
It is important to identify the empty tank using the LCD and replace it may cause a problem. The ink tank with an empty ink tank. Empty ink tank • Press the Cancel button to cancel the current print job. • Press the Resume button to orange and flash four times as soon ...as possible. If you continue printing with a new ink tank. z To cancel printing, select NO and then press the OK button. 35 See "When Printing Becomes Faint or Colors are Incorrect" on the LCD...

i900D Direct Printing Guide
Page 37
... printer is removed, do not touch the open the front cover. z Once the protective cap is on, and then open ink port. Replacing Ink Tanks When ink tanks run out of ink, replace them using the following steps. 1 Ensure that all the orange tape has been peeled off the orange tape. (2) ... or the surrounding area. remove only the ink tank. If there remains a part of the orange tape, ink may cause the ink to the local laws and regulations regarding disposal of ink tanks as this may not be ejected correctly. 36 z Discard empty ink tanks according to leak and stain your clothes...
... printer is removed, do not touch the open the front cover. z Once the protective cap is on, and then open ink port. Replacing Ink Tanks When ink tanks run out of ink, replace them using the following steps. 1 Ensure that all the orange tape has been peeled off the orange tape. (2) ... or the surrounding area. remove only the ink tank. If there remains a part of the orange tape, ink may cause the ink to the local laws and regulations regarding disposal of ink tanks as this may not be ejected correctly. 36 z Discard empty ink tanks according to leak and stain your clothes...

i900D Direct Printing Guide
Page 38
...when black-and-white or grayscale printing is now complete. Notes z To maintain optimal Print Quality, use an ink tank within six months of first use. 4 Install the ink tank. (1) Insert the ink tank in the open and then reinstalled in the head cleaning and deep cleaning, which are necessary to the... right. The print head holder moves to maintain the printer's performance. 37 The ink tank installation process is specified. z Once an ink tank has been used, do not remove it from the printer and leave it out in the print head holder. (2) ...
...when black-and-white or grayscale printing is now complete. Notes z To maintain optimal Print Quality, use an ink tank within six months of first use. 4 Install the ink tank. (1) Insert the ink tank in the open and then reinstalled in the head cleaning and deep cleaning, which are necessary to the... right. The print head holder moves to maintain the printer's performance. 37 The ink tank installation process is specified. z Once an ink tank has been used, do not remove it from the printer and leave it out in the print head holder. (2) ...
i900D Direct Printing Guide
Page 39
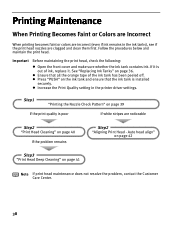
... stripes are clogged and clean them first. Important Before maintaining the print head, check the following: z Open the front cover and make sure whether the ink tank contains ink. z Press "PUSH" on page 40 If the problem remains Step2 "Aligning Print Head - If it . z Ensure that the... ink tank is out of the ink tank has been peeled off. Follow the procedures below and maintain the print head. Printing Maintenance When Printing Becomes Faint or Colors are Incorrect When ...
... stripes are clogged and clean them first. Important Before maintaining the print head, check the following: z Open the front cover and make sure whether the ink tank contains ink. z Press "PUSH" on page 40 If the problem remains Step2 "Aligning Print Head - If it . z Ensure that the... ink tank is out of the ink tank has been peeled off. Follow the procedures below and maintain the print head. Printing Maintenance When Printing Becomes Faint or Colors are Incorrect When ...
i900D Direct Printing Guide
Page 40
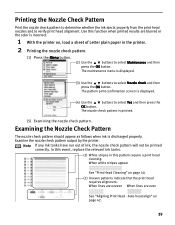
...discharged properly. When lines are uneven When lines are blurred or the color is incorrect. 1 With the printer on, load a sheet of ink, the nozzle check pattern will not be printed correctly. When white stripes appear See "Print Head Cleaning" on page 42. 39 Examining the Nozzle... the printer. 2 Printing the nozzle check pattern. (1) Press the Menu button. (2) Use the buttons to verify print head alignment. Note If any ink tanks have run out of Letter plain paper in this function when printed results are even See "Aligning Print Head - Use this pattern require a print...
...discharged properly. When lines are uneven When lines are blurred or the color is incorrect. 1 With the printer on, load a sheet of ink, the nozzle check pattern will not be printed correctly. When white stripes appear See "Print Head Cleaning" on page 42. 39 Examining the Nozzle... the printer. 2 Printing the nozzle check pattern. (1) Press the Menu button. (2) Use the buttons to verify print head alignment. Note If any ink tanks have run out of Letter plain paper in this function when printed results are even See "Aligning Print Head - Use this pattern require a print...
i900D Direct Printing Guide
Page 41
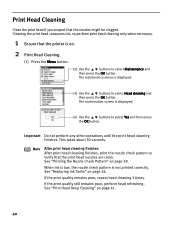
...If the print quality remains poor, repeat head cleaning 3 times. Cleaning the print head consumes ink, so perform print head cleaning only when necessary. 1 Ensure that the printer is not printed correctly. See "Replacing Ink Tanks" on . 2 Print Head Cleaning. (1) Press the Menu button. (2) Use the ... poor, perform head refreshing. The confirmation screen is displayed. (3) Use the buttons to verify that the nozzles might be clogged. When ink is low, the nozzle check pattern is on page 36. Note After print head cleaning finishes After print head cleaning finishes, print the...
...If the print quality remains poor, repeat head cleaning 3 times. Cleaning the print head consumes ink, so perform print head cleaning only when necessary. 1 Ensure that the printer is not printed correctly. See "Replacing Ink Tanks" on . 2 Print Head Cleaning. (1) Press the Menu button. (2) Use the ... poor, perform head refreshing. The confirmation screen is displayed. (3) Use the buttons to verify that the nozzles might be clogged. When ink is low, the nozzle check pattern is on page 36. Note After print head cleaning finishes After print head cleaning finishes, print the...
i900D Direct Printing Guide
Page 42
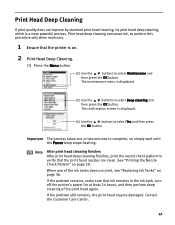
..., turn off the printer's power for at least 24 hours, and then perform deep cleaning of the ink tanks does not print, see "Replacing Ink Tanks" on page 39. If the problem remains, make sure that the print head nozzles are clean. The maintenance menu is on. 2 Print ...print head may be damaged. Contact the Customer Care Center. 41 See "Printing the Nozzle Check Pattern" on page 36. Print head deep cleaning consumes ink, so perform this procedure only when necessary. 1 Ensure that the printer is displayed. (3) Use the buttons to select Deep cleaning and then press the...
..., turn off the printer's power for at least 24 hours, and then perform deep cleaning of the ink tanks does not print, see "Replacing Ink Tanks" on page 39. If the problem remains, make sure that the print head nozzles are clean. The maintenance menu is on. 2 Print ...print head may be damaged. Contact the Customer Care Center. 41 See "Printing the Nozzle Check Pattern" on page 36. Print head deep cleaning consumes ink, so perform this procedure only when necessary. 1 Ensure that the printer is displayed. (3) Use the buttons to select Deep cleaning and then press the...


