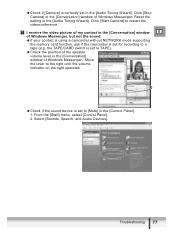
ZoomBrowser EX 6.5 for Windows Instruction Manual
Page 10
... card reader to complete settings in the screen currently displayed. HINT Changing the Transfer Destination Folder The default settings save transferred images into the [Pictures] or [My Pictures] folders. CameraWindow (Menu Screen) After you click [OK] in the dialog that have not yet been transferred will display in Step 4 as described above...
ZoomBrowser EX 6.5 for Windows Instruction Manual
Page 31
... can be processed. • Ensure that occurs when shooting night time scenery, or when shooting at a high ISO speed. Adjusts the brightness, white balance and picture style. Selects folders containing images. Adjusts the contrast, color tone, color saturation and sharpness. 3 Click (Edit image window). 4 Adjust the image brightness and white balance... of Contents 31 Reduces noise that you can adjust all three RGB channel levels together or separately with your desired scene or subject by specifying a picture style. • The items available to JPEG and TIFF images.
DV NETWORK SOLUTION DISK Ver.2 Software Instruction Manual
Page 35
In PLAY (VCR) mode, the recorded video appears. DV Messenger 6 Read the explanation for speaker and microphone settings and click [Next]. 4 Select your camcorder and click [Next]. Videoconferencing 35 In NETWORK or CAMERA mode, the live video appears. If you are connecting a Canon camcorder using a USB cable, select [Canon USB Video]. If you are connecting a Canon camcorder using a E DV cable, select [Canon DV Device]. 5 When the video picture appears, click [Next].
DV NETWORK SOLUTION DISK Ver.2 Software Instruction Manual
Page 38
If you press [Select], the connection will be listed. Video picture of your contact's camcorder Video picture of your contact from the DVM panel. The communication between your and your contact's DV Messenger starts and you can only perform a videoconference with members ...
DV NETWORK SOLUTION DISK Ver.2 Software Instruction Manual
Page 47
E A message with the options [Accept] and [Decline] appears in the [Conversation] window of the Camcorder 47 Changing the Mode of your contact clicks [Accept], the videoconference restarts. If your contact. DV Messenger 3 Wait until the video picture and camcorder information such as the tape counter appear on the camcorder screen and click [Start Camera].
DV NETWORK SOLUTION DISK Ver.2 Software Instruction Manual
Page 48
... your contact 48 Operating Camcorders with DV Messenger: Your Camcorder Your Contact's Camcorder Canon Digital Camcorder Canon Digital Camcorder Non-Canon Digital Camcorder Non-Canon Canon Digital Camcorder Digital Camcorder Non-Canon Digital Camcorder You can operate your and your contact's camcorder. Camcorders that can be... either camcorder. Depending on the lower part of the communication line during videoconference, video picture may appear interrupted or sound may not be able to operate the camcorder. If you wish to communicate with DV Messenger....
DV NETWORK SOLUTION DISK Ver.2 Software Instruction Manual
Page 50
Click here to record the live video picture as a still image on the [Contact] control panel in to maximum telephoto. Moves the focus point farther. (Cannot be used with DV Messenger Click here ...
DV NETWORK SOLUTION DISK Ver.2 Software Instruction Manual
Page 51
... recorded in extended recording modes ( SP/ LP). This is played back again, the playback picture appears. Depending on the camcorder, Windows Messenger may produce noises such as buzzing sound... also control the playback functions from the DVM panel while monitoring the picture in the [Conversation] window. Operating the Tape Playback Functions When you play back a tape recorded ...in extended recording modes, the picture in the [Conversation] window may be set to PLAY (VCR) mode): Click the [CONTACT] tab...
DV NETWORK SOLUTION DISK Ver.2 Software Instruction Manual
Page 76
... within 30 seconds after you tried to connect DV Messenger, a message asking him to download DV Messenger Version 2. Videoconferencing The video picture does not appear in CAMERA mode, make sure that the playback tape has been recorded in the menu. From the [Start] menu..., click [My Computer]. 4. If you are using the camcorder in the [Conversation] window of the camcorder during videoconference. Check if [Canon Camera Storage Device] appears under [Scanners and Cameras]. Camcorder without NETWORK mode, make sure that the recording mode is connected to restart the ...
DV NETWORK SOLUTION DISK Ver.2 Software Instruction Manual
Page 77
... indicator on the right operates. Î Check if the sound device is set to [Mute] in the [Conversation] window of Windows Messenger. I receive the video picture of my contact in the [Conversation] window of Windows Messenger, but not the sound. Î If your contact is using a camcorder without NETWORK mode supporting...
DV NETWORK SOLUTION DISK Ver.2 Software Instruction Manual
Page 78
...should do. 78 Troubleshooting Click [Start Camera] to TAPE). Î Check the position of Windows Messenger, but not the sound. Î Canon camcorder without NETWORK mode supporting the memory card function: Check if the camcorder is set for what your contact to [Mute]. See "I receive... the video picture of the speakers. Check if [Device Volume] is selected in the [Audio Tuning Wizard]. for recording to a tape (e.g. 3. Remove the ...
DV NETWORK SOLUTION DISK Ver.2 Software Instruction Manual
Page 79
the video picture stops and then appears to be fast-forwarded). Troubleshooting 79 Click [Network Connections]. From the [Start] menu, select [Control Panel]. 2. In such case, uninstall the [QoS Packet Scheduler]. E 1. Click [Network and Internet Connections]. 3. The video picture of Windows Messenger's [Conversation] window does not appear smooth. Î If Windows XP Service Pack 2 and [QoS Packet Scheduler] are installed, the video picture send by your contact may not appear smooth (e.g.
DV NETWORK SOLUTION DISK Ver.2 Software Instruction Manual
Page 82
In such case, refer to [The video picture of Windows Messenger's [Conversation] window does not appear smooth.] ( 79), and ask ... on the DVM panel cannot be operated in CAMERA mode. Î Camcorder without NETWORK mode: If the Canon camcorder is set to CAMERA mode, some camcorders will enter the demonstration mode after a certain time to protect...may therefore display [Slow]. When using the camcorder in CAMERA mode. Î Camcorder without NETWORK mode: If the Canon camcorder set to CAMERA mode and a recordable tape is inserted, the camcorder automatically turns off after a certain time...
ZR80 Instruction Manual
Page 3
... Do not use accessories not recommended in the operating instructions should be operated only E ZR90/ZR85/ZR80 A and all its accessories. information with care. Do not place on 1. moved... with respect to your home, consult your electrician to the Canon Digital Video Camcorder Power Adapter should be feature. from 7. If you are not sure... and requirements for future reference. 11. Quick stops, excessive force, and uneven surfaces may cause picture interference, or permanently damage the camera. 13. Cleaning - Accessories - If you are unable to...
ZR80 Instruction Manual
Page 14
... min. Connect the power cord to the camcorder's DC IN terminal. q POWER CAMERA OFF PLAY(VCR) r ew ❍ Turn off . The battery pack may cause picture interference. Time LCD 85 min. 155 min. 180 min. 320 min. 520 min. This is used close to a TV, it back to the camcorder. ❍...
ZR80 Instruction Manual
Page 19
... other strong light sources through the strap mount and adjust the length of the wireless controller narrows), or may cause a shadow to appear on the picture when recording with a video light or the assist lamp (White LED). ❍ Filters cannot be used with the wide attachment. ❍ If dust ...the wide attachment or on the camcorder lens, clean both lenses gently with a blower brush. ❍ Do not touch the lens to telephoto, the picture will not be in focus. ❍ The wide attachment may obstruct the remote sensor (the range of the strap. The wide attachment is for indoor...
ZR80 Instruction Manual
Page 33
... close the LCD panel. Press the e/a button to PLAY (VCR). Use headphones when using a Canon Head E Cleaning Cassette or a commercially available digital video head-cleaning cassette ( 135). 1. t 3. Basic Functions Playback Playing Back a Tape If the playback picture is less than 15 seconds. 33 Open the LCD panel. Set the camcorder to PLAY...
ZR80 Instruction Manual
Page 34
...; The camcorder stops the tape automatically after 5 minutes in playback pause mode to normal playback. ❍ There is no sound during special playback. ❍ The picture may become distorted during playback pause. Special Playback Modes ` (rewind) button 1 (fast forward) button REW PLAY FF - / STOP + / 3 (stop) button e/a (play/pause) button PAUSE SLOW...
ZR80 Instruction Manual
Page 37
... S-video terminals. 3. If connecting to a TV, set the input selector to LINE. ❍ We recommend powering the camcorder from a household power source. ❍ For high picture quality, we recommend using a TV with an S (S1) terminal. ❍ TVs with S (S1)-Video Input Terminal Refer also to the TV or VCR instruction manual...
ZR80 Instruction Manual
Page 48
... of the program selector. ❍ Do not change abruptly. ❍ Sports/Portrait mode: The picture may not appear smooth when played back. ❍ Low Light mode: - CARD PLAY 2. Picture quality may have difficulty to focus automatically. 48 The picture may not appear smooth when played back. ❍ Sand & Snow mode: - The symbol of...