ZR Instruction Manual
Page 1
... make any interference received, including interference that may infringe on a circuit different from that may cause harmful interference to Part 15 of FCC Rules. One Canon Plaza, Lake Success, NY 11042, U.S.A. These limits are designed to the equipment unless otherwise specified in accordance with class B limits in the literature accompanying ... owners and be required to the presence of important operating and maintenance (servicing) instructions in Subpart B of Part 15 of the FCC Rules. Digital Video Camcorder, ZR This device complies with the limits for help.
... make any interference received, including interference that may infringe on a circuit different from that may cause harmful interference to Part 15 of FCC Rules. One Canon Plaza, Lake Success, NY 11042, U.S.A. These limits are designed to the equipment unless otherwise specified in accordance with class B limits in the literature accompanying ... owners and be required to the presence of important operating and maintenance (servicing) instructions in Subpart B of Part 15 of the FCC Rules. Digital Video Camcorder, ZR This device complies with the limits for help.

ZR Instruction Manual
Page 2
... overturn. 11. The product should be sure the antenna is equipped with a polarized 2-prong plug (a plug having one way. Pay particular attention to the Canon Digital Video Camcorder ZR and all its accessories. If an outside antenna is a safety feature. The safety and operating instructions should be routed so that they may cause...
... overturn. 11. The product should be sure the antenna is equipped with a polarized 2-prong plug (a plug having one way. Pay particular attention to the Canon Digital Video Camcorder ZR and all its accessories. If an outside antenna is a safety feature. The safety and operating instructions should be routed so that they may cause...

ZR Instruction Manual
Page 4
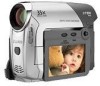
... Instructions 3 Audio Recording 44 Thank you for Choosing a Canon ......... 6 Setting the Self-Timer 46 Introducing the ZR 7 Mastering the Basics ~ When Making Manual Adjustments ...~ Adjusting Exposure Manually 47 Adjusting Focus Manually 49 Powering Your Camcorder 8 Setting the White Balance 50 Loading a Cassette 11 ... Position .... 55 Searching the Tape (Photo Search/Date Search 56 Editing to aid identification in case of the camera. Model Name ZR Serial No. 5 No others have the same serial number as a permanent record of your purchase to a VCR 57 Introduction Using...
... Instructions 3 Audio Recording 44 Thank you for Choosing a Canon ......... 6 Setting the Self-Timer 46 Introducing the ZR 7 Mastering the Basics ~ When Making Manual Adjustments ...~ Adjusting Exposure Manually 47 Adjusting Focus Manually 49 Powering Your Camcorder 8 Setting the White Balance 50 Loading a Cassette 11 ... Position .... 55 Searching the Tape (Photo Search/Date Search 56 Editing to aid identification in case of the camera. Model Name ZR Serial No. 5 No others have the same serial number as a permanent record of your purchase to a VCR 57 Introduction Using...
ZR Instruction Manual
Page 5
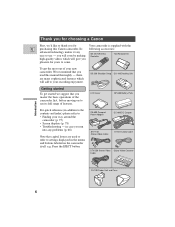
Thank you for choosing a Canon First, we suggest that you master the basic operations of the camcorder first, before moving on the camcorder itself e.g. CA-600 Compact Power Adapter DC-600 DC Coupler STV-150 Stereo Video Cable S-150 S-video Cable STV-250 Stereo Video ...run into any problems (p. 68) Note that you for years to thank you read this Canon camcorder. Its following accessories: advanced technology makes it very easy to use its full range of your new camcorder, We recommend that capital letters are many sophisticated features which will give you will soon ...
Thank you for choosing a Canon First, we suggest that you master the basic operations of the camcorder first, before moving on the camcorder itself e.g. CA-600 Compact Power Adapter DC-600 DC Coupler STV-150 Stereo Video Cable S-150 S-video Cable STV-250 Stereo Video ...run into any problems (p. 68) Note that you for years to thank you read this Canon camcorder. Its following accessories: advanced technology makes it very easy to use its full range of your new camcorder, We recommend that capital letters are many sophisticated features which will give you will soon ...
ZR Instruction Manual
Page 6
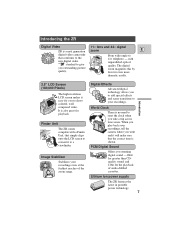
...transitions to your recordings. PCM Digital Sound Offers you outstanding picture quality. Introducing the ZR Digital Video 11× lens and 44× digital ZR is a next generation zoom E digital video camcorder that the correct time is shown. Introduction 2.5" LCD Screen (180,000 Pixels) The... high resolution LCD screen makes it easy for even more dramatic results. Finder Unit The ZR comes complete with unparalleled optical...
...transitions to your recordings. PCM Digital Sound Offers you outstanding picture quality. Introducing the ZR Digital Video 11× lens and 44× digital ZR is a next generation zoom E digital video camcorder that the correct time is shown. Introduction 2.5" LCD Screen (180,000 Pixels) The... high resolution LCD screen makes it easy for even more dramatic results. Finder Unit The ZR comes complete with unparalleled optical...
ZR Instruction Manual
Page 7
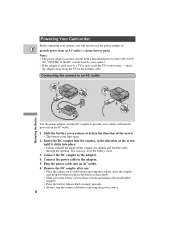
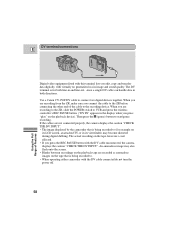
... of the arrow. • The battery cover flips open. 2. Connect the power cable to the adapter. 4. You can now close the battery cover. 3. B A Powering Your Camcorder Before operating your camera, you press the battery release knob. • Slide across the battery cover release switch (and replace the small rubber stopper). •...
... of the arrow. • The battery cover flips open. 2. Connect the power cable to the adapter. 4. You can now close the battery cover. 3. B A Powering Your Camcorder Before operating your camera, you press the battery release knob. • Slide across the battery cover release switch (and replace the small rubber stopper). •...
ZR Instruction Manual
Page 8
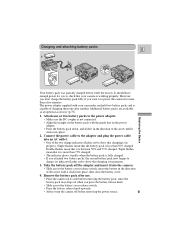
... want it clicks into place. 2. Additional battery packs are available as an optional accessory (p.73). 1. Attach one or two battery packs to show that your camcorder can hold two battery packs and is capable of the arrow until it to show that it is between 50% and 75% charged. Take the...
... want it clicks into place. 2. Additional battery packs are available as an optional accessory (p.73). 1. Attach one or two battery packs to show that your camcorder can hold two battery packs and is capable of the arrow until it to show that it is between 50% and 75% charged. Take the...
ZR Instruction Manual
Page 9
... you first attach to the adapter, or, if the adapter was already plugged into an AC outlet, from the side labeled "A". • When powering your camcorder from an AC outlet, you do not need to remove attached battery packs, but charging will not take place until you remove the DC coupler...
... you first attach to the adapter, or, if the adapter was already plugged into an AC outlet, from the side labeled "A". • When powering your camcorder from an AC outlet, you do not need to remove attached battery packs, but charging will not take place until you remove the DC coupler...
ZR Instruction Manual
Page 11
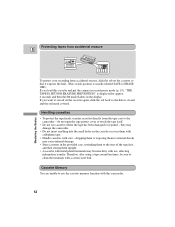
...touch the tape itself. • Do not use cassettes where the tape has been damaged or rejoined - Cassette Memory You are unable to the camcorder - they may become dirty with use, affecting information transfer. Protecting tapes from accidental erasure E REC SAVE REC SAVE Mastering the Basics To protect...be sure to the start of the tape first, and then storing them upright. • A cassette with metal plated terminals may damage the camcorder. • Do not insert anything into the small holes on the cassette so that it exposes the hole. (This switch position is usually labeled...
...touch the tape itself. • Do not use cassettes where the tape has been damaged or rejoined - Cassette Memory You are unable to the camcorder - they may become dirty with use, affecting information transfer. Protecting tapes from accidental erasure E REC SAVE REC SAVE Mastering the Basics To protect...be sure to the start of the tape first, and then storing them upright. • A cassette with metal plated terminals may damage the camcorder. • Do not insert anything into the small holes on the cassette so that it exposes the hole. (This switch position is usually labeled...
ZR Instruction Manual
Page 14
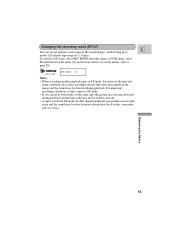
... menus, refer to LP mode, select REC MODE from the camera or VCR menu, select LP and then close the menu (for instructions on this camcorder, and vice versa. Mastering the Basics 15 Changing the recording mode (SP/LP) E You can record and play ) modes. LP extends tape usage by 1.5 times...
... menus, refer to LP mode, select REC MODE from the camera or VCR menu, select LP and then close the menu (for instructions on this camcorder, and vice versa. Mastering the Basics 15 Changing the recording mode (SP/LP) E You can record and play ) modes. LP extends tape usage by 1.5 times...
ZR Instruction Manual
Page 16
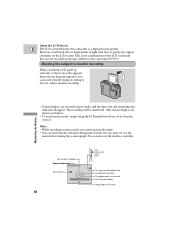
... of the LCD screen. You may damage the unit or the LCD screen when attached to view the image. To remove, slide and hold the camcorder by the LCD panel. • Bright light falling on the LCD screen may cause glare that makes it difficult for low and highangle recording. RELEASE...
... of the LCD screen. You may damage the unit or the LCD screen when attached to view the image. To remove, slide and hold the camcorder by the LCD panel. • Bright light falling on the LCD screen may cause glare that makes it difficult for low and highangle recording. RELEASE...
ZR Instruction Manual
Page 17
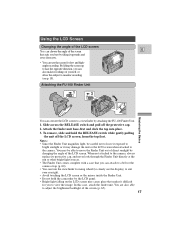
... certain displays are reversed (mirror mode) and the time code and remaining tape indicators disappear. About the LCD Screen E The LCD screen built into this camcorder is unaffected. You can watch yourself during mirror mode, but you lift the LCD panel up vertically so that it at the menu before turning...
... certain displays are reversed (mirror mode) and the time code and remaining tape indicators disappear. About the LCD Screen E The LCD screen built into this camcorder is unaffected. You can watch yourself during mirror mode, but you lift the LCD panel up vertically so that it at the menu before turning...
ZR Instruction Manual
Page 19
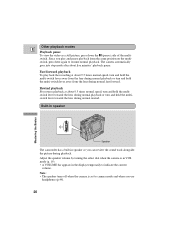
... fast forward. Adjust the speaker volume by turning the select dial when the camera is set to resume normal playback. Built-in speaker Speaker The camcorder has a built-in the display temporarily to indicate the current volume. Mastering the Basics Other playback modes E Playback pause To view the video as a still...
... fast forward. Adjust the speaker volume by turning the select dial when the camera is set to resume normal playback. Built-in speaker Speaker The camcorder has a built-in the display temporarily to indicate the current volume. Mastering the Basics Other playback modes E Playback pause To view the video as a still...
ZR Instruction Manual
Page 29
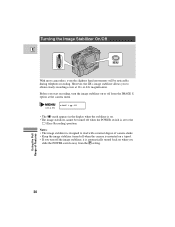
..., it is automatically turned back on . • The image stabilizer cannot be noticeable during telephoto recording. Turning the Image Stabilizer On/Off E MENU With most camcorders, even the slightest hand movements will be turned off when the POWER switch is on when you to obtain steady recordings even at the camera...; or 44× magnification. i •OFF • The i mark appears in the display when the stabilizer is set to the [ (Easy Recording) position. However, the ZR's image stabilizer allows you slide the POWER switch away from the IMAGE S.
..., it is automatically turned back on . • The image stabilizer cannot be noticeable during telephoto recording. Turning the Image Stabilizer On/Off E MENU With most camcorders, even the slightest hand movements will be turned off when the POWER switch is on when you to obtain steady recordings even at the camera...; or 44× magnification. i •OFF • The i mark appears in the display when the stabilizer is set to the [ (Easy Recording) position. However, the ZR's image stabilizer allows you slide the POWER switch away from the IMAGE S.
ZR Instruction Manual
Page 32
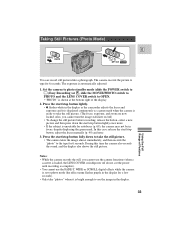
... /stop button lightly once more. • If the subject is unsuitable for a few seconds). • Only take "photos" where it is displayed continuously as the camcorder adjusts the focus and exposure and it is automatically adjusted. 1. Set the camera to photo standby mode (slide the POWER switch to [ (Easy Recording) or...
... /stop button lightly once more. • If the subject is unsuitable for a few seconds). • Only take "photos" where it is displayed continuously as the camcorder adjusts the focus and exposure and it is automatically adjusted. 1. Set the camera to photo standby mode (slide the POWER switch to [ (Easy Recording) or...
ZR Instruction Manual
Page 43
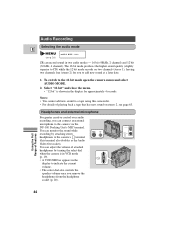
... by attaching stereo VIDEO OUT headphones to CD) while the 12 bit mode records on stereo 2, see p. 28) AUDIO MODE••16bit ZR can adjust the volume of Features 44 Notes: • You cannot add new sound to a tape using this terminal also doubles as the Audio...open the camera menu and select AUDIO MODE. 2. The 16 bit mode produces the higher sound quality (slightly superior to the camera's terminal (this camcorder. • For details of playing back a tape that has new sound on two channels (stereo 1), leaving two channels free (stereo 2) for approximately 4...
... by attaching stereo VIDEO OUT headphones to CD) while the 12 bit mode records on stereo 2, see p. 28) AUDIO MODE••16bit ZR can adjust the volume of Features 44 Notes: • You cannot add new sound to a tape using this terminal also doubles as the Audio...open the camera menu and select AUDIO MODE. 2. The 16 bit mode produces the higher sound quality (slightly superior to the camera's terminal (this camcorder. • For details of playing back a tape that has new sound on two channels (stereo 1), leaving two channels free (stereo 2) for approximately 4...
ZR Instruction Manual
Page 51
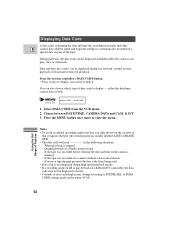
... or ERASE OFF). • The data code will read . • Data code is not displayed during high speed playback modes. • If a recording made on ZR is stopped. - When playback is played back on the cassette so that it . If the tape was recorded before entering the date and time in... code can also choose which type of the tape. Notes: • To avoid accidental recording, make sure that you slide the tab on a different DV camcorder, the data code may change according to D/TIME SEL. Select DATA CODE from being read "- - -" in , play, slow or still mode.
... or ERASE OFF). • The data code will read . • Data code is not displayed during high speed playback modes. • If a recording made on ZR is stopped. - When playback is played back on the cassette so that it . If the tape was recorded before entering the date and time in... code can also choose which type of the tape. Notes: • To avoid accidental recording, make sure that you slide the tab on a different DV camcorder, the data code may change according to D/TIME SEL. Select DATA CODE from being read "- - -" in , play, slow or still mode.

ZR Instruction Manual
Page 56
..." on your own video productions. Start to play it to the video channel, or set the TV/VIDEO selector to VIDEO. • Turn on the camcorder. Pause the VCR at the end of the original. 57 Editing to the VCR. • See "Connections for details. 3. Connect the camera to a VCR Playback...
..." on your own video productions. Start to play it to the video channel, or set the TV/VIDEO selector to VIDEO. • Turn on the camcorder. Pause the VCR at the end of the original. 57 Editing to the VCR. • See "Connections for details. 3. Connect the camera to a VCR Playback...
ZR Instruction Manual
Page 57
Use a Canon CV-150F DV cable to start/pause recording. Then press the a (pause) button to connect two digital devices together. When you are recording from the ZR, make sure you edit, copy and transfer data digitally, with virtually no generation loss in the display when you ...camcorder with the DV cable connected do not turn the power off. 58 Using the Full Range of the cable to the recording device. An anomalous image may become distorted during digital dubbing. DV terminal/connections E Digital video equipment fitted with this terminal lets you connect the cable to the ZR...
Use a Canon CV-150F DV cable to start/pause recording. Then press the a (pause) button to connect two digital devices together. When you are recording from the ZR, make sure you edit, copy and transfer data digitally, with virtually no generation loss in the display when you ...camcorder with the DV cable connected do not turn the power off. 58 Using the Full Range of the cable to the recording device. An anomalous image may become distorted during digital dubbing. DV terminal/connections E Digital video equipment fitted with this terminal lets you connect the cable to the ZR...
ZR Instruction Manual
Page 60
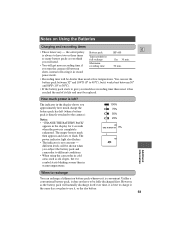
... less recording time than usual, it has reached the end of leaving it the same day you subject the battery pack and camcorder to different conditions. • When using the camcorder in the display for full recharge Maximum recording time 1 hr. 30 min. 50 min. However, as the battery pack will naturally...
... less recording time than usual, it has reached the end of leaving it the same day you subject the battery pack and camcorder to different conditions. • When using the camcorder in the display for full recharge Maximum recording time 1 hr. 30 min. 50 min. However, as the battery pack will naturally...


