
ZR100/200/300 Brochure
Page 2
...Canon U.S.A., Inc. Blvd. M. Low-Light Features The camcorder's Night Mode allows you record video to an e-mail or posting on the rights of the SD Memory Card. Other names and products not mentioned above may infringe on the web. • ZR300, ZR200 or ZR100 • Battery... capture beautiful XGA (1024 x 768 pixel) photos onto a memory card-perfect for enjoying with genuine Canon accessories. SPECIFICATIONS Tape Format Video cassettes bearing the ∂ mark. ZR300/ZR200/ZR100 KIT LCD Backlight For shooting on the move. • Program Auto Exposure • Motion JPEG (...
...Canon U.S.A., Inc. Blvd. M. Low-Light Features The camcorder's Night Mode allows you record video to an e-mail or posting on the rights of the SD Memory Card. Other names and products not mentioned above may infringe on the web. • ZR300, ZR200 or ZR100 • Battery... capture beautiful XGA (1024 x 768 pixel) photos onto a memory card-perfect for enjoying with genuine Canon accessories. SPECIFICATIONS Tape Format Video cassettes bearing the ∂ mark. ZR300/ZR200/ZR100 KIT LCD Backlight For shooting on the move. • Program Auto Exposure • Motion JPEG (...

Instruction Manual
Page 3
...close to TV transmitters, particular attention to 9. See figure 1. from the the plug still fails to the Canon Digital Video Camcorder Power Adapter should be operated only E ZR100 A and all its accessories. Regarding other ). All warnings on the marking label. Unplug this manual. ... 2. Accessories - Hazard of electric or magnetic radiation. Placing or Moving - combination should be adhered to instructions in this manual as battery power, refer to . 4. The CA-570 Compact Introduction 3. If you are not likely not recommended in this manual. 12. ...
...close to TV transmitters, particular attention to 9. See figure 1. from the the plug still fails to the Canon Digital Video Camcorder Power Adapter should be operated only E ZR100 A and all its accessories. Regarding other ). All warnings on the marking label. Unplug this manual. ... 2. Accessories - Hazard of electric or magnetic radiation. Placing or Moving - combination should be adhered to instructions in this manual as battery power, refer to . 4. The CA-570 Compact Introduction 3. If you are not likely not recommended in this manual. 12. ...

Instruction Manual
Page 4
...controls that have fallen into this can be sure the service technician has used with the same type number CA570. Contact your nearest Canon Service Center for service. 19.Replacement Parts - NATIONAL ELECTRICAL CODE GROUNDING CONDUCTORS (NEC SECTION 810-21) GROUND CLAMPS POWER SERVICE GROUNDING...ANTENNA LEAD IN WIRE GROUND LAMP ANTENNA DISCHARGE UNIT (NEC SECTION 810-20) ELECTRIC SERVICE EQUIPMENT NEC - Refer all power sources including battery, and refer servicing to dangerous voltage or other hazards. 20.Safety Check - When the power-supply cord or plug is required, please...
...controls that have fallen into this can be sure the service technician has used with the same type number CA570. Contact your nearest Canon Service Center for service. 19.Replacement Parts - NATIONAL ELECTRICAL CODE GROUNDING CONDUCTORS (NEC SECTION 810-21) GROUND CLAMPS POWER SERVICE GROUNDING...ANTENNA LEAD IN WIRE GROUND LAMP ANTENNA DISCHARGE UNIT (NEC SECTION 810-20) ELECTRIC SERVICE EQUIPMENT NEC - Refer all power sources including battery, and refer servicing to dangerous voltage or other hazards. 20.Safety Check - When the power-supply cord or plug is required, please...

Instruction Manual
Page 6
... contents Introduction Using this Manual 5 Checking Supplied Accessories 8 Components Guide 9 Basic Functions Preparations Preparing the Power Supply 12 Loading/Unloading a Cassette 15 Installing the Backup Battery 16 Preparing the Camcorder 17 Adjusting the LCD Screen 18 Setting the Time Zone, Date and Time 19 Recording Recording Movies on a Tape 22 Zooming...
... contents Introduction Using this Manual 5 Checking Supplied Accessories 8 Components Guide 9 Basic Functions Preparations Preparing the Power Supply 12 Loading/Unloading a Cassette 15 Installing the Backup Battery 16 Preparing the Camcorder 17 Adjusting the LCD Screen 18 Setting the Time Zone, Date and Time 19 Recording Recording Movies on a Tape 22 Zooming...
Instruction Manual
Page 8
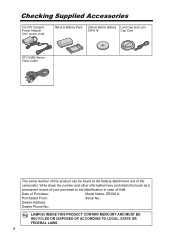
...Write down the number and other information here and retain this product can be found at the battery attachment unit of the camcorder. power cord) NB-2LH Battery Pack Lithium Button Battery Lens Cap and Lens CR1616 Cap Cord STV-250N Stereo Video Cable The serial number of this... book as a permanent record of your purchase to aid identification in case of Purchase: Model Name: ZR100 A Purchased From: Serial No.: Dealer...
...Write down the number and other information here and retain this product can be found at the battery attachment unit of the camcorder. power cord) NB-2LH Battery Pack Lithium Button Battery Lens Cap and Lens CR1616 Cap Cord STV-250N Stereo Video Cable The serial number of this... book as a permanent record of your purchase to aid identification in case of Purchase: Model Name: ZR100 A Purchased From: Serial No.: Dealer...

Instruction Manual
Page 9
Components Guide ZR100 E Introduction REC SEARCH - button ( 25) / (record review) button ( 25) / (rewind) button ( 29) REC SEARCH + button ( 25) / (fast forward) button ( 29) LCD BACKLIGHT button ( 18) WIDESCREEN ... ( 61) REC PAUSE button ( 69) Speaker ( 31) LCD screen ( 18) SET dial ( 34) CHARGE indicator ( 12) Program selector ( 38) EASY Easy recording Program AE Backup battery compartment ( 16) Battery attachment unit ( 12) / Serial number DC IN terminal ( 12) MENU button ( 34) 9
Components Guide ZR100 E Introduction REC SEARCH - button ( 25) / (record review) button ( 25) / (rewind) button ( 29) REC SEARCH + button ( 25) / (fast forward) button ( 29) LCD BACKLIGHT button ( 18) WIDESCREEN ... ( 61) REC PAUSE button ( 69) Speaker ( 31) LCD screen ( 18) SET dial ( 34) CHARGE indicator ( 12) Program selector ( 38) EASY Easy recording Program AE Backup battery compartment ( 16) Battery attachment unit ( 12) / Serial number DC IN terminal ( 12) MENU button ( 34) 9

Instruction Manual
Page 12
...and disconnect it clicks. DC IN terminal 12 When charging is complete. 4. Press the BATT. Connect the power cord to remove the battery. It glows steadily when charging is complete, disconnect the power adapter from the adapter. 5. button to the adapter. 2. Turn the ...indicator starts flashing. Basic Functions Preparing Preparations the Power Supply Attaching the Battery Pack 1. Connect the power adapter to OFF. 2. Attach the battery pack to the camcorder. • Remove the terminal cover of the battery pack. • Press lightly and slide it in the direction of...
...and disconnect it clicks. DC IN terminal 12 When charging is complete. 4. Press the BATT. Connect the power cord to remove the battery. It glows steadily when charging is complete, disconnect the power adapter from the adapter. 5. button to the adapter. 2. Turn the ...indicator starts flashing. Basic Functions Preparing Preparations the Power Supply Attaching the Battery Pack 1. Connect the power adapter to OFF. 2. Attach the battery pack to the camcorder. • Remove the terminal cover of the battery pack. • Press lightly and slide it in the direction of...

Instruction Manual
Page 13
...household power source to use . Connect the power cord to OFF. 2. Move the adapter away from the power adapter during charging. The battery pack may also not be charged correctly even if the CHARGE indicator glows steady. E 1. This is defective, the CHARGE indicator flashes rapidly ...(at about 2 flashes/second) and charging stops. The CHARGE indicator informs you about the battery power. The battery pack may cause picture interference. Plug the power cord into a power outlet. 4. Charging may hear some noise from the TV or the...
...household power source to use . Connect the power cord to OFF. 2. Move the adapter away from the power adapter during charging. The battery pack may also not be charged correctly even if the CHARGE indicator glows steady. E 1. This is defective, the CHARGE indicator flashes rapidly ...(at about 2 flashes/second) and charging stops. The CHARGE indicator informs you about the battery power. The battery pack may cause picture interference. Plug the power cord into a power outlet. 4. Charging may hear some noise from the TV or the...

Instruction Manual
Page 14
... according to 104 °F), the CHARGE indicator flashes rapidly and charging stops. A lithium ion battery pack can be shorter. We recommend charging the battery pack in record pause mode. 14 Outside the temperature range of leaving it before charging. We...in temperatures between 10 °C and 30 °C (50 °F and 86 °F). Battery Pack Charging Time Max. Unlike conventional battery packs, you do not need . To conserve battery power, turn off . Recording Time Viewfinder LCD normal bright Typical RecordingTime* Viewfinder LCD normal bright...
... according to 104 °F), the CHARGE indicator flashes rapidly and charging stops. A lithium ion battery pack can be shorter. We recommend charging the battery pack in record pause mode. 14 Outside the temperature range of leaving it before charging. We...in temperatures between 10 °C and 30 °C (50 °F and 86 °F). Battery Pack Charging Time Max. Unlike conventional battery packs, you do not need . To conserve battery power, turn off . Recording Time Viewfinder LCD normal bright Typical RecordingTime* Viewfinder LCD normal bright...

Instruction Manual
Page 16
Installing the Backup Battery The backup battery (lithium button battery CR1616) allows the camcorder to be replaced. The backup battery has a life span of about a year. " you that it needs to retain date, time ( 19) and other camcorder settings while the power source is disconnected. Open the backup battery cover. 2. Close the cover. Insert the backup battery with the + side facing outward. 3. " flashes in red to retain the settings. 1. Connect a power source to the camcorder when replacing the backup battery to inform 16
Installing the Backup Battery The backup battery (lithium button battery CR1616) allows the camcorder to be replaced. The backup battery has a life span of about a year. " you that it needs to retain date, time ( 19) and other camcorder settings while the power source is disconnected. Open the backup battery cover. 2. Close the cover. Insert the backup battery with the + side facing outward. 3. " flashes in red to retain the settings. 1. Connect a power source to the camcorder when replacing the backup battery to inform 16

Instruction Manual
Page 18
... degrees. • You can rotate the panel by 90 degrees outward. • You can switch the brightness of the POWER switch. The battery usage time shortens when the LCD screen is useful for outdoor recordings. This is set brighter ( 14). 18 Press the LCD BACKLIGHT button. ...This setting does not affect the brightness of the recording or the viewfinder screen. When using a battery pack, the camcorder retains the setting even if you change the position of the LCD screen between normal and bright by 180 degrees inward. LCD...
... degrees. • You can rotate the panel by 90 degrees outward. • You can switch the brightness of the POWER switch. The battery usage time shortens when the LCD screen is useful for outdoor recordings. This is set brighter ( 14). 18 Press the LCD BACKLIGHT button. ...This setting does not affect the brightness of the recording or the viewfinder screen. When using a battery pack, the camcorder retains the setting even if you change the position of the LCD screen between normal and bright by 180 degrees inward. LCD...

Instruction Manual
Page 19
...:00 AM 5. Basic Functions Preparations Setting the Time Zone, Date and Time Set the time zone, date and time when you have replaced the backup battery. The time zone setting appears (see table on the next page). To adjust for daylight saving time, select the time zone with the next to...
...:00 AM 5. Basic Functions Preparations Setting the Time Zone, Date and Time Set the time zone, date and time when you have replaced the backup battery. The time zone setting appears (see table on the next page). To adjust for daylight saving time, select the time zone with the next to...

Instruction Manual
Page 24
When [LCD MIRROR] is set to close the menu. Time Code Indicates the recording time in red when the lithium button battery is less than 15 seconds, the remaining tape time may not appear. • Depending on the type of the tape, the indication may not...button to [ON], some screen displays appear mirrorreversed. Screen Displays during Recording Remaining battery charge The battery symbol indicates the charge status of the tape in red when the battery pack is helpful to 10 seconds when you attach an empty battery pack, the power may turn off without displaying " ". • The ...
When [LCD MIRROR] is set to close the menu. Time Code Indicates the recording time in red when the lithium button battery is less than 15 seconds, the remaining tape time may not appear. • Depending on the type of the tape, the indication may not...button to [ON], some screen displays appear mirrorreversed. Screen Displays during Recording Remaining battery charge The battery symbol indicates the charge status of the tape in red when the battery pack is helpful to 10 seconds when you attach an empty battery pack, the power may turn off without displaying " ". • The ...

Instruction Manual
Page 77
.... Additional Information 77 PLAYBACK NOT POSSIBLE COPYRIGHT PROTECTED You attempted to play back a tape recorded in HD format. - Replace or charge the battery pack. 12 PACK THE TAPE IS SET FOR Cassette is 72 turned off. Rewind the tape or replace the cassette. - CHANGE THE... BATTERY Battery pack is received during analog-digital conversion of a copyright protected tape. Unload and 15 reload the cassette. WRONG FORMAT You attempted to play...
.... Additional Information 77 PLAYBACK NOT POSSIBLE COPYRIGHT PROTECTED You attempted to play back a tape recorded in HD format. - Replace or charge the battery pack. 12 PACK THE TAPE IS SET FOR Cassette is 72 turned off. Rewind the tape or replace the cassette. - CHANGE THE... BATTERY Battery pack is received during analog-digital conversion of a copyright protected tape. Unload and 15 reload the cassette. WRONG FORMAT You attempted to play...

Instruction Manual
Page 80
...weather. • Do not try to disassemble or modify it. • Do not drop or knock it. • Do not get it wet. Charged battery packs continue to temperature higher than 60 °C (140 °F). For example, with care. • Keep it away from fire (or it near a heater .... At cold temperatures, performance will temporarily decline. Back side of use, or the day before, to ensure a full charge. Attach the terminal cover whenever a battery pack is from 0 °C to 40 °C (32 °F to 104 °F), the optimal range is not in your pocket before use. Replace...
...weather. • Do not try to disassemble or modify it. • Do not drop or knock it. • Do not get it wet. Charged battery packs continue to temperature higher than 60 °C (140 °F). For example, with care. • Keep it away from fire (or it near a heater .... At cold temperatures, performance will temporarily decline. Back side of use, or the day before, to ensure a full charge. Attach the terminal cover whenever a battery pack is from 0 °C to 40 °C (32 °F to 104 °F), the optimal range is not in your pocket before use. Replace...
Instruction Manual
Page 81
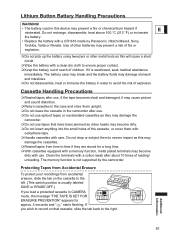
...Use of other metal tools as this will cause a short circuit. Wipe the battery with care. If you load a protected cassette in water to ensure proper contact. Keep the battery out of reach of the cassette, or cover them with cellophane tape. Handle cassettes... with a clean dry cloth to avoid the risk of loading/ unloading. Lithium Button Battery Handling Precautions WARNING! • The battery used in the camcorder after use. Do not use spliced tapes or nonstandard cassettes as they are stored for approx....
...Use of other metal tools as this will cause a short circuit. Wipe the battery with care. If you load a protected cassette in water to ensure proper contact. Keep the battery out of reach of the cassette, or cover them with cellophane tape. Handle cassettes... with a clean dry cloth to avoid the risk of loading/ unloading. Lithium Button Battery Handling Precautions WARNING! • The battery used in the camcorder after use. Do not use spliced tapes or nonstandard cassettes as they are stored for approx....

Instruction Manual
Page 82
Consult the Canon Service Center for information on TVs with power supply between 100 and 240 V AC, 50/60 Hz. The NTSC system is used in any country ... Sources You can only play back your recordings on plug adapters for overseas use the compact power adapter to operate the camcorder and to charge battery packs in the following countries/areas: American Samoa, Antigua, Aruba, Bahamas, Barbados, Bermuda, Bolivia, Canada, Chile, Columbia, Costa Rica, Cuba, Ecuador, El Salvador, Guam, Guatemala...
Consult the Canon Service Center for information on TVs with power supply between 100 and 240 V AC, 50/60 Hz. The NTSC system is used in any country ... Sources You can only play back your recordings on plug adapters for overseas use the compact power adapter to operate the camcorder and to charge battery packs in the following countries/areas: American Samoa, Antigua, Aruba, Bahamas, Barbados, Bermuda, Bolivia, Canada, Chile, Columbia, Costa Rica, Cuba, Ecuador, El Salvador, Guam, Guatemala...

Instruction Manual
Page 83
... a problem with use and may not charge. Replace or charge the battery 12 pack. Power save function has Turn on the camcorder. 22 Cassette is not fully open . compartment cover fully. Consult a Canon Service - outside the temperature temperatures between 0 °C range of 0...damaged. Camcorder is detected. Replace or charge the battery 12 pack. Additional Information 83 Center. Cause Solution Battery pack is exhausted. Replace or charge the battery 12 pack. CAMERA mode. with your dealer or a Canon Service Center if the problem persists. Consult your ...
... a problem with use and may not charge. Replace or charge the battery 12 pack. Power save function has Turn on the camcorder. 22 Cassette is not fully open . compartment cover fully. Consult a Canon Service - outside the temperature temperatures between 0 °C range of 0...damaged. Camcorder is detected. Replace or charge the battery 12 pack. Additional Information 83 Center. Cause Solution Battery pack is exhausted. Replace or charge the battery 12 pack. CAMERA mode. with your dealer or a Canon Service Center if the problem persists. Consult your ...

Instruction Manual
Page 84
.... Camcorder is inserted the wrong way. the screen. not be recorded in a dark scene - Battery pack is set to a mode Set the camcorder to appear. protect switch. time. Insert the backup battery with 16 the + side facing outward and set . Turn on the power. 22 will not ...and time are Set the time zone, date and 19 DATE AND TIME" appears on not set the time zone, date and time. Backup battery is distorted or When recording near loud - Cassette is not adjusted. Viewfinder is not loaded. a malfunction. drums or concerts), sound may become...
.... Camcorder is inserted the wrong way. the screen. not be recorded in a dark scene - Battery pack is set to a mode Set the camcorder to appear. protect switch. time. Insert the backup battery with 16 the + side facing outward and set . Turn on the power. 22 will not ...and time are Set the time zone, date and 19 DATE AND TIME" appears on not set the time zone, date and time. Backup battery is distorted or When recording near loud - Cassette is not adjusted. Viewfinder is not loaded. a malfunction. drums or concerts), sound may become...

Instruction Manual
Page 87
...varies according to charge battery packs on a chargeable basis. Canon shall not be liable for your Canon camcorder by the malfunction of non-genuine Canon accessories (e.g., a leakage and/or explosion of a battery pack). CB-2LT Battery Charger Use the battery charger for genuine Canon video accessories. Optional Accessories... 90 min. 80 min. 150 min. 170 min. CBC-NB2 Car Battery Charger Use the car battery charger to the charging condition. Use of non-genuine Canon accessories, although you need extra battery packs, select from the following: NB-2L, NB-2LH, BP-2L12...
...varies according to charge battery packs on a chargeable basis. Canon shall not be liable for your Canon camcorder by the malfunction of non-genuine Canon accessories (e.g., a leakage and/or explosion of a battery pack). CB-2LT Battery Charger Use the battery charger for genuine Canon video accessories. Optional Accessories... 90 min. 80 min. 150 min. 170 min. CBC-NB2 Car Battery Charger Use the car battery charger to the charging condition. Use of non-genuine Canon accessories, although you need extra battery packs, select from the following: NB-2L, NB-2LH, BP-2L12...


