
Instruction Manual
Page 2
...provide reasonable protection against harmful interference in the literature accompanying the product. One Canon Plaza, Lake Success, NY 11042, U.S.A. Note: This equipment has been tested and found to comply with class B limits in the manual. Use of shielded cable is intended to alert the user to the equipment...SHOCK DO NOT OPEN CAUTION: TO REDUCE THE RISK OF ELECTRIC SHOCK, DO NOT REMOVE COVER (OR BACK). Inc. Digital Video Camcorder, ZR100 systems This device complies with the limits for help. If such changes or modifications should be made, you could be contrary to Part 15...
...provide reasonable protection against harmful interference in the literature accompanying the product. One Canon Plaza, Lake Success, NY 11042, U.S.A. Note: This equipment has been tested and found to comply with class B limits in the manual. Use of shielded cable is intended to alert the user to the equipment...SHOCK DO NOT OPEN CAUTION: TO REDUCE THE RISK OF ELECTRIC SHOCK, DO NOT REMOVE COVER (OR BACK). Inc. Digital Video Camcorder, ZR100 systems This device complies with the limits for help. If such changes or modifications should be made, you could be contrary to Part 15...

Instruction Manual
Page 3
... instructions should be sure the antenna is grounded permanently damage the camera. Follow Instructions - liquid or aerosol cleaners. Do not use this manual. 12. Do not use electrician to the They may fall, causing lead-in the operating instructions should be retained such as recommended polarized...). Read Instructions - The CA-570 Compact Introduction 3. Cleaning - Accessories - Power Adapter is a safety feature. If you are unable to the Canon Digital Video Camcorder Power Adapter should be operated only E ZR100 A and all its accessories.
... instructions should be sure the antenna is grounded permanently damage the camera. Follow Instructions - liquid or aerosol cleaners. Do not use this manual. 12. Do not use electrician to the They may fall, causing lead-in the operating instructions should be retained such as recommended polarized...). Read Instructions - The CA-570 Compact Introduction 3. Cleaning - Accessories - Power Adapter is a safety feature. If you are unable to the Canon Digital Video Camcorder Power Adapter should be operated only E ZR100 A and all its accessories.

Instruction Manual
Page 5
...Used in this mode. Operating Mode CAMERA PLAY (VCR) POWER Switch CAMERA PLAY (VCR) CAMERA : Function can be used in This Manual : Precautions related to the camcorder operation. : Additional topics that complement the basic operating procedures. : ...129; "Screen" refers to be registered trademarks or trademarks of the POWER switch. Using this Manual Thank you use the camcorder and retain it for purchasing the Canon ZR100. Please read this manual carefully before you begin ( 64). Trademark Acknowledgments • is a trademark. • Windows...
...Used in this mode. Operating Mode CAMERA PLAY (VCR) POWER Switch CAMERA PLAY (VCR) CAMERA : Function can be used in This Manual : Precautions related to the camcorder operation. : Additional topics that complement the basic operating procedures. : ...129; "Screen" refers to be registered trademarks or trademarks of the POWER switch. Using this Manual Thank you use the camcorder and retain it for purchasing the Canon ZR100. Please read this manual carefully before you begin ( 64). Trademark Acknowledgments • is a trademark. • Windows...

Instruction Manual
Page 6
Table of contents Introduction Using this Manual 5 Checking Supplied Accessories 8 Components Guide 9 Basic Functions Preparations Preparing the Power Supply 12 Loading/Unloading a Cassette 15 Installing the Backup Battery 16 Preparing the Camcorder ... Settings 34 Recording Using the Recording Programs 38 Using the Night Mode 41 Skin Detail Function 42 Adjusting the AE Shift 43 Adjusting the Focus Manually 44 Setting the White Balance 46 Setting the Shutter Speed 48 Using the Self-Timer 50 Changing the Recording Mode (SP/LP 51 Audio Recording...
Table of contents Introduction Using this Manual 5 Checking Supplied Accessories 8 Components Guide 9 Basic Functions Preparations Preparing the Power Supply 12 Loading/Unloading a Cassette 15 Installing the Backup Battery 16 Preparing the Camcorder ... Settings 34 Recording Using the Recording Programs 38 Using the Night Mode 41 Skin Detail Function 42 Adjusting the AE Shift 43 Adjusting the Focus Manually 44 Setting the White Balance 46 Setting the Shutter Speed 48 Using the Self-Timer 50 Changing the Recording Mode (SP/LP 51 Audio Recording...

Instruction Manual
Page 32
... the TV/VCR. Turn off all devices before starting the connections. 2. If connecting to a VCR, set the input selector to the TV or VCR instruction manual. Connect the STV-250N Stereo Video Cable to the yellow video terminal VIDEO. 3.
... the TV/VCR. Turn off all devices before starting the connections. 2. If connecting to a VCR, set the input selector to the TV or VCR instruction manual. Connect the STV-250N Stereo Video Cable to the yellow video terminal VIDEO. 3.

Instruction Manual
Page 35
... FADER TYPE EFFECT TYPE M.S.SPEED FADE-T, WIPE, CORNER, JUMP, FLIP, PUZZLE, ZIGZAG, BEAM, TIDE ART, BLACK&WHITE, SEPIA, MOSAIC, BALL, CUBE, WAVE, COLOR MASK, MIRROR MANUAL, FAST, MODERATE, SLOW M.S.SPLIT 4, 9, 16 CAMERA SETUP SHUTTER A.SL SHUTTER AUTO, 1/60, 1/100, 1/250, 1/500, 1/1000, 48 1/2000 ON, OFF 49 D.ZOOM OFF, 80X, 400X...
... FADER TYPE EFFECT TYPE M.S.SPEED FADE-T, WIPE, CORNER, JUMP, FLIP, PUZZLE, ZIGZAG, BEAM, TIDE ART, BLACK&WHITE, SEPIA, MOSAIC, BALL, CUBE, WAVE, COLOR MASK, MIRROR MANUAL, FAST, MODERATE, SLOW M.S.SPLIT 4, 9, 16 CAMERA SETUP SHUTTER A.SL SHUTTER AUTO, 1/60, 1/100, 1/250, 1/500, 1/1000, 48 1/2000 ON, OFF 49 D.ZOOM OFF, 80X, 400X...
Instruction Manual
Page 37
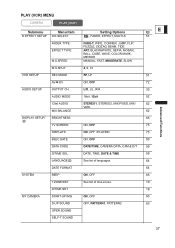
... FADER TYPE EFFECT TYPE M.S.SPEED FADE-T, WIPE, CORNER, JUMP, FLIP, PUZZLE, ZIGZAG, BEAM, TIDE ART, BLACK&WHITE, SEPIA, MOSAIC, BALL, CUBE, WAVE, COLOR MASK, MIRROR MANUAL, FAST, MODERATE, SLOW M.S.SPLIT 4, 9, 16 VCR SETUP REC MODE SP, LP 51 AV DV ON, OFF 72 AUDIO SETUP OUTPUT CH L/R, L/L, R/R 33 AUDIO MODE 16bit...
... FADER TYPE EFFECT TYPE M.S.SPEED FADE-T, WIPE, CORNER, JUMP, FLIP, PUZZLE, ZIGZAG, BEAM, TIDE ART, BLACK&WHITE, SEPIA, MOSAIC, BALL, CUBE, WAVE, COLOR MASK, MIRROR MANUAL, FAST, MODERATE, SLOW M.S.SPLIT 4, 9, 16 VCR SETUP REC MODE SP, LP 51 AV DV ON, OFF 72 AUDIO SETUP OUTPUT CH L/R, L/L, R/R 33 AUDIO MODE 16bit...

Instruction Manual
Page 38
... underexposed. Low Light Use this mode in dimly lit places. 38 The blur effect increases the more you have the option of adjusting the settings manually.
... underexposed. Low Light Use this mode in dimly lit places. 38 The blur effect increases the more you have the option of adjusting the settings manually.

Instruction Manual
Page 41
... program AE mode cannot be changed while a night mode is activated. 41 E Night Mode Program selector NIGHT MODE button 1. In such case, adjust the focus manually. Digital zoom and multi-image screen cannot be used , without sacrificing color.
... program AE mode cannot be changed while a night mode is activated. 41 E Night Mode Program selector NIGHT MODE button 1. In such case, adjust the focus manually. Digital zoom and multi-image screen cannot be used , without sacrificing color.
Instruction Manual
Page 44
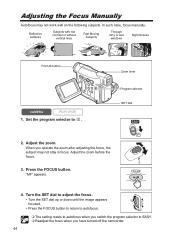
In such case, focus manually. Set the program selector to EASY. Readjust the focus when you operate the zoom after adjusting the focus, the subject may not work well .... • Press the FOCUS button to return to autofocus. The setting resets to autofocus when you switch the program selector to . Adjusting the Focus Manually Autofocus may not stay in focus. Press the FOCUS button.
In such case, focus manually. Set the program selector to EASY. Readjust the focus when you operate the zoom after adjusting the focus, the subject may not work well .... • Press the FOCUS button to return to autofocus. The setting resets to autofocus when you switch the program selector to . Adjusting the Focus Manually Autofocus may not stay in focus. Press the FOCUS button.

Instruction Manual
Page 45
"MF " appears. When you wish to manual focus. 45 Advanced Functions Recording Infinity Focus Use this function when you operate the zoom or turn the SET dial, " " disappears and the camcorder changes to focus on faraway subjects such as mountains or fireworks. E Press the FOCUS button more than 2 seconds after step 2 in Adjusting the Focus Manually.
"MF " appears. When you wish to manual focus. 45 Advanced Functions Recording Infinity Focus Use this function when you operate the zoom or turn the SET dial, " " disappears and the camcorder changes to focus on faraway subjects such as mountains or fireworks. E Press the FOCUS button more than 2 seconds after step 2 in Adjusting the Focus Manually.

Instruction Manual
Page 48
... fluorescent lighting and adjusts the shutter speed accordingly. Open the menu and select [CAMERA SETUP]. 4. Setting the Shutter Speed You can adjust the shutter speed manually to the (Auto) mode. 3. Close the menu. Do not point the camcorder directly at the sun when the shutter speed is set the shutter...
... fluorescent lighting and adjusts the shutter speed accordingly. Open the menu and select [CAMERA SETUP]. 4. Setting the Shutter Speed You can adjust the shutter speed manually to the (Auto) mode. 3. Close the menu. Do not point the camcorder directly at the sun when the shutter speed is set the shutter...

Instruction Manual
Page 56
...the transition speed. Following transition speeds can operate the multi-image screen only in the following playback modes: • When [M.S.SPEED] is set to [MANUAL]: Playback pause, slow forward/reverse playback • When [M.S.SPEED] is set to [MULTI-S]. 3. To cancel the multi-image screen, press the ...129; The multi-image screen cannot be captured each time you turn it to EASY. - Press the DIGITAL EFFECTS ON/OFF button. • MANUAL: Images will be captured at the set speed. During DV dubbing. Pressing the DIGITAL EFFECTS ON/OFF button for more than 1 second cancels ...
...the transition speed. Following transition speeds can operate the multi-image screen only in the following playback modes: • When [M.S.SPEED] is set to [MANUAL]: Playback pause, slow forward/reverse playback • When [M.S.SPEED] is set to [MULTI-S]. 3. To cancel the multi-image screen, press the ...129; The multi-image screen cannot be captured each time you turn it to EASY. - Press the DIGITAL EFFECTS ON/OFF button. • MANUAL: Images will be captured at the set speed. During DV dubbing. Pressing the DIGITAL EFFECTS ON/OFF button for more than 1 second cancels ...

Instruction Manual
Page 67
Editing Signal flow Commercially available DV cable Recording CAMERA PLAY (VCR) 1. Connected device: Load a blank cassette and set the device to the instruction manual of the digital video device. Play back the tape. 5. Connecting a Digital Video Device Refer also to record pause mode. 3. Locate the scene you wish to ...
Editing Signal flow Commercially available DV cable Recording CAMERA PLAY (VCR) 1. Connected device: Load a blank cassette and set the device to the instruction manual of the digital video device. Play back the tape. 5. Connecting a Digital Video Device Refer also to record pause mode. 3. Locate the scene you wish to ...
Instruction Manual
Page 72
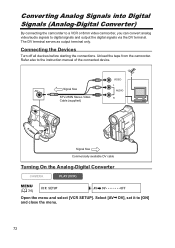
The DV terminal serves as output terminal only. Unload the tape from the camcorder. Select [AV DV], set it to the instruction manual of the connected device. Refer also to [ON] and close the menu. 72 Signal flow STV-250N Stereo Video Cable (supplied) VIDEO L AUDIO R Signal flow ...
The DV terminal serves as output terminal only. Unload the tape from the camcorder. Select [AV DV], set it to the instruction manual of the connected device. Refer also to [ON] and close the menu. 72 Signal flow STV-250N Stereo Video Cable (supplied) VIDEO L AUDIO R Signal flow ...

Instruction Manual
Page 74
...is connected to the computer. Refer also to the instruction manual of the computer. Users of Windows XP can download the DV Messenger software from below homepage. www.canondv.com www.canon.ca www.canon-asia.com 74 IEEE1394 (DV) terminal Commercially available DV cable 6-pin...camcorder and computer back on and reconnect them. We recommend powering the camcorder from tape to computer. Refer to the instruction manual of your camcorder. With DV Messenger, you have connected the camcorder, disconnect and reconnect the DV cable. Transferring Video Recordings to a ...
...is connected to the computer. Refer also to the instruction manual of the computer. Users of Windows XP can download the DV Messenger software from below homepage. www.canondv.com www.canon.ca www.canon-asia.com 74 IEEE1394 (DV) terminal Commercially available DV cable 6-pin...camcorder and computer back on and reconnect them. We recommend powering the camcorder from tape to computer. Refer to the instruction manual of your camcorder. With DV Messenger, you have connected the camcorder, disconnect and reconnect the DV cable. Transferring Video Recordings to a ...
Instruction Manual
Page 76
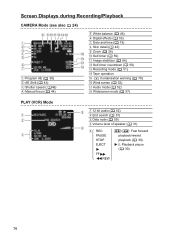
Screen Displays during Recording/Playback CAMERA Mode (see also 24) Program AE ( 38) AE Shift ( 43) Shutter speed ( 48) Manual focus ( 44) White balance ( 46) Digital effects ( 53) Date and time ( 19) Skin detail ( 42) Zoom ( 26) Self-timer ( 50) Image stabilizer ( 66) Self-timer ...
Screen Displays during Recording/Playback CAMERA Mode (see also 24) Program AE ( 38) AE Shift ( 43) Shutter speed ( 48) Manual focus ( 44) White balance ( 46) Digital effects ( 53) Date and time ( 19) Skin detail ( 42) Zoom ( 26) Self-timer ( 50) Image stabilizer ( 66) Self-timer ...

Instruction Manual
Page 84
... time are Set the time zone, date and 19 DATE AND TIME" appears on not set the time zone, date and time. Turn on Focus manually. 44 that subject. the screen.
... time are Set the time zone, date and 19 DATE AND TIME" appears on not set the time zone, date and time. Turn on Focus manually. 44 that subject. the screen.

Instruction Manual
Page 85
Image will TV/VIDEO selector on the TV Set the selector to VIDEO. 32 not appear on the [AV DV] is set to the instruction manual of the connected device. Set [AV DV] to play back or Stop playback/dubbing. - Video heads are dirty. Clean the video heads. 78 You attempted ...
Image will TV/VIDEO selector on the TV Set the selector to VIDEO. 32 not appear on the [AV DV] is set to the instruction manual of the connected device. Set [AV DV] to play back or Stop playback/dubbing. - Video heads are dirty. Clean the video heads. 78 You attempted ...

Instruction Manual
Page 90
... 20x power zoom 35mm equivalent: 4:3 recording: 53.5-1070 mm 16:9 recording : 44.2-884 mm 11 elements in 8 groups 28 mm TTL autofocus, manual focusing possible 1 m (3.3 ft.); 1 cm (0.39 in.) on maximum wide angle Auto white balance, pre-set white balance (indoor, outdoor) or...;C (32 - 104 °F) 51 x 93 x 130 mm (2.0 x 3.7 x 5.1 in.) excluding protrusions 430 g (15.2 oz.) 90 cassette) 2.4-inch. Specifications ZR100 System Video Recording System Audio Recording System Television System Image Sensor Tape Format Tape Speed Maximum Recording Time (80 min. cassette) Fast Forward/Rewind Time...
... 20x power zoom 35mm equivalent: 4:3 recording: 53.5-1070 mm 16:9 recording : 44.2-884 mm 11 elements in 8 groups 28 mm TTL autofocus, manual focusing possible 1 m (3.3 ft.); 1 cm (0.39 in.) on maximum wide angle Auto white balance, pre-set white balance (indoor, outdoor) or...;C (32 - 104 °F) 51 x 93 x 130 mm (2.0 x 3.7 x 5.1 in.) excluding protrusions 430 g (15.2 oz.) 90 cassette) 2.4-inch. Specifications ZR100 System Video Recording System Audio Recording System Television System Image Sensor Tape Format Tape Speed Maximum Recording Time (80 min. cassette) Fast Forward/Rewind Time...


