

Console Software Operations Manual
Page 36
...you wish to record simultaneously on the hard disc will be magnified when enlarging the viewfinder image. When magnifying the viewfinder image by operating the camcorder or the recording panel of the video folder ( Tr-2). - We recommend defragmenting the drive on which the video folder is displayed, you start... Failed" may be displayed while recording onto the hard disk, and the recording may be some scenes that [ ] is running out of the battery, the recording file may be corrupted and/or may occur when you record on both the hard disk and tape. When you cannot ...
...you wish to record simultaneously on the hard disc will be magnified when enlarging the viewfinder image. When magnifying the viewfinder image by operating the camcorder or the recording panel of the video folder ( Tr-2). - We recommend defragmenting the drive on which the video folder is displayed, you start... Failed" may be displayed while recording onto the hard disk, and the recording may be some scenes that [ ] is running out of the battery, the recording file may be corrupted and/or may occur when you record on both the hard disk and tape. When you cannot ...
XL H1 Instruction Manual
Page 3
... to your home, consult your obsolete outlet. Power cords should be taken to keep from touching such power lines or circuits as battery power, refer to instructions in wire to an antenna discharge unit, size of grounding conductors, location of the lead-in this manual... from the wall outlet and disconnect the antenna. IMPORTANT SAFETY INSTRUCTIONS In these safety instructions the word "product" refers to the Canon Digital Video Camcorder XL H1A and all servicing to qualified service personnel. 3 Follow Instructions - Unplug this manual as to provide some protection against them...
... to your home, consult your obsolete outlet. Power cords should be taken to keep from touching such power lines or circuits as battery power, refer to instructions in wire to an antenna discharge unit, size of grounding conductors, location of the lead-in this manual... from the wall outlet and disconnect the antenna. IMPORTANT SAFETY INSTRUCTIONS In these safety instructions the word "product" refers to the Canon Digital Video Camcorder XL H1A and all servicing to qualified service personnel. 3 Follow Instructions - Unplug this manual as to provide some protection against them...
XL H1 Instruction Manual
Page 4
... product from the wall outlet and all power sources including battery, and refer servicing to determine that the product is in safe operating order. c. Adjust only those controls that are specified by Canon or that are covered by a qualified technician to restore ... Check - 19. If the product does not operate normally even if you follow the operating instructions. e. Replacement Parts - Contact your Canon dealer for information about plug adapter for service. 20. Improper adjustment of power supply is damaged. Unauthorized substitutions may result in fire, ...
... product from the wall outlet and all power sources including battery, and refer servicing to determine that the product is in safe operating order. c. Adjust only those controls that are specified by Canon or that are covered by a qualified technician to restore ... Check - 19. If the product does not operate normally even if you follow the operating instructions. e. Replacement Parts - Contact your Canon dealer for information about plug adapter for service. 20. Improper adjustment of power supply is damaged. Unauthorized substitutions may result in fire, ...
XL H1 Instruction Manual
Page 5
...as follows: D/TIME SET••• JAN.1,2005 12:00 PM : Function can be used in rechargeable battery has completely discharged. Should your camcorder fail to operate correctly, refer to select the setting option that complement the basic operating procedures. : ... respective companies. 5 Press the MENU button. 2. To adjust for purchasing the Canon XL H1. Please read this Manual : Precautions related to the camcorder operation. : Additional topics that represents your camcorder, or if the built-in this mode. : Function cannot be trademarks or ...
...as follows: D/TIME SET••• JAN.1,2005 12:00 PM : Function can be used in rechargeable battery has completely discharged. Should your camcorder fail to operate correctly, refer to select the setting option that complement the basic operating procedures. : ... respective companies. 5 Press the MENU button. 2. To adjust for purchasing the Canon XL H1. Please read this Manual : Precautions related to the camcorder operation. : Additional topics that represents your camcorder, or if the built-in this mode. : Function cannot be trademarks or ...
XL H1 Instruction Manual
Page 9
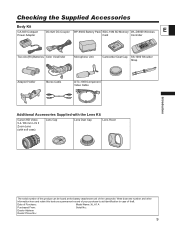
... WL-D5000 Wireless E Power Adapter Card Controller Two AA (R6) Batteries Color Viewfinder Microphone Unit Camcorder Dust Cap SS-1000 Shoulder Strap Adapter Holder Stereo Cable DTC-1000 Component Video Cable Introduction Additional Accessories Supplied with the Lens Kit Canon HD Video 5.4-108 mm L IS II Zoom Lens (with soft ...aid identification in case of theft. Write down the number and other information here and retain this product can be found at the battery attachment unit of Purchase: Model Name: XL H1 A Purchased From: Serial No.: Dealer Address Dealer Phone No.: 9
... WL-D5000 Wireless E Power Adapter Card Controller Two AA (R6) Batteries Color Viewfinder Microphone Unit Camcorder Dust Cap SS-1000 Shoulder Strap Adapter Holder Stereo Cable DTC-1000 Component Video Cable Introduction Additional Accessories Supplied with the Lens Kit Canon HD Video 5.4-108 mm L IS II Zoom Lens (with soft ...aid identification in case of theft. Write down the number and other information here and retain this product can be found at the battery attachment unit of Purchase: Model Name: XL H1 A Purchased From: Serial No.: Dealer Address Dealer Phone No.: 9
XL H1 Instruction Manual
Page 12
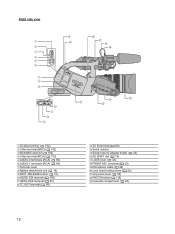
RELEASE button ( 16) HD/SD SDI terminal ( 100) GEN.LOCK terminal ( 60) TC OUT terminal ( 60) TC IN terminal ( 60) Serial number Screw hole for adapter holder ( 23) AE SHIFT dial ( 76) LOCK lever ( 43) FRONT MIC terminals ( 22) Microphone cable ( 22) Lens hood locking screw ( 25) Grip zoom lever ( 50) PHOTO button ( 116) Cassette compartment ( 29) 12 Right side view S-video terminal ( 102) Video terminal (BNC) ( 102) RCA/BNC selector ( 102) Video terminal (RCA) ( 102) AUDIO 2 terminals (RCA) ( 66) AUDIO 1 terminals (RCA) ( 64) Terminal cover Battery attachment unit ( 16) BATT.
RELEASE button ( 16) HD/SD SDI terminal ( 100) GEN.LOCK terminal ( 60) TC OUT terminal ( 60) TC IN terminal ( 60) Serial number Screw hole for adapter holder ( 23) AE SHIFT dial ( 76) LOCK lever ( 43) FRONT MIC terminals ( 22) Microphone cable ( 22) Lens hood locking screw ( 25) Grip zoom lever ( 50) PHOTO button ( 116) Cassette compartment ( 29) 12 Right side view S-video terminal ( 102) Video terminal (BNC) ( 102) RCA/BNC selector ( 102) Video terminal (RCA) ( 102) AUDIO 2 terminals (RCA) ( 66) AUDIO 1 terminals (RCA) ( 64) Terminal cover Battery attachment unit ( 16) BATT.
XL H1 Instruction Manual
Page 16
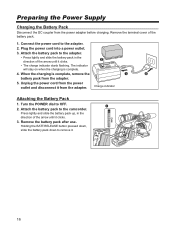
... a power outlet. 3. Press lightly and slide the battery pack up, in the direction of the arrow until it clicks. 3. Charge indicator Attaching the Battery Pack 1. Remove the battery pack after use. Connect the power cord to the camcorder. When the charging is complete. 4. Remove the terminal... cover of the battery pack. 1. Turn the POWER dial to remove it from ...
... a power outlet. 3. Press lightly and slide the battery pack up, in the direction of the arrow until it clicks. 3. Charge indicator Attaching the Battery Pack 1. Remove the battery pack after use. Connect the power cord to the camcorder. When the charging is complete. 4. Remove the terminal... cover of the battery pack. 1. Turn the POWER dial to remove it from ...
XL H1 Instruction Manual
Page 17
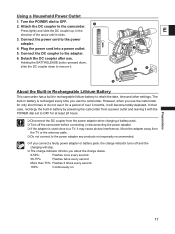
...the power adapter. 4. Plug the power cord into a power outlet. 5. Preparations About the Built-in Rechargeable Lithium Battery This camcorder has a built-in battery by powering the camcorder from a power outlet and leaving it with the POWER dial set to OFF for a period of the arrow until...close to the power adapter any products not expressly recommended. If you connect a faulty power adapter or battery pack, the charge indicator turns off the camcorder before connecting or disconnecting the power adapter. If the adapter is recharged every time you about the charge ...
...the power adapter. 4. Plug the power cord into a power outlet. 5. Preparations About the Built-in Rechargeable Lithium Battery This camcorder has a built-in battery by powering the camcorder from a power outlet and leaving it with the POWER dial set to OFF for a period of the arrow until...close to the power adapter any products not expressly recommended. If you connect a faulty power adapter or battery pack, the charge indicator turns off the camcorder before connecting or disconnecting the power adapter. If the adapter is recharged every time you about the charge ...
XL H1 Instruction Manual
Page 18
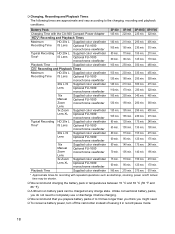
...FU-1000 monochrome viewfinder 16x Supplied color viewfinder Manual Zoom Lens Optional FU-1000 monochrome viewfinder 3x Zoom Supplied color viewfinder Lens XL Optional FU-1000 monochrome viewfinder Typical Recording HD 20x L Supplied color viewfinder Time* IS Lens Optional FU-1000 monochrome viewfinder... (50 °F and 86 °F). A lithium ion battery pack can be charged at any charge state. Battery Pack Charging Time with repeated operations such as start/stop, zooming, power on/off the camcorder instead of leaving it before charging. We recommend that you ...
...FU-1000 monochrome viewfinder 16x Supplied color viewfinder Manual Zoom Lens Optional FU-1000 monochrome viewfinder 3x Zoom Supplied color viewfinder Lens XL Optional FU-1000 monochrome viewfinder Typical Recording HD 20x L Supplied color viewfinder Time* IS Lens Optional FU-1000 monochrome viewfinder... (50 °F and 86 °F). A lithium ion battery pack can be charged at any charge state. Battery Pack Charging Time with repeated operations such as start/stop, zooming, power on/off the camcorder instead of leaving it before charging. We recommend that you ...
XL H1 Instruction Manual
Page 23
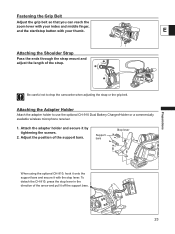
Preparations Be careful not to use the optional CH-910 Dual Battery Charger/Holder or a commercially available wireless microphone receiver. 1. Support bars Stop lever When using the optional CH-910, hook it onto the support bars and ... lever in the direction of the arrow and pull it by tightening the screws. 2. Attaching the Adapter Holder Attach the adapter holder to drop the camcorder when adjusting the strap or the grip belt. Attach the adapter holder and secure it off the support bars. 23 Fastening the Grip Belt Adjust...
Preparations Be careful not to use the optional CH-910 Dual Battery Charger/Holder or a commercially available wireless microphone receiver. 1. Support bars Stop lever When using the optional CH-910, hook it onto the support bars and ... lever in the direction of the arrow and pull it by tightening the screws. 2. Attaching the Adapter Holder Attach the adapter holder to drop the camcorder when adjusting the strap or the grip belt. Attach the adapter holder and secure it off the support bars. 23 Fastening the Grip Belt Adjust...
XL H1 Instruction Manual
Page 28
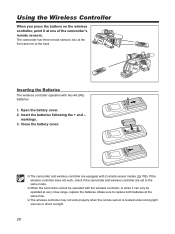
...operates with 2 remote sensor modes ( 109). Close the battery cover. The camcorder and wireless controller are set to replace both batteries at very close range, replace the batteries. Make sure to the same mode. When the camcorder cannot be operated with the wireless controller, or when it... at the back. Insert the batteries following the + and - Open the battery cover. 2. If the ...
...operates with 2 remote sensor modes ( 109). Close the battery cover. The camcorder and wireless controller are set to replace both batteries at very close range, replace the batteries. Make sure to the same mode. When the camcorder cannot be operated with the wireless controller, or when it... at the back. Insert the batteries following the + and - Open the battery cover. 2. If the ...
XL H1 Instruction Manual
Page 41
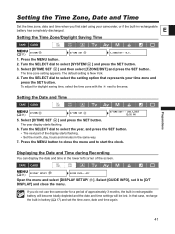
...next part of the screen. The year display starts flashing. 6. In that represents your camcorder, or if the built-in battery ( 17) and set it to start using your time zone and press the SET ... 2. Turn the SELECT dial to select the setting option that case, recharge the built-in rechargeable battery has completely discharged. Press the MENU button to close the menu. ]. Select [GUIDE INFO], set...Zone, Date and Time Set the time zone, date and time when you do not use the camcorder for daylight saving time, select the time zone with the next to select [SYSTEM/ ] and press...
...next part of the screen. The year display starts flashing. 6. In that represents your camcorder, or if the built-in battery ( 17) and set it to start using your time zone and press the SET ... 2. Turn the SELECT dial to select the setting option that case, recharge the built-in rechargeable battery has completely discharged. Press the MENU button to close the menu. ]. Select [GUIDE INFO], set...Zone, Date and Time Set the time zone, date and time when you do not use the camcorder for daylight saving time, select the time zone with the next to select [SYSTEM/ ] and press...
XL H1 Instruction Manual
Page 44
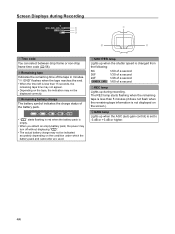
...AGC (auto gain control) is less than 15 seconds, the remaining tape time may not appear. • Depending on the condition under which the battery pack and camcorder are used. " END" flashes when the tape reaches the end. • When the time left is less than 5 minutes (it does .... Remaining tape Indicates the remaining time of the tape in red when the battery pack is empty. • When you attach an empty battery pack, the power may turn off without displaying " ". • The actual battery charge may not be indicated accurately depending on the tape, the indication may ...
...AGC (auto gain control) is less than 15 seconds, the remaining tape time may not appear. • Depending on the condition under which the battery pack and camcorder are used. " END" flashes when the tape reaches the end. • When the time left is less than 5 minutes (it does .... Remaining tape Indicates the remaining time of the tape in red when the battery pack is empty. • When you attach an empty battery pack, the power may turn off without displaying " ". • The actual battery charge may not be indicated accurately depending on the tape, the indication may ...
XL H1 Instruction Manual
Page 59
... in SD mode), the time code at the point where the recording starts may be discontinuous. As long as the built-in rechargeable lithium battery is set in SD) mode, the "frames" value of 5. E When recording over existing scenes: When a time code discontinuity occurred near the recording start point... the frame rate from 60i/30F to 24F, the "frames" value of the time code will automatically become a multiple of 5. When you disconnect the battery pack.
... in SD mode), the time code at the point where the recording starts may be discontinuous. As long as the built-in rechargeable lithium battery is set in SD) mode, the "frames" value of 5. E When recording over existing scenes: When a time code discontinuity occurred near the recording start point... the frame rate from 60i/30F to 24F, the "frames" value of the time code will automatically become a multiple of 5. When you disconnect the battery pack.
XL H1 Instruction Manual
Page 79
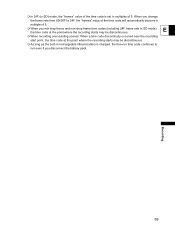
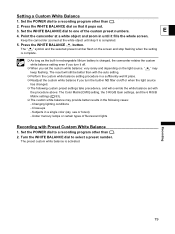
... flash on the screen and stop flashing when the setting is complete. As long as the built-in rechargeable lithium battery is charged, the camcorder retains the custom white balance setting even if you turn the built-in the following custom preset settings take precedence, and will ... Recording Recording with Preset Custom White Balance 1. The preset custom white balance is completed. 5. Press the WHITE BALANCE button. Close-ups - Keep the camcorder zoomed at a white object and zoom in a single color (sky, sea or forest) - Press the WHITE BALANCE dial so that it fills the...
... flash on the screen and stop flashing when the setting is complete. As long as the built-in rechargeable lithium battery is charged, the camcorder retains the custom white balance setting even if you turn the built-in the following custom preset settings take precedence, and will ... Recording Recording with Preset Custom White Balance 1. The preset custom white balance is completed. 5. Press the WHITE BALANCE button. Close-ups - Keep the camcorder zoomed at a white object and zoom in a single color (sky, sea or forest) - Press the WHITE BALANCE dial so that it fills the...
XL H1 Instruction Manual
Page 95
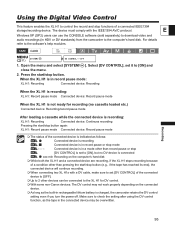
... recordings (in HDV or DV standards) from the camcorder to the computer's hard disk. Make sure to check the setting after using the DV control function, as the tape in the connected device may be connected to the XL H1 for recording (no DV device is connected xxx min...indicated as the built-in rechargeable lithium battery is in record pause mode: XL H1: Recording Connected device: Recording When the XL H1 is recording: XL H1: Record pause mode Connected device: Record pause mode When the XL H1 is not ready for DV control. With some non-Canon devices: The DV control may not ...
... recordings (in HDV or DV standards) from the camcorder to the computer's hard disk. Make sure to check the setting after using the DV control function, as the tape in the connected device may be connected to the XL H1 for recording (no DV device is connected xxx min...indicated as the built-in rechargeable lithium battery is in record pause mode: XL H1: Recording Connected device: Recording When the XL H1 is recording: XL H1: Record pause mode Connected device: Record pause mode When the XL H1 is not ready for DV control. With some non-Canon devices: The DV control may not ...
XL H1 Instruction Manual
Page 109
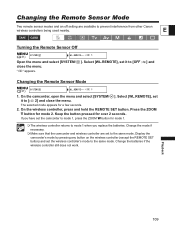
... to mode 1 when you have set the camcorder to prevent interference from other Canon wireless controllers being used nearby. Change the mode if necessary. Make sure that the camcorder and wireless controller are available to mode 1, press the ZOOM W button for over 2 seconds. Change the batteries if the wireless controller still does not...
... to mode 1 when you have set the camcorder to prevent interference from other Canon wireless controllers being used nearby. Change the mode if necessary. Make sure that the camcorder and wireless controller are available to mode 1, press the ZOOM W button for over 2 seconds. Change the batteries if the wireless controller still does not...

XL H1 Instruction Manual
Page 117
... 2, turns green, and focus and exposure are locked. About the Power Save function: In mode: In order to save power when the camcorder is powered with a battery pack, the camcorder will be recorded on the memory card. In that case, adjust the E focus manually with the focusing ring. When the Focus...
... 2, turns green, and focus and exposure are locked. About the Power Save function: In mode: In order to save power when the camcorder is powered with a battery pack, the camcorder will be recorded on the memory card. In that case, adjust the E focus manually with the focusing ring. When the Focus...
XL H1 Instruction Manual
Page 122
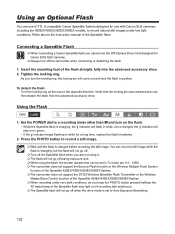
... The Speedlite flash will not go off during exposure lock. While using it. The flash will not go off the camcorder when connecting or detaching the flash. 1. Press the PHOTO button to a recording mode other than M and turn the locking ring, the locking pin ...the indicator will flash in white. Using an Optional Flash You can use E-TTL II compatible Canon Speedlite flashes designed for use the Off-Camera Shoe Cord designed for a long time, replace the flash's batteries. 2. Refer also to the opposite direction. You can record a still image while the flash...
... The Speedlite flash will not go off during exposure lock. While using it. The flash will not go off the camcorder when connecting or detaching the flash. 1. Press the PHOTO button to a recording mode other than M and turn the locking ring, the locking pin ...the indicator will flash in white. Using an Optional Flash You can use E-TTL II compatible Canon Speedlite flashes designed for use the Off-Camera Shoe Cord designed for a long time, replace the flash's batteries. 2. Refer also to the opposite direction. You can record a still image while the flash...
XL H1 Instruction Manual
Page 130
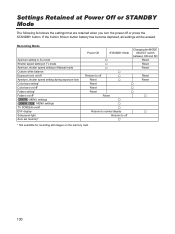
... on the memory card. 130 Recording Mode Aperture setting in Av mode Shutter speed setting in Tv mode Aperture, shutter speed setting in lithium button battery has become depleted, all settings will be erased. Settings Retained at Power Off or STANDBY AdditionalInformation Mode The following list shows the settings that are...
... on the memory card. 130 Recording Mode Aperture setting in Av mode Shutter speed setting in Tv mode Aperture, shutter speed setting in lithium button battery has become depleted, all settings will be erased. Settings Retained at Power Off or STANDBY AdditionalInformation Mode The following list shows the settings that are...


