
Instruction Manual
Page 2
...accept any changes or modifications to OET65 and RSS-102 of a car under direct sunlight, fire, etc. Frequecncy Tolerance: 25 ppm Canon U.S.A., Inc. WARNING TO REDUCE THE RISK OF ELECTRIC SHOCK AND TO REDUCE ANNOYING INTERFERENCE, USE THE RECOMMENDED ACCESSORIES ONLY. Important Introduction ... interference will not occur in accordance with the instructions, may cause undesired operation of batteries. • Do not expose batteries or product to copyright laws. 2 FCC/IC NOTICE HD Camcorder, XA25 / XA20 systems This device complies with any other words, this device must accept ...
...accept any changes or modifications to OET65 and RSS-102 of a car under direct sunlight, fire, etc. Frequecncy Tolerance: 25 ppm Canon U.S.A., Inc. WARNING TO REDUCE THE RISK OF ELECTRIC SHOCK AND TO REDUCE ANNOYING INTERFERENCE, USE THE RECOMMENDED ACCESSORIES ONLY. Important Introduction ... interference will not occur in accordance with the instructions, may cause undesired operation of batteries. • Do not expose batteries or product to copyright laws. 2 FCC/IC NOTICE HD Camcorder, XA25 / XA20 systems This device complies with any other words, this device must accept ...
Instruction Manual
Page 8
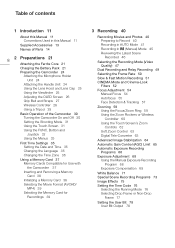
... in AUTO Mode 41 Recording in this Manual 11 Supplied Accessories 13 Names of Parts 14 8 2 Preparations 21 Attaching the Ferrite Core 21 Charging the Battery Pack 21 Preparing the Camcorder 24 Attaching the Microphone Holder Unit 24 Attaching the Handle Unit 24 Using the Lens Hood and Lens Cap 25...
... in AUTO Mode 41 Recording in this Manual 11 Supplied Accessories 13 Names of Parts 14 8 2 Preparations 21 Attaching the Ferrite Core 21 Charging the Battery Pack 21 Preparing the Camcorder 24 Attaching the Microphone Holder Unit 24 Attaching the Handle Unit 24 Using the Lens Hood and Lens Cap 25...

Instruction Manual
Page 10
... Point 137 Wi-Fi Protected Setup (WPS) 137 Searching for Wi-Fi Functions 165 Handling Precautions 168 Camcorder 168 Battery Pack 169 Memory Card 170 Built-in Rechargeable Lithium Battery 170 Lithium Button Battery 171 Disposal 171 Maintenance/Others 172 Cleaning 172 Condensation 172 Using the Camcorder Abroad 173 Optional Accessories 174 Specifications...
... Point 137 Wi-Fi Protected Setup (WPS) 137 Searching for Wi-Fi Functions 165 Handling Precautions 168 Camcorder 168 Battery Pack 169 Memory Card 170 Built-in Rechargeable Lithium Battery 170 Lithium Button Battery 171 Disposal 171 Maintenance/Others 172 Cleaning 172 Condensation 172 Using the Camcorder Abroad 173 Optional Accessories 174 Specifications...
Instruction Manual
Page 13
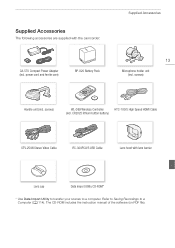
... Wireless Controller HTC-100/S High Speed HDMI Cable (incl. The CD-ROM includes the instruction manual of the software (on PDF file). CR2025 lithium button battery) STV-250N Stereo Video Cable IFC-300PCU/S USB Cable Lens hood with the camcorder: CA-570 Compact Power Adapter (incl. screws) Handle unit (incl. Supplied... Lens cap Data Import Utility CD-ROM* * Use Data Import Utility to transfer your scenes to a Computer (A 114). power cord and ferrite core) BP-820 Battery Pack Supplied Accessories 13 Microphone holder unit (incl.
... Wireless Controller HTC-100/S High Speed HDMI Cable (incl. The CD-ROM includes the instruction manual of the software (on PDF file). CR2025 lithium button battery) STV-250N Stereo Video Cable IFC-300PCU/S USB Cable Lens hood with the camcorder: CA-570 Compact Power Adapter (incl. screws) Handle unit (incl. Supplied... Lens cap Data Import Utility CD-ROM* * Use Data Import Utility to transfer your scenes to a Computer (A 114). power cord and ferrite core) BP-820 Battery Pack Supplied Accessories 13 Microphone holder unit (incl.

Instruction Manual
Page 14
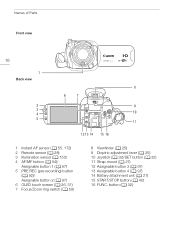
INFO (battery information) button (A 155) Names of Parts Names of Parts Left side view 14 2 3 1 4 5 67 8 9 10 11 1 Lens barrier switch (A 40) 2 Memory card slot 2 (A 38) 3 Memory card slot 3 (A 38) 4 u (review recording) button (A 46)/ Assignable button 5 (A 97) 5 Lens hood (A 25) 6 Focus/Zoom ring (A 54, 59) 7 CUSTOM (customizable) dial (A 96) 8 CUSTOM (customizable) button (A 96) 9 INFRARED switch (A 94) 10 Double memory card slot cover 11 DISP. (onscreen display) button (A 93)/BATT.
INFO (battery information) button (A 155) Names of Parts Names of Parts Left side view 14 2 3 1 4 5 67 8 9 10 11 1 Lens barrier switch (A 40) 2 Memory card slot 2 (A 38) 3 Memory card slot 3 (A 38) 4 u (review recording) button (A 46)/ Assignable button 5 (A 97) 5 Lens hood (A 25) 6 Focus/Zoom ring (A 54, 59) 7 CUSTOM (customizable) dial (A 96) 8 CUSTOM (customizable) button (A 96) 9 INFRARED switch (A 94) 10 Double memory card slot cover 11 DISP. (onscreen display) button (A 93)/BATT.
Instruction Manual
Page 16
...) 8 Viewfinder (A 25) 9 Dioptric adjustment lever (A 25) 10 Joystick (A 32)/SET button (A 32) 11 Strap mount (A 27) 12 Assignable button 3 (A 97) 13 Assignable button 4 (A 97) 14 Battery attachment unit (A 21) 15 START/STOP button (A 40) 16 FUNC.
...) 8 Viewfinder (A 25) 9 Dioptric adjustment lever (A 25) 10 Joystick (A 32)/SET button (A 32) 11 Strap mount (A 27) 12 Assignable button 3 (A 97) 13 Assignable button 4 (A 97) 14 Battery attachment unit (A 21) 15 START/STOP button (A 40) 16 FUNC.

Instruction Manual
Page 17
Top view Names of Parts 1 23 45 17 2 67 1 Built-in stereo microphone (A 79) 2 Handle attachment unit (A 24) 3 Mode switch (A 31) 4 Zoom rocker (A 59) 5 ACCESS indicator (A 40) 6 Power switch (A 30) 7 POWER / CHG (battery charging) indicator (A 21)
Top view Names of Parts 1 23 45 17 2 67 1 Built-in stereo microphone (A 79) 2 Handle attachment unit (A 24) 3 Mode switch (A 31) 4 Zoom rocker (A 59) 5 ACCESS indicator (A 40) 6 Power switch (A 30) 7 POWER / CHG (battery charging) indicator (A 21)
Instruction Manual
Page 18
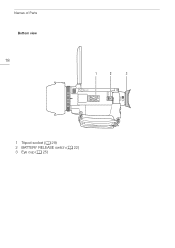
Names of Parts Bottom view 18 1 2 3 1 Tripod socket (A 29) 2 BATTERY RELEASE switch (A 22) 3 Eye cup (A 25)
Names of Parts Bottom view 18 1 2 3 1 Tripod socket (A 29) 2 BATTERY RELEASE switch (A 22) 3 Eye cup (A 25)

Instruction Manual
Page 21
...core and wrap it around the core, then close the unit until it clicks shut. For approximate charging times and recording/playback times with a battery pack or directly using the compact power adapter. Attaching the ferrite core to the compact power adapter cable is necessary to suppress RF interference. ...21 Attach the ferrite core to the cable about 6 cm (2.4 in.) from the plug end (the plug to be powered with a fully charged battery pack, refer to Charging, Recording and Playback Times (A 175). 1 Connect the power cord to the camcorder's DC IN terminal. DC IN terminal 4 Attach ...
...core and wrap it around the core, then close the unit until it clicks shut. For approximate charging times and recording/playback times with a battery pack or directly using the compact power adapter. Attaching the ferrite core to the compact power adapter cable is necessary to suppress RF interference. ...21 Attach the ferrite core to the cable about 6 cm (2.4 in.) from the plug end (the plug to be powered with a fully charged battery pack, refer to Charging, Recording and Playback Times (A 175). 1 Connect the power cord to the camcorder's DC IN terminal. DC IN terminal 4 Attach ...

Instruction Manual
Page 22
... then pull it out. The red POWER/CHG indicator will go out when you can power the camcorder using the compact power adapter so the battery pack will not be charged only when the camcorder is off. • If the power supply was on the memory card. Be sure to ... not connect the supplied compact power adapter to voltage converters for overseas travels or special power sources such as those on in red (battery pack charging). To remove the battery pack 1 Slide d in temperatures between 10 °C and 30 °C (50 °F and 86 °F). After you turn off the camcorder. ...
... then pull it out. The red POWER/CHG indicator will go out when you can power the camcorder using the compact power adapter so the battery pack will not be charged only when the camcorder is off. • If the power supply was on the memory card. Be sure to ... not connect the supplied compact power adapter to voltage converters for overseas travels or special power sources such as those on in red (battery pack charging). To remove the battery pack 1 Slide d in temperatures between 10 °C and 30 °C (50 °F and 86 °F). After you turn off the camcorder. ...

Instruction Manual
Page 23
...will ensure that the remaining recording time will be displayed accurately. • We recommend that you prepare battery packs to last 2 to 3 times longer than you think you use a battery pack, fully charge it and then use , or the day before, to ensure a full charge. ...• The first time you might need. • USA and Canada only: The Lithium ion/polymer battery that powers the product is completely exhausted. Charging the Battery Pack • Charged battery packs continue to recycle this battery. Therefore, charge them on how to discharge naturally.
...will ensure that the remaining recording time will be displayed accurately. • We recommend that you prepare battery packs to last 2 to 3 times longer than you think you use a battery pack, fully charge it and then use , or the day before, to ensure a full charge. ...• The first time you might need. • USA and Canada only: The Lithium ion/polymer battery that powers the product is completely exhausted. Charging the Battery Pack • Charged battery packs continue to recycle this battery. Therefore, charge them on how to discharge naturally.
Instruction Manual
Page 26
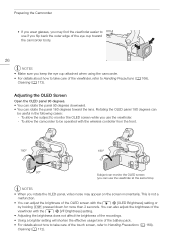
...] setting. • Adjusting the brightness does not affect the brightness of the recordings. • Using a brighter setting will shorten the effective usage time of the battery pack. • For details about how to take care of the viewfinder, refer to Handling Precautions (A 168), Cleaning (A 172). This is not a malfunction. • You...
...] setting. • Adjusting the brightness does not affect the brightness of the recordings. • Using a brighter setting will shorten the effective usage time of the battery pack. • For details about how to take care of the viewfinder, refer to Handling Precautions (A 168), Cleaning (A 172). This is not a malfunction. • You...
Instruction Manual
Page 28
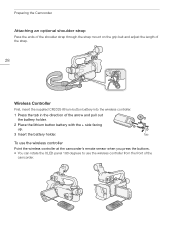
... through the strap mount on the grip belt and adjust the length of the strap. 28 Wireless Controller First, insert the supplied CR2025 lithium button battery into the wireless controller. 1 Press the tab in the direction of the camcorder. Tab To use the wireless controller Point the wireless controller at the... buttons. • You can rotate the OLED panel 180 degrees to use the wireless controller from the front of the arrow and pull out the battery holder. 2 Place the lithium button battery with the + side facing up. 3 Insert the...
... through the strap mount on the grip belt and adjust the length of the strap. 28 Wireless Controller First, insert the supplied CR2025 lithium button battery into the wireless controller. 1 Press the tab in the direction of the camcorder. Tab To use the wireless controller Point the wireless controller at the... buttons. • You can rotate the OLED panel 180 degrees to use the wireless controller from the front of the arrow and pull out the battery holder. 2 Place the lithium button battery with the + side facing up. 3 Insert the...
Instruction Manual
Page 29
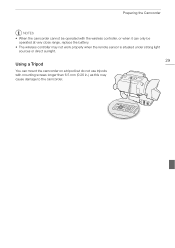
Preparing the Camcorder NOTES • When the camcorder cannot be operated with the wireless controller, or when it can only be operated at very close range, replace the battery. • The wireless controller may not work properly when the remote sensor is situated under strong light sources or direct sunlight. 29 Using a Tripod You can mount the camcorder on a tripod but do not use tripods with mounting screws longer than 6.5 mm (0.26 in.) as this may cause damage to the camcorder.
Preparing the Camcorder NOTES • When the camcorder cannot be operated with the wireless controller, or when it can only be operated at very close range, replace the battery. • The wireless controller may not work properly when the remote sensor is situated under strong light sources or direct sunlight. 29 Using a Tripod You can mount the camcorder on a tripod but do not use tripods with mounting screws longer than 6.5 mm (0.26 in.) as this may cause damage to the camcorder.
Instruction Manual
Page 35
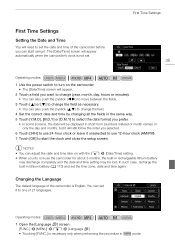
... you selected. 6 Touch [24H] to use 24-hour clock or leave it unselected to use the camcorder for about 3 months, the built-in rechargeable lithium battery may discharge completely and the date and time setting may be displayed in short form (numbers instead of month names or only the day and... month), but it to one of 27 languages. In such case, recharge the built-in lithium battery (A 170) and set the date and time of the camcorder before you do not use 12-hour clock (AM/PM). 7 Touch [OK] to start using...
... you selected. 6 Touch [24H] to use 24-hour clock or leave it unselected to use the camcorder for about 3 months, the built-in rechargeable lithium battery may discharge completely and the date and time setting may be displayed in short form (numbers instead of month names or only the day and... month), but it to one of 27 languages. In such case, recharge the built-in lithium battery (A 170) and set the date and time of the camcorder before you do not use 12-hour clock (AM/PM). 7 Touch [OK] to start using...
Instruction Manual
Page 40
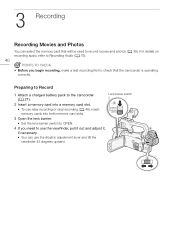
... it out and adjust it, if necessary. • You can select the memory card that the camcorder is operating correctly. Preparing to Record 1 Attach a charged battery pack to record movies and photos (A 39).
... it out and adjust it, if necessary. • You can select the memory card that the camcorder is operating correctly. Preparing to Record 1 Attach a charged battery pack to record movies and photos (A 39).

Instruction Manual
Page 44
... in the 44 following table. In such case, we recommend recording in mode (A 45). • Photos are summarized in order to save power when using a battery pack (A 25). Movie Format AVCHD MP4 Recording mode Any 35 Mbps, 24 Mbps, 17 Mbps 4 Mbps 3 Mbps Photo size 1920x1080 1920x1080 1280x720 640x360 Number of...
... in the 44 following table. In such case, we recommend recording in mode (A 45). • Photos are summarized in order to save power when using a battery pack (A 25). Movie Format AVCHD MP4 Recording mode Any 35 Mbps, 24 Mbps, 17 Mbps 4 Mbps 3 Mbps Photo size 1920x1080 1920x1080 1280x720 640x360 Number of...

Instruction Manual
Page 46
... the q > [OLED Brightness] setting. With the supplied software, Data Import Utility, you can join such split files into a single scene and save power when using a battery pack (A 25). While reviewing the latest scene, the picture will be recorded while the digital zoom is set another during relay recording, the video will...
... the q > [OLED Brightness] setting. With the supplied software, Data Import Utility, you can join such split files into a single scene and save power when using a battery pack (A 25). While reviewing the latest scene, the picture will be recorded while the digital zoom is set another during relay recording, the video will...
Instruction Manual
Page 77
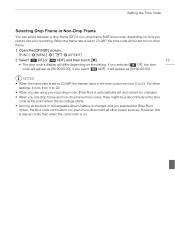
... setting. For other power sources. However, this is less accurate than when the camcorder is set to 23.98P, the frames value in rechargeable lithium battery is automatically set and cannot be changed. • When you mix drop frame and non-drop frame time codes, there might be set to 23...
... setting. For other power sources. However, this is less accurate than when the camcorder is set to 23.98P, the frames value in rechargeable lithium battery is automatically set and cannot be changed. • When you mix drop frame and non-drop frame time codes, there might be set to 23...
Instruction Manual
Page 126
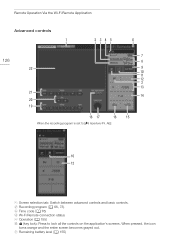
Remote Operation Via the Wi-Fi Remote Application Advanced controls 1 2345 6 126 7 8 22 9 10 11 12 2 13 21 14 20 19 18 17 16 15 When the recording program is set to lock all the controls on the application's screens. When pressed, the icon turns orange and the entire screen becomes grayed out. 7 Remaining battery level (A 155) AE]: 10 12 1 Screen selection tab: Switch between advanced controls and basic controls. 2 Recording program (A 66, 73) 3 Time code (A 76) 4 Wi-Fi Remote connection status 5 Operation (A 155) 6 D (key lock): Press to [" Aperture-Pri.
Remote Operation Via the Wi-Fi Remote Application Advanced controls 1 2345 6 126 7 8 22 9 10 11 12 2 13 21 14 20 19 18 17 16 15 When the recording program is set to lock all the controls on the application's screens. When pressed, the icon turns orange and the entire screen becomes grayed out. 7 Remaining battery level (A 155) AE]: 10 12 1 Screen selection tab: Switch between advanced controls and basic controls. 2 Recording program (A 66, 73) 3 Time code (A 76) 4 Wi-Fi Remote connection status 5 Operation (A 155) 6 D (key lock): Press to [" Aperture-Pri.


