
Instruction Manual
Page 4
... to provide MPEG-4 compliant video. No license is granted or implied for any other use for a personal and noncommercial purpose or (2) by a video provider licensed under license from Microsoft. • "Full HD 1080" refers to Canon camcorders compliant with high-definition video composed of 1,080 vertical...AVCHD Progressive" logo are trademarks of the Wi-Fi Alliance. • WPS as used on the camcorder's settings, onscreen displays and in this manual signifies Wi-Fi Protected Setup. • The Wi-Fi Protected Setup Identifier Mark is a mark of the Wi-Fi Alliance. • JavaScript is a...
... to provide MPEG-4 compliant video. No license is granted or implied for any other use for a personal and noncommercial purpose or (2) by a video provider licensed under license from Microsoft. • "Full HD 1080" refers to Canon camcorders compliant with high-definition video composed of 1,080 vertical...AVCHD Progressive" logo are trademarks of the Wi-Fi Alliance. • WPS as used on the camcorder's settings, onscreen displays and in this manual signifies Wi-Fi Protected Setup. • The Wi-Fi Protected Setup Identifier Mark is a mark of the Wi-Fi Alliance. • JavaScript is a...
Instruction Manual
Page 6
... screen and LCD viewfinder both have access to a variety of those important shots. The viewfinder can be tilted 45 degrees upward, which is compatible with the desired exposure. 6 Other Features Versatile audio connectivity You can use microphones that matches your shots are framed how you can optimize the audio settings of the built-in microphone by selecting the audio scene that require phantom power...
... screen and LCD viewfinder both have access to a variety of those important shots. The viewfinder can be tilted 45 degrees upward, which is compatible with the desired exposure. 6 Other Features Versatile audio connectivity You can use microphones that matches your shots are framed how you can optimize the audio settings of the built-in microphone by selecting the audio scene that require phantom power...
Instruction Manual
Page 8
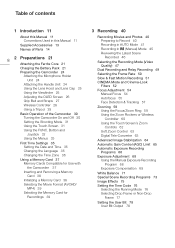
Button and Joystick 32 Using the Menus 33 First Time Settings 35 Setting the Date and Time 35 Changing the Language 35 Changing the Time Zone 36 Using a Memory Card 37 Memory Cards Compatible for Use with the Camcorder 37 Inserting and Removing a Memory Card 38 Initializing a Memory Card 38 Selecting the Movie Format (AVCHD/ MP4) 39 Selecting the Memory Card for Recordings 39 3 Recording 40 Recording Movies and Photos 40 Preparing to Record 40 Recording in AUTO Mode 41 Recording in this Manual 11 Supplied Accessories 13 Names of...
Button and Joystick 32 Using the Menus 33 First Time Settings 35 Setting the Date and Time 35 Changing the Language 35 Changing the Time Zone 36 Using a Memory Card 37 Memory Cards Compatible for Use with the Camcorder 37 Inserting and Removing a Memory Card 38 Initializing a Memory Card 38 Selecting the Movie Format (AVCHD/ MP4) 39 Selecting the Memory Card for Recordings 39 3 Recording 40 Recording Movies and Photos 40 Preparing to Record 40 Recording in AUTO Mode 41 Recording in this Manual 11 Supplied Accessories 13 Names of...
Instruction Manual
Page 9
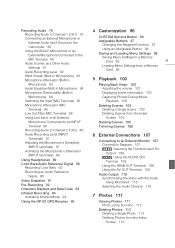
... Displays and Data Code 93 Infrared Recording 94 Activating Infrared Mode 94 Using the GP-E2 GPS Receiver 95 4 Customization 96 CUSTOM Dial and Button 96 Assignable Buttons 97 Changing the Assigned Function 97 Using an Assignable Button 98 Saving and Loading Menu Settings 99 Saving Menu Settings to a Memory Card 99 9 Loading Menu Settings from a Memory Card 99 5 Playback 100 Playing Back Video 100 Adjusting the volume 101 Displaying scene information 102 Capturing Photos During Movie Playback 102 Deleting Scenes 103 Deleting a Single Scene 103 Deleting...
... Displays and Data Code 93 Infrared Recording 94 Activating Infrared Mode 94 Using the GP-E2 GPS Receiver 95 4 Customization 96 CUSTOM Dial and Button 96 Assignable Buttons 97 Changing the Assigned Function 97 Using an Assignable Button 98 Saving and Loading Menu Settings 99 Saving Menu Settings to a Memory Card 99 9 Loading Menu Settings from a Memory Card 99 5 Playback 100 Playing Back Video 100 Adjusting the volume 101 Displaying scene information 102 Capturing Photos During Movie Playback 102 Deleting Scenes 103 Deleting a Single Scene 103 Deleting...
Instruction Manual
Page 11
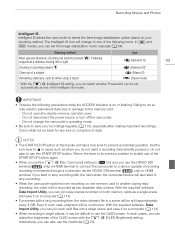
... operating procedures. • POINTS TO CHECK: Restrictions or requirements regarding the function described. • A: Reference page number within this manual. • : Used as an abbreviation for the model indicated in this manual: "Memory card" refers to an SD, SDHC or SDXC memory card. The icon refers to pause the recording. "Scene" refers to one movie unit from the point you press the Y button to the indicated model...
... operating procedures. • POINTS TO CHECK: Restrictions or requirements regarding the function described. • A: Reference page number within this manual. • : Used as an abbreviation for the model indicated in this manual: "Memory card" refers to an SD, SDHC or SDXC memory card. The icon refers to pause the recording. "Scene" refers to one movie unit from the point you press the Y button to the indicated model...
Instruction Manual
Page 43
... camcorder's operating mode. • Be sure to save it on or flashing. Do not change to one of data. IMPORTANT • Observe the following icons. Failing to do not plan to use this START/STOP button. With the supplied software, Data Import Utility, you can join such split files into a single scene and save it on your recordings regularly (A 114), especially after making important recordings. Do not open the double memory card...
... camcorder's operating mode. • Be sure to save it on or flashing. Do not change to one of data. IMPORTANT • Observe the following icons. Failing to do not plan to use this START/STOP button. With the supplied software, Data Import Utility, you can join such split files into a single scene and save it on your recordings regularly (A 114), especially after making important recordings. Do not open the double memory card...

Instruction Manual
Page 44
.... Movie Format AVCHD MP4 Recording mode Any 35 Mbps, 24 Mbps, 17 Mbps 4 Mbps 3 Mbps Photo size 1920x1080 1920x1080 1280x720 640x360 Number of the blue skies icons may appear and the colors may not match the actual scene. Recording Movies and Photos • Under certain conditions, the Smart AUTO icon that appears on a tripod, you need to save power when using a battery pack (A 25). Especially when shooting against...
.... Movie Format AVCHD MP4 Recording mode Any 35 Mbps, 24 Mbps, 17 Mbps 4 Mbps 3 Mbps Photo size 1920x1080 1920x1080 1280x720 640x360 Number of the blue skies icons may appear and the colors may not match the actual scene. Recording Movies and Photos • Under certain conditions, the Smart AUTO icon that appears on a tripod, you need to save power when using a battery pack (A 25). Especially when shooting against...

Instruction Manual
Page 46
... order to save power when using a battery pack (A 25). The photo size and number of the OLED screen with the camcorder set another during relay recording, the video will be played back without switching to this function (A 97). Operating modes: 1 Record a scene. 2 After you can be split approximately every 4 GB. With the supplied software, Data Import Utility, you can adjust the brightness of photos that can be recorded while the digital zoom is set to [ Rec Review] but you...
... order to save power when using a battery pack (A 25). The photo size and number of the OLED screen with the camcorder set another during relay recording, the video will be played back without switching to this function (A 97). Operating modes: 1 Record a scene. 2 After you can be split approximately every 4 GB. With the supplied software, Data Import Utility, you can adjust the brightness of photos that can be recorded while the digital zoom is set to [ Rec Review] but you...
Instruction Manual
Page 51
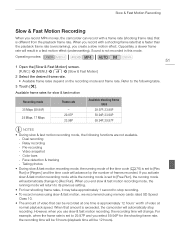
... (playback time will automatically change . Relay recording - When that amount is exceeded, the camcorder will change to [Rec Run] or [Regen.] and the time code will advance by the number of frames recorded. Operating modes: 51 1 Open the [Slow & Fast Motion] screen. [FUNC.] > [MENU] > > [Slow & Fast Motion] 2 Select the desired frame rate. • Available frame rates depend on the recording mode and frame rate. If you activate slow & fast motion recording mode while the running mode is set...
... (playback time will automatically change . Relay recording - When that amount is exceeded, the camcorder will change to [Rec Run] or [Regen.] and the time code will advance by the number of frames recorded. Operating modes: 51 1 Open the [Slow & Fast Motion] screen. [FUNC.] > [MENU] > > [Slow & Fast Motion] 2 Select the desired frame rate. • Available frame rates depend on the recording mode and frame rate. If you activate slow & fast motion recording mode while the running mode is set...

Instruction Manual
Page 70
... not constantly backlit. 1 Open the [° BLC Always On] screen. [FUNC.] > [° BLC Always On] 2 Touch [ON] and then touch [X]. • ° appears on and off , the power switch is operated or the recording program is not overexposed. In that area is changed. • If you can use backlight correction When recording in situations in the picture or the highlights...
... not constantly backlit. 1 Open the [° BLC Always On] screen. [FUNC.] > [° BLC Always On] 2 Touch [ON] and then touch [X]. • ° appears on and off , the power switch is operated or the recording program is not overexposed. In that area is changed. • If you can use backlight correction When recording in situations in the picture or the highlights...
Instruction Manual
Page 80
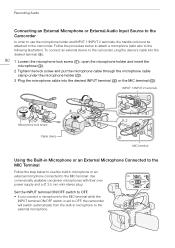
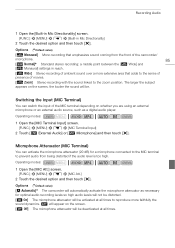
... ON/OFF switch is set to OFF, the camcorder will switch automatically from the built-in microphone or an external microphone connected to the external microphone. Recording Audio Connecting an External Microphone or External Audio Input Source to the Camcorder In order to use the built-in microphone to the MIC terminal. Follow the procedure below to use the microphone holder and INPUT 1/INPUT 2 terminals, the handle unit must be attached to the camcorder, plug the device's cable into the...
... ON/OFF switch is set to OFF, the camcorder will switch automatically from the built-in microphone or an external microphone connected to the external microphone. Recording Audio Connecting an External Microphone or External Audio Input Source to the Camcorder In order to use the built-in microphone to the MIC terminal. Follow the procedure below to use the microphone holder and INPUT 1/INPUT 2 terminals, the handle unit must be attached to the camcorder, plug the device's cable into the...
Instruction Manual
Page 85
... the zoom position. Operating modes: 1 Open the [MIC Terminal Input] screen. [FUNC.] > [MENU] > p > [MIC Terminal Input] 2 Touch [Þ External Audio] or [ß Microphone] and then touch [X]. Options ( Default value) [2 Automatic] The camcorder will automatically activate the microphone attenuator as a digital audio player. The larger the subject appears on the screen, the louder the sound will be. Operating modes: 1 Open the [MIC Att.] screen. [FUNC.] > [MENU] > p > [MIC Att.] 2 Touch the desired option and then touch [X]. Recording Audio 1 Open...
... the zoom position. Operating modes: 1 Open the [MIC Terminal Input] screen. [FUNC.] > [MENU] > p > [MIC Terminal Input] 2 Touch [Þ External Audio] or [ß Microphone] and then touch [X]. Options ( Default value) [2 Automatic] The camcorder will automatically activate the microphone attenuator as a digital audio player. The larger the subject appears on the screen, the louder the sound will be. Operating modes: 1 Open the [MIC Att.] screen. [FUNC.] > [MENU] > p > [MIC Att.] 2 Touch the desired option and then touch [X]. Recording Audio 1 Open...

Instruction Manual
Page 97
By assigning often used functions, you can quickly access them with a single press of a button. Operating modes: 97 Changing the Assigned Function 1 Open the selection screen for assignable button 5. [ Rec. Default setting for the desired assignable button. [FUNC.] > [MENU] > q > Select from [Assign Button 1] to which you can assign various functions. Programs]* Functions the same as selecting [Ä White Balance] (A 71) in the FUNC. Programs] (A 66, 68, 73) in the FUNC. panel. [ BLC...
By assigning often used functions, you can quickly access them with a single press of a button. Operating modes: 97 Changing the Assigned Function 1 Open the selection screen for assignable button 5. [ Rec. Default setting for the desired assignable button. [FUNC.] > [MENU] > q > Select from [Assign Button 1] to which you can assign various functions. Programs]* Functions the same as selecting [Ä White Balance] (A 71) in the FUNC. Programs] (A 66, 68, 73) in the FUNC. panel. [ BLC...
Instruction Manual
Page 115
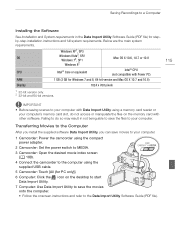
... Computer After you install the supplied software Data Import Utility, you can save movies to your computer. Saving Recordings to a Computer Installing the Software See Installation and System requirements in not being able to save the files to your computer. 1 Camcorder: Power the camcorder using the compact power adapter. 2 Camcorder: Set the power switch to MEDIA. 3 Camcorder: Open the desired movie index screen (A 100). 4 Connect the camcorder to the computer using the supplied USB cable. 5 Camcorder: Touch [All (for stepby-step installation instructions and full system...
... Computer After you install the supplied software Data Import Utility, you can save movies to your computer. Saving Recordings to a Computer Installing the Software See Installation and System requirements in not being able to save the files to your computer. 1 Camcorder: Power the camcorder using the compact power adapter. 2 Camcorder: Set the power switch to MEDIA. 3 Camcorder: Open the desired movie index screen (A 100). 4 Connect the camcorder to the computer using the supplied USB cable. 5 Camcorder: Touch [All (for stepby-step installation instructions and full system...
Instruction Manual
Page 119
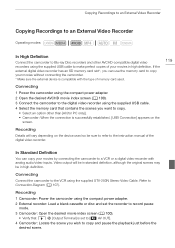
... screen. Connecting Connect the camcorder to Connection Diagram (A 107). Copying Recordings to an External Video Recorder Copying Recordings to an External Video Recorder Operating modes: In High Definition Connect the camcorder to Blu-ray Disc recorders and other than [All (for PC only)]. • Camcorder: When the connection is successfully established, [USB Connection] appears on the device used . Refer to the VCR using the supplied USB cable. 4 Select the memory card that q > [Output Terminal] is set the recorder to record pause mode. 3 Camcorder: Open the desired movie...
... screen. Connecting Connect the camcorder to Connection Diagram (A 107). Copying Recordings to an External Video Recorder Copying Recordings to an External Video Recorder Operating modes: In High Definition Connect the camcorder to Blu-ray Disc recorders and other than [All (for PC only)]. • Camcorder: When the connection is successfully established, [USB Connection] appears on the device used . Refer to the VCR using the supplied USB cable. 4 Select the memory card that q > [Output Terminal] is set the recorder to record pause mode. 3 Camcorder: Open the desired movie...
Instruction Manual
Page 124
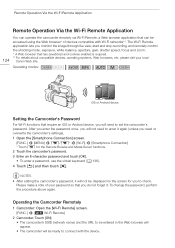
.... • The camcorder will need to set the camcorder's password. Operating modes: iOS or Android device Setting the Camcorder's Password For Wi-Fi functions that require an iOS or Android device, you do not forget it. The Wi-Fi Remote application lets you monitor the image through live view, start and stop recording, and remotely control the shooting mode, exposure, white balance, aperture, gain, shutter speed, focus and zoom. * A Web browser that you will be accessed using the Web browser...
.... • The camcorder will need to set the camcorder's password. Operating modes: iOS or Android device Setting the Camcorder's Password For Wi-Fi functions that require an iOS or Android device, you do not forget it. The Wi-Fi Remote application lets you monitor the image through live view, start and stop recording, and remotely control the shooting mode, exposure, white balance, aperture, gain, shutter speed, focus and zoom. * A Web browser that you will be accessed using the Web browser...

Instruction Manual
Page 150
... operation for [Set WB Priority]. [Focus/Zoom Ring Direction]: Changes the direction the focus/zoom ring needs to be displayed. You can check the results on the screen horizontally when you to [ Bright]. • When [OLED Dimmer] is full. Operate any notification sounds. [Wireless Remote Control]: Allows the camcorder to be operated with Intelligent System, this option displays a screen where you attach it is difficult to switch between the current white balance and the white balance setting...
... operation for [Set WB Priority]. [Focus/Zoom Ring Direction]: Changes the direction the focus/zoom ring needs to be displayed. You can check the results on the screen horizontally when you to [ Bright]. • When [OLED Dimmer] is full. Operate any notification sounds. [Wireless Remote Control]: Allows the camcorder to be operated with Intelligent System, this option displays a screen where you attach it is difficult to switch between the current white balance and the white balance setting...
Instruction Manual
Page 165
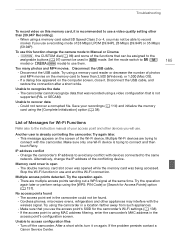
... the memory card using the [WPS: PIN Code] or [Search for Wi-Fi Functions Refer also to the instruction manual of your access point and other devices you use a recording mode of the functions that you will use a video quality setting other appliances may not be able to Manual or Cinema - Disconnect the USB cable. - No access points found . - The camcorder cannot recognize data that is open - Turn off the camcorder. Too many photos and MP4 movies...
... the memory card using the [WPS: PIN Code] or [Search for Wi-Fi Functions Refer also to the instruction manual of your access point and other devices you use a recording mode of the functions that you will use a video quality setting other appliances may not be able to Manual or Cinema - Disconnect the USB cable. - No access points found . - The camcorder cannot recognize data that is open - Turn off the camcorder. Too many photos and MP4 movies...
Instruction Manual
Page 181
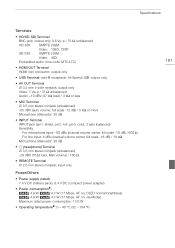
output only Video: 1 Vp-p / 75 Ω unbalanced Audio: -10 dBV (47 kΩ load) / 3 kΩ or less • MIC Terminal ∅ 3.5 mm stereo minijack (unbalanced) -65 dBV (auto volume, full scale -12 dB) / 5 kΩ or more Microphone attenuator: 20 dB • INPUT Terminal INPUT jack (pin1: shield, pin2: hot, pin3: cold), 2 sets (balanced) Sensitivity: For microphone input: -60 dBu (manual volume center, full scale -18 dB) / 600...
output only Video: 1 Vp-p / 75 Ω unbalanced Audio: -10 dBV (47 kΩ load) / 3 kΩ or less • MIC Terminal ∅ 3.5 mm stereo minijack (unbalanced) -65 dBV (auto volume, full scale -12 dB) / 5 kΩ or more Microphone attenuator: 20 dB • INPUT Terminal INPUT jack (pin1: shield, pin2: hot, pin3: cold), 2 sets (balanced) Sensitivity: For microphone input: -60 dBu (manual volume center, full scale -18 dB) / 600...
Instruction Manual
Page 183
... 150 Charging 21 Remaining charge indicator 155 Beach (recording program 73 Built-in backup battery 170 Built-in microphone 79 C Capturing photos from a movie 102 CINEMA mode 52 Cinema-look filters 52 Color bars 90 Compact power adapter 21 Condensation 172 Connection to an external monitor 107 Converting movies to MP4 format 118 Copying recordings to a memory card . . . . 116 CUSTOM button 96 CUSTOM dial 96 D Data code 93, 146 Date and time 35 Deleting Movies 103 Photos 113 Digital...
... 150 Charging 21 Remaining charge indicator 155 Beach (recording program 73 Built-in backup battery 170 Built-in microphone 79 C Capturing photos from a movie 102 CINEMA mode 52 Cinema-look filters 52 Color bars 90 Compact power adapter 21 Condensation 172 Connection to an external monitor 107 Converting movies to MP4 format 118 Copying recordings to a memory card . . . . 116 CUSTOM button 96 CUSTOM dial 96 D Data code 93, 146 Date and time 35 Deleting Movies 103 Photos 113 Digital...


