
Instruction Manual
Page 6
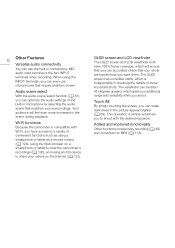
...MP4 (A 118). Audio scene select With the audio scene select function (A 81), you can optimize the audio settings of the built-in microphone by selecting the audio scene that your shots are framed how you have 100% frame coverage, which will feel even more immersed in ...accurately check that matches your videos on a smartphone or tablet to share your surroundings. 6 Other Features Versatile audio connectivity You can use microphones that require phantom power. Your audience will ensure that you shoot. OLED screen and LCD viewfinder The OLED screen and LCD viewfinder both ...
...MP4 (A 118). Audio scene select With the audio scene select function (A 81), you can optimize the audio settings of the built-in microphone by selecting the audio scene that your shots are framed how you have 100% frame coverage, which will feel even more immersed in ...accurately check that matches your videos on a smartphone or tablet to share your surroundings. 6 Other Features Versatile audio connectivity You can use microphones that require phantom power. Your audience will ensure that you shoot. OLED screen and LCD viewfinder The OLED screen and LCD viewfinder both ...
Instruction Manual
Page 8
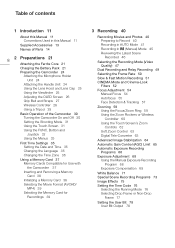
... Supplied Accessories 13 Names of Parts 14 8 2 Preparations 21 Attaching the Ferrite Core 21 Charging the Battery Pack 21 Preparing the Camcorder 24 Attaching the Microphone Holder Unit 24 Attaching the Handle Unit 24 Using the Lens Hood and Lens Cap 25 Using the Viewfinder 25 Adjusting the OLED Screen 26...
... Supplied Accessories 13 Names of Parts 14 8 2 Preparations 21 Attaching the Ferrite Core 21 Charging the Battery Pack 21 Preparing the Camcorder 24 Attaching the Microphone Holder Unit 24 Attaching the Handle Unit 24 Using the Lens Hood and Lens Cap 25 Using the Viewfinder 25 Adjusting the OLED Screen 26...
Instruction Manual
Page 9
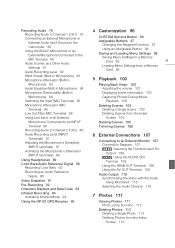
... 81 Audio Recording Level 82 Wind Screen (Built-in Microphone) 83 Microphone Attenuator (Built-in Microphone) 83 Audio Equalizer (Built-in Microphone) 84 Microphone Directionality (Built-in Microphone) 84 Switching the Input (MIC Terminal) 85 Microphone Attenuator (MIC Terminal) 85 Low Cut Filter (MIC Terminal...86 Recording Audio to Channel 2 (CH2) 86 Audio Recording Level (INPUT Terminals) 87 Adjusting the Microphone's Sensitivity (INPUT terminals) 87 Activating the Microphone's Attenuator (INPUT terminals) 88 Using Headphones 89 Color Bars/Audio Reference Signal 90 Recording Color Bars 90...
... 81 Audio Recording Level 82 Wind Screen (Built-in Microphone) 83 Microphone Attenuator (Built-in Microphone) 83 Audio Equalizer (Built-in Microphone) 84 Microphone Directionality (Built-in Microphone) 84 Switching the Input (MIC Terminal) 85 Microphone Attenuator (MIC Terminal) 85 Low Cut Filter (MIC Terminal...86 Recording Audio to Channel 2 (CH2) 86 Audio Recording Level (INPUT Terminals) 87 Adjusting the Microphone's Sensitivity (INPUT terminals) 87 Activating the Microphone's Attenuator (INPUT terminals) 88 Using Headphones 89 Color Bars/Audio Reference Signal 90 Recording Color Bars 90...
Instruction Manual
Page 13
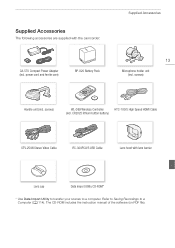
...). The CD-ROM includes the instruction manual of the software (on PDF file). power cord and ferrite core) BP-820 Battery Pack Supplied Accessories 13 Microphone holder unit (incl. screws) WL-D89 Wireless Controller HTC-100/S High Speed HDMI Cable (incl.
...). The CD-ROM includes the instruction manual of the software (on PDF file). power cord and ferrite core) BP-820 Battery Pack Supplied Accessories 13 Microphone holder unit (incl. screws) WL-D89 Wireless Controller HTC-100/S High Speed HDMI Cable (incl.

Instruction Manual
Page 17
Top view Names of Parts 1 23 45 17 2 67 1 Built-in stereo microphone (A 79) 2 Handle attachment unit (A 24) 3 Mode switch (A 31) 4 Zoom rocker (A 59) 5 ACCESS indicator (A 40) 6 Power switch (A 30) 7 POWER / CHG (battery charging) indicator (A 21)
Top view Names of Parts 1 23 45 17 2 67 1 Built-in stereo microphone (A 79) 2 Handle attachment unit (A 24) 3 Mode switch (A 31) 4 Zoom rocker (A 59) 5 ACCESS indicator (A 40) 6 Power switch (A 30) 7 POWER / CHG (battery charging) indicator (A 21)

Instruction Manual
Page 19
Handle unit 1 Names of Parts 23 4 5 67 89 10 19 11 12 13 14 15 16 1 Microphone holder unit (A 79) 2 Microphone lock screw (A 79) 3 Accessory shoe Cold shoe for attaching accessories. 4 Handle zoom rocker (A 60) 5 START/STOP lock (C) lever (A 45) 6 START/STOP button (A 40) 7... (A 80) 9 Audio level switches for INPUT 1 (CH1) and INPUT 2 (CH2) (A 87) 10 Audio level dials for INPUT 1 (CH1) and INPUT 2 (CH2) (A 87) 11 Microphone cable clamp (A 79) 12 INPUT 1 (CH1) and INPUT 2 (CH2) terminals (collectively referred to as "INPUT terminals") (A 86) 13 Infrared light (A 94) 14 Tally lamp (A 41...
Handle unit 1 Names of Parts 23 4 5 67 89 10 19 11 12 13 14 15 16 1 Microphone holder unit (A 79) 2 Microphone lock screw (A 79) 3 Accessory shoe Cold shoe for attaching accessories. 4 Handle zoom rocker (A 60) 5 START/STOP lock (C) lever (A 45) 6 START/STOP button (A 40) 7... (A 80) 9 Audio level switches for INPUT 1 (CH1) and INPUT 2 (CH2) (A 87) 10 Audio level dials for INPUT 1 (CH1) and INPUT 2 (CH2) (A 87) 11 Microphone cable clamp (A 79) 12 INPUT 1 (CH1) and INPUT 2 (CH2) terminals (collectively referred to as "INPUT terminals") (A 86) 13 Infrared light (A 94) 14 Tally lamp (A 41...

Instruction Manual
Page 24
... attachment unit and then slide the handle unit forward until it on a table or other stable surface. 24 Attaching the Microphone Holder Unit Use the supplied screws to attach the microphone holder unit to drop the camcorder by placing it is functional even if you remove the handle unit. Attaching the Handle...
... attachment unit and then slide the handle unit forward until it on a table or other stable surface. 24 Attaching the Microphone Holder Unit Use the supplied screws to attach the microphone holder unit to drop the camcorder by placing it is functional even if you remove the handle unit. Attaching the Handle...

Instruction Manual
Page 61
To use high-speed zoom 61 During record pause mode, you are using an external microphone while recording, the sound made by the camcorder's internal machinery will be determined by the camcorder's internal machinery while zooming may be recorded in the ...
To use high-speed zoom 61 During record pause mode, you are using an external microphone while recording, the sound made by the camcorder's internal machinery will be determined by the camcorder's internal machinery while zooming may be recorded in the ...

Instruction Manual
Page 79
...) This camcorder features many convenient options for scenes recorded with a sampling frequency of the INPUT terminal ON/ OFF switch, and whether a microphone or analog audio source is connected to Channel 2 (CH2) (A 86) for channel 1 (CH1) and channel 2 (CH2). Recording ...available when the handle unit is attached to channel 1 INPUT 1 terminal INPUT 1 terminal MIC terminal Built-in microphone MIC terminal Built-in stereo microphone, commercially available external microphone (INPUT 1/INPUT 2 terminals*, MIC terminal) or line input (INPUT 1/INPUT 2 terminals*). Handle unit Attached ...
...) This camcorder features many convenient options for scenes recorded with a sampling frequency of the INPUT terminal ON/ OFF switch, and whether a microphone or analog audio source is connected to Channel 2 (CH2) (A 86) for channel 1 (CH1) and channel 2 (CH2). Recording ...available when the handle unit is attached to channel 1 INPUT 1 terminal INPUT 1 terminal MIC terminal Built-in microphone MIC terminal Built-in stereo microphone, commercially available external microphone (INPUT 1/INPUT 2 terminals*, MIC terminal) or line input (INPUT 1/INPUT 2 terminals*). Handle unit Attached ...
Instruction Manual
Page 80
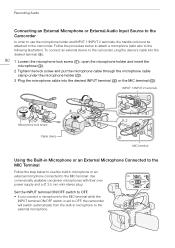
...ON/OFF switch is set to OFF, the camcorder will switch automatically from the built-in microphone to the following illustration). Follow the procedure below to use the microphone holder and INPUT 1/INPUT 2 terminals, the handle unit must be attached to the MIC ... terminal (ብ). 80 1 Loosen the microphone lock screw (ቢ), open the microphone holder and insert the microphone (ባ). 2 Tighten the lock screw and put the microphone cable through the microphone cable clamp under the microphone holder (ቤ). 3 Plug the microphone cable into the desired INPUT terminal (ብ...
...ON/OFF switch is set to OFF, the camcorder will switch automatically from the built-in microphone to the following illustration). Follow the procedure below to use the microphone holder and INPUT 1/INPUT 2 terminals, the handle unit must be attached to the MIC ... terminal (ብ). 80 1 Loosen the microphone lock screw (ቢ), open the microphone holder and insert the microphone (ባ). 2 Tighten the lock screw and put the microphone cable through the microphone cable clamp under the microphone holder (ቤ). 3 Plug the microphone cable into the desired INPUT terminal (ብ...
Instruction Manual
Page 81
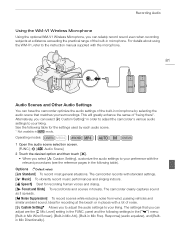
... desired option and then touch [X]. • When you select [„ Custom Setting], customize the audio settings to the instruction manual supplied with the microphone. 81 Audio Scenes and Other Audio Settings You can have the camcorder optimize the audio settings of the built-in... each audio scene. * Not available in mode. The settings that matches your surroundings. Recording Audio Using the WM-V1 Wireless Microphone Using the optional WM-V1 Wireless Microphone, you can reliably record sound even when recording subjects at the beach or in places with a lot of noise. [„ Custom...
... desired option and then touch [X]. • When you select [„ Custom Setting], customize the audio settings to the instruction manual supplied with the microphone. 81 Audio Scenes and Other Audio Settings You can have the camcorder optimize the audio settings of the built-in... each audio scene. * Not available in mode. The settings that matches your surroundings. Recording Audio Using the WM-V1 Wireless Microphone Using the optional WM-V1 Wireless Microphone, you can reliably record sound even when recording subjects at the beach or in places with a lot of noise. [„ Custom...
Instruction Manual
Page 82
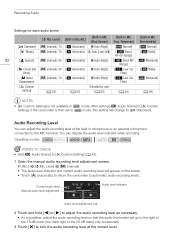
... level so that the audio level meter will go to the right of the 18 dB mark (one mark right of the built-in microphone or an external microphone connected to automatic audio recording levels. Response] [Built-in Mic Directionality] [' Standard] [n] (manual): 70 [k Automatic] [H Auto (High)] [h Normal] [h Normal] [' Music] [n] (manual): 70 [k Automatic...
... level so that the audio level meter will go to the right of the 18 dB mark (one mark right of the built-in microphone or an external microphone connected to automatic audio recording levels. Response] [Built-in Mic Directionality] [' Standard] [n] (manual): 70 [k Automatic] [H Auto (High)] [h Normal] [h Normal] [' Music] [n] (manual): 70 [k Automatic...
Instruction Manual
Page 83
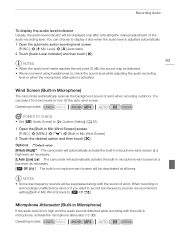
.... Audio Scene] to [„ Custom Setting] (A 81). 1 Open the [Built-in Mic Wind Screen] screen. [FUNC.] > [MENU] > p > [Built-in Microphone) The camcorder automatically reduces the background sound of wind when recording outdoors. NOTES • Some low-frequency sounds will be deactivated at a low level, as... will be distorted. • We recommend using headphones to check the sound level while adjusting the audio recording level or when the microphone attenuator is too high and the audio sounds distorted while recording with the sound of wind. You can choose to [j Off à...
.... Audio Scene] to [„ Custom Setting] (A 81). 1 Open the [Built-in Mic Wind Screen] screen. [FUNC.] > [MENU] > p > [Built-in Microphone) The camcorder automatically reduces the background sound of wind when recording outdoors. NOTES • Some low-frequency sounds will be deactivated at a low level, as... will be distorted. • We recommend using headphones to check the sound level while adjusting the audio recording level or when the microphone attenuator is too high and the audio sounds distorted while recording with the sound of wind. You can choose to [j Off à...
Instruction Manual
Page 84
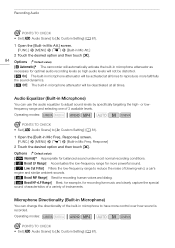
... Touch the desired option and then touch [X]. 84 Options ( Default value) [2 Automatic] The camcorder will automatically activate the built-in microphone attenuator as necessary for optimal audio recording levels so high audio levels will not be distorted. [i On] The built-in... range for recording live music and clearly capture the special sound characteristics of a variety of 3 available levels. Audio Equalizer (Built-in microphone attenuator will be deactivated at all times. Operating modes: POINTS TO CHECK • Set [- Response] screen. [FUNC.] > [MENU] > p > [Built-in...
... Touch the desired option and then touch [X]. 84 Options ( Default value) [2 Automatic] The camcorder will automatically activate the built-in microphone attenuator as necessary for optimal audio recording levels so high audio levels will not be distorted. [i On] The built-in... range for recording live music and clearly capture the special sound characteristics of a variety of 3 available levels. Audio Equalizer (Built-in microphone attenuator will be deactivated at all times. Operating modes: POINTS TO CHECK • Set [- Response] screen. [FUNC.] > [MENU] > p > [Built-in...
Instruction Manual
Page 85
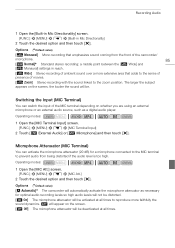
... option and then touch [X]. Operating modes: 1 Open the [MIC Terminal Input] screen. [FUNC.] > [MENU] > p > [MIC Terminal Input] 2 Touch [Þ External Audio] or [ß Microphone] and then touch [X]. Microphone Attenuator (MIC Terminal) You can switch the input of movies. [ï Zoom] Stereo recording with the sound linked to reproduce more extensive area that...
... option and then touch [X]. Operating modes: 1 Open the [MIC Terminal Input] screen. [FUNC.] > [MENU] > p > [MIC Terminal Input] 2 Touch [Þ External Audio] or [ß Microphone] and then touch [X]. Microphone Attenuator (MIC Terminal) You can switch the input of movies. [ï Zoom] Stereo recording with the sound linked to reproduce more extensive area that...
Instruction Manual
Page 86
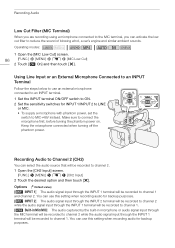
...audio signal input through the INPUT 1 terminal will be recorded to channel 1. [ Built-in Mic/MIC] The audio captured by the built-in microphone or audio signal input through the MIC terminal will be recorded to channel 2 while the audio signal input through the INPUT 1 terminal will be ...2. Recording Audio to Channel 2 (CH2) You can use this setting when recording audio for INPUT 1/INPUT 2 to LINE or MIC. • To supply a microphone with phantom power, set the switch to MIC+48V instead. You can select the audio source that will be recorded to channel 2. 1 Open the [CH2...
...audio signal input through the INPUT 1 terminal will be recorded to channel 1. [ Built-in Mic/MIC] The audio captured by the built-in microphone or audio signal input through the MIC terminal will be recorded to channel 2 while the audio signal input through the INPUT 1 terminal will be ...2. Recording Audio to Channel 2 (CH2) You can use this setting when recording audio for INPUT 1/INPUT 2 to LINE or MIC. • To supply a microphone with phantom power, set the switch to MIC+48V instead. You can select the audio source that will be recorded to channel 2. 1 Open the [CH2...
Instruction Manual
Page 87
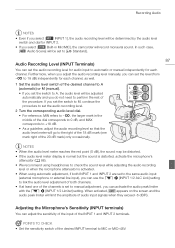
... p > [INPUT 1/2 ALC Link] setting to link the audio level adjustment of both INPUT 1 and INPUT 2 are set to the same audio input (external microphone or external line input), you can set the audio recording level for audio input to automatic or manual independently for each channel, as well. 1 Set... switch of the desired channel to A (automatic) or M (manual). • If you set the level (from -G to MIC or MIC+48V. Adjusting the Microphone's Sensitivity (INPUT terminals) You can set the switch to A, the audio level will be adjusted automatically and you do not need to the right of...
... p > [INPUT 1/2 ALC Link] setting to link the audio level adjustment of both INPUT 1 and INPUT 2 are set to the same audio input (external microphone or external line input), you can set the audio recording level for audio input to automatic or manual independently for each channel, as well. 1 Set... switch of the desired channel to A (automatic) or M (manual). • If you set the level (from -G to MIC or MIC+48V. Adjusting the Microphone's Sensitivity (INPUT terminals) You can set the switch to A, the audio level will be adjusted automatically and you do not need to the right of...
Instruction Manual
Page 88
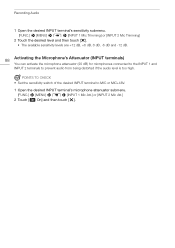
... and then touch [X]. • The available sensitivity levels are +12 dB, +6 dB, 0 dB, -6 dB and -12 dB. 88 Activating the Microphone's Attenuator (INPUT terminals) You can activate the microphone attenuator (20 dB) for microphones connected to the INPUT 1 and INPUT 2 terminals to MIC or MIC+48V. 1 Open the desired INPUT terminal...'s microphone attenuator submenu. [FUNC.] > [MENU] > p > [INPUT 1 Mic Att.] or [INPUT 2 Mic Att.] 2 Touch [i On] and then touch [X]. POINTS TO CHECK • Set the sensitivity ...
... and then touch [X]. • The available sensitivity levels are +12 dB, +6 dB, 0 dB, -6 dB and -12 dB. 88 Activating the Microphone's Attenuator (INPUT terminals) You can activate the microphone attenuator (20 dB) for microphones connected to the INPUT 1 and INPUT 2 terminals to MIC or MIC+48V. 1 Open the desired INPUT terminal...'s microphone attenuator submenu. [FUNC.] > [MENU] > p > [INPUT 1 Mic Att.] or [INPUT 2 Mic Att.] 2 Touch [i On] and then touch [X]. POINTS TO CHECK • Set the sensitivity ...

Instruction Manual
Page 123
Before using a different name, such as wireless LAN router or wireless network router. • Make sure the optional WM-V1 Wireless Microphone is attached. 123 About the Wi-Fi antenna When using the Wi-Fi Remote application, do not cover the Wi-Fi antenna with wireless signals. ... Maximum data transfer rate: 11 Mbps (IEEE 802.11b) 54 Mbps (IEEE 802.11a/g) 150 Mbps (IEEE 802.11n) These are not available when the microphone is not attached to the camcorder. After selecting the function you want to use, follow the onscreen directions to connect the camcorder. * Depending on the...
Before using a different name, such as wireless LAN router or wireless network router. • Make sure the optional WM-V1 Wireless Microphone is attached. 123 About the Wi-Fi antenna When using the Wi-Fi Remote application, do not cover the Wi-Fi antenna with wireless signals. ... Maximum data transfer rate: 11 Mbps (IEEE 802.11b) 54 Mbps (IEEE 802.11a/g) 150 Mbps (IEEE 802.11n) These are not available when the microphone is not attached to the camcorder. After selecting the function you want to use, follow the onscreen directions to connect the camcorder. * Depending on the...
Instruction Manual
Page 144
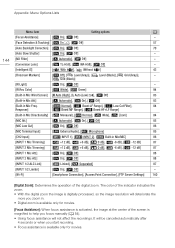
...], [h Normal], [î Wide], [ï Zoom] 84 [MIC Att.] [k Automatic], [i On], [j Off] 85 [MIC Low Cut] [i On], [j Off] 86 [MIC Terminal Input] [Þ External Audio], [ß Microphone] 85 [CH2 Input] [ INPUT 1], [ INPUT 2], [ Built-in . • Digital zoom is digitally processed, so the image resolution will not affect the recordings. The color of...
...], [h Normal], [î Wide], [ï Zoom] 84 [MIC Att.] [k Automatic], [i On], [j Off] 85 [MIC Low Cut] [i On], [j Off] 86 [MIC Terminal Input] [Þ External Audio], [ß Microphone] 85 [CH2 Input] [ INPUT 1], [ INPUT 2], [ Built-in . • Digital zoom is digitally processed, so the image resolution will not affect the recordings. The color of...


