

S530D Quick Start Guide
Page 70
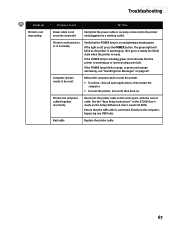
...to be deleted, then press Delete to cancel the print job. Printer driver installed incorrectly Uninstall and reinstall the driver. Double-click the Canon S530D printer icon. Open the BJ Print Monitor window (click Finder, then BJ Print Monitor). 2. Troubleshooting Problem Printer will not print Possible ... in the Print Queue dialog box. The Print Manager window will be reset Reboot the computer and/or reset the printer. • To reboot, close all open applications, then restart the computer. • To reset the printer, turn it off, then back on. Highlight the job ...
...to be deleted, then press Delete to cancel the print job. Printer driver installed incorrectly Uninstall and reinstall the driver. Double-click the Canon S530D printer icon. Open the BJ Print Monitor window (click Finder, then BJ Print Monitor). 2. Troubleshooting Problem Printer will not print Possible ... in the Print Queue dialog box. The Print Manager window will be reset Reboot the computer and/or reset the printer. • To reboot, close all open applications, then restart the computer. • To reset the printer, turn it off, then back on. Highlight the job ...
S530D Quick Start Guide
Page 71
... printer. • To reboot, close all open applications, then restart the computer. • To reset the printer, turn it off , press the POWER button. Bad cable Replace the printer cable. 67 If the POWER lamp blinks orange, or green and ...orange alternately, see "Handling Error Messages" on . See the "Easy Setup Instructions" in the S530D User's Guide on and glowing a steady green. Ensure that the USB cable is securely connected to the printer and plugged into a working outlet. Troubleshooting Problem...
... printer. • To reboot, close all open applications, then restart the computer. • To reset the printer, turn it off , press the POWER button. Bad cable Replace the printer cable. 67 If the POWER lamp blinks orange, or green and ...orange alternately, see "Handling Error Messages" on . See the "Easy Setup Instructions" in the S530D User's Guide on and glowing a steady green. Ensure that the USB cable is securely connected to the printer and plugged into a working outlet. Troubleshooting Problem...

S530D Quick Start Guide
Page 76
... the print head. Error occurred in printer Press the Cancel button to reset the error. See "Using the Memory Card Utility" on . Time Out is activated during communication with the digital camera. If the condition does not improve, contact the Canon Customer Care Center. Troubleshooting Error Number 402 611/612 802, 803...
... the print head. Error occurred in printer Press the Cancel button to reset the error. See "Using the Memory Card Utility" on . Time Out is activated during communication with the digital camera. If the condition does not improve, contact the Canon Customer Care Center. Troubleshooting Error Number 402 611/612 802, 803...

S530D Quick Start Guide
Page 5
Reset Button Press to print. Print Head Lock Lever Locks the print head into the holder. Once the print head is installed, do not touch this ...
Reset Button Press to print. Print Head Lock Lever Locks the print head into the holder. Once the print head is installed, do not touch this ...

S530D Quick Start Guide
Page 31
..., please refer to insert the PC card adapter deeply. 29 When printing from the operation panel, eject the memory card and print again after having reset it. • Ensure to 'Correcting Photographs (Image Correction)' on . When printing from the operation panel, printing may not be done correctly. The indicator lamp will...
..., please refer to insert the PC card adapter deeply. 29 When printing from the operation panel, eject the memory card and print again after having reset it. • Ensure to 'Correcting Photographs (Image Correction)' on . When printing from the operation panel, printing may not be done correctly. The indicator lamp will...

S530D Quick Start Guide
Page 48
... saved (see page 29). 3 Select the Print Selected using or . Specifying the printing area • The printing area can be changed using and . • To reset the print area specifications Change Mode and Media type. 46 Specifying the printing area 1 Check that the printer power is selected for Layout. • Examples...
... saved (see page 29). 3 Select the Print Selected using or . Specifying the printing area • The printing area can be changed using and . • To reset the print area specifications Change Mode and Media type. 46 Specifying the printing area 1 Check that the printer power is selected for Layout. • Examples...

S530D Quick Start Guide
Page 53
.... 2 Load A4-size paper. 3 Press the Maintenance button. Follow the procedure below. 1 Check that the printer is on. 2 Load A4-size plain paper. 3 Keep the Reset button pressed down, and release it when the power lamp blinks twice. 1 Check that the printer is correctly positioned. ¯Note You can also print... the nozzle check pattern by pressing the Reset button of the printer. See "Cleaning the Print Head" on page 20. 2 51 See "Adjusting the Print Head" on page 52.
.... 2 Load A4-size paper. 3 Press the Maintenance button. Follow the procedure below. 1 Check that the printer is on. 2 Load A4-size plain paper. 3 Keep the Reset button pressed down, and release it when the power lamp blinks twice. 1 Check that the printer is correctly positioned. ¯Note You can also print... the nozzle check pattern by pressing the Reset button of the printer. See "Cleaning the Print Head" on page 20. 2 51 See "Adjusting the Print Head" on page 52.

S530D Quick Start Guide
Page 54
... head cleaning only when necessary because the operation consumes a lot of ink. ¯Note You can also perform print head cleaning by pressing the Reset button on page 53. 52 The Sheets. s Cleaning the Print Head Clean the print head if a nozzle in Required 2 Press the The ...nozzle check pattern, and check that the printer is displayed. 3 Press the Print button. See "Printing the Nozzle Check Pattern" on . 2 Keep the Reset button pressed down, and release it when the power lamp blinks once. 1 Press the Maintenance button. Follow the procedure below. 1 Check that the pattern ...
... head cleaning only when necessary because the operation consumes a lot of ink. ¯Note You can also perform print head cleaning by pressing the Reset button on page 53. 52 The Sheets. s Cleaning the Print Head Clean the print head if a nozzle in Required 2 Press the The ...nozzle check pattern, and check that the printer is displayed. 3 Press the Print button. See "Printing the Nozzle Check Pattern" on . 2 Keep the Reset button pressed down, and release it when the power lamp blinks once. 1 Press the Maintenance button. Follow the procedure below. 1 Check that the pattern ...
S530D Quick Start Guide
Page 57
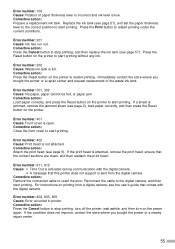
... number: 301, 302 Cause: No paper, paper cannot be fed, or paper jam Corrective action: Load paper correctly, and press the Reset button on the printer to start printing without any ink. Reconnect the cable to restart printing. For instructions on the printer to the digital...action: Press the Cancel button to stop printing, and then replace the ink tank (see page 2), load paper correctly, and then press the Reset button on the power again. Corrective action: Remove the connected cable to restart printing under the current conditions. Error number: 802, 803, 809...
... number: 301, 302 Cause: No paper, paper cannot be fed, or paper jam Corrective action: Load paper correctly, and press the Reset button on the printer to start printing without any ink. Reconnect the cable to restart printing. For instructions on the printer to the digital...action: Press the Cancel button to stop printing, and then replace the ink tank (see page 2), load paper correctly, and then press the Reset button on the power again. Corrective action: Remove the connected cable to restart printing under the current conditions. Error number: 802, 803, 809...

Photo Application Guide(Windows)
Page 155
... hard disk are small. • Thumbnails can be displayed on the 1. The specified number of copies is displayed between the buttons. The enlarged image will reset the number of copies to 0. Selecting Images 155 The number of the selected image, click the image and then click Zoom in on the image...
... hard disk are small. • Thumbnails can be displayed on the 1. The specified number of copies is displayed between the buttons. The enlarged image will reset the number of copies to 0. Selecting Images 155 The number of the selected image, click the image and then click Zoom in on the image...


