
iP4500 series Quick Start Guide
Page 4
..., nor should they are trademarks of Microsoft Corporation. All statements, technical information and recommendations in this manual may differ. Specifications are subject to your Canon PIXMA iP4500 series Photo Printer. Canon U.S.A., Inc. and other countries. Under the copyright laws, this manual and in any form, in whole or in Windows Vista™ operating system Ultimate...
..., nor should they are trademarks of Microsoft Corporation. All statements, technical information and recommendations in this manual may differ. Specifications are subject to your Canon PIXMA iP4500 series Photo Printer. Canon U.S.A., Inc. and other countries. Under the copyright laws, this manual and in any form, in whole or in Windows Vista™ operating system Ultimate...
iP4500 series Quick Start Guide
Page 5
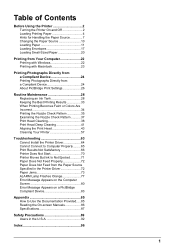
...38 Print Head Deep Cleaning 41 Aligning the Print Head 43 Cleaning Your Printer 57 Troubleshooting 63 Cannot Install the Printer Driver 64 Cannot Connect to Computer Properly.........65 Print Results Not Satisfactory 66 Printer Does Not Start 70 Printer Moves But Ink Is Not Ejected 71 Paper Does Not Feed Properly ...72 Paper Does Not Feed from the Paper Source Specified in the Printer Driver 72 Paper Jams 73 ALARM Lamp Flashes Orange 77 Error Message Appears on the Computer Screen 80 Error Message Appears on a PictBridge ...
...38 Print Head Deep Cleaning 41 Aligning the Print Head 43 Cleaning Your Printer 57 Troubleshooting 63 Cannot Install the Printer Driver 64 Cannot Connect to Computer Properly.........65 Print Results Not Satisfactory 66 Printer Does Not Start 70 Printer Moves But Ink Is Not Ejected 71 Paper Does Not Feed Properly ...72 Paper Does Not Feed from the Paper Source Specified in the Printer Driver 72 Paper Jams 73 ALARM Lamp Flashes Orange 77 Error Message Appears on the Computer Screen 80 Error Message Appears on a PictBridge ...
iP4500 series Quick Start Guide
Page 6
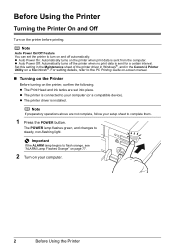
Set this setting in the Maintenance sheet of the printer driver in Windows®, and in the Canon IJ Printer Utility on the printer, confirm the following. For setting details, refer to the PC Printing Guide on-screen manual. „ Turning on the Printer Before turning on a Macintosh®. Note Auto Power On/Off Feature You...
Set this setting in the Maintenance sheet of the printer driver in Windows®, and in the Canon IJ Printer Utility on the printer, confirm the following. For setting details, refer to the PC Printing Guide on-screen manual. „ Turning on the Printer Before turning on a Macintosh®. Note Auto Power On/Off Feature You...
iP4500 series Quick Start Guide
Page 7
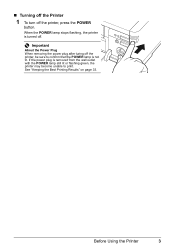
If the power plug is removed from the wall outlet with the POWER lamp still lit or flashing green, the printer may become unable to confirm that the POWER lamp is turned off the printer, press the POWER button. Before Using the Printer 3 „ Turning off the Printer 1 To turn off . See "Keeping the Best Printing Results" on page 33. Important About the Power Plug When removing the power plug after turing off the printer, be sure to print. When the POWER lamp stops flashing, the printer is not lit.
If the power plug is removed from the wall outlet with the POWER lamp still lit or flashing green, the printer may become unable to confirm that the POWER lamp is turned off the printer, press the POWER button. Before Using the Printer 3 „ Turning off the Printer 1 To turn off . See "Keeping the Best Printing Results" on page 33. Important About the Power Plug When removing the power plug after turing off the printer, be sure to print. When the POWER lamp stops flashing, the printer is not lit.
iP4500 series Quick Start Guide
Page 8
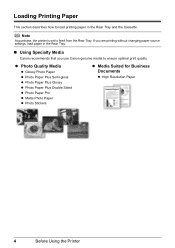
Loading Printing Paper This section describes how to feed from the Rear Tray. Note At purchase, the printer is set to load printing paper in the Rear Tray. „ Using Specialty Media Canon recommends that you are printing without changing paper source settings, load paper in the Rear Tray and the Cassette. z Photo... Glossy z Photo Paper Plus Double Sided z Photo Paper Pro z Matte Photo Paper z Photo Stickers z Media Suited for Business Documents z High Resolution Paper 4 Before Using the Printer If you use Canon genuine media to ensure optimal print quality.
Loading Printing Paper This section describes how to feed from the Rear Tray. Note At purchase, the printer is set to load printing paper in the Rear Tray. „ Using Specialty Media Canon recommends that you are printing without changing paper source settings, load paper in the Rear Tray and the Cassette. z Photo... Glossy z Photo Paper Plus Double Sided z Photo Paper Pro z Matte Photo Paper z Photo Stickers z Media Suited for Business Documents z High Resolution Paper 4 Before Using the Printer If you use Canon genuine media to ensure optimal print quality.
iP4500 series Quick Start Guide
Page 9
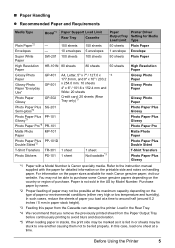
... z Recommended Paper and Requirements Media Type Plain Paper*2 Model*1 Paper Support Load Limit Rear Tray Cassette - 150 sheets 150 sheets Paper Printer Driver Output Tray Setting for Media Load Limit Type 50 sheets Plain Paper Envelopes - 10 envelopes 5 envelopes 1 envelope Envelope Super White Paper... side may not be possible at a time to be marked as it is Canon specialty media. Purchase paper by Model Number. Before Using the Printer 5 Refer to purchase some Canon genuine papers depending on the paper sizes available for detailed information on the printable ...
... z Recommended Paper and Requirements Media Type Plain Paper*2 Model*1 Paper Support Load Limit Rear Tray Cassette - 150 sheets 150 sheets Paper Printer Driver Output Tray Setting for Media Load Limit Type 50 sheets Plain Paper Envelopes - 10 envelopes 5 envelopes 1 envelope Envelope Super White Paper... side may not be possible at a time to be marked as it is Canon specialty media. Purchase paper by Model Number. Before Using the Printer 5 Refer to purchase some Canon genuine papers depending on the paper sizes available for detailed information on the printable ...
iP4500 series Quick Start Guide
Page 10
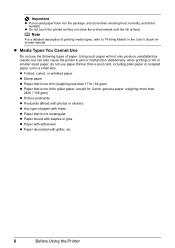
... with holes z Paper that is not rectangular z Paper bound with staples or glue z Paper with adhesives z Paper decorated with glitter, etc. 6 Before Using the Printer z Folded, curled, or wrinkled paper z Damp paper z Paper that is too thin (weighing less than 17 lb / 64 gsm) z Paper that is fixed....detailed description of paper. z Do not touch the printed surface nor stack the printed sheets until the ink is too thick (plain paper, except for Canon genuine paper, weighing more than a post card, including plain paper or notepad paper cut to a small size. Additionally, when printing on A5 or...
... with holes z Paper that is not rectangular z Paper bound with staples or glue z Paper with adhesives z Paper decorated with glitter, etc. 6 Before Using the Printer z Folded, curled, or wrinkled paper z Damp paper z Paper that is too thin (weighing less than 17 lb / 64 gsm) z Paper that is fixed....detailed description of paper. z Do not touch the printed surface nor stack the printed sheets until the ink is too thick (plain paper, except for Canon genuine paper, weighing more than a post card, including plain paper or notepad paper cut to a small size. Additionally, when printing on A5 or...
iP4500 series Quick Start Guide
Page 11
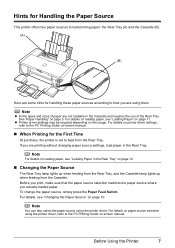
... the PC Printing Guide on-screen manual. the Rear Tray (A) and the Cassette (B). (A) (B) Here are not loadable in the Rear Tray. z Printer driver settings may be required depending on page 5. If you actually loaded paper. For details, see "Loading Paper in the Rear Tray" on page ... details on page 11. For details on loading paper, see "Loading Paper" on paper source selection using the printer driver, refer to load printing paper; Before Using the Printer 7 Before you print, make sure that the paper source selection matches the paper source where you are printing without...
... the PC Printing Guide on-screen manual. the Rear Tray (A) and the Cassette (B). (A) (B) Here are not loadable in the Rear Tray. z Printer driver settings may be required depending on page 5. If you actually loaded paper. For details, see "Loading Paper in the Rear Tray" on page ... details on page 11. For details on loading paper, see "Loading Paper" on paper source selection using the printer driver, refer to load printing paper; Before Using the Printer 7 Before you print, make sure that the paper source selection matches the paper source where you are printing without...

iP4500 series Quick Start Guide
Page 12
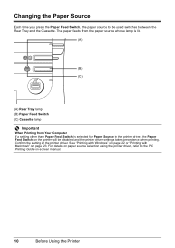
... of paper just by specifying the type of paper you use most regularly, such as on page 11. z Printer driver settings may be fed from the Cassette using the printer driver. For details on printer driver settings, refer to the Cassette for this paper. (A) (B) (A) Rear Tray: Load paper of paper are not loadable... automatically to the PC Printing Guide on-screen manual. „ If You Print Regularly on Photo Paper as well as plain paper. 8 Before Using the Printer
... of paper just by specifying the type of paper you use most regularly, such as on page 11. z Printer driver settings may be fed from the Cassette using the printer driver. For details on printer driver settings, refer to the Cassette for this paper. (A) (B) (A) Rear Tray: Load paper of paper are not loadable... automatically to the PC Printing Guide on-screen manual. „ If You Print Regularly on Photo Paper as well as plain paper. 8 Before Using the Printer
iP4500 series Quick Start Guide
Page 13
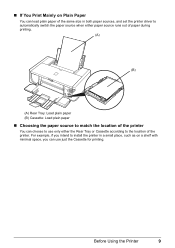
... out of paper during printing. (A) (B) (A) Rear Tray: Load plain paper (B) Cassette: Load plain paper „ Choosing the paper source to match the location of the printer. „ If You Print Mainly on Plain Paper You can load plain paper of the same size in both paper sources, and set the... printer driver to automatically switch the paper source when either the Rear Tray or Cassette according to install the printer in a small place, such as on a shelf with minimal space, you intend to the location of...
... out of paper during printing. (A) (B) (A) Rear Tray: Load plain paper (B) Cassette: Load plain paper „ Choosing the paper source to match the location of the printer. „ If You Print Mainly on Plain Paper You can load plain paper of the same size in both paper sources, and set the... printer driver to automatically switch the paper source when either the Rear Tray or Cassette according to install the printer in a small place, such as on a shelf with minimal space, you intend to the location of...
iP4500 series Quick Start Guide
Page 14
...paper source selection using the printer driver, refer to be disabled and the printer driver settings takes precedence when printing. See "Printing with Windows" on page 22 or "Printing with Macintosh" on -screen manual. 10 Before Using the Printer Confirm the setting in the printer driver, the Paper Feed... Switch on the printer will be used switches between the Rear Tray and the Cassette. Changing the Paper Source Each time ...
...paper source selection using the printer driver, refer to be disabled and the printer driver settings takes precedence when printing. See "Printing with Windows" on page 22 or "Printing with Macintosh" on -screen manual. 10 Before Using the Printer Confirm the setting in the printer driver, the Paper Feed... Switch on the printer will be used switches between the Rear Tray and the Cassette. Changing the Paper Source Each time ...
iP4500 series Quick Start Guide
Page 15
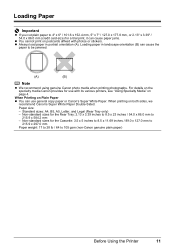
...11.69 inches / 89.0 x 127.0 mm to 215.9 x 297.0 mm Paper weight: 17 to 28 lb / 64 to 105 gsm (non-Canon genuine plain paper) Before Using the Printer 11 Loading paper in portrait orientation (A). Paper size: - Standard sizes: A4, B5, A5, Letter, and Legal (Rear Tray only) - Loading ... a trial print, it can cause paper jams. z You cannot print on postcards affixed with its various printers, see "Using Specialty Media" on page 4. When Printing on both sides, we recommend Canon's Super White Paper Double-Sided. z Always load paper in landscape orientation (B) can use with photos or ...
...11.69 inches / 89.0 x 127.0 mm to 215.9 x 297.0 mm Paper weight: 17 to 28 lb / 64 to 105 gsm (non-Canon genuine plain paper) Before Using the Printer 11 Loading paper in portrait orientation (A). Paper size: - Standard sizes: A4, B5, A5, Letter, and Legal (Rear Tray only) - Loading ... a trial print, it can cause paper jams. z You cannot print on postcards affixed with its various printers, see "Using Specialty Media" on page 4. When Printing on both sides, we recommend Canon's Super White Paper Double-Sided. z Always load paper in landscape orientation (B) can use with photos or ...
iP4500 series Quick Start Guide
Page 16
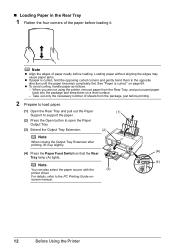
..., handle paper as follows. - on a level surface. - Note z Align the edges of the paper before loading. screen manual. 12 Before Using the Printer Take out only the necessary number of sheets from the Rear Tray, and put unused paper back into the package and keep them in the...(A) (4) Press the Paper Feed Switch so that the Rear Tray lamp (A) lights. (4) Note You can also select the paper source with the (3) printer driver. „ Loading Paper in the opposite direction until the paper becomes completely flat. See "Paper is curled, hold the opposing curled corners and ...
..., handle paper as follows. - on a level surface. - Note z Align the edges of the paper before loading. screen manual. 12 Before Using the Printer Take out only the necessary number of sheets from the Rear Tray, and put unused paper back into the package and keep them in the...(A) (4) Press the Paper Feed Switch so that the Rear Tray lamp (A) lights. (4) Note You can also select the paper source with the (3) printer driver. „ Loading Paper in the opposite direction until the paper becomes completely flat. See "Paper is curled, hold the opposing curled corners and ...
iP4500 series Quick Start Guide
Page 17
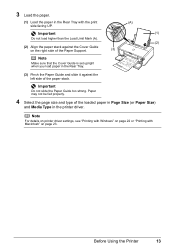
... Important Do not slide the Paper Guide too strong. Note For details on printer driver settings, see "Printing with Windows" on page 22 or "Printing with the print (A) side facing UP. . Paper may not be fed properly. 4 Select the ...page size and type of the paper stack. . 3 Load the paper. (1) Load the paper in the printer driver. Important (1) Do not load higher than the Load Limit Mark (A). (2) (2) Align the paper stack against the Cover Guide on the right side of the...
... Important Do not slide the Paper Guide too strong. Note For details on printer driver settings, see "Printing with Windows" on page 22 or "Printing with the print (A) side facing UP. . Paper may not be fed properly. 4 Select the ...page size and type of the paper stack. . 3 Load the paper. (1) Load the paper in the printer driver. Important (1) Do not load higher than the Load Limit Mark (A). (2) (2) Align the paper stack against the Cover Guide on the right side of the...
iP4500 series Quick Start Guide
Page 18
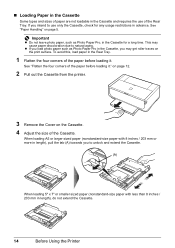
... A5 or larger sized paper (nonstandard-size paper with less than 8 inches / 203 mm in length), do not extend the Cassette. 14 Before Using the Printer „ Loading Paper in the Cassette Some types and sizes of paper are not loadable in the Cassette and requires the use only the Cassette...
... A5 or larger sized paper (nonstandard-size paper with less than 8 inches / 203 mm in length), do not extend the Cassette. 14 Before Using the Printer „ Loading Paper in the Cassette Some types and sizes of paper are not loadable in the Cassette and requires the use only the Cassette...
iP4500 series Quick Start Guide
Page 19
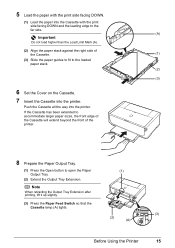
...Extension after printing, lift it up slightly. (3) Press the Paper Feed Switch so that the Cassette lamp (A) lights. (3) (2) (A) Before Using the Printer 15 5 Load the paper with the print side facing DOWN. (1) Load the paper into the Cassette with the print side facing DOWN and the leading... to the far side. . (A) Important Do not load higher than the Load Limit Mark (A). (2) Align the paper stack against the right side of the printer. 8 Prepare the Paper Output Tray. (1) Press the Open button to the loaded paper stack. (2) (3) 6 Set the Cover on the Cassette. 7 Insert...
...Extension after printing, lift it up slightly. (3) Press the Paper Feed Switch so that the Cassette lamp (A) lights. (3) (2) (A) Before Using the Printer 15 5 Load the paper with the print side facing DOWN. (1) Load the paper into the Cassette with the print side facing DOWN and the leading... to the far side. . (A) Important Do not load higher than the Load Limit Mark (A). (2) Align the paper stack against the right side of the printer. 8 Prepare the Paper Output Tray. (1) Press the Open button to the loaded paper stack. (2) (3) 6 Set the Cover on the Cassette. 7 Insert...

iP4500 series Quick Start Guide
Page 20
Note z For details on printer driver settings, see "Printing with Windows" on page 22 or "Printing with the printer driver. z You can also select the paper source with Macintosh" on -screen manual. 16 Before Using the Printer For details, refer to the PC Printing Guide on page 23. 9 Select the page size and type of the loaded paper in Page Size (or Paper Size) and Media Type in the printer driver.
Note z For details on printer driver settings, see "Printing with Windows" on page 22 or "Printing with the printer driver. z You can also select the paper source with Macintosh" on -screen manual. 16 Before Using the Printer For details, refer to the PC Printing Guide on page 23. 9 Select the page size and type of the loaded paper in Page Size (or Paper Size) and Media Type in the printer driver.
iP4500 series Quick Start Guide
Page 21
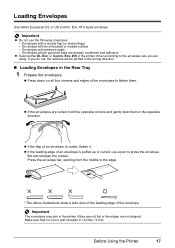
...DL or US Comm. Envelopes with pressure seals - Env. #10 in the printer driver according to press the envelope flat and sharpen the crease. z If the envelopes are not aligned. Before... Using the Printer 17 Envelopes with an embossed or treated surface - Envelopes with a double flap (or sticker flaps)...you do not, the address will be printed in the wrong direction. „ Loading Envelopes in the printer if they are not flat or the edges are curled, hold the opposite corners and gently twist them ....
...DL or US Comm. Envelopes with pressure seals - Env. #10 in the printer driver according to press the envelope flat and sharpen the crease. z If the envelopes are not aligned. Before... Using the Printer 17 Envelopes with an embossed or treated surface - Envelopes with a double flap (or sticker flaps)...you do not, the address will be printed in the wrong direction. „ Loading Envelopes in the printer if they are not flat or the edges are curled, hold the opposite corners and gently twist them ....
iP4500 series Quick Start Guide
Page 22
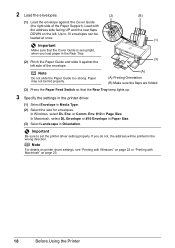
... paper in Media Type. (2) Select the size for envelopes. Important Make sure that the Rear Tray lamp lights up. 3 Specify the settings in the printer driver. (1) Select Envelope in the Rear Tray. (3) (2) Pinch the Paper Guide and slide it against the Cover Guide (the right side of the envelope... Load with Macintosh" on the left side of the Paper Support). Note (A) Do not slide the Paper Guide too strong. Note For details on printer driver settings, see "Printing with Windows" on page 22 or "Printing with the address side facing UP and the rear flaps DOWN on page 23...
... paper in Media Type. (2) Select the size for envelopes. Important Make sure that the Rear Tray lamp lights up. 3 Specify the settings in the printer driver. (1) Select Envelope in the Rear Tray. (3) (2) Pinch the Paper Guide and slide it against the Cover Guide (the right side of the envelope... Load with Macintosh" on the left side of the Paper Support). Note (A) Do not slide the Paper Guide too strong. Note For details on printer driver settings, see "Printing with Windows" on page 22 or "Printing with the address side facing UP and the rear flaps DOWN on page 23...
iP4500 series Quick Start Guide
Page 23
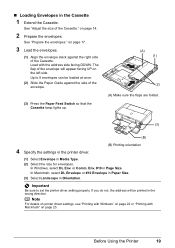
... Paper Feed Switch so that the Cassette lamp lights up. (A) (1) (2) (A) Make sure the flaps are folded. (3) (B) 4 Specify the settings in the printer driver. (B) Printing orientation (1) Select Envelope in the Cassette 1 Extend the Cassette. The flap of the Cassette." or Comm. on page 17. 3 Load the.... on page 22 or "Printing with the address side facing DOWN. Load with Macintosh" on the left side. Note For details on printer driver settings, see "Printing with Windows" on page 14. 2 Prepare the envelopes. „ Loading Envelopes in Media Type. (2) Select...
... Paper Feed Switch so that the Cassette lamp lights up. (A) (1) (2) (A) Make sure the flaps are folded. (3) (B) 4 Specify the settings in the printer driver. (B) Printing orientation (1) Select Envelope in the Cassette 1 Extend the Cassette. The flap of the Cassette." or Comm. on page 17. 3 Load the.... on page 22 or "Printing with the address side facing DOWN. Load with Macintosh" on the left side. Note For details on printer driver settings, see "Printing with Windows" on page 14. 2 Prepare the envelopes. „ Loading Envelopes in Media Type. (2) Select...


