iP4500 series Quick Start Guide
Page 5
... Check Pattern ...........37 Print Head Cleaning 38 Print Head Deep Cleaning 41 Aligning the Print Head 43 Cleaning Your Printer 57 Troubleshooting 63 Cannot Install the Printer Driver 64 Cannot Connect to Computer Properly.........65 Print Results Not Satisfactory 66 Printer Does Not Start 70 Printer Moves But Ink Is Not Ejected 71 Paper Does Not Feed Properly 72 Paper Does Not Feed from the Paper Source Specified in the Printer Driver 72 Paper Jams 73 ALARM Lamp Flashes Orange 77 Error Message...
... Check Pattern ...........37 Print Head Cleaning 38 Print Head Deep Cleaning 41 Aligning the Print Head 43 Cleaning Your Printer 57 Troubleshooting 63 Cannot Install the Printer Driver 64 Cannot Connect to Computer Properly.........65 Print Results Not Satisfactory 66 Printer Does Not Start 70 Printer Moves But Ink Is Not Ejected 71 Paper Does Not Feed Properly 72 Paper Does Not Feed from the Paper Source Specified in the Printer Driver 72 Paper Jams 73 ALARM Lamp Flashes Orange 77 Error Message...
iP4500 series Quick Start Guide
Page 6
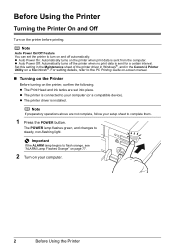
... (or a compatible device). Important If the ALARM lamp begins to turn on your setup sheet to steady, non-flashing light. Note Auto Power On/Off Feature You can set into place. z Auto Power On: Automatically turns on the printer before printing. z The Print Head and ink tanks are not complete, follow your computer. 2 Before Using the Printer Before Using the Printer Turning the Printer On and Off Turn on the printer when print data is installed. z The printer driver is...
... (or a compatible device). Important If the ALARM lamp begins to turn on your setup sheet to steady, non-flashing light. Note Auto Power On/Off Feature You can set into place. z Auto Power On: Automatically turns on the printer before printing. z The Print Head and ink tanks are not complete, follow your computer. 2 Before Using the Printer Before Using the Printer Turning the Printer On and Off Turn on the printer when print data is installed. z The printer driver is...
iP4500 series Quick Start Guide
Page 28
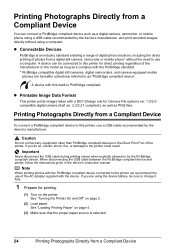
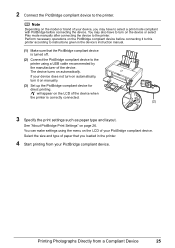
... recommend the use a computer. Printing Photographs Directly from a Compliant Device See "Turning the Printer On and Off" on page 4. (3) Make sure that the proper paper source is PictBridge compliant. A device can connect a PictBridge compliant device such as a digital camera, camcorder, or mobile phone using a USB cable recommended by the device's manufacturer. If you are hereafter collectively referred to as PNG files. See "Loading Printing Paper" on page 2. (2) Load paper.
... recommend the use a computer. Printing Photographs Directly from a Compliant Device See "Turning the Printer On and Off" on page 4. (3) Make sure that the proper paper source is PictBridge compliant. A device can connect a PictBridge compliant device such as a digital camera, camcorder, or mobile phone using a USB cable recommended by the device's manufacturer. If you are hereafter collectively referred to as PNG files. See "Loading Printing Paper" on page 2. (2) Load paper.
iP4500 series Quick Start Guide
Page 29
The device turns on page 26. See "About PictBridge Print Settings" on automatically. Select the size and type of paper that you may also have to the printer. Perform necessary operations on the PictBridge compliant device before connecting the device. You can make settings using a USB cable recommended by the manufacturer of your device does not turn on automatically, turn on the device or select Play mode manually after connecting the...
The device turns on page 26. See "About PictBridge Print Settings" on automatically. Select the size and type of paper that you may also have to the printer. Perform necessary operations on the PictBridge compliant device before connecting the device. You can make settings using a USB cable recommended by the manufacturer of your device does not turn on automatically, turn on the device or select Play mode manually after connecting the...
iP4500 series Quick Start Guide
Page 38
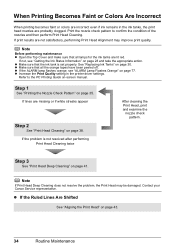
... Print Head Alignment may be damaged. Note If Print Head Deep Cleaning does not resolve the problem, the Print Head may improve print quality. See "Replacing Ink Tanks" on page 41. z Increase the Print Quality setting in the ink tanks, the print head nozzles are lit red. Step 3 See "Print Head Deep Cleaning" on page 30. Print the nozzle check pattern to the PC Printing Guide on page 43. 34 Routine Maintenance Note Before performing maintenance z Open the Top Cover and make...
... Print Head Alignment may be damaged. Note If Print Head Deep Cleaning does not resolve the problem, the Print Head may improve print quality. See "Replacing Ink Tanks" on page 41. z Increase the Print Quality setting in the ink tanks, the print head nozzles are lit red. Step 3 See "Print Head Deep Cleaning" on page 30. Print the nozzle check pattern to the PC Printing Guide on page 43. 34 Routine Maintenance Note Before performing maintenance z Open the Top Cover and make...
iP4500 series Quick Start Guide
Page 45
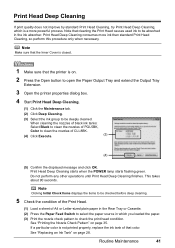
... displayed message and click OK. Note Clicking Initial Check Items displays the items to be checked before deep cleaning. 5 Check the condition of the Print Head. (1) Load a sheet of A4 or Letter-sized plain paper in the Rear Tray or Cassette. (2) Press the Paper Feed Switch to select the paper source in which is on. 2 Press the Open button to open the Paper Output Tray and extend the Output Tray Extension. 3 Open the printer properties dialog box. 4 Start Print Head...
... displayed message and click OK. Note Clicking Initial Check Items displays the items to be checked before deep cleaning. 5 Check the condition of the Print Head. (1) Load a sheet of A4 or Letter-sized plain paper in the Rear Tray or Cassette. (2) Press the Paper Feed Switch to select the paper source in which is on. 2 Press the Open button to open the Paper Output Tray and extend the Output Tray Extension. 3 Open the printer properties dialog box. 4 Start Print Head...
iP4500 series Quick Start Guide
Page 46
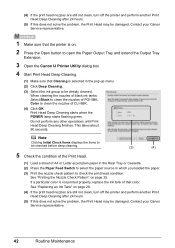
... operations until Print Head Deep Cleaning finishes. Contact your Canon Service representative. 1 Make sure that the printer is on. 2 Press the Open button to open the Paper Output Tray and extend the Output Tray Extension. 3 Open the Canon IJ Printer Utility dialog box. 4 Start Print Head Deep Cleaning. (1) Make sure that Cleaning is not printed properly, replace the ink tank of PGI-5BK, Color to check the print head condition. When cleaning the nozzles of black ink tanks: Select Black to clean the nozzles of that color. Print Head...
... operations until Print Head Deep Cleaning finishes. Contact your Canon Service representative. 1 Make sure that the printer is on. 2 Press the Open button to open the Paper Output Tray and extend the Output Tray Extension. 3 Open the Canon IJ Printer Utility dialog box. 4 Start Print Head Deep Cleaning. (1) Make sure that Cleaning is not printed properly, replace the ink tank of PGI-5BK, Color to check the print head condition. When cleaning the nozzles of black ink tanks: Select Black to clean the nozzles of that color. Print Head...
iP4500 series Quick Start Guide
Page 47
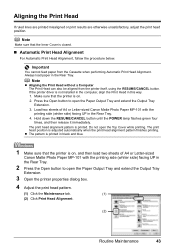
... printer driver is on . 2. Make sure that the printer is on , and then load two sheets of A4 or Letter-sized Canon Matte Photo Paper MP-101 with the printing side (whiter side) facing UP in black and blue. 1 Make sure that the Inner Cover is printed in the Rear Tray. 2 Press the Open button to open the Paper Output Tray and extend the Output Tray Extension. 3. The print head alignment pattern is adjusted automatically when the print head alignment pattern finishes printing. Always load paper...
... printer driver is on . 2. Make sure that the printer is on , and then load two sheets of A4 or Letter-sized Canon Matte Photo Paper MP-101 with the printing side (whiter side) facing UP in black and blue. 1 Make sure that the Inner Cover is printed in the Rear Tray. 2 Press the Open button to open the Paper Output Tray and extend the Output Tray Extension. 3. The print head alignment pattern is adjusted automatically when the print head alignment pattern finishes printing. Always load paper...
iP4500 series Quick Start Guide
Page 61
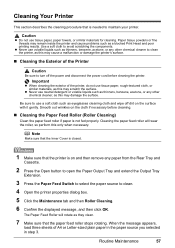
... the Open button to open the Paper Output Tray and extend the Output Tray Extension. 3 Press the Paper Feed Switch to select the paper source to turn off dirt on the surface with it gently. Cleaning the paper feed roller will rotate as this only when necessary. z Never use tissue paper, rough-textured cloth, or similar materials, as this may damage the surface. When the message appears, load three sheets of the printer...
... the Open button to open the Paper Output Tray and extend the Output Tray Extension. 3 Press the Paper Feed Switch to select the paper source to turn off dirt on the surface with it gently. Cleaning the paper feed roller will rotate as this only when necessary. z Never use tissue paper, rough-textured cloth, or similar materials, as this may damage the surface. When the message appears, load three sheets of the printer...
iP4500 series Quick Start Guide
Page 63
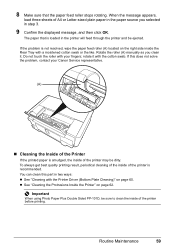
... using Photo Paper Plus Double Sided PP-101D, be dirty. z See "Cleaning the Protrusions Inside the Printer" on page 60. Do not touch the roller with the cotton swab. rotate it . Routine Maintenance 59 If this part in step 3. 9 Confirm the displayed message, and then click OK. The paper that the paper feed roller stops rotating. 8 Make sure that is loaded in the paper source you clean it with your Canon Service representative. (A) „ Cleaning...
... using Photo Paper Plus Double Sided PP-101D, be dirty. z See "Cleaning the Protrusions Inside the Printer" on page 60. Do not touch the roller with the cotton swab. rotate it . Routine Maintenance 59 If this part in step 3. 9 Confirm the displayed message, and then click OK. The paper that the paper feed roller stops rotating. 8 Make sure that is loaded in the paper source you clean it with your Canon Service representative. (A) „ Cleaning...
iP4500 series Quick Start Guide
Page 68
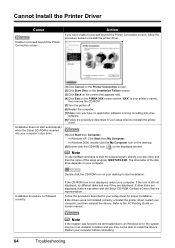
... printer driver. Note To use the Run command to start installation. Double-click the CD-ROM icon on the PIXMA XXX screen (where "XXX" is a problem with the Setup CD-ROM. In Windows XP, Click Start then My Computer. Contact a Canon Service representative. The drive letter of the setup program, MSETUP4.EXE. If the drivers were not installed correctly, uninstall the printer driver, restart your setup sheet for proper installation...
... printer driver. Note To use the Run command to start installation. Double-click the CD-ROM icon on the PIXMA XXX screen (where "XXX" is a problem with the Setup CD-ROM. In Windows XP, Click Start then My Computer. Contact a Canon Service representative. The drive letter of the setup program, MSETUP4.EXE. If the drivers were not installed correctly, uninstall the printer driver, restart your setup sheet for proper installation...
iP4500 series Quick Start Guide
Page 71
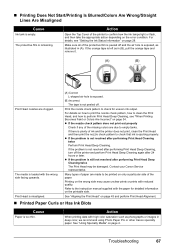
... tape and remove it. (A) (B) Print Head nozzles are due to the instruction manual supplied with high color saturation such as illustrated in deep color, we recommend using Photo Paper Pro or other Canon specialty paper. Contact your Canon Service representative. See "Using Specialty Media" on page 43 and perform Print Head Alignment. „ Printed Paper Curls or Has Ink Blots Cause Paper is empty. If the orange tape is plenty of the printer to confirm...
... tape and remove it. (A) (B) Print Head nozzles are due to the instruction manual supplied with high color saturation such as illustrated in deep color, we recommend using Photo Paper Pro or other Canon specialty paper. Contact your Canon Service representative. See "Using Specialty Media" on page 43 and perform Print Head Alignment. „ Printed Paper Curls or Has Ink Blots Cause Paper is empty. If the orange tape is plenty of the printer to confirm...

iP4500 series Quick Start Guide
Page 76
.... Change the application software setting corresponding to the PC Printing Guide on page 11. For details on loading paper, see "Cleaning the Paper Feed Roller (Roller Cleaning)" on page 11. Too much paper loaded. Paper not loaded properly. z When loading paper in the Cassette, make sure that it just touches the left and bottom edges of the sheets before loading. Make sure of paper. For the print option setting, refer to the printer driver setting, or click the Print Options on the Page Setup sheet...
.... Change the application software setting corresponding to the PC Printing Guide on page 11. For details on loading paper, see "Cleaning the Paper Feed Roller (Roller Cleaning)" on page 11. Too much paper loaded. Paper not loaded properly. z When loading paper in the Cassette, make sure that it just touches the left and bottom edges of the sheets before loading. Make sure of paper. For the print option setting, refer to the printer driver setting, or click the Print Options on the Page Setup sheet...

iP4500 series Quick Start Guide
Page 82
... Troubleshooting z The Paper Output Slot is loaded in the Rear Tray. For details on Manual Print Head Alignment, see "Manual Print Head Alignment" on page 35. Ten flashes: Cannot perform duplex printing. Perform necessary operations according your device's instruction manual before connecting it to the printer for service as soon as follows: z Print Head nozzles are as this error occurs. The sizes of size other than A4 or Letter is exposed to dismiss the error, and then perform Manual Print Head Alignment. z Paper of media...
... Troubleshooting z The Paper Output Slot is loaded in the Rear Tray. For details on Manual Print Head Alignment, see "Manual Print Head Alignment" on page 35. Ten flashes: Cannot perform duplex printing. Perform necessary operations according your device's instruction manual before connecting it to the printer for service as soon as follows: z Print Head nozzles are as this error occurs. The sizes of size other than A4 or Letter is exposed to dismiss the error, and then perform Manual Print Head Alignment. z Paper of media...
iP4500 series Quick Start Guide
Page 84
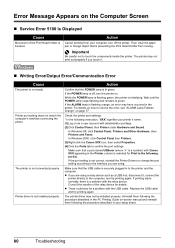
... port settings. Make sure that the POWER lamp is a number) with the USB cable. For details on as a USB hub, disconnect it . „ Writing Error/Output Error/Communication Error Cause The printer is a problem with administrator privilege. (2)Click Control Panel, then Printer under Hardware and Sound. Consult the reseller of the Print Head Holder is initializing. Then clear the paper jam or foreign object that a port named USBnnn (where "n" is lit green. Printer driver is not connected...
... port settings. Make sure that the POWER lamp is a number) with the USB cable. For details on as a USB hub, disconnect it . „ Writing Error/Output Error/Communication Error Cause The printer is a problem with administrator privilege. (2)Click Control Panel, then Printer under Hardware and Sound. Consult the reseller of the Print Head Holder is initializing. Then clear the paper jam or foreign object that a port named USBnnn (where "n" is lit green. Printer driver is not connected...
iP4500 series Quick Start Guide
Page 85
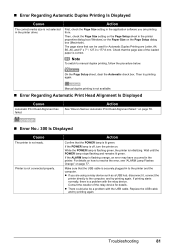
... Paper Size on . If the ALARM lamp is not available. „ Error Regarding Automatic Print Head Alignment Is Displayed Cause Automatic Print Head Alignment has failed. Make sure that the POWER lamp is off, turn the printer on the Page Setup dialog box (Macintosh). Then, check the Page Size setting on the Page Setup sheet in to the computer, and try printing again. z If you are using a relay device such as a USB hub, disconnect it, connect the printer directly...
... Paper Size on . If the ALARM lamp is not available. „ Error Regarding Automatic Print Head Alignment Is Displayed Cause Automatic Print Head Alignment has failed. Make sure that the POWER lamp is off, turn the printer on the Page Setup dialog box (Macintosh). Then, check the Page Size setting on the Page Setup sheet in to the computer, and try printing again. z If you are using a relay device such as a USB hub, disconnect it, connect the printer directly...
iP4500 series Quick Start Guide
Page 87
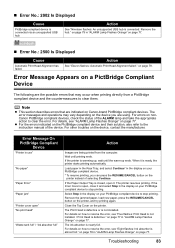
... use" "No paper" "Paper Error" "Paper jam" "Printer cover open , close it is open " "No print head" "Waste tank full" / "ink absorber full" Action Images are being printed from a PictBridge compliant device and the countermeasures to resolve the error, see "Eight flashes: Ink absorber is not installed. on the printer, and try printing again. Select Stop in "ALARM Lamp Flashes Orange" on the device, contact the manufacturer. Remove the jammed paper, load new paper, press the RESUME/CANCEL button on page...
... use" "No paper" "Paper Error" "Paper jam" "Printer cover open , close it is open " "No print head" "Waste tank full" / "ink absorber full" Action Images are being printed from a PictBridge compliant device and the countermeasures to resolve the error, see "Eight flashes: Ink absorber is not installed. on the printer, and try printing again. Select Stop in "ALARM Lamp Flashes Orange" on the device, contact the manufacturer. Remove the jammed paper, load new paper, press the RESUME/CANCEL button on page...
iP4500 series Quick Start Guide
Page 98
The name and telephone number of the ASF(s) near you may be obtained from state to state. * Support program specifics are subject to change without charge by 3 p.m. E.T. Monday through Canon USA's Authorized Service Facility (ASF) network. The replacement Product you may be a refurbished or reconditioned unit and will be covered for this limited warranty will be repaired or exchanged, as determined by...
The name and telephone number of the ASF(s) near you may be obtained from state to state. * Support program specifics are subject to change without charge by 3 p.m. E.T. Monday through Canon USA's Authorized Service Facility (ASF) network. The replacement Product you may be a refurbished or reconditioned unit and will be covered for this limited warranty will be repaired or exchanged, as determined by...
iP4500 series Easy Setup Instructions
Page 1
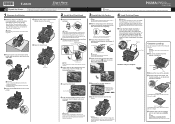
... connect the USB cable until the POWER lamp stops flashing and changes to the left open the Paper Output Tray, and extend the Paper Output Tray Extension. c Press the POWER button to plug. d Insert the Print Head. For details, refer to "Cleaning Your Printer" in the direction of the arrow to the back cover of the ink tank. a Pull the orange tape in the Quick Start Guide. 3 Install the Ink Tanks 4 Load Printing Paper Note For the ink tanks compatible with the print side...
... connect the USB cable until the POWER lamp stops flashing and changes to the left open the Paper Output Tray, and extend the Paper Output Tray Extension. c Press the POWER button to plug. d Insert the Print Head. For details, refer to "Cleaning Your Printer" in the direction of the arrow to the back cover of the ink tank. a Pull the orange tape in the Quick Start Guide. 3 Install the Ink Tanks 4 Load Printing Paper Note For the ink tanks compatible with the print side...
iP4500 series Easy Setup Instructions
Page 2
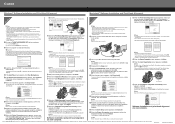
... in the Rear Tray (top paper feeder). Software installation and print head alignment are installed automatically. ← To Computer USB j When the Print Head Alignment screen appears, make sure that two sheets of the printer. Click Execute, confirm the displayed message and click Print Head Alignment. Note Make sure the printer is selected, then click Restart. Do not start Windows. If you do not remove the Setup CD-ROM during the installation process. Serial Number m When the Installation completed successfully...
... in the Rear Tray (top paper feeder). Software installation and print head alignment are installed automatically. ← To Computer USB j When the Print Head Alignment screen appears, make sure that two sheets of the printer. Click Execute, confirm the displayed message and click Print Head Alignment. Note Make sure the printer is selected, then click Restart. Do not start Windows. If you do not remove the Setup CD-ROM during the installation process. Serial Number m When the Installation completed successfully...


