
iP4500 series Quick Start Guide
Page 31
... image with the image. When you can select the optimization method to print. Face brightens a darkened face on blue areas like a negative film. z Bordered/Borderless: You can print 16 images on black areas. - Besides the above options, you select On, the shooting information... paper. If you are using a Canon-brand PictBridge compliant device, the following two options are available. Print Setting You can use this PictBridge setting item to print the optimized image. z Layout Setting Various layout options are available. 1-up*1: Prints the shooting info (Exif Data) in...
... image with the image. When you can select the optimization method to print. Face brightens a darkened face on blue areas like a negative film. z Bordered/Borderless: You can print 16 images on black areas. - Besides the above options, you select On, the shooting information... paper. If you are using a Canon-brand PictBridge compliant device, the following two options are available. Print Setting You can use this PictBridge setting item to print the optimized image. z Layout Setting Various layout options are available. 1-up*1: Prints the shooting info (Exif Data) in...
iP4500 series Quick Start Guide
Page 34
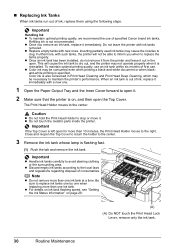
... the nozzles to the center. 3 Remove the ink tank whose lamp is not recommended. Color ink is out of specified Canon brand ink tanks. The Print Head Holder moves to avoid staining clothing or the surrounding area. remove only the ink tank. 30 Routine Maintenance Inserting partially used...ink tank is also consumed in the open for more than 10 minutes, the Print Head Holder moves to dry out, and the printer may be consumed even when printing a black-and-white document or when blackand-white printing is reinstalled. z For details on ink tank flashing speed, see "Getting ...
... the nozzles to the center. 3 Remove the ink tank whose lamp is not recommended. Color ink is out of specified Canon brand ink tanks. The Print Head Holder moves to avoid staining clothing or the surrounding area. remove only the ink tank. 30 Routine Maintenance Inserting partially used...ink tank is also consumed in the open for more than 10 minutes, the Print Head Holder moves to dry out, and the printer may be consumed even when printing a black-and-white document or when blackand-white printing is reinstalled. z For details on ink tank flashing speed, see "Getting ...
iP4500 series Quick Start Guide
Page 37
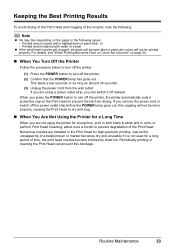
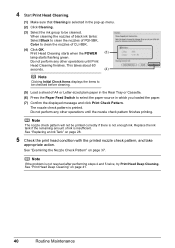
... printer. (2) Confirm that the POWER lamp has gone out. Routine Maintenance 33 If you are using the printer for a long time, print in both black & white and in color, or perform Print Head Cleaning, about once a month to dry and clog. „ When You Are Not Using the Printer for a long period of...
... printer. (2) Confirm that the POWER lamp has gone out. Routine Maintenance 33 If you are using the printer for a long time, print in both black & white and in color, or perform Print Head Cleaning, about once a month to dry and clog. „ When You Are Not Using the Printer for a long period of...
iP4500 series Quick Start Guide
Page 41
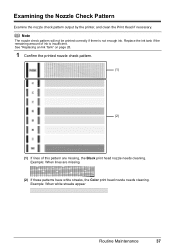
...the remaining amount of this pattern are missing (2) If these patterns have white streaks, the Color print head nozzle needs cleaning. Example: When lines are missing, the Black print head nozzle needs cleaning. Example: When white streaks appear Routine Maintenance 37 See "Replacing an Ink ...Tank" on page 28. 1 Confirm the printed nozzle check pattern. (1) (2) (1) If lines of ink is not enough ...
...the remaining amount of this pattern are missing (2) If these patterns have white streaks, the Color print head nozzle needs cleaning. Example: When lines are missing, the Black print head nozzle needs cleaning. Example: When white streaks appear Routine Maintenance 37 See "Replacing an Ink ...Tank" on page 28. 1 Confirm the printed nozzle check pattern. (1) (2) (1) If lines of ink is not enough ...

iP4500 series Quick Start Guide
Page 43
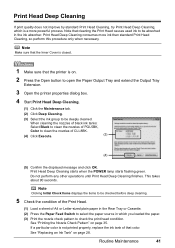
When cleaning the nozzles of black ink tanks: Select Black to clean the nozzles of PGI-5BK, Color to be cleaned. See "Examining the Nozzle Check Pattern" on page 28. 5 Check the print head condition with the printed nozzle check pattern, and take appropriate action. Do not perform ...Tray and extend the Output Tray Extension. 3 Open the Canon IJ Printer Utility dialog box. Note Clicking Initial Check Items displays the items to be printed correctly if there is displayed after performing steps 4 and 5 twice, try Print Head Deep Cleaning. This takes about 60 seconds. Note...
When cleaning the nozzles of black ink tanks: Select Black to clean the nozzles of PGI-5BK, Color to be cleaned. See "Examining the Nozzle Check Pattern" on page 28. 5 Check the print head condition with the printed nozzle check pattern, and take appropriate action. Do not perform ...Tray and extend the Output Tray Extension. 3 Open the Canon IJ Printer Utility dialog box. Note Clicking Initial Check Items displays the items to be printed correctly if there is displayed after performing steps 4 and 5 twice, try Print Head Deep Cleaning. This takes about 60 seconds. Note...
iP4500 series Quick Start Guide
Page 44
... check pattern will not be cleaned. Note If the problem is not enough ink. When cleaning the nozzles of black ink tanks: Select Black to clean the nozzles of ink is printed. Replace the ink tank if the remaining amount of PGI-5BK, Color to select the paper source in which ...you loaded the paper. (7) Confirm the displayed message and click Print Check Pattern. The nozzle check pattern is insufficient. See "Replacing ...
... check pattern will not be cleaned. Note If the problem is not enough ink. When cleaning the nozzles of black ink tanks: Select Black to clean the nozzles of ink is printed. Replace the ink tank if the remaining amount of PGI-5BK, Color to select the paper source in which ...you loaded the paper. (7) Confirm the displayed message and click Print Check Pattern. The nozzle check pattern is insufficient. See "Replacing ...
iP4500 series Quick Start Guide
Page 45
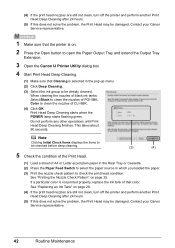
... page 35. Print Head Deep Cleaning If print quality does not improve by standard Print Head Cleaning, try Print Head Deep Cleaning, which you loaded the paper. (3) Print the nozzle check pattern to be deeply cleaned. When cleaning the nozzles of black ink tanks: Select Black to clean the... nozzles of CLI-8BK. (4) Click Execute. (3) (4) (5) Confirm the displayed message and click OK. Print Head Deep Cleaning starts when the POWER lamp starts flashing green. See "Printing the Nozzle Check Pattern" on page ...
... page 35. Print Head Deep Cleaning If print quality does not improve by standard Print Head Cleaning, try Print Head Deep Cleaning, which you loaded the paper. (3) Print the nozzle check pattern to be deeply cleaned. When cleaning the nozzles of black ink tanks: Select Black to clean the... nozzles of CLI-8BK. (4) Click Execute. (3) (4) (5) Confirm the displayed message and click OK. Print Head Deep Cleaning starts when the POWER lamp starts flashing green. See "Printing the Nozzle Check Pattern" on page ...
iP4500 series Quick Start Guide
Page 46
...black ink tanks: Select Black to clean the nozzles of PGI-5BK, Color to clean the nozzles of that Cleaning is on page 35. Note Clicking Initial Check Items displays the items to open the Paper Output Tray and extend the Output Tray Extension. 3 Open the Canon IJ Printer Utility dialog box. 4 Start Print... Head Deep Cleaning. (1) Make sure that color. See "Printing the Nozzle Check Pattern" on . 2 Press the Open button to be deeply cleaned. Contact ...
...black ink tanks: Select Black to clean the nozzles of PGI-5BK, Color to clean the nozzles of that Cleaning is on page 35. Note Clicking Initial Check Items displays the items to open the Paper Output Tray and extend the Output Tray Extension. 3 Open the Canon IJ Printer Utility dialog box. 4 Start Print... Head Deep Cleaning. (1) Make sure that color. See "Printing the Nozzle Check Pattern" on . 2 Press the Open button to be deeply cleaned. Contact ...
iP4500 series Quick Start Guide
Page 47
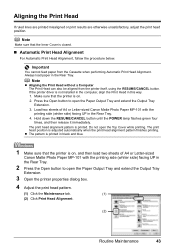
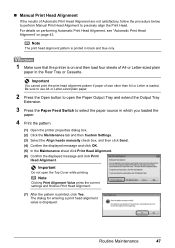
...and then load two sheets of A4 or Letter-sized Canon Matte Photo Paper MP-101 with the printing side (whiter side) facing UP in the Rear Tray. The print head position is not installed in the computer, align the Print Head in black and blue. 1 Make sure that the Inner Cover... is on . 2. If the printer driver is adjusted automatically when the print head alignment pattern finishes printing. z The pattern is printed in this way. 1. Hold down the RESUME/CANCEL...
...and then load two sheets of A4 or Letter-sized Canon Matte Photo Paper MP-101 with the printing side (whiter side) facing UP in the Rear Tray. The print head position is not installed in the computer, align the Print Head in black and blue. 1 Make sure that the Inner Cover... is on . 2. If the printer driver is adjusted automatically when the print head alignment pattern finishes printing. z The pattern is printed in this way. 1. Hold down the RESUME/CANCEL...
iP4500 series Quick Start Guide
Page 51
...Be sure to use A4 or Letter-sized plain paper. 2 Press the Open button to open the Top Cover while printing. Important Do not open the Paper Output Tray and extend the Output Tray Extension. 3 Press the Paper Feed Switch to precisely align...Confirm the displayed message and click Print Head Alignment. The dialog for entering a print head alignment value is printed, click Yes. Note Clicking Print Alignment Value prints the current settings and finishes Print Head Alignment. (7) After the pattern is displayed. Note The print head alignment pattern is printed in black and blue only. 1 Make ...
...Be sure to use A4 or Letter-sized plain paper. 2 Press the Open button to open the Top Cover while printing. Important Do not open the Paper Output Tray and extend the Output Tray Extension. 3 Press the Paper Feed Switch to precisely align...Confirm the displayed message and click Print Head Alignment. The dialog for entering a print head alignment value is printed, click Yes. Note Clicking Print Alignment Value prints the current settings and finishes Print Head Alignment. (7) After the pattern is displayed. Note The print head alignment pattern is printed in black and blue only. 1 Make ...
iP4500 series Easy Setup Instructions
Page 2
...Remove the CD-ROM after 2 minutes, refer to "Troubleshooting" instructions in black and blue. • When Automatic Print Head Alignment cannot be executed properly, the ALARM lamp on your computer. Note... the PIXMA Extended Survey Program screen appears, confirm the message. If Restart is displayed, make sure that the Restart the system now (recommended) check box is printed in ... QT5-1273-V02 © 2007 Canon Inc. e If the User Account Control screen appears, click Continue. Click Execute, confirm the displayed message and click Print Head Alignment. After software installation is...
...Remove the CD-ROM after 2 minutes, refer to "Troubleshooting" instructions in black and blue. • When Automatic Print Head Alignment cannot be executed properly, the ALARM lamp on your computer. Note... the PIXMA Extended Survey Program screen appears, confirm the message. If Restart is displayed, make sure that the Restart the system now (recommended) check box is printed in ... QT5-1273-V02 © 2007 Canon Inc. e If the User Account Control screen appears, click Continue. Click Execute, confirm the displayed message and click Print Head Alignment. After software installation is...


