iP2000 Easy Setup Instructions
Page 1
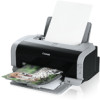
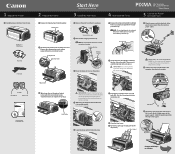
...the left . 1 Unpack the Printer 1 Carefully remove all shipping tape from its package and pull off the orange protective cap. Packing Material Print Head Holder Tear at notch to the right of blank paper in the paper support. NOTE: To avoid spilling ink, do not touch ... Do not press it clicks into the slot on the right. PIXMA iP2000 Photo Printer Print Head Power Cord 2 Prepare the Printer Start Here Easy Setup Instructions 3 Install the Print Head 4 Install the Ink Tanks 1 Remove all items from the print head holder. Protective Cap 2 Insert the black ink tank (BCI...
...the left . 1 Unpack the Printer 1 Carefully remove all shipping tape from its package and pull off the orange protective cap. Packing Material Print Head Holder Tear at notch to the right of blank paper in the paper support. NOTE: To avoid spilling ink, do not touch ... Do not press it clicks into the slot on the right. PIXMA iP2000 Photo Printer Print Head Power Cord 2 Prepare the Printer Start Here Easy Setup Instructions 3 Install the Print Head 4 Install the Ink Tanks 1 Remove all items from the print head holder. Protective Cap 2 Insert the black ink tank (BCI...
iP2000 Easy Setup Instructions
Page 2
... OK. Then click Continue. 5 Read the License Agreement, then click Yes to "Aligning the Print Head" instructions in the Mac OS X folder, to restart the computer appears, click Restart. 3 Double-click the PIXMA iP2000 280.pkg icon. 11 When the "Installation is your confirmation to install. 4 When the "... User's Guide" CD-ROM. NOTE: If a message prompting you may need to be installed. NOTE: · When you print out for the printer driver to align the print head. Canon is a registered trademark of the Quick Start Guide. 1 Turn on -screen instructions. 4 When the "Welcome to the BJ ...
... OK. Then click Continue. 5 Read the License Agreement, then click Yes to "Aligning the Print Head" instructions in the Mac OS X folder, to restart the computer appears, click Restart. 3 Double-click the PIXMA iP2000 280.pkg icon. 11 When the "Installation is your confirmation to install. 4 When the "... User's Guide" CD-ROM. NOTE: If a message prompting you may need to be installed. NOTE: · When you print out for the printer driver to align the print head. Canon is a registered trademark of the Quick Start Guide. 1 Turn on -screen instructions. 4 When the "Welcome to the BJ ...
iP2000 Quick Start Guide
Page 5
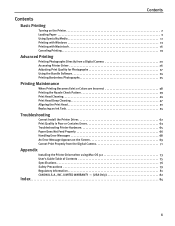
... Speciality Media 11 Printing with Windows 13 Printing with Macintosh 16 Canceling Printing 19 Advanced Printing Printing Photographs Directly from a Digital Camera 20 Accessing Printer Driver 26 Adjusting Print Quality for Photographs 27 Using the Bundle Software 34 Printing Borderless Photographs 35 Printing Maintenance When Printing Becomes Faint or...65 Paper Does Not Feed Properly 66 Handling Error Messages 68 An Error Message Appears on the Screen 69 Cannot Print Properly from the Digital Camera 71 Appendix Installing the Printer Driver when using Mac OS 9.x 73 User's Guide ...
... Speciality Media 11 Printing with Windows 13 Printing with Macintosh 16 Canceling Printing 19 Advanced Printing Printing Photographs Directly from a Digital Camera 20 Accessing Printer Driver 26 Adjusting Print Quality for Photographs 27 Using the Bundle Software 34 Printing Borderless Photographs 35 Printing Maintenance When Printing Becomes Faint or...65 Paper Does Not Feed Properly 66 Handling Error Messages 68 An Error Message Appears on the Screen 69 Cannot Print Properly from the Digital Camera 71 Appendix Installing the Printer Driver when using Mac OS 9.x 73 User's Guide ...
iP2000 Quick Start Guide
Page 6
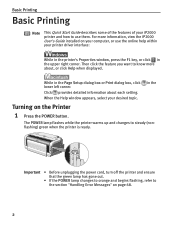
Then click the feature you want to know more information, view the iP2000 User's Guide installed on page 68. 2 The POWER lamp flashes while the printer warms up and changes to steady (nonflashing) green when the printer is ... the Help window appears, select your desired topic. in the Page Setup dialog box or Print dialog box, click lower left corner. Basic Printing Basic Printing Note This Quick Start Guide describes some of the features of your iP2000 printer and how to use the online help within your printer driver interface: While in...
Then click the feature you want to know more information, view the iP2000 User's Guide installed on page 68. 2 The POWER lamp flashes while the printer warms up and changes to steady (nonflashing) green when the printer is ... the Help window appears, select your desired topic. in the Page Setup dialog box or Print dialog box, click lower left corner. Basic Printing Basic Printing Note This Quick Start Guide describes some of the features of your iP2000 printer and how to use the online help within your printer driver interface: While in...
iP2000 Quick Start Guide
Page 7
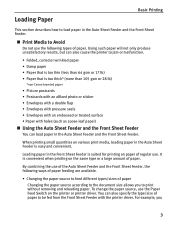
It is too thick* (more than 64 gsm or 17 lb) • Paper that is too thin (less than 105 gsm or 28 lb) *non-Canon branded paper • Picture postcards • Postcards with an affixed photo or sticker • Envelopes with a double flap • Envelopes with pressure seals • ...amount of regular use the Paper Feed Switch on the printer or printer driver. Loading paper in the Auto Sheet Feeder is suited for printing on various print media, loading paper in the Front Sheet Feeder is easy and convenient. You can also cause the printer to be fed from the Front...
It is too thick* (more than 64 gsm or 17 lb) • Paper that is too thin (less than 105 gsm or 28 lb) *non-Canon branded paper • Picture postcards • Postcards with an affixed photo or sticker • Envelopes with a double flap • Envelopes with pressure seals • ...amount of regular use the Paper Feed Switch on the printer or printer driver. Loading paper in the Auto Sheet Feeder is suited for printing on various print media, loading paper in the Front Sheet Feeder is easy and convenient. You can also cause the printer to be fed from the Front...
iP2000 Quick Start Guide
Page 8
...for regular use with its various printers, refer to the section "Using Speciality Media" on page 11. • See "Printing Media" in the User's Guide for printing a large amount of paper by using both the Auto Sheet Feeder and the Front Sheet Feeder together When paper is loaded ... the User's Guide. „ Loading Paper in the Auto Sheet Feeder Note • For detailed information on the speciality media Canon provides for use . • Continuous printing on how to load envelopes and speciality media into the printer. 1 Flatten the four corners of paper, the paper source automatically ...
...for regular use with its various printers, refer to the section "Using Speciality Media" on page 11. • See "Printing Media" in the User's Guide for printing a large amount of paper by using both the Auto Sheet Feeder and the Front Sheet Feeder together When paper is loaded ... the User's Guide. „ Loading Paper in the Auto Sheet Feeder Note • For detailed information on the speciality media Canon provides for use . • Continuous printing on how to load envelopes and speciality media into the printer. 1 Flatten the four corners of paper, the paper source automatically ...
iP2000 Quick Start Guide
Page 9
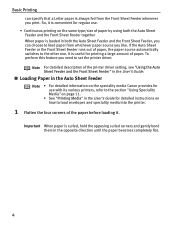
... Sheet Feeder" in the printer driver. 2 Prepare to the right position ( ) only for plain paper. Auto Sheet Feeder Lamp (3) Press the Paper Feed Switch. Basic Printing (1) Pull out the Paper Support. See "Canon Speciality Media" on page 12. • You can also select the paper source in the User's Guide. 5
... Sheet Feeder" in the printer driver. 2 Prepare to the right position ( ) only for plain paper. Auto Sheet Feeder Lamp (3) Press the Paper Feed Switch. Basic Printing (1) Pull out the Paper Support. See "Canon Speciality Media" on page 12. • You can also select the paper source in the User's Guide. 5
iP2000 Quick Start Guide
Page 10
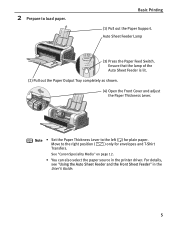
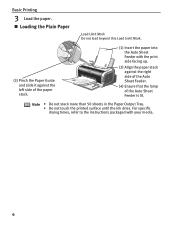
Basic Printing 3 Load the paper. „ Loading the Plain Paper Load Limit Mark Do not load beyond this Load Limit Mark. (3) Pinch the Paper Guide and slide ...; Do not stack more than 50 sheets in the Paper Output Tray. • Do not touch the printed surface until the ink dries. For specific drying times, refer to the instructions packaged with the print side facing up. (2) Align the paper stack against the right side of the Auto Sheet Feeder. (4) Ensure...
Basic Printing 3 Load the paper. „ Loading the Plain Paper Load Limit Mark Do not load beyond this Load Limit Mark. (3) Pinch the Paper Guide and slide ...; Do not stack more than 50 sheets in the Paper Output Tray. • Do not touch the printed surface until the ink dries. For specific drying times, refer to the instructions packaged with the print side facing up. (2) Align the paper stack against the right side of the Auto Sheet Feeder. (4) Ensure...
iP2000 Quick Start Guide
Page 11
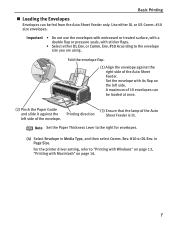
... the Auto Sheet Feeder only. Env. #10 or DL Env. Use either DL Env. Fold the envelope flap. (1) Align the envelope against the left side. Printing direction (3) Ensure that the lamp of the Auto Sheet Feeder. Note Set the Paper Thickness Lever to the envelope size you are using. Set the... its flap on page 16. 7 Env. #10 According to the right for envelopes. (4) Select Envelope in Page Size. For the printer driver setting, refer to "Printing with Windows" on page 13, "Printing with Macintosh" on the left side of the envelope.
... the Auto Sheet Feeder only. Env. #10 or DL Env. Use either DL Env. Fold the envelope flap. (1) Align the envelope against the left side. Printing direction (3) Ensure that the lamp of the Auto Sheet Feeder. Note Set the Paper Thickness Lever to the envelope size you are using. Set the... its flap on page 16. 7 Env. #10 According to the right for envelopes. (4) Select Envelope in Page Size. For the printer driver setting, refer to "Printing with Windows" on page 13, "Printing with Macintosh" on the left side of the envelope.
iP2000 Quick Start Guide
Page 12
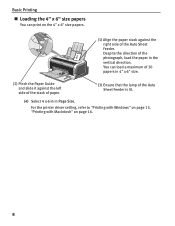
... page 16. 8 For the printer driver setting, refer to "Printing with Windows" on page 13, "Printing with Macintosh" on the 4" x 6" size papers. (1) Align the paper stack against the left side of the stack of paper. (3) Ensure that the lamp of the ...photograph, load the paper in Page Size. Despite the direction of the Auto Sheet Feeder is lit. (4) Select 4 x 6 in in the vertical direction. Basic Printing „ Loading the 4" x 6" size papers You can load a maximum of 20 papers in 4" x 6" size. (2) Pinch the Paper Guide and slide it against the right side...
... page 16. 8 For the printer driver setting, refer to "Printing with Windows" on page 13, "Printing with Macintosh" on the 4" x 6" size papers. (1) Align the paper stack against the left side of the stack of paper. (3) Ensure that the lamp of the ...photograph, load the paper in Page Size. Despite the direction of the Auto Sheet Feeder is lit. (4) Select 4 x 6 in in the vertical direction. Basic Printing „ Loading the 4" x 6" size papers You can load a maximum of 20 papers in 4" x 6" size. (2) Pinch the Paper Guide and slide it against the right side...
iP2000 Quick Start Guide
Page 13
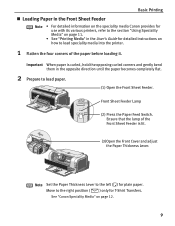
...gently bend them in the User's Guide for detailed instructions on page 12. 9 Basic Printing „ Loading Paper in the Front Sheet Feeder Note • For detailed information on the speciality media Canon provides for use with its various printers, refer to the section "Using Speciality Media"... on page 11. • See "Printing Media" in the opposite direction until the paper becomes completely flat. 2 Prepare ...
...gently bend them in the User's Guide for detailed instructions on page 12. 9 Basic Printing „ Loading Paper in the Front Sheet Feeder Note • For detailed information on the speciality media Canon provides for use with its various printers, refer to the section "Using Speciality Media"... on page 11. • See "Printing Media" in the opposite direction until the paper becomes completely flat. 2 Prepare ...

iP2000 Quick Start Guide
Page 14
... side, according to the message shown on the correct side of the paper stack. Pull out completely as shown below. • To Print with Duplex Printing After printing one side, the printed paper can also select the paper source from the Auto Sheet Feeder. For details, refer to the instructions packaged with the... side of it as shown. Note • Do not stack more than 50 sheets in the Paper Output Tray. • Do not touch the printed surface until the ink dries. Note • You can be fed from the printer driver. For specific drying times, refer to "Using the Auto ...
... side, according to the message shown on the correct side of the paper stack. Pull out completely as shown below. • To Print with Duplex Printing After printing one side, the printed paper can also select the paper source from the Auto Sheet Feeder. For details, refer to the instructions packaged with the... side of it as shown. Note • Do not stack more than 50 sheets in the Paper Output Tray. • Do not touch the printed surface until the ink dries. Note • You can be fed from the printer driver. For specific drying times, refer to "Using the Auto ...
iP2000 Quick Start Guide
Page 16
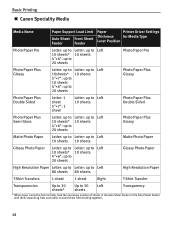
Basic Printing „ Canon Speciality Media Media Name Paper Support Load Limit Paper Printer Driver Settings Auto Sheet Front Sheet Thickness for Media Type Lever Position Feeder Feeder Photo ...
Basic Printing „ Canon Speciality Media Media Name Paper Support Load Limit Paper Printer Driver Settings Auto Sheet Front Sheet Thickness for Media Type Lever Position Feeder Feeder Photo ...
iP2000 Quick Start Guide
Page 17
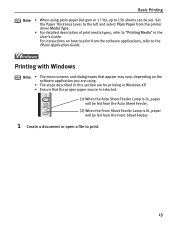
... to the left and select Plain Paper from the software applications, refer to the Photo Application Guide. Basic Printing Note • When using . • The steps described in this section are for printing in the User's Guide. For instructions on the software application you are using plain paper (64 gsm or... 17 lb), up to 150 sheets can be fed from the Front Sheet Feeder. 1 Create a document or open a file to "Printing Media" in Windows XP. • Ensure that the proper paper source is selected. (1) When the Auto Sheet Feeder Lamp is lit, paper will be fed...
... to the left and select Plain Paper from the software applications, refer to the Photo Application Guide. Basic Printing Note • When using . • The steps described in this section are for printing in the User's Guide. For instructions on the software application you are using plain paper (64 gsm or... 17 lb), up to 150 sheets can be fed from the Front Sheet Feeder. 1 Create a document or open a file to "Printing Media" in Windows XP. • Ensure that the proper paper source is selected. (1) When the Auto Sheet Feeder Lamp is lit, paper will be fed...
iP2000 Quick Start Guide
Page 18
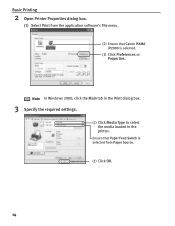
Basic Printing 2 Open Printer Properties dialog box. (1) Select Print from the application software's File menu. (2) Ensure that Paper Feed Switch is selected. (3) Click Preferences or Properties. Ensure that Canon PIXMA iP2000 is selected from Paper Source. (2) Click OK. 14 Note In Windows 2000, click the Main tab in the Print dialog box. 3 Specify the required settings. (1) Click Media Type to select the media loaded in the printer.
Basic Printing 2 Open Printer Properties dialog box. (1) Select Print from the application software's File menu. (2) Ensure that Paper Feed Switch is selected. (3) Click Preferences or Properties. Ensure that Canon PIXMA iP2000 is selected from Paper Source. (2) Click OK. 14 Note In Windows 2000, click the Main tab in the Print dialog box. 3 Specify the required settings. (1) Click Media Type to select the media loaded in the printer.
iP2000 Quick Start Guide
Page 19
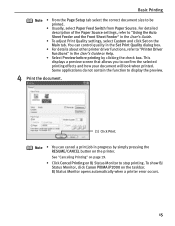
This displays a preview screen that allows you to display the preview. 4 Print the document. (1) Click Print. Some applications do not contain the function to confirm the selected printing effects and how your document will look when printed. To show BJ Status Monitor, click Canon PIXMA iP2000 on BJ Status Monitor to "Using the Auto Sheet Feeder and the...
This displays a preview screen that allows you to display the preview. 4 Print the document. (1) Click Print. Some applications do not contain the function to confirm the selected printing effects and how your document will look when printed. To show BJ Status Monitor, click Canon PIXMA iP2000 on BJ Status Monitor to "Using the Auto Sheet Feeder and the...
iP2000 Quick Start Guide
Page 20
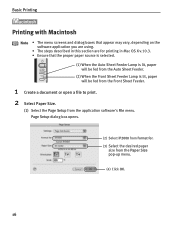
... steps described in this section are for . (3) Select the desired paper size from the application software's File menu. Page Setup dialog box opens. (2) Select iP2000 from Format for printing in Mac OS X v.10.3. • Ensure that the proper paper source is selected. (1) When the Auto Sheet Feeder Lamp is lit, paper will...
... steps described in this section are for . (3) Select the desired paper size from the application software's File menu. Page Setup dialog box opens. (2) Select iP2000 from Format for printing in Mac OS X v.10.3. • Ensure that the proper paper source is selected. (1) When the Auto Sheet Feeder Lamp is lit, paper will...

iP2000 Quick Start Guide
Page 21
Basic Printing (2) Select Quality & Media from the pop-up menu. (3) Select the Media Type from the Print Mode. (5) Click Print. 17 Ensure that Paper Feed Switch is selected from Paper Source. (4) Select the print mode appropriate to your document from the pop-up menu. 3 Specify the required settings. (1) Select Print from the application software's File menu.
Basic Printing (2) Select Quality & Media from the pop-up menu. (3) Select the Media Type from the Print Mode. (5) Click Print. 17 Ensure that Paper Feed Switch is selected from Paper Source. (4) Select the print mode appropriate to your document from the pop-up menu. 3 Specify the required settings. (1) Select Print from the application software's File menu.
iP2000 Quick Start Guide
Page 22
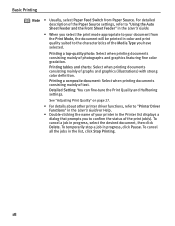
...select the desired document, then click Delete. To cancel a job in the list, click Stop Printing. 18 Printing tables and charts: Select when printing documents consisting mainly of text. For detailed description of the Paper Source settings, refer to "Using ... Setting: You can fine-tune the Print Quality and Halftoning settings. Printing a composite document: Select when printing documents consisting mainly of graphs and graphics (illustrations) with strong color definition. Printing a top-quality photo: Select when printing documents consisting mainly of photographs and graphics...
...select the desired document, then click Delete. To cancel a job in the list, click Stop Printing. 18 Printing tables and charts: Select when printing documents consisting mainly of text. For detailed description of the Paper Source settings, refer to "Using ... Setting: You can fine-tune the Print Quality and Halftoning settings. Printing a composite document: Select when printing documents consisting mainly of graphs and graphics (illustrations) with strong color definition. Printing a top-quality photo: Select when printing documents consisting mainly of photographs and graphics...
iP2000 Quick Start Guide
Page 23
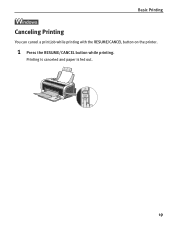
Printing is canceled and paper is fed out. 19 Basic Printing Canceling Printing You can cancel a print job while printing with the RESUME/CANCEL button on the printer. 1 Press the RESUME/CANCEL button while printing.
Printing is canceled and paper is fed out. 19 Basic Printing Canceling Printing You can cancel a print job while printing with the RESUME/CANCEL button on the printer. 1 Press the RESUME/CANCEL button while printing.


