MP210 series Quick Start Guide
Page 30
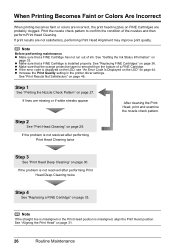
...on page 30. Step 1 See "Printing the Nozzle Check Pattern" on page 44. z Make sure that a FINE Cartridge has not run out of ink. If the problem is displayed on the LED, see "An Error Code Is Displayed on the LED" on page 27. Note If the straight line...misaligned or the Print Head position is installed properly. See "Print Results Not Satisfactory" on page 29. z Increase the Print Quality setting in the printer driver settings. Step 2 See "Print Head Cleaning" on page 48. Note Before performing maintenance z Make sure that the orange protective tape is ...
...on page 30. Step 1 See "Printing the Nozzle Check Pattern" on page 44. z Make sure that a FINE Cartridge has not run out of ink. If the problem is displayed on the LED, see "An Error Code Is Displayed on the LED" on page 27. Note If the straight line...misaligned or the Print Head position is installed properly. See "Print Results Not Satisfactory" on page 29. z Increase the Print Quality setting in the printer driver settings. Step 2 See "Print Head Cleaning" on page 48. Note Before performing maintenance z Make sure that the orange protective tape is ...

MP210 series Quick Start Guide
Page 38
...Color FINE Cartridge as an example. (C) (C) The Ink lamp flashes. The function for a while, but we recommend you to have run out.) in "An Error Code Is Displayed on the LED" on the printer status monitor (Windows) and Canon IJ Printer Utility (Macintosh). (A) (A) Confirm whether any symbols... are displayed here. 34 Routine Maintenance See "E, 1, 3" (Ink may have run out. You can confirm the status of each FINE ...
...Color FINE Cartridge as an example. (C) (C) The Ink lamp flashes. The function for a while, but we recommend you to have run out.) in "An Error Code Is Displayed on the LED" on the printer status monitor (Windows) and Canon IJ Printer Utility (Macintosh). (A) (A) Confirm whether any symbols... are displayed here. 34 Routine Maintenance See "E, 1, 3" (Ink may have run out. You can confirm the status of each FINE ...
MP210 series Quick Start Guide
Page 39
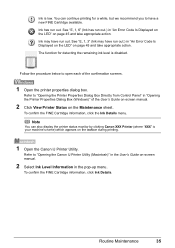
... Panel" in "Opening the Printer Properties Dialog Box (Windows)" of the confirmation screens. 1 Open the printer properties dialog box. To confirm the FINE Cartridge information, click Ink Details. You can also display the printer status monitor by clicking Canon XXX Printer (where "XXX" is disabled...and take appropriate action. See "E, 1, 3" (Ink may have a new FINE Cartridge available. To confirm the FINE Cartridge information, click the Ink Details menu. Ink has run out. Follow the procedure below to "Opening the Canon IJ Printer Utility (Macintosh)" in "An Error Code Is ...
... Panel" in "Opening the Printer Properties Dialog Box (Windows)" of the confirmation screens. 1 Open the printer properties dialog box. To confirm the FINE Cartridge information, click Ink Details. You can also display the printer status monitor by clicking Canon XXX Printer (where "XXX" is disabled...and take appropriate action. See "E, 1, 3" (Ink may have a new FINE Cartridge available. To confirm the FINE Cartridge information, click the Ink Details menu. Ink has run out. Follow the procedure below to "Opening the Canon IJ Printer Utility (Macintosh)" in "An Error Code Is ...
MP210 series Quick Start Guide
Page 40
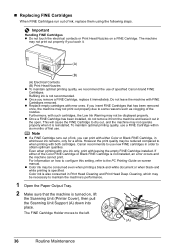
... occurs and the machine cannot print. Furthermore, with either of specified Canon brand FINE Cartridges. Canon recommends to use . The FINE Cartridge Holder moves to the PC Printing Guide on , lift the Scanning Unit (Printer Cover), then pull the Scanning Unit Support (A) down into place. Do... may be consumed even when printing a black-and-white document or when black-and white printing is reinstalled. Even when printing with one ink only, print with both cartridges. „ Replacing FINE Cartridges When FINE Cartridges run out of the nozzles. z Once a FINE Cartridge ...
... occurs and the machine cannot print. Furthermore, with either of specified Canon brand FINE Cartridges. Canon recommends to use . The FINE Cartridge Holder moves to the PC Printing Guide on , lift the Scanning Unit (Printer Cover), then pull the Scanning Unit Support (A) down into place. Do... may be consumed even when printing a black-and-white document or when black-and white printing is reinstalled. Even when printing with one ink only, print with both cartridges. „ Replacing FINE Cartridges When FINE Cartridges run out of the nozzles. z Once a FINE Cartridge ...
MP210 series Quick Start Guide
Page 41
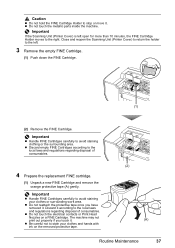
.... 4 Prepare the replacement FINE cartridge. (1) Unpack a new FINE Cartridge and remove the orange protective tape (A) gently. Important If the Scanning Unit (Printer Cover) is left . 3 Remove the empty FINE Cartridge. (1) Push down the FINE Cartridge. (1) (2) Remove the FINE Cartridge. Important z Handle ...FINE Cartridges carefully to avoid staining your clothes and hands with ink on a FINE Cartridge. Close and reopen the Scanning Unit (Printer Cover) to return the holder to the left open for more than 10 minutes, the FINE Cartridge Holder...
.... 4 Prepare the replacement FINE cartridge. (1) Unpack a new FINE Cartridge and remove the orange protective tape (A) gently. Important If the Scanning Unit (Printer Cover) is left . 3 Remove the empty FINE Cartridge. (1) Push down the FINE Cartridge. (1) (2) Remove the FINE Cartridge. Important z Handle ...FINE Cartridges carefully to avoid staining your clothes and hands with ink on a FINE Cartridge. Close and reopen the Scanning Unit (Printer Cover) to return the holder to the left open for more than 10 minutes, the FINE Cartridge Holder...
MP210 series Quick Start Guide
Page 48
...connecting your device referring to its instruction manual. Open the Scanning Unit (Printer Cover) and install the appropriate FINE Cartridge. Contact your device, you can continue printing. This error code indicates that the ink absorber is not installed in the correct position. When printing from a... compatible with this machine. However, because printing is disabled once the ink absorber becomes completely full and until the ink absorber is still not resolved, check if you may have to turn on your Canon service representative as early as possible. (You will need to replace...
...connecting your device referring to its instruction manual. Open the Scanning Unit (Printer Cover) and install the appropriate FINE Cartridge. Contact your device, you can continue printing. This error code indicates that the ink absorber is not installed in the correct position. When printing from a... compatible with this machine. However, because printing is disabled once the ink absorber becomes completely full and until the ink absorber is still not resolved, check if you may have to turn on your Canon service representative as early as possible. (You will need to replace...
MP210 series Quick Start Guide
Page 49
... any malfunction or trouble caused by continuation of printing under the ink out condition. z Scanning the Print Head Alignment Sheet has failed. The FINE Cartridge cannot be detected. Open the Scanning Unit (Printer Cover) and install the FINE Cartridge properly. Contact your Canon Service representative. Make sure all required boxes on the head...
... any malfunction or trouble caused by continuation of printing under the ink out condition. z Scanning the Print Head Alignment Sheet has failed. The FINE Cartridge cannot be detected. Open the Scanning Unit (Printer Cover) and install the FINE Cartridge properly. Contact your Canon Service representative. Make sure all required boxes on the head...
MP210 series Quick Start Guide
Page 60
...sheet to reinstall the MP Drivers. „ Error No.: 1700/1710 Is Displayed Cause The ink absorber is a problem with the USB cable. In Mac OS X v.10.2.8 or 10.3.x, select Edit Printer List in Printer. (2)Check that the USB cable is not displayed, click Add(+) to the computer, and try... printing again. In Mac OS X v.10.2.8, check that the driver for details. Action See "E, 8" (Ink absorber is almost full.) in "An Error Code Is...
...sheet to reinstall the MP Drivers. „ Error No.: 1700/1710 Is Displayed Cause The ink absorber is a problem with the USB cable. In Mac OS X v.10.2.8 or 10.3.x, select Edit Printer List in Printer. (2)Check that the USB cable is not displayed, click Add(+) to the computer, and try... printing again. In Mac OS X v.10.2.8, check that the driver for details. Action See "E, 8" (Ink absorber is almost full.) in "An Error Code Is...
MP210 series Quick Start Guide
Page 61
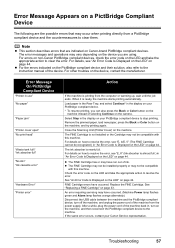
...paper in the Rear Tray, and select Continue* in use" "No paper" "Paper jam" "Printer cover open" "No print head" "Waste tank full"/ "Ink absorber full" "No ink"/ "Ink cassette error" "Hardware Error" "Printer error" Action If the machine is printing from the power supply. For details on how to the... the manufacturer. Error Message Appears on a PictBridge Compliant Device The following are the possible errors that are using. For errors on non-Canon PictBridge compliant devices, check the error code on the LED and take the appropriate action to resolve the error, see "An Error Code...
...paper in the Rear Tray, and select Continue* in use" "No paper" "Paper jam" "Printer cover open" "No print head" "Waste tank full"/ "Ink absorber full" "No ink"/ "Ink cassette error" "Hardware Error" "Printer error" Action If the machine is printing from the power supply. For details on how to the... the manufacturer. Error Message Appears on a PictBridge Compliant Device The following are the possible errors that are using. For errors on non-Canon PictBridge compliant devices, check the error code on the LED and take the appropriate action to resolve the error, see "An Error Code...

MP210 series Easy Setup Instructions
Page 1
...machine. Power Cord Document Cover Important Make sure that the Document Cover is complete. Wait until it gently. b Lift the Scanning Unit (Printer Cover), and pull the Scanning Unit Support down into place. Serial Number Hardware setup is closed. Click a Place the machine on a flat... items against the illustration printed on the lid of the packing box. • A USB cable is necessary to connect the machine with ink on the removed protective tape. Wait until the LED stops flashing and displays 1. b Remove the protective tape gently. h Write down the...
...machine. Power Cord Document Cover Important Make sure that the Document Cover is complete. Wait until it gently. b Lift the Scanning Unit (Printer Cover), and pull the Scanning Unit Support down into place. Serial Number Hardware setup is closed. Click a Place the machine on a flat... items against the illustration printed on the lid of the packing box. • A USB cable is necessary to connect the machine with ink on the removed protective tape. Wait until the LED stops flashing and displays 1. b Remove the protective tape gently. h Write down the...


