
Operation Manual
Page 2
... aux appareils numerigues(de la classe B)prescrites dans le Reglement sur le brouillage radioelectrigue edicte par le ministere des Communications du Canada." Before using the copier, please be sure to read this manual nearby so you can always refer to it when you need to Use This Manual This manual is...
... aux appareils numerigues(de la classe B)prescrites dans le Reglement sur le brouillage radioelectrigue edicte par le ministere des Communications du Canada." Before using the copier, please be sure to read this manual nearby so you can always refer to it when you need to Use This Manual This manual is...

Operation Manual
Page 3
CONTENTS Parts and Controls Precautions Before Use Precautions on handling the copier Installation environment Consumables Installation procedures Transporting the copier 1 Basic Operating Procedure Putting paper into the cassette Making copies Copying thick books or large originals [ How to Utilize Various Functions Adjusting the copy density ...
CONTENTS Parts and Controls Precautions Before Use Precautions on handling the copier Installation environment Consumables Installation procedures Transporting the copier 1 Basic Operating Procedure Putting paper into the cassette Making copies Copying thick books or large originals [ How to Utilize Various Functions Adjusting the copy density ...
Operation Manual
Page 4
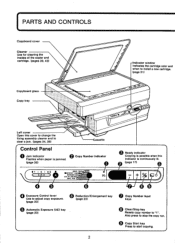
PARTS AND CONTROLS Copyboard cover Cleaner Use for cleaning the insides of the copier and cartridge. (pages 39, 43) Copyboard glass Copy tray -Indicator window Indicates the cartridge color and when to Install a new cartridge. (page 31) Left cover ...
PARTS AND CONTROLS Copyboard cover Cleaner Use for cleaning the insides of the copier and cartridge. (pages 39, 43) Copyboard glass Copy tray -Indicator window Indicates the cartridge color and when to Install a new cartridge. (page 31) Left cover ...

Operation Manual
Page 5
Cartridge Manual feed guide Slide the guides to adjust them to install a new cartridge. • Cartridge color indicator Corona assembly cleaning groove cV„ • Tab 3 Power switch Power cord connector Right cover Manual feed tray Cartridge status indicator This Indicates when to the size of the copy paper. (page 16) Cartridge -siwr O .e.et'es; Gray lever Lift this lever to open the copier.
Cartridge Manual feed guide Slide the guides to adjust them to install a new cartridge. • Cartridge color indicator Corona assembly cleaning groove cV„ • Tab 3 Power switch Power cord connector Right cover Manual feed tray Cartridge status indicator This Indicates when to the size of the copy paper. (page 16) Cartridge -siwr O .e.et'es; Gray lever Lift this lever to open the copier.
Operation Manual
Page 8
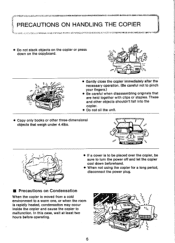
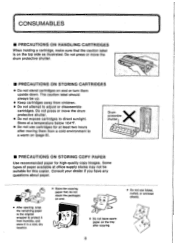
... originals that weigh under 4.41bs. -err 0 • If a cover is to be placed over the copier, be sure to turn the power off and let the copier cool down beforehand. • When not using the copier for a long period, disconnect the power plug. 0 II Precautions on Condensation When the...one, or when the room is rapidly heated, condensation may occur inside the copier and cause the copier to " o malfunction. In this case, wait at least two hours before operating. These and other objects shouldn't fall into the copier. • Do not oil the unit. • Copy only books or...
... originals that weigh under 4.41bs. -err 0 • If a cover is to be placed over the copier, be sure to turn the power off and let the copier cool down beforehand. • When not using the copier for a long period, disconnect the power plug. 0 II Precautions on Condensation When the...one, or when the room is rapidly heated, condensation may occur inside the copier and cause the copier to " o malfunction. In this case, wait at least two hours before operating. These and other objects shouldn't fall into the copier. • Do not oil the unit. • Copy only books or...
Operation Manual
Page 9
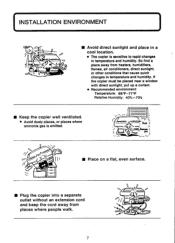
...from heaters, humidifiers, flames, air conditioners, direct sunlight, or other conditions that cause quick changes in temperature and humidity. If the copier must be placed near a window with direct sunlight, put up a curtain. • Recommended environment Temperature: 68T-770F Relative Humidity: ...40%-70% • Keep the copier well ventilated. • Avoid dusty places, or places where ammonia gas is sensitive to rapid changes in temperature and humidity. INSTALLATION ...
...from heaters, humidifiers, flames, air conditioners, direct sunlight, or other conditions that cause quick changes in temperature and humidity. If the copier must be placed near a window with direct sunlight, put up a curtain. • Recommended environment Temperature: 68T-770F Relative Humidity: ...40%-70% • Keep the copier well ventilated. • Avoid dusty places, or places where ammonia gas is sensitive to rapid changes in temperature and humidity. INSTALLATION ...
Operation Manual
Page 10
... tray after moving them upside down. Some types of paper available at least two hours 'Al after copying. 8 • Do not use cartridges for this copier. The caution label should always be suitable for at office supply stores may not be up. • Keep cartridges away from humidity, and store it...
... tray after moving them upside down. Some types of paper available at least two hours 'Al after copying. 8 • Do not use cartridges for this copier. The caution label should always be suitable for at office supply stores may not be up. • Keep cartridges away from humidity, and store it...
Operation Manual
Page 11
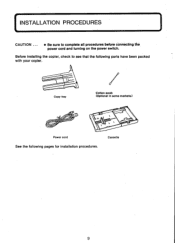
Copy tray Cotton swab (Optional In some markets.) Power cord See the following parts have been packed with your copier. Before installing the copier, check to complete all procedures before connecting the power cord and turning on the power switch. Cassette 9 ( INSTALLATION PROCEDURES CAUTION ... • Be sure to see that the following pages for installation procedures.
Copy tray Cotton swab (Optional In some markets.) Power cord See the following parts have been packed with your copier. Before installing the copier, check to complete all procedures before connecting the power cord and turning on the power switch. Cassette 9 ( INSTALLATION PROCEDURES CAUTION ... • Be sure to see that the following pages for installation procedures.

Operation Manual
Page 12
...Is face up. Do not press or move the Drum Protective Shutter. (Please see page 83 Lift the copier (in its outer bag in its sealed bag) out of the box, then remove the bag. If ...it Is packed separately, remove 111 it from the copier. 1. Now you are ready to a warm room, wait at least two hours before O removing the spacers. Lift... In the cartridge, peel the tape and remove the two black sheets from forming inside the copier. I Unpack the opier. Hold the cartridge horizontally and turn It gently 90° In both directions several...
...Is face up. Do not press or move the Drum Protective Shutter. (Please see page 83 Lift the copier (in its outer bag in its sealed bag) out of the box, then remove the bag. If ...it Is packed separately, remove 111 it from the copier. 1. Now you are ready to a warm room, wait at least two hours before O removing the spacers. Lift... In the cartridge, peel the tape and remove the two black sheets from forming inside the copier. I Unpack the opier. Hold the cartridge horizontally and turn It gently 90° In both directions several...
Operation Manual
Page 13
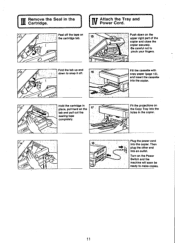
... fingers. Fill the cassette with copy paper (page 15), and insert the cassette Into the copier. Then plug the other end Into an outlet. Fit the projections on the upper right part of the copier and close the copier securely. Push down to snap it off the tape on the cartridge tab. 5 Fold... the tab up and down on the Copy Tray into the copier. W Remove the Seal in the...
... fingers. Fill the cassette with copy paper (page 15), and insert the cassette Into the copier. Then plug the other end Into an outlet. Fit the projections on the upper right part of the copier and close the copier securely. Push down to snap it off the tape on the cartridge tab. 5 Fold... the tab up and down on the Copy Tray into the copier. W Remove the Seal in the...
Operation Manual
Page 14
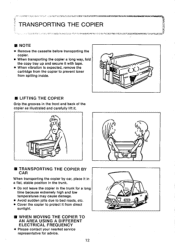
... in the trunk for advice. 12 't a' -.-"'3:97TITAW4fr22410ita1takIrRIV7titir.711:447I1:16trtaal&COPOIWMPIth TRANSPORTING THE COPIER ■ NOTE • Remove the cassette before transporting the copier. • When transporting the copier a long way, fold the copy tray up and secure it with tape. • ...When vibration is expected, remove the cartridge from the copier to prevent toner from direct sunlight. • WHEN MOVING THE COPIER TO AN AREA USING A DIFFERENT ELECTRICAL FREQUENCY • Please contact your nearest service representative for ...
... in the trunk for advice. 12 't a' -.-"'3:97TITAW4fr22410ita1takIrRIV7titir.711:447I1:16trtaal&COPOIWMPIth TRANSPORTING THE COPIER ■ NOTE • Remove the cassette before transporting the copier. • When transporting the copier a long way, fold the copy tray up and secure it with tape. • ...When vibration is expected, remove the cartridge from the copier to prevent toner from direct sunlight. • WHEN MOVING THE COPIER TO AN AREA USING A DIFFERENT ELECTRICAL FREQUENCY • Please contact your nearest service representative for ...

Operation Manual
Page 17
... the stack in the cassette and tap it stops. • If the copy paper comes out curled at the edges or gets jammed in the copier, turn over the paper in the cassette. 15 Insert the cassette until it towards the back paper guide as shown. • If necessary, readjust the...
... the stack in the cassette and tap it stops. • If the copy paper comes out curled at the edges or gets jammed in the copier, turn over the paper in the cassette. 15 Insert the cassette until it towards the back paper guide as shown. • If necessary, readjust the...
Operation Manual
Page 18
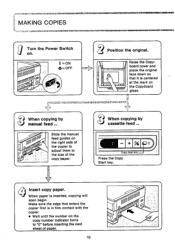
...on . Press the Copy Start key. When copying by manual feed ... Raise the Copyboard cover and place the original face down so that enters the copier first is inserted, copying will soon begin. Make sure the edge that it Is centered at the mark on the copy number indicator turns to... .0" the size of paper. 16 Insert copy paper. When paper is in firm contact with the copier. • Wait until the number on 080 the Copyboard glass. @ When copying by cassette feed ... 17 o Copy Start koy--. MAKING COPIES Turn the Power ...
...on . Press the Copy Start key. When copying by manual feed ... Raise the Copyboard cover and place the original face down so that enters the copier first is inserted, copying will soon begin. Make sure the edge that it Is centered at the mark on the copy number indicator turns to... .0" the size of paper. 16 Insert copy paper. When paper is in firm contact with the copier. • Wait until the number on 080 the Copyboard glass. @ When copying by cassette feed ... 17 o Copy Start koy--. MAKING COPIES Turn the Power ...
Operation Manual
Page 19
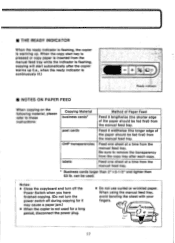
...the paper should be fed first) from the manual feed tray. I 0 17 ■ THE READY INDICATOR When the ready indicator is flashing, the copier is warming up (i.e., when the ready indicator is continuously lit.) Co Ready Indicator ■ NOTES ON PAPER FEED When copying on the following material,... please refer to remove the transparency from the copy tray after the copier warms up . Be sure to these instructions: Copying Material business cards* Method of Paper Feed Feed it may cause a paper jam.) •...
...the paper should be fed first) from the manual feed tray. I 0 17 ■ THE READY INDICATOR When the ready indicator is flashing, the copier is warming up (i.e., when the ready indicator is continuously lit.) Co Ready Indicator ■ NOTES ON PAPER FEED When copying on the following material,... please refer to remove the transparency from the copy tray after the copier warms up . Be sure to these instructions: Copying Material business cards* Method of Paper Feed Feed it may cause a paper jam.) •...
Operation Manual
Page 22
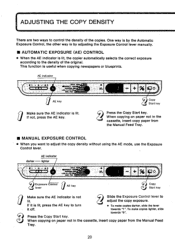
... Indicator darker - Wir.sittn Exposure Control lever AE key 3 Copy Start key Make sure the AE indicator is lit. towards "9". This function is lit, the copier automatically selects the correct exposure according to the density of the copies. lighter (1 • se • eg aligns sir®; When copying on paper not...
... Indicator darker - Wir.sittn Exposure Control lever AE key 3 Copy Start key Make sure the AE indicator is lit. towards "9". This function is lit, the copier automatically selects the correct exposure according to the density of the copies. lighter (1 • se • eg aligns sir®; When copying on paper not...
Operation Manual
Page 23
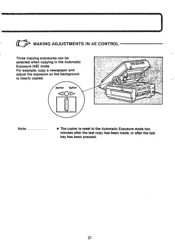
For example, copy a newspaper and adjust the exposure so the background is clearly copied. 111 darker lighter 0 MAKING ADJUSTMENTS IN AE CONTROL Three copying exposures can be selected when copying in the Automatic Exposure (AE) mode.
For example, copy a newspaper and adjust the exposure so the background is clearly copied. 111 darker lighter 0 MAKING ADJUSTMENTS IN AE CONTROL Three copying exposures can be selected when copying in the Automatic Exposure (AE) mode.
Operation Manual
Page 24
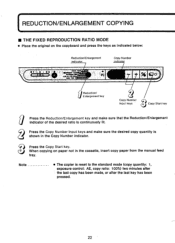
.../Enlargement key and make sure the desired copy quantity is shown in the cassette, insert copy paper from the manual feed tray. Note • The copier is continuously lit. ( REDUCTION/ENLARGEMENT COPYING ■ THE FIXED REPRODUCTION RATIO MODE • Place the original on paper not in the Copy Number indicator...
.../Enlargement key and make sure the desired copy quantity is shown in the cassette, insert copy paper from the manual feed tray. Note • The copier is continuously lit. ( REDUCTION/ENLARGEMENT COPYING ■ THE FIXED REPRODUCTION RATIO MODE • Place the original on paper not in the Copy Number indicator...
Operation Manual
Page 30
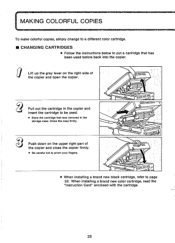
Pull out the cartridge in the copier and insert the cartridge to put a cartridge that has been used . • Store the cartridge that was removed in the storage case. MAKING COLORFUL COPIES ... • Follow the instructions below to be used before back into the copier. Lift up the gray lever on the upper right part of the copier and open the copier. Push down on the right side of the copier and close the copier firmly. • Be careful not to pinch your fingers. 1/1/1////////////011/ 111 •...
Pull out the cartridge in the copier and insert the cartridge to put a cartridge that has been used . • Store the cartridge that was removed in the storage case. MAKING COLORFUL COPIES ... • Follow the instructions below to be used before back into the copier. Lift up the gray lever on the upper right part of the copier and open the copier. Push down on the right side of the copier and close the copier firmly. • Be careful not to pinch your fingers. 1/1/1////////////011/ 111 •...

Operation Manual
Page 32
...Iwo colors) 30 Make the copy. (Black copy) ight-blue cartridge Pull the black cartridge out of the copier and insert the light-blue a 4 cartridge into it. 0 (Original for light-blue) Place the original for... Feed Tray with the copy side faceup and insert it into the copier. MAKING COLORFUL COPIES • MAKING COLOR COPIES (Example: Black and light-blue copy) Insert the black cartridge ...into the copier. • By following the procedures above, copies in three colors can be made . Black...
...Iwo colors) 30 Make the copy. (Black copy) ight-blue cartridge Pull the black cartridge out of the copier and insert the light-blue a 4 cartridge into it. 0 (Original for light-blue) Place the original for... Feed Tray with the copy side faceup and insert it into the copier. MAKING COLORFUL COPIES • MAKING COLOR COPIES (Example: Black and light-blue copy) Insert the black cartridge ...into the copier. • By following the procedures above, copies in three colors can be made . Black...
Operation Manual
Page 34
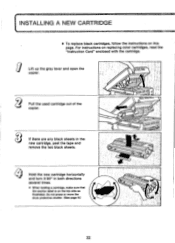
... press or move the drum protective shutter. (See page 8.) ////////// //////1 111 32 Pull the used cartridge out of the copier. For instructions on this page. Lift up the gray lever and open the copier. Hold the new cartridge horizontally and turn it 90° in the new cartridge, peel the tape and remove...
... press or move the drum protective shutter. (See page 8.) ////////// //////1 111 32 Pull the used cartridge out of the copier. For instructions on this page. Lift up the gray lever and open the copier. Hold the new cartridge horizontally and turn it 90° in the new cartridge, peel the tape and remove...


