

Operation Manual
Page 3
... copies/copies are completely dark 42 White stripes appear on copies/parts of copies are faint 44 If troubleshooting fails after all operations 46 Weekly Cleaning 48 Specifications 49 1
... copies/copies are completely dark 42 White stripes appear on copies/parts of copies are faint 44 If troubleshooting fails after all operations 46 Weekly Cleaning 48 Specifications 49 1
Operation Manual
Page 4
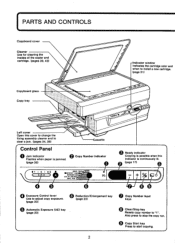
O Copy Start key Press to stop the copy run. Also press to start copying. 2 PARTS AND CONTROLS Copyboard cover Cleaner Use for cleaning the insides of the copier and cartridge. (pages 39, 43) Copyboard glass Copy tray -Indicator window Indicates the cartridge color and when to Install a new ...
O Copy Start key Press to stop the copy run. Also press to start copying. 2 PARTS AND CONTROLS Copyboard cover Cleaner Use for cleaning the insides of the copier and cartridge. (pages 39, 43) Copyboard glass Copy tray -Indicator window Indicates the cartridge color and when to Install a new ...

Operation Manual
Page 5
Power switch Power cord connector Right cover Manual feed tray Cartridge status indicator This Indicates when to open the copier. Gray lever Lift this lever to install a new cartridge. • Cartridge color indicator Corona assembly cleaning groove cV„ • Tab 3 Cartridge Manual feed guide Slide the guides to adjust them to the size of the copy paper. (page 16) Cartridge -siwr O .e.et'es;
Power switch Power cord connector Right cover Manual feed tray Cartridge status indicator This Indicates when to open the copier. Gray lever Lift this lever to install a new cartridge. • Cartridge color indicator Corona assembly cleaning groove cV„ • Tab 3 Cartridge Manual feed guide Slide the guides to adjust them to the size of the copy paper. (page 16) Cartridge -siwr O .e.et'es;
Operation Manual
Page 40
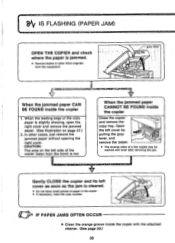
... cleared. • Do not leave small pieces of paper in the copier. • If necessary, reset the copy number. 0 IF PAPER JAMS OFTEN OCCUR • Clean the orange groove Inside the copier with toner after removing the jam. In other thick originals from the front) is slightly showing, open the right...
... cleared. • Do not leave small pieces of paper in the copier. • If necessary, reset the copy number. 0 IF PAPER JAMS OFTEN OCCUR • Clean the orange groove Inside the copier with toner after removing the jam. In other thick originals from the front) is slightly showing, open the right...

Operation Manual
Page 41
Gently close the copier as soon as cleaning is finished. 39 Mat • CLEANING THE ORANGE GROOVE for orange groove t Cleaner storage location t Cleaner CAUTION • Turn the power switch off and disconnect the power plug before performing the following operations. Using the brush on the tip of the cleaner, sweep out the dust from the orange groove inside the copier.
Gently close the copier as soon as cleaning is finished. 39 Mat • CLEANING THE ORANGE GROOVE for orange groove t Cleaner storage location t Cleaner CAUTION • Turn the power switch off and disconnect the power plug before performing the following operations. Using the brush on the tip of the cleaner, sweep out the dust from the orange groove inside the copier.

Operation Manual
Page 44
( DARK STRIPES APPEAR ON COPIES/COPIES ARE COMPLETELY DARK Wipe the DUSTPROOF GLASS with the attached cleaner. (See page 43.) Clean the CORONA WIRE OF THE CARTRIDGE. (See page 43.) Cleaner storage location or dustproof glass for corona wire WHEN CLEAR COPIES CANNOT BE MADE AFTER THE ABOVE OPERATIONS ARE PERFORMED • Is there condensation on the inside of the copier? (See page 6.) 42
( DARK STRIPES APPEAR ON COPIES/COPIES ARE COMPLETELY DARK Wipe the DUSTPROOF GLASS with the attached cleaner. (See page 43.) Clean the CORONA WIRE OF THE CARTRIDGE. (See page 43.) Cleaner storage location or dustproof glass for corona wire WHEN CLEAR COPIES CANNOT BE MADE AFTER THE ABOVE OPERATIONS ARE PERFORMED • Is there condensation on the inside of the copier? (See page 6.) 42

Operation Manual
Page 45
III CLEANING THE CORONA WIRE OF THE CARTRIDGE z Insert the tip of blue arrow, slide the cleaner from end to end several times. While pressing the cleaner ... cleaner completely into the cartridge slot. • CAUTION • Turn the power switch off and disconnect the power plug before performing the following operations. ■ CLEANING THE DUSTPROOF GLASS GPI C Lift up the gray lever and open the copier. 11' Pull out the cartridge. ofiera„,„40, Place the cleaner...
III CLEANING THE CORONA WIRE OF THE CARTRIDGE z Insert the tip of blue arrow, slide the cleaner from end to end several times. While pressing the cleaner ... cleaner completely into the cartridge slot. • CAUTION • Turn the power switch off and disconnect the power plug before performing the following operations. ■ CLEANING THE DUSTPROOF GLASS GPI C Lift up the gray lever and open the copier. 11' Pull out the cartridge. ofiera„,„40, Place the cleaner...

Operation Manual
Page 46
... with every new black cartridge. (See page 34.) If the indicator is a normal occurrence after replacing the cartridge. If troubleshooting fails after the above operations, clean the INSIDE OF THE COPIER (see the Indicator on the first copies Immediately after cartridge changes. IWHITE STRIPES APPEAR ON COPIES/PARTS OF COPIES ARE... may become faint or the image will not be sure to red. A new fixing assembly cleaner comes with a new cartridge. This is GREEN or YELLOW Clean the corona wire of the cartridge.
... with every new black cartridge. (See page 34.) If the indicator is a normal occurrence after replacing the cartridge. If troubleshooting fails after the above operations, clean the INSIDE OF THE COPIER (see the Indicator on the first copies Immediately after cartridge changes. IWHITE STRIPES APPEAR ON COPIES/PARTS OF COPIES ARE... may become faint or the image will not be sure to red. A new fixing assembly cleaner comes with a new cartridge. This is GREEN or YELLOW Clean the corona wire of the cartridge.

Operation Manual
Page 47
c VI O Gently move the cotton swab (included with a damp cloth. wire Rg metallisplate Gently close the copier as soon as cleaning is finished. ° 45 Be careful not to the metallic plate. Clean the metallic plate with each cartridge) up the gray lever and open the copier. ■ CLEANING THE INSIDE OF THE COPIER CAUTION • Turn the power switch off and disconnect the power plug before performing the following operation. Next, slide the swab along the left edge of -the metallic plate. Lift up and down the thin wire, parallel to break this wire.
c VI O Gently move the cotton swab (included with a damp cloth. wire Rg metallisplate Gently close the copier as soon as cleaning is finished. ° 45 Be careful not to the metallic plate. Clean the metallic plate with each cartridge) up the gray lever and open the copier. ■ CLEANING THE INSIDE OF THE COPIER CAUTION • Turn the power switch off and disconnect the power plug before performing the following operation. Next, slide the swab along the left edge of -the metallic plate. Lift up and down the thin wire, parallel to break this wire.
Operation Manual
Page 50
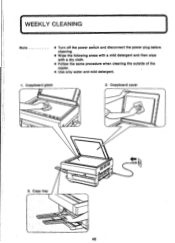
Copyboard glasS 2. ( WEEKLY CLEANING Note • Turn off the power switch and disconnect the power plug before cleaning. • Wipe the following areas with a mild detergent and then wipe with a dry cloth. • Follow the same procedure when cleaning the outside of the copier. • Use only water and mild detergent. 1. Copyboard cover 0 3. Copy tray F m 48
Copyboard glasS 2. ( WEEKLY CLEANING Note • Turn off the power switch and disconnect the power plug before cleaning. • Wipe the following areas with a mild detergent and then wipe with a dry cloth. • Follow the same procedure when cleaning the outside of the copier. • Use only water and mild detergent. 1. Copyboard cover 0 3. Copy tray F m 48


