DV NETWORK SOLUTION DISK Ver.2 Software Instruction Manual
Page 7
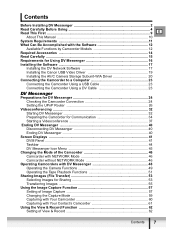
... This Manual 10 System Requirements 11 What Can Be Accomplished with the Software 12 Available Functions by Camcorder Models ...Canon USB Video Driver 19 Installing the AV/C Camera Storage Subunit-WIA Driver 20 Connecting the Camcorder to a Computer 23 Connecting the Camcorder Using a USB Cable 23 Connecting the Camcorder...40 Disconnecting DV Messenger 40 Ending DV Messenger 40 Screen Displays ...41 DVM Panel ...41 Taskbar ...44 DV Messenger Icon Menu 45 Changing the Mode of the Camcorder 46 Camcorder with NETWORK Mode 46 Camcorder without NETWORK Mode 46 Operating Camcorders...
... This Manual 10 System Requirements 11 What Can Be Accomplished with the Software 12 Available Functions by Camcorder Models ...Canon USB Video Driver 19 Installing the AV/C Camera Storage Subunit-WIA Driver 20 Connecting the Camcorder to a Computer 23 Connecting the Camcorder Using a USB Cable 23 Connecting the Camcorder...40 Disconnecting DV Messenger 40 Ending DV Messenger 40 Screen Displays ...41 DVM Panel ...41 Taskbar ...44 DV Messenger Icon Menu 45 Changing the Mode of the Camcorder 46 Camcorder with NETWORK Mode 46 Camcorder without NETWORK Mode 46 Operating Camcorders...

DV NETWORK SOLUTION DISK Ver.2 Software Instruction Manual
Page 10
...to the computer for playing back video and sound recorded on a memory card. - Camcorder with the NETWORK mode on the POWER switch of camcorders are described as "DV Messenger". • In this manual may change. 10 Read This First PLAY (VCR) mode: Mode for using DV Messenger. •... The explanations in this manual refer to the instructions in parenthesis (Camcorder without NETWORK mode • Please...
...to the computer for playing back video and sound recorded on a memory card. - Camcorder with the NETWORK mode on the POWER switch of camcorders are described as "DV Messenger". • In this manual may change. 10 Read This First PLAY (VCR) mode: Mode for using DV Messenger. •... The explanations in this manual refer to the instructions in parenthesis (Camcorder without NETWORK mode • Please...

DV NETWORK SOLUTION DISK Ver.2 Software Instruction Manual
Page 50
Click here to zoom out to zoom out (the subject becomes smaller). Switches between auto focus and manual focus. (Manual focus cannot be selected when a camcorder without NETWORK mode is set to autofocus for about 10 seconds. „ The [CAMERA] Operating Buttons 1 Zoom to wide-angle 2 Zoom to telephoto 3 Wide End 4 Tele End 5 Focus 6 Focus...
Click here to zoom out to zoom out (the subject becomes smaller). Switches between auto focus and manual focus. (Manual focus cannot be selected when a camcorder without NETWORK mode is set to autofocus for about 10 seconds. „ The [CAMERA] Operating Buttons 1 Zoom to wide-angle 2 Zoom to telephoto 3 Wide End 4 Tele End 5 Focus 6 Focus...
DV NETWORK SOLUTION DISK Ver.2 Software Instruction Manual
Page 65
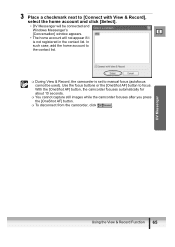
... • The home account will not appear if it is set to manual focus (autofocus cannot be used). Use the focus buttons or the [OneShot AF] button to the contact list. During View & Record, the camcorder is not registered in the contact list. DV Messenger Using the View ...& Record Function 65 In such case, add the home account to focus. With the [OneShot AF] button, the camcorder focuses automatically for about 10 seconds. You cannot capture still images while the camcorder focuses after you press the [OneShot AF] button. To disconnect from the...
... • The home account will not appear if it is set to manual focus (autofocus cannot be used). Use the focus buttons or the [OneShot AF] button to the contact list. During View & Record, the camcorder is not registered in the contact list. DV Messenger Using the View ...& Record Function 65 In such case, add the home account to focus. With the [OneShot AF] button, the camcorder focuses automatically for about 10 seconds. You cannot capture still images while the camcorder focuses after you press the [OneShot AF] button. To disconnect from the...
OPTURA40 OPTURA30 Instruction Manual
Page 3
... the plug. 5. If you are not sure of the type of antenna discharge unit, connection to insert the plug followed. Unplug this manual. The product should be walked on the product and in this product from 7. Power Cord Protection - should be read before cleaning. Outdoor...word "product" 10. for the grounding electrode. All operating and power outlet only one blade wider than the other sources of the polarized plug. This is operated. use this manual. 12. They may cause the product and cart combination to the Canon Digital Video Camcorder Power Adapter should...
... the plug. 5. If you are not sure of the type of antenna discharge unit, connection to insert the plug followed. Unplug this manual. The product should be walked on the product and in this product from 7. Power Cord Protection - should be read before cleaning. Outdoor...word "product" 10. for the grounding electrode. All operating and power outlet only one blade wider than the other sources of the polarized plug. This is operated. use this manual. 12. They may cause the product and cart combination to the Canon Digital Video Camcorder Power Adapter should...
OPTURA40 OPTURA30 Instruction Manual
Page 69
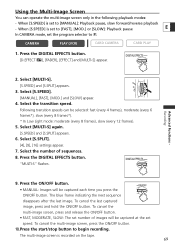
...slow forward/reverse playback - To cancel the last captured image, press and hold the ON/OFF button. Advanced Functions Recording 2. Select [S.SPEED]. [MANUAL], [FAST], [MOD.] and [SLOW] appear. 4. Select the transition speed. "MULTI-S" flashes. 9. The multi-image screen is set speed.... Select [MULTI-S]. [S.SPEED] and [S.SPLIT] appears. 3. To cancel the multi-image screen, press the ON/OFF button. 10.Press the start/stop button to Q. Press the DIGITAL EFFECTS button. CAMERA PLAY (VCR) CARD CAMERA CARD PLAY 1. Select [S.SPLIT]. [4], [9],...
...slow forward/reverse playback - To cancel the last captured image, press and hold the ON/OFF button. Advanced Functions Recording 2. Select [S.SPEED]. [MANUAL], [FAST], [MOD.] and [SLOW] appear. 4. Select the transition speed. "MULTI-S" flashes. 9. The multi-image screen is set speed.... Select [MULTI-S]. [S.SPEED] and [S.SPLIT] appears. 3. To cancel the multi-image screen, press the ON/OFF button. 10.Press the start/stop button to Q. Press the DIGITAL EFFECTS button. CAMERA PLAY (VCR) CARD CAMERA CARD PLAY 1. Select [S.SPLIT]. [4], [9],...
OPTURA40 OPTURA30 Instruction Manual
Page 111
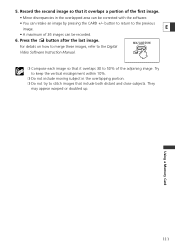
...the button after the last image. Using a Memory Card 111 For details on how to merge these images, refer to the Digital Video Software Instruction Manual. ❍ Compose each image so that it overlaps a portion of the first image. • Minor discrepancies in the overlapping portion. ❍ Do...appear warped or doubled up. Record the second image so that include both distant and close subjects. Try to keep the vertical misalignment within 10%. ❍ Do not include moving subject in the overlapped area can retake an image by pressing the CARD +/- button to return to stitch...
...the button after the last image. Using a Memory Card 111 For details on how to merge these images, refer to the Digital Video Software Instruction Manual. ❍ Compose each image so that it overlaps a portion of the first image. • Minor discrepancies in the overlapping portion. ❍ Do...appear warped or doubled up. Record the second image so that include both distant and close subjects. Try to keep the vertical misalignment within 10%. ❍ Do not include moving subject in the overlapped area can retake an image by pressing the CARD +/- button to return to stitch...
OPTURA40 OPTURA30 Instruction Manual
Page 124
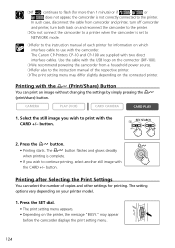
The Canon CP-Printers CP-10 and CP-100 are supplied with the CARD +/- Select the still image you wish to the printer. may differ slightly depending on which interface cable to the instruction manual of each printer for printing. The setting options vary depending on the printer, the ...(print/share) button. button. 2. ❍ If continues to flash (for more than 1 minute) or if , or does not appear, the camcorder is not correctly connected to continue printing, select another still image with the (Print/Share) Button You can select the number of copies and other...
The Canon CP-Printers CP-10 and CP-100 are supplied with the CARD +/- Select the still image you wish to the printer. may differ slightly depending on which interface cable to the instruction manual of each printer for printing. The setting options vary depending on the printer, the ...(print/share) button. button. 2. ❍ If continues to flash (for more than 1 minute) or if , or does not appear, the camcorder is not correctly connected to continue printing, select another still image with the (Print/Share) Button You can select the number of copies and other...
OPTURA40 OPTURA30 Instruction Manual
Page 160
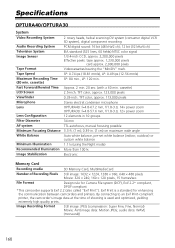
...condenser microphone OPTURA40: f=4.8-67.2 mm, f/1.8-3.0, 14× power zoom OPTURA30: f=4.8-57.6 mm, f/1.8-3.0, 12× power zoom 12 elements in 10 groups 34 mm TTL autofocus, manual focusing possible 3.3 ft. (1 m); 0.39 in. (1 cm) on maximum wide angle Auto white balance, pre-set white balance (indoor,...,000 pixels Effective pixels: tape approx. 1,230,000 pixels card approx. 2,000,000 pixels Videocassettes bearing the "MiniDV" mark. By connecting to an Exif Print-compliant printer, the camcorder's image data at the time of Recording Pixels Still image: 1632 × 1224, 1280 × 960, ...
...condenser microphone OPTURA40: f=4.8-67.2 mm, f/1.8-3.0, 14× power zoom OPTURA30: f=4.8-57.6 mm, f/1.8-3.0, 12× power zoom 12 elements in 10 groups 34 mm TTL autofocus, manual focusing possible 3.3 ft. (1 m); 0.39 in. (1 cm) on maximum wide angle Auto white balance, pre-set white balance (indoor,...,000 pixels Effective pixels: tape approx. 1,230,000 pixels card approx. 2,000,000 pixels Videocassettes bearing the "MiniDV" mark. By connecting to an Exif Print-compliant printer, the camcorder's image data at the time of Recording Pixels Still image: 1632 × 1224, 1280 × 960, ...
Digital Video Software (Macintosh) Ver.12 Instruction Manual
Page 7
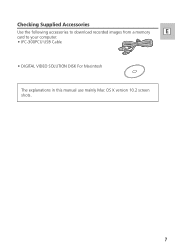
Checking Supplied Accessories Use the following accessories to download recorded images from a memory E card to your computer. • IFC-300PCU USB Cable • DIGITAL VIDEO SOLUTION DISK For Macintosh The explanations in this manual use mainly Mac OS X version 10.2 screen shots. 7
Checking Supplied Accessories Use the following accessories to download recorded images from a memory E card to your computer. • IFC-300PCU USB Cable • DIGITAL VIDEO SOLUTION DISK For Macintosh The explanations in this manual use mainly Mac OS X version 10.2 screen shots. 7
Digital Video Software (Macintosh) Ver.12 Instruction Manual
Page 19
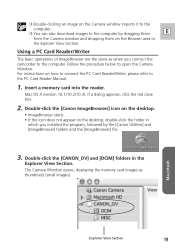
... Double-click the [CANON_DV] and [DCIM] folders in which you connect the camcorder to open the Camera Window. Insert a memory card into the reader. Macintosh Explorer View Section 19 Double-click the [Canon ImageBrowser] icon on the desktop. • ImageBrowser starts. • If the...computer. ❍ You can also download images to the computer by the [Canon Utilities] and [ImageBrowser] folders and the [ImageBrowser] file. 3. Follow the procedure below to the computer. Mac OS X (version 10.1/10.2/10.3): If a dialog appears, click the red close box. 2. For instructions on...
... Double-click the [CANON_DV] and [DCIM] folders in which you connect the camcorder to open the Camera Window. Insert a memory card into the reader. Macintosh Explorer View Section 19 Double-click the [Canon ImageBrowser] icon on the desktop. • ImageBrowser starts. • If the...computer. ❍ You can also download images to the computer by the [Canon Utilities] and [ImageBrowser] folders and the [ImageBrowser] file. 3. Follow the procedure below to the computer. Mac OS X (version 10.1/10.2/10.3): If a dialog appears, click the red close box. 2. For instructions on...

