ZoomBrowser EX 6.5 for Windows Instruction Manual
Page 5
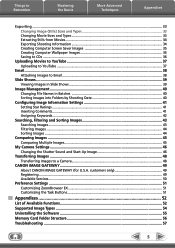
... Changing Movie Sizes and Types 33 Extracting Stills from Movies...34 Exporting Shooting Information 34 Creating Computer Screen Saver Images 35 Creating Computer Wallpaper Images 35 Saving to CDs...36 Uploading Movies to YouTube 37 Uploading to YouTube...37 Email...38 Attaching Images to Email...38 Slide Shows...39 Viewing Images in Slide Shows...39 Image Management...40 Changing File Names in Batches 40 Sorting Images into Folders by Shooting Date 40 Configuring Image Information Settings 41 Setting...
... Changing Movie Sizes and Types 33 Extracting Stills from Movies...34 Exporting Shooting Information 34 Creating Computer Screen Saver Images 35 Creating Computer Wallpaper Images 35 Saving to CDs...36 Uploading Movies to YouTube 37 Uploading to YouTube...37 Email...38 Attaching Images to Email...38 Slide Shows...39 Viewing Images in Slide Shows...39 Image Management...40 Changing File Names in Batches 40 Sorting Images into Folders by Shooting Date 40 Configuring Image Information Settings 41 Setting...
ZoomBrowser EX 6.5 for Windows Instruction Manual
Page 53
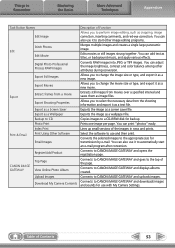
... a movie Export Shooting Properties Export as a Screen Saver Export as a Wallpaper Backup to CD Photo Print Index Print Print Using Other Software Email Images Register/Add Product CANON iMAGE GATEWAY Top Page View Online Photo Album Upload Images Download My Camera Contents Description of Function Allows you to select the necessary data from movies over a specified interval and saves them as image files. You can also use with My Camera Settings. Allows you to change the image size...
... a movie Export Shooting Properties Export as a Screen Saver Export as a Wallpaper Backup to CD Photo Print Index Print Print Using Other Software Email Images Register/Add Product CANON iMAGE GATEWAY Top Page View Online Photo Album Upload Images Download My Camera Contents Description of Function Allows you to select the necessary data from movies over a specified interval and saves them as image files. You can also use with My Camera Settings. Allows you to change the image size...

DV NETWORK SOLUTION DISK Ver.2 Software Instruction Manual
Page 53
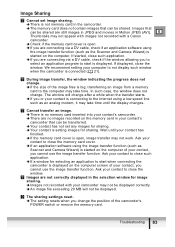
... memory card is displayed. Sharing Images (File Transfer) 53 Depending on a memory card in progress when changing the mode of your camcorder to download images. Sharing Images (File Transfer) With camcorders equipped with the NETWORK mode or file transfer function. E Image Sharing can only be installed on the Internet connection, file type or file size. When images are being transferred from your contact, the DVM panel displays a bar indicating that transfer is not in a camcorder. If the camcorder is connected using a DV cable, the AV/C Camera...
... memory card is displayed. Sharing Images (File Transfer) 53 Depending on a memory card in progress when changing the mode of your camcorder to download images. Sharing Images (File Transfer) With camcorders equipped with the NETWORK mode or file transfer function. E Image Sharing can only be installed on the Internet connection, file type or file size. When images are being transferred from your contact, the DVM panel displays a bar indicating that transfer is not in a camcorder. If the camcorder is connected using a DV cable, the AV/C Camera...
DV NETWORK SOLUTION DISK Ver.2 Software Instruction Manual
Page 83
...; Images not recorded with a Canon camcorder. Î Check if the memory card cover is open. Î If you are connecting via a DV cable, check if an application software using the image transfer function (such as the Scanner and Camera Wizard) is started on the memory card in your contact has finished. Î If the memory card cover is open, image transfer may take time until your contact's camcorder that can be shared. The sharing settings reset. Î The setting resets...
...; Images not recorded with a Canon camcorder. Î Check if the memory card cover is open. Î If you are connecting via a DV cable, check if an application software using the image transfer function (such as the Scanner and Camera Wizard) is started on the memory card in your contact has finished. Î If the memory card cover is open, image transfer may take time until your contact's camcorder that can be shared. The sharing settings reset. Î The setting resets...
DV NETWORK SOLUTION DISK Ver.2 Software Instruction Manual
Page 86
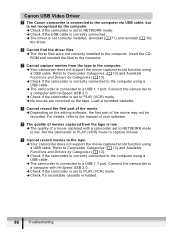
... USB cable is correctly connected. Î The driver is low. Î The quality of a movie captured with a camcorder set to PLAY (VCR) mode. Î No movies are recorded on the editing software, the first part of your software. The quality of movies captured from the tape to the computer. Î Your camcorder does not support the movie capture/record function using a USB cable. Set the camcorder to PLAY (VCR) mode to the computer. Cannot find the driver files. Î The driver files were not correctly installed to the manual...
... USB cable is correctly connected. Î The driver is low. Î The quality of a movie captured with a camcorder set to PLAY (VCR) mode. Î No movies are recorded on the editing software, the first part of your software. The quality of movies captured from the tape to the computer. Î Your camcorder does not support the movie capture/record function using a USB cable. Set the camcorder to PLAY (VCR) mode to the computer. Cannot find the driver files. Î The driver files were not correctly installed to the manual...
OPTURA40 OPTURA30 Instruction Manual
Page 6
... Camcorder 18 Using the Wireless Controller 20 Setting the Time Zone, Date and Time 21 Recording Recording Movies on a Tape 24 Zooming ...28 Tips for Making Better Videos 30 Playback Playing Back a Tape ...31 Adjusting the Volume 33 Playing Back on a TV Screen 34 Advanced Functions Menus and Settings ...37 Recording Using the Recording Programs 45 Using the Night Modes 48 Skin Detail Function...50 Adjusting Exposure Manually 51 Adjusting the Focus Manually 52 Setting the White Balance 54 Setting the Shutter Speed 56 Using the Self-Timer...58 Changing the Recording Mode...
... Camcorder 18 Using the Wireless Controller 20 Setting the Time Zone, Date and Time 21 Recording Recording Movies on a Tape 24 Zooming ...28 Tips for Making Better Videos 30 Playback Playing Back a Tape ...31 Adjusting the Volume 33 Playing Back on a TV Screen 34 Advanced Functions Menus and Settings ...37 Recording Using the Recording Programs 45 Using the Night Modes 48 Skin Detail Function...50 Adjusting Exposure Manually 51 Adjusting the Focus Manually 52 Setting the White Balance 54 Setting the Shutter Speed 56 Using the Self-Timer...58 Changing the Recording Mode...
OPTURA40 OPTURA30 Instruction Manual
Page 21
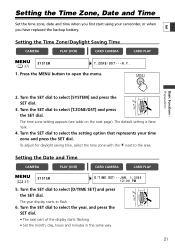
... way. 21 Turn the SET dial to flash. 6. The time zone setting appears (see table on the next page). Press the MENU button to the area. To adjust for daylight saving time, select the time zone with the U next to open the menu. Setting the Time Zone, Date and Time Set the time zone, date and time when you first start using your time zone and press the SET dial. E Setting the Time Zone/Daylight Saving Time CAMERA PLAY (VCR) CARD CAMERA CARD PLAY ( 37...
... way. 21 Turn the SET dial to flash. 6. The time zone setting appears (see table on the next page). Press the MENU button to the area. To adjust for daylight saving time, select the time zone with the U next to open the menu. Setting the Time Zone, Date and Time Set the time zone, date and time when you first start using your time zone and press the SET dial. E Setting the Time Zone/Daylight Saving Time CAMERA PLAY (VCR) CARD CAMERA CARD PLAY ( 37...

OPTURA40 OPTURA30 Instruction Manual
Page 75
... recorded consecutively. Advanced Functions Playback 75 DATA CODE SLIDE SHOW CARD DATE SEARCH ZERO SET MEMORY REW PLAY FF 12bit AUDIO OUT STOP The zero set memory and the tape will stop at that point when you wish to return to time code. Press the ZERO SET MEMORY button at "0:00:00". • The tape counter changes to later. • "0:00:00 Â" appears. • To cancel, press the ZERO SET MEMORY button again. 2. REW ` button ZERO SET MEMORY button E PLAY e button STOP 3 button CAMERA PLAY (VCR) CARD CAMERA CARD PLAY...
... recorded consecutively. Advanced Functions Playback 75 DATA CODE SLIDE SHOW CARD DATE SEARCH ZERO SET MEMORY REW PLAY FF 12bit AUDIO OUT STOP The zero set memory and the tape will stop at that point when you wish to return to time code. Press the ZERO SET MEMORY button at "0:00:00". • The tape counter changes to later. • "0:00:00 Â" appears. • To cancel, press the ZERO SET MEMORY button again. 2. REW ` button ZERO SET MEMORY button E PLAY e button STOP 3 button CAMERA PLAY (VCR) CARD CAMERA CARD PLAY...
OPTURA40 OPTURA30 Instruction Manual
Page 89
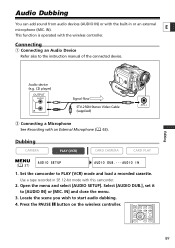
... function is operated with an External Microphone ( 63). Set the camcorder to start audio dubbing. 4. Locate the scene you wish to PLAY (VCR) mode and load a recorded cassette. Connecting q Connecting an Audio Device Refer also to [AUDIO IN] or [MIC. Editing Audio device (e.g. Use a tape recorded in or an external microphone (MIC. Open the menu and select [AUDIO SETUP]. PAUSE SLOW 2 AV DV REMOTESET 89 Audio Dubbing You can add sound from audio devices (AUDIO IN) or with the built-in SP, 12-bit mode with this camcorder. 2. Dubbing CAMERA PLAY (VCR) CARD CAMERA...
... function is operated with an External Microphone ( 63). Set the camcorder to start audio dubbing. 4. Locate the scene you wish to PLAY (VCR) mode and load a recorded cassette. Connecting q Connecting an Audio Device Refer also to [AUDIO IN] or [MIC. Editing Audio device (e.g. Use a tape recorded in or an external microphone (MIC. Open the menu and select [AUDIO SETUP]. PAUSE SLOW 2 AV DV REMOTESET 89 Audio Dubbing You can add sound from audio devices (AUDIO IN) or with the built-in SP, 12-bit mode with this camcorder. 2. Dubbing CAMERA PLAY (VCR) CARD CAMERA...
OPTURA40 OPTURA30 Instruction Manual
Page 92
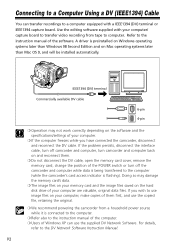
... the hard disk drive of the POWER switch or turn camcorder and computer back on Mac operating systems later than Mac OS 9, and will be installed automatically. For details, refer to the DV Network Software Instruction Manual. 92 IEEE1394 (DV) terminal Commercially available DV cable 6-pin 4-pin ❍ Operation may damage the memory card's data. ❍ The image files on your memory card and the image files saved on the software and the specifications/settings of the software. Use the editing software...
... the hard disk drive of the POWER switch or turn camcorder and computer back on Mac operating systems later than Mac OS 9, and will be installed automatically. For details, refer to the DV Network Software Instruction Manual. 92 IEEE1394 (DV) terminal Commercially available DV cable 6-pin 4-pin ❍ Operation may damage the memory card's data. ❍ The image files on your memory card and the image files saved on the software and the specifications/settings of the software. Use the editing software...
OPTURA40 OPTURA30 Instruction Manual
Page 106
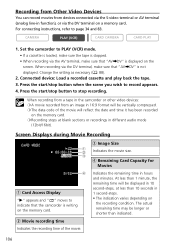
... reflect the date and time it has been recorded on the recording condition. For connecting instructions, refer to indicate that "AV \DV" is writing on a memory card. CAMERA PLAY (VCR) CARD CAMERA CARD PLAY 1. Change the setting as necessary ( 88). 2. Indicates the remaining time in function), or via the AV terminal, make sure that the camcorder is not displayed. Set the camcorder to record appears. 4. Screen Displays during Movie Recording e Image Size q w Indicates the movie size. w Movie recording time Indicates the recording time of the movie will be...
... reflect the date and time it has been recorded on the recording condition. For connecting instructions, refer to indicate that "AV \DV" is writing on a memory card. CAMERA PLAY (VCR) CARD CAMERA CARD PLAY 1. Change the setting as necessary ( 88). 2. Indicates the remaining time in function), or via the AV terminal, make sure that the camcorder is not displayed. Set the camcorder to record appears. 4. Screen Displays during Movie Recording e Image Size q w Indicates the movie size. w Movie recording time Indicates the recording time of the movie will be...
OPTURA40 OPTURA30 Instruction Manual
Page 108
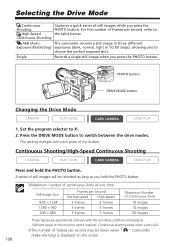
... displayed on the memory card is full. ❍ The number of frames per second, refer to choose the perfect exposed shot. Continuous Shooting AEB (Auto The camcorder records a still image in three different Exposure Bracketing) exposures (dark, normal, light in 1/2 EV steps), allowing you press the PHOTO button. Continuous shooting stops when card is required. Set the program selector to switch between the drive modes. Continuous Shooting/High-Speed Continuous Shooting CAMERA PLAY (VCR) CARD CAMERA CARD PLAY Press...
... displayed on the memory card is full. ❍ The number of frames per second, refer to choose the perfect exposed shot. Continuous Shooting AEB (Auto The camcorder records a still image in three different Exposure Bracketing) exposures (dark, normal, light in 1/2 EV steps), allowing you press the PHOTO button. Continuous shooting stops when card is required. Set the program selector to switch between the drive modes. Continuous Shooting/High-Speed Continuous Shooting CAMERA PLAY (VCR) CARD CAMERA CARD PLAY Press...
OPTURA40 OPTURA30 Instruction Manual
Page 112
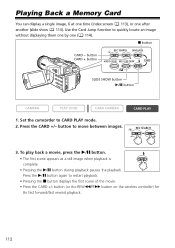
Press the CARD +/- Set the camcorder to move between images. button to CARD PLAY mode. 2. button (or the REW`/FF1 button on the wireless controller) for 8× fast forward/fast rewind playback. 112 button CARD + button SLIDE SHOW button e/a button CAMERA PLAY (VCR) CARD CAMERA 1. Press the e/a button again to quickly locate an image without displaying them one by one after another (slide show 113). Use the Card Jump function to restart playback. • Pressing the 3 button displays the first scene of the...
Press the CARD +/- Set the camcorder to move between images. button to CARD PLAY mode. 2. button (or the REW`/FF1 button on the wireless controller) for 8× fast forward/fast rewind playback. 112 button CARD + button SLIDE SHOW button e/a button CAMERA PLAY (VCR) CARD CAMERA 1. Press the e/a button again to quickly locate an image without displaying them one by one after another (slide show 113). Use the Card Jump function to restart playback. • Pressing the 3 button displays the first scene of the...

OPTURA40 OPTURA30 Instruction Manual
Page 123
... print order settings for approx. 6 seconds. 123 Set the camcorder to a printer with direct print function 1. Connect the camcorder to the printer using the cable. • appears and changes to , or when the printer is properly connected to the Camcorder Direct Printing Printer with Direct Print function. Turn on the printer. 3. You can be displayed for direct printing ( 132). Printing Still Images You can print still images by connecting the camcorder to CARD PLAY mode. 4.
... print order settings for approx. 6 seconds. 123 Set the camcorder to a printer with direct print function 1. Connect the camcorder to the printer using the cable. • appears and changes to , or when the printer is properly connected to the Camcorder Direct Printing Printer with Direct Print function. Turn on the printer. 3. You can be displayed for direct printing ( 132). Printing Still Images You can print still images by connecting the camcorder to CARD PLAY mode. 4.

OPTURA40 OPTURA30 Instruction Manual
Page 134
... Digital Video Software Instruction Manual. For details, refer to the DV Network Software Instruction Manual. 134 Otherwise, the computer may not work correctly depending on the software and the specifications/settings of your computer. ❍ The image files on your memory card and the image files saved on the hard disk drive of your computer are not connected with the standard Picture Transfer Protocol (PTP) allowing you wish to use image files on a tape cannot be transferred to a computer via USB cable...
... Digital Video Software Instruction Manual. For details, refer to the DV Network Software Instruction Manual. 134 Otherwise, the computer may not work correctly depending on the software and the specifications/settings of your computer. ❍ The image files on your memory card and the image files saved on the hard disk drive of your computer are not connected with the standard Picture Transfer Protocol (PTP) allowing you wish to use image files on a tape cannot be transferred to a computer via USB cable...
OPTURA40 OPTURA30 Instruction Manual
Page 144
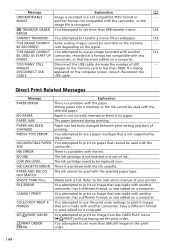
... RECORDED card depending on the memory card to less than 1800. IMAGES images on the signal. If a dialog DISCONNECT USB appeared on a computer. There is a problem with the ink cassette. There is inserted, or the ink cannot be used with the camcorder. Refer to print an image from the CARD PLAY menu [\ PRINT] without having set more than 998 transfer orders. 138 ERROR CANNOT TRANSFER! Reconnect the CABLE USB cable. Wrong paper size...
... RECORDED card depending on the memory card to less than 1800. IMAGES images on the signal. If a dialog DISCONNECT USB appeared on a computer. There is a problem with the ink cassette. There is inserted, or the ink cannot be used with the camcorder. Refer to print an image from the CARD PLAY menu [\ PRINT] without having set more than 998 transfer orders. 138 ERROR CANNOT TRANSFER! Reconnect the CABLE USB cable. Wrong paper size...
OPTURA40 OPTURA30 Instruction Manual
Page 154
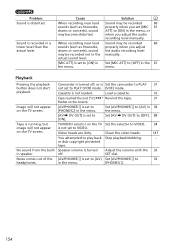
... set to PLAY (VCR) mode. (VCR) mode. Problem Sound is not loaded. Solution Sound may be recorded 60 properly when you adjust the audio recording level manually. Clean the video heads. 147 You attempted to [ON]. Playback Pressing the playback button does not start playback. No sound from the built- Image will not appear is turned in the 61 menu. Speaker volume is not set to [ON] in the menu, or when you adjust the audio recording level manually. Camcorder is Set the camcorder to PLAY 31 not set...
... set to PLAY (VCR) mode. (VCR) mode. Problem Sound is not loaded. Solution Sound may be recorded 60 properly when you adjust the audio recording level manually. Clean the video heads. 147 You attempted to [ON]. Playback Pressing the playback button does not start playback. No sound from the built- Image will not appear is turned in the 61 menu. Speaker volume is not set to [ON] in the menu, or when you adjust the audio recording level manually. Camcorder is Set the camcorder to PLAY 31 not set...

OPTURA40 OPTURA30 Instruction Manual
Page 164
... U USB terminal 123, 134 V Video heads 147 Video light 103, 158, 159 Videocassettes 16 Viewfinder 18 W White balance 54 Widescreen 80 Wind screen 62 Wireless controller 20 Z Zero set memory 75 Zooming 28 Manual focus 52 Memory card 93 Menus 37-44 MIC terminal 63 Microphone 63 Microphone attenuator 61 Microphone level 60 Movie size 95 Multi-image screen 66 MultiMediaCard 93 My Camera settings 77 N ND filter 98 NETWORK mode 139 Night mode 48 Night+ mode 48 O Operating Mode 5 Output channel 36 P Playback -
... U USB terminal 123, 134 V Video heads 147 Video light 103, 158, 159 Videocassettes 16 Viewfinder 18 W White balance 54 Widescreen 80 Wind screen 62 Wireless controller 20 Z Zero set memory 75 Zooming 28 Manual focus 52 Memory card 93 Menus 37-44 MIC terminal 63 Microphone 63 Microphone attenuator 61 Microphone level 60 Movie size 95 Multi-image screen 66 MultiMediaCard 93 My Camera settings 77 N ND filter 98 NETWORK mode 139 Night mode 48 Night+ mode 48 O Operating Mode 5 Output channel 36 P Playback -

Digital Video Software (Windows) Ver.12 Instruction Manual
Page 24
... screen and the (print/share) button lights up each time you connect the camcorder to Download Images (Direct Transfer Function) If your camcorder instruction manual for direct transfer. Downloading Images (ZoomBrowser EX) The Camera Window closes and the Main Window opens. The downloaded images appear in full screen mode. - [Launch ZoomBrowser EX]: Starts ZoomBrowser EX after downloading the images. - [Show Window]: The [CameraWindow - Download Image(s)] window appears when you can set the action that is carried out for how to set and operate the camcorder to transfer images...
... screen and the (print/share) button lights up each time you connect the camcorder to Download Images (Direct Transfer Function) If your camcorder instruction manual for direct transfer. Downloading Images (ZoomBrowser EX) The Camera Window closes and the Main Window opens. The downloaded images appear in full screen mode. - [Launch ZoomBrowser EX]: Starts ZoomBrowser EX after downloading the images. - [Show Window]: The [CameraWindow - Download Image(s)] window appears when you can set the action that is carried out for how to set and operate the camcorder to transfer images...

Digital Video Software (Windows) Ver.12 Instruction Manual
Page 85
... you connected the camcorder to power the camcorder? ➜ If the problem is not correctly connected to the computer's operation. If you delete the wrong file, you using the power adapter to the computer via the USB cable before installing the Digital Video Software. 85 Click the [View] menu and select [Refresh Current Folder]. Driver Installation ? Uninstall and reinstall the driver. Be extremely careful not to a Computer ( 17) and check the connection. Read Connecting the Camcorder to delete...
... you connected the camcorder to power the camcorder? ➜ If the problem is not correctly connected to the computer's operation. If you delete the wrong file, you using the power adapter to the computer via the USB cable before installing the Digital Video Software. 85 Click the [View] menu and select [Refresh Current Folder]. Driver Installation ? Uninstall and reinstall the driver. Be extremely careful not to a Computer ( 17) and check the connection. Read Connecting the Camcorder to delete...


