
Network Setup Guide
Page 1
... 2 Installing the Software 18 2-1 Setting Up for Use over wired LAN. Network Setup Guide This manual contains the setup information required to use the machine with USB connection, refer to the Machine (the machine is not detected) 32 The Following Screen Is Displayed during Setup 33 Setting Up the Machine Again for Use over Wired LAN 23 2-2 Setting Up an Additional LAN-connected Computer 27 Troubleshooting 30 Cannot Install the MP Drivers 31 Cannot Connect to your setup sheet.
... 2 Installing the Software 18 2-1 Setting Up for Use over wired LAN. Network Setup Guide This manual contains the setup information required to use the machine with USB connection, refer to the Machine (the machine is not detected) 32 The Following Screen Is Displayed during Setup 33 Setting Up the Machine Again for Use over Wired LAN 23 2-2 Setting Up an Additional LAN-connected Computer 27 Troubleshooting 30 Cannot Install the MP Drivers 31 Cannot Connect to your setup sheet.
Network Setup Guide
Page 4
... applications before installation. Screens may appear during installation. z Turn off when your network environment. If you disabled for the Windows setup. - The configuration and the type of purchase, the following . Important Depending on the country or region of the device vary depending on the firewall function you connect to a network that the configuration of your security software, refer to as your device's instruction manual or contact its manufacturer. z Make sure...
... applications before installation. Screens may appear during installation. z Turn off when your network environment. If you disabled for the Windows setup. - The configuration and the type of purchase, the following . Important Depending on the country or region of the device vary depending on the firewall function you connect to a network that the configuration of your security software, refer to as your device's instruction manual or contact its manufacturer. z Make sure...

Network Setup Guide
Page 5
... installation process, remove the USB cable connected to your computer's disc drive." Then turn off the machine and proceed from step 3 to quit the screen. Note z If the Select Language screen appears, select a language, then click Next. Click Cancel to install the software. 1 Turn off the machine. Setting Up the Machine and the Computer (Windows) 3 Note Confirm that all the lamps on the Operation Panel have gone out. 2 Turn the computer on page...
... installation process, remove the USB cable connected to your computer's disc drive." Then turn off the machine and proceed from step 3 to quit the screen. Note z If the Select Language screen appears, select a language, then click Next. Click Cancel to install the software. 1 Turn off the machine. Setting Up the Machine and the Computer (Windows) 3 Note Confirm that all the lamps on the Operation Panel have gone out. 2 Turn the computer on page...
Network Setup Guide
Page 32
... User's Guide onscreen manual. is already mapped as Network Drive to the Machine (the machine is not detected)" on page 32 z "The Following Screen Is Displayed during Setup" on page 33 • "The Set Printer IP Address dialog box is displayed" on page 33 • "The Enter Password dialog box is displayed" on page 34 • ""Communication with the Card Slot failed." is displayed" on page 36 Other troubles Refer to "Troubleshooting" in setup/connections z "Cannot Install the MP Drivers" on page...
... User's Guide onscreen manual. is already mapped as Network Drive to the Machine (the machine is not detected)" on page 32 z "The Following Screen Is Displayed during Setup" on page 33 • "The Set Printer IP Address dialog box is displayed" on page 33 • "The Enter Password dialog box is displayed" on page 34 • ""Communication with the Card Slot failed." is displayed" on page 36 Other troubles Refer to "Troubleshooting" in setup/connections z "Cannot Install the MP Drivers" on page...
Network Setup Guide
Page 33
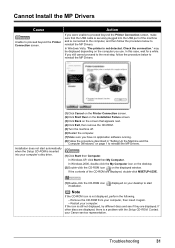
... described in "Setting Up the Machine and the Computer (Windows)" on page 1 to start automatically when the Setup CD-ROM is inserted into your computer's disc drive. (1)Click Cancel on the Printer Connection screen. (2)Click Start Over on the Installation Failure screen. (3)Click Back on the screen that the USB cable is securely plugged into the USB port of the CD-ROM are displayed, double-click MSETUP4.EXE. (1)Double-click the CD...
... described in "Setting Up the Machine and the Computer (Windows)" on page 1 to start automatically when the Setup CD-ROM is inserted into your computer's disc drive. (1)Click Cancel on the Printer Connection screen. (2)Click Start Over on the Installation Failure screen. (3)Click Back on the screen that the USB cable is securely plugged into the USB port of the CD-ROM are displayed, double-click MSETUP4.EXE. (1)Double-click the CD...
Network Setup Guide
Page 39
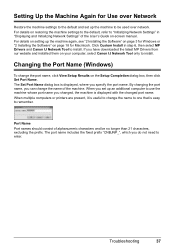
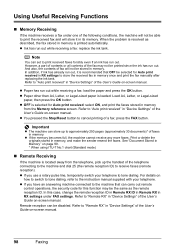
... MP Drivers and Canon IJ Network Tool to "Initializing Network Settings" in "Displaying and Initializing Network Settings" of the User's Guide on page 18 for Use over network. Changing the Port Name (Windows) To change the name of alphanumeric characters and be used over Network Restore the machine settings to the default and set up the machine again, see "2 Installing the Software" on page 3 for Windows or "2 Installing the Software" on -screen manual. By changing the port name, you can change the port name, click View Setup...
... MP Drivers and Canon IJ Network Tool to "Initializing Network Settings" in "Displaying and Initializing Network Settings" of the User's Guide on page 18 for Use over network. Changing the Port Name (Windows) To change the name of alphanumeric characters and be used over Network Restore the machine settings to the default and set up the machine again, see "2 Installing the Software" on page 3 for Windows or "2 Installing the Software" on -screen manual. By changing the port name, you can change the port name, click View Setup...
Quick Start Guide
Page 5
... Printer Driver ........ 147 Paper Jams 148 Document Jams in the ADF 152 Message Appears on the Computer Screen 156 Error Message Appears on a PictBridge Compliant Device 159 Cannot Print Properly through Bluetooth Communication 160 Cannot Print Properly from a Photo Index Sheet 161 Cannot Remove a Memory Card 161 Scanning Problems 161 Problems Receiving Faxes 162 Problems Sending Faxes 165 Telephone Problems 166 Appendix 167 How to Use the Documentation Provided... 167 Reading the On-screen Manuals 168 Solution Menu (Windows only 169 My Printer (Windows only 169 Specifications...
... Printer Driver ........ 147 Paper Jams 148 Document Jams in the ADF 152 Message Appears on the Computer Screen 156 Error Message Appears on a PictBridge Compliant Device 159 Cannot Print Properly through Bluetooth Communication 160 Cannot Print Properly from a Photo Index Sheet 161 Cannot Remove a Memory Card 161 Scanning Problems 161 Problems Receiving Faxes 162 Problems Sending Faxes 165 Telephone Problems 166 Appendix 167 How to Use the Documentation Provided... 167 Reading the On-screen Manuals 168 Solution Menu (Windows only 169 My Printer (Windows only 169 Specifications...
Quick Start Guide
Page 35
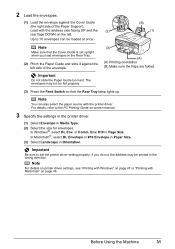
... paper source with the printer driver. Important Do not slide the Paper Guide too hard. The envelopes may be printed in the Rear Tray. (2) Pinch the Paper Guide and slide it against the Cover Guide (the right side of the envelope. Important Be sure to the PC Printing Guide on-screen manual. 3 Specify the settings in the printer driver. (1) Select Envelope in Media Type. (2) Select the size for envelopes. 2 Load the envelopes. (1) Load the envelope against the left . If you load envelopes...
... paper source with the printer driver. Important Do not slide the Paper Guide too hard. The envelopes may be printed in the Rear Tray. (2) Pinch the Paper Guide and slide it against the Cover Guide (the right side of the envelope. Important Be sure to the PC Printing Guide on-screen manual. 3 Specify the settings in the printer driver. (1) Select Envelope in Media Type. (2) Select the size for envelopes. 2 Load the envelopes. (1) Load the envelope against the left . If you load envelopes...
Quick Start Guide
Page 102
... -screen manual. z OFF is located away from the Memory reference screen. Print or delete the originals stored in memory once and print the fax manually after replacing the ink tank. z If you use a rotary pulse line, temporarily switch your telephone. z Paper has run out. Important z The machine can be printed since the ink has run out while receiving a fax: load the paper and press the OK button. Refer to approximately 250 pages (approximately 30 documents)* of the User's Guide...
... -screen manual. z OFF is located away from the Memory reference screen. Print or delete the originals stored in memory once and print the fax manually after replacing the ink tank. z If you use a rotary pulse line, temporarily switch your telephone. z Paper has run out. Important z The machine can be printed since the ink has run out while receiving a fax: load the paper and press the OK button. Refer to approximately 250 pages (approximately 30 documents)* of the User's Guide...
Quick Start Guide
Page 103
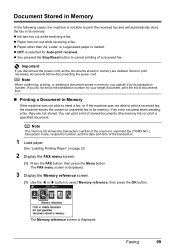
.... 1 Load paper. See "Loading Printing Paper" on page 20. 2 Display the FAX menu screen. (1) Press the FAX button, then press the Menu button. The FAX menu screen is selected for your target document, print the list of stored documents (the memory list) or print a specified document. z OFF is displayed. 3 Display the Memory reference screen. (1) Use the [ or ] button to select Memory reference, then press the OK button. Faxing 99 Send or print necessary documents before disconnecting the power cord. If an error occurred when sending a fax, they are deleted. Document Stored in...
.... 1 Load paper. See "Loading Printing Paper" on page 20. 2 Display the FAX menu screen. (1) Press the FAX button, then press the Menu button. The FAX menu screen is selected for your target document, print the list of stored documents (the memory list) or print a specified document. z OFF is displayed. 3 Display the Memory reference screen. (1) Use the [ or ] button to select Memory reference, then press the OK button. Faxing 99 Send or print necessary documents before disconnecting the power cord. If an error occurred when sending a fax, they are deleted. Document Stored in...
Quick Start Guide
Page 109
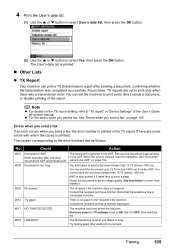
... /her load paper. #017 NO TONE DETECTED The machine could not detect the dial tone. Dial tone detect in the recipient's fax machine. Faxing 105 At purchase, TX reports are set the machine to print every time it sends a document, or disable printing of the User's Guide on the TX report setting, refer to ON. See "Document document in ADF. You attempted to lower, then resend it takes time to the error numbers are some errors with which...
... /her load paper. #017 NO TONE DETECTED The machine could not detect the dial tone. Dial tone detect in the recipient's fax machine. Faxing 105 At purchase, TX reports are set the machine to print every time it sends a document, or disable printing of the User's Guide on the TX report setting, refer to ON. See "Document document in ADF. You attempted to lower, then resend it takes time to the error numbers are some errors with which...
Quick Start Guide
Page 110
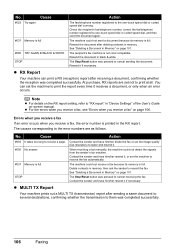
... BLACK & WHITE STOP The fax/telephone number registered to receive the fax automatically. The recipient's fax machine is wrong. z RX Report Your machine can set the machine to the one -touch speed dial or coded speed dial, and then send the document again. Cause Action #003 It takes too long to print the report every time it receives a document, or only when an error occurs. Resend the document after deleting contents in "Device Settings" of the User's Guide on-screen manual. At purchase, RX reports...
... BLACK & WHITE STOP The fax/telephone number registered to receive the fax automatically. The recipient's fax machine is wrong. z RX Report Your machine can set the machine to the one -touch speed dial or coded speed dial, and then send the document again. Cause Action #003 It takes too long to print the report every time it receives a document, or only when an error occurs. Resend the document after deleting contents in "Device Settings" of the User's Guide on-screen manual. At purchase, RX reports...
Quick Start Guide
Page 139
... the ink tanks are clogged. Remove the document page jammed in the ADF" on the model or brand of the machine back in ADF and pressing OK." z A communication time out occurs if an operation takes too long or if it directly to its instruction manual. See "Document Jams in the ADF, then press the OK button. Make sure that the Paper Output Slot is still not resolved, check if you may cancel printing...
... the ink tanks are clogged. Remove the document page jammed in the ADF" on the model or brand of the machine back in ADF and pressing OK." z A communication time out occurs if an operation takes too long or if it directly to its instruction manual. See "Document Jams in the ADF, then press the OK button. Make sure that the Paper Output Slot is still not resolved, check if you may cancel printing...

Quick Start Guide
Page 143
... USB port of the CD-ROM are displayed, there is a problem with the Setup CD-ROM. Restart your computer's disc drive. (1)Click Cancel on the Printer Connection screen. (2)Click Start Over on the Installation Failure screen. (3)Click Back on your setup sheet or the Network Setup Guide to reinstall the MP Drivers. (1)Click Start then Computer. If other discs are displayed, double-click MSETUP4.EXE. (1)Double-click the CD-ROM icon installation. Troubleshooting 139 In Windows...
... USB port of the CD-ROM are displayed, there is a problem with the Setup CD-ROM. Restart your computer's disc drive. (1)Click Cancel on the Printer Connection screen. (2)Click Start Over on the Installation Failure screen. (3)Click Back on your setup sheet or the Network Setup Guide to reinstall the MP Drivers. (1)Click Start then Computer. If other discs are displayed, double-click MSETUP4.EXE. (1)Double-click the CD-ROM icon installation. Troubleshooting 139 In Windows...
Quick Start Guide
Page 151
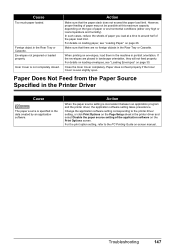
... Cover completely. Change the application software setting corresponding to the PC Printing Guide on envelopes, load them in the machine in the Rear Tray or Cassette. Envelopes not prepared or loaded properly. When printing on -screen manual. For details on loading envelopes, see "Loading Paper" on the Page Setup sheet in the Rear Tray or Cassette. Action When the paper source setting is not completely closed. For the print option setting, refer to the printer driver setting, or click Print Options on page 26. Make...
... Cover completely. Change the application software setting corresponding to the PC Printing Guide on envelopes, load them in the machine in the Rear Tray or Cassette. Envelopes not prepared or loaded properly. When printing on -screen manual. For details on loading envelopes, see "Loading Paper" on the Page Setup sheet in the Rear Tray or Cassette. Action When the paper source setting is not completely closed. For the print option setting, refer to the printer driver setting, or click Print Options on page 26. Make...

Quick Start Guide
Page 166
... User's Guide onscreen manual. Change the paper in "Device Settings" of the fax may not be stored in memory once and print the fax manually after replacing the ink tank. 162 Troubleshooting z If the power was an error during reception. See "An Error Message Is Displayed on the LCD" on . Replace the ink tank, then print them in the specified paper source, then press the OK button. If a paper size other than A4, Letter, or Legal* is loaded in Memory...
... User's Guide onscreen manual. Change the paper in "Device Settings" of the fax may not be stored in memory once and print the fax manually after replacing the ink tank. 162 Troubleshooting z If the power was an error during reception. See "An Error Message Is Displayed on the LCD" on . Replace the ink tank, then print them in the specified paper source, then press the OK button. If a paper size other than A4, Letter, or Legal* is loaded in Memory...
Quick Start Guide
Page 169
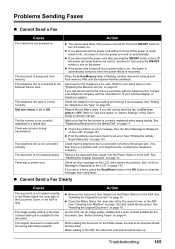
... page 16. When loading in the ADF. The telephone line is not loaded properly. z If you still cannot send the fax, set an image quality suitable and a scan contrast suitable for the Speed Dial" on the LCD, then resolve the problem. Refer to turn the power on page 60. z Print the Activity report and check for Fax" on the power. Remove the document then reload it . See "Handling the Original Document" on page 16. Check an error message...
... page 16. When loading in the ADF. The telephone line is not loaded properly. z If you still cannot send the fax, set an image quality suitable and a scan contrast suitable for the Speed Dial" on the LCD, then resolve the problem. Refer to turn the power on page 60. z Print the Activity report and check for Fax" on the power. Remove the document then reload it . See "Handling the Original Document" on page 16. Check an error message...
Quick Start Guide
Page 186
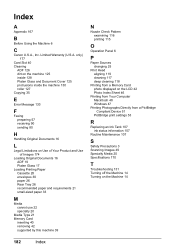
... Media Type 21 Memory Card inserting 40 removing 42 supported by this machine 39 N Nozzle Check Pattern examining 116 printing 115 O Operation Panel 6 P Paper Sources changing 25 Print Head aligning 119 cleaning 117 deep cleaning 118 Printing from a Memory Card photo displayed on the LCD 42 Photo Index Sheet 46 Printing from Your Computer Macintosh 48 Windows 47 Printing Photographs Directly from a PictBridge Compliant Device 51 PictBridge print settings 53 R Replacing an Ink Tank 107 ink status information 107 Routine Maintenance 107 S Safety Precautions 3 Scanning Images...
... Media Type 21 Memory Card inserting 40 removing 42 supported by this machine 39 N Nozzle Check Pattern examining 116 printing 115 O Operation Panel 6 P Paper Sources changing 25 Print Head aligning 119 cleaning 117 deep cleaning 118 Printing from a Memory Card photo displayed on the LCD 42 Photo Index Sheet 46 Printing from Your Computer Macintosh 48 Windows 47 Printing Photographs Directly from a PictBridge Compliant Device 51 PictBridge print settings 53 R Replacing an Ink Tank 107 ink status information 107 Routine Maintenance 107 S Safety Precautions 3 Scanning Images...
Easy Setup Instructions
Page 1
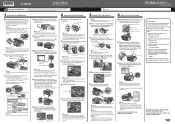
... start another operation until it . Refer to connect the machine with the Document Cover closed . • Do NOT connect the USB cable at this has no effect on print quality. d Insert the Print Head. this stage. Important If the Scanning Unit (Printer Cover) is necessary to "An Error Message Is Displayed on the LCD" in the ADF (Auto Document Feeder). Paper Support Extension Paper Guide Rear Tray Cover b Load two sheets of supplied paper (MP-101) into place, open it stops. d Make sure the ink...
... start another operation until it . Refer to connect the machine with the Document Cover closed . • Do NOT connect the USB cable at this has no effect on print quality. d Insert the Print Head. this stage. Important If the Scanning Unit (Printer Cover) is necessary to "An Error Message Is Displayed on the LCD" in the ADF (Auto Document Feeder). Paper Support Extension Paper Guide Rear Tray Cover b Load two sheets of supplied paper (MP-101) into place, open it stops. d Make sure the ink...
Easy Setup Instructions
Page 2
... the printer port being used. When using Mac OS X v.10.3.9, before installation. • Log into a user account with the administrator privilege. • Do not switch users during the installation process. k When the Canon IJ Network Tool screen appears, select USB connection, then click OK. Note To register later, click Cancel and go to the next procedure after three minutes, refer to "Cannot Install the MP Drivers" in the Quick Start Guide. After software installation...
... the printer port being used. When using Mac OS X v.10.3.9, before installation. • Log into a user account with the administrator privilege. • Do not switch users during the installation process. k When the Canon IJ Network Tool screen appears, select USB connection, then click OK. Note To register later, click Cancel and go to the next procedure after three minutes, refer to "Cannot Install the MP Drivers" in the Quick Start Guide. After software installation...


