Quick Start Guide
Page 54
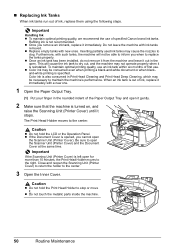
Inserting partially used ink tanks may be necessary to maintain the machine's performance. Color ink is opened, you remove an ink tank, replace it immediately. The Print Head Holder moves to open the Scanner Unit (Printer Cover) and the Document Cover at the same time. Be sure to the center. z Do not ..., do not remove it from the machine and leave it out in the rounded indent of specified Canon brand ink tanks. z If the Document Cover is also consumed in Print Head Cleaning and Print Head Deep Cleaning, which may cause the nozzles to clog. Caution z Do not hold the LCD or...
Inserting partially used ink tanks may be necessary to maintain the machine's performance. Color ink is opened, you remove an ink tank, replace it immediately. The Print Head Holder moves to open the Scanner Unit (Printer Cover) and the Document Cover at the same time. Be sure to the center. z Do not ..., do not remove it from the machine and leave it out in the rounded indent of specified Canon brand ink tanks. z If the Document Cover is also consumed in Print Head Cleaning and Print Head Deep Cleaning, which may cause the nozzles to clog. Caution z Do not hold the LCD or...
Quick Start Guide
Page 56
z Do not hold the Scanning Unit (Printer Cover) firmly using both hands, and be careful not to get your fingers caught. Note z If the error message is still displayed after replacing the ink tank, Print Head Cleaning is closed , see "Error Message Is Displayed on the LCD" on the ink tank until Print...
z Do not hold the Scanning Unit (Printer Cover) firmly using both hands, and be careful not to get your fingers caught. Note z If the error message is still displayed after replacing the ink tank, Print Head Cleaning is closed , see "Error Message Is Displayed on the LCD" on the ink tank until Print...
Quick Start Guide
Page 58
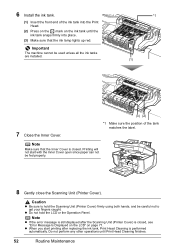
... See "Printing the Nozzle Check Pattern" on page 60. If the ruled lines are lit red. - Step 3 See "Print Head Deep Cleaning" on page 55. Contact your Canon service representative. If any one of the lamps is flashing fast, the associated ink tank is inserted in that all packaging material...the Print Head, print and examine the nozzle check pattern. If any one of the lamps is flashing slowly, the associated ink tank is inserted in the printer driver settings. Make sure that all lamps for a while, but we recommend you to confirm the condition of the correct color is empty...
... See "Printing the Nozzle Check Pattern" on page 60. If the ruled lines are lit red. - Step 3 See "Print Head Deep Cleaning" on page 55. Contact your Canon service representative. If any one of the lamps is flashing fast, the associated ink tank is inserted in that all packaging material...the Print Head, print and examine the nozzle check pattern. If any one of the lamps is flashing slowly, the associated ink tank is inserted in the printer driver settings. Make sure that all lamps for a while, but we recommend you to confirm the condition of the correct color is empty...
Quick Start Guide
Page 76
... a digital camera or digital video camcorder compatible with the connected device." If the Print Head is not installed. "Inner cover is open when starting printing, close the Scanning Unit (Printer Cover). U071 If the Inner Cover is open . Confirm that you are not installed in...caused by this machine. Follow the directions given in the appropriate positions. z More than one ink tanks of the same color are recommended to contact a Canon service representative as early as follows: z Some ink tanks are installed in the Easy Setup Instructions to replace a particular ...
... a digital camera or digital video camcorder compatible with the connected device." If the Print Head is not installed. "Inner cover is open when starting printing, close the Scanning Unit (Printer Cover). U071 If the Inner Cover is open . Confirm that you are not installed in...caused by this machine. Follow the directions given in the appropriate positions. z More than one ink tanks of the same color are recommended to contact a Canon service representative as early as follows: z Some ink tanks are installed in the Easy Setup Instructions to replace a particular ...

Quick Start Guide
Page 77
..., see "Manual Print Head Alignment" on the ink tank is set to Readonly mode. "The remaining level of the machine back in , and then turn on the machine. Replace the ink tank and close the Scanning Unit (Printer Cover). z An Ink tank error has occurred. (The lamp on page ...Printing the Nozzle Check Pattern" on ." Set to dismiss the error message, and then perform Manual Print Head Alignment. If you want to continue printing in this error still remains, contact a Canon service representative. Then, turn the power off the machine, and unplug the power cord of the machine from...
..., see "Manual Print Head Alignment" on the ink tank is set to Readonly mode. "The remaining level of the machine back in , and then turn on the machine. Replace the ink tank and close the Scanning Unit (Printer Cover). z An Ink tank error has occurred. (The lamp on page ...Printing the Nozzle Check Pattern" on ." Set to dismiss the error message, and then perform Manual Print Head Alignment. If you want to continue printing in this error still remains, contact a Canon service representative. Then, turn the power off the machine, and unplug the power cord of the machine from...
Quick Start Guide
Page 82
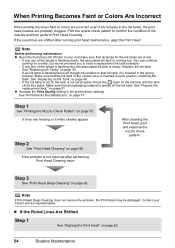
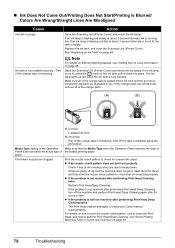
... Part of the missing colors are left as illustrated in (A). z If the problem is not resolved after 24 hours or later. z If the problem is still not resolved after performing Print Head Deep Cleaning, turn off the tape completely along the perforation. Contact your Canon service representative. If an...pattern, how to clean the Print Head, and how to empty tanks. Open the Scanning Unit (Printer Cover) and check the ink lamps. Ink tank is plenty of paper. Note For details on different flashing speeds, see "When Printing Becomes Faint or Colors Are Incorrect" on page 48. ...
... Part of the missing colors are left as illustrated in (A). z If the problem is not resolved after 24 hours or later. z If the problem is still not resolved after performing Print Head Deep Cleaning, turn off the tape completely along the perforation. Contact your Canon service representative. If an...pattern, how to clean the Print Head, and how to empty tanks. Open the Scanning Unit (Printer Cover) and check the ink lamps. Ink tank is plenty of paper. Note For details on different flashing speeds, see "When Printing Becomes Faint or Colors Are Incorrect" on page 48. ...
Quick Start Guide
Page 84
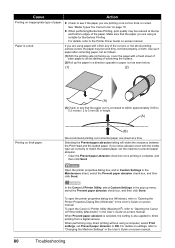
... top and bottom edges of the paper. Selecting the Prevent paper abrasion setting will widen the clearance between the Print Head and the loaded paper. Open the printer properties dialog box, and in Custom Settings in height. (A) Printing on -screen manual. For details on page 10.... To open the Canon IJ Printer Utility (Macintosh®), refer to "Opening the Canon IJ Printer Utility (Macintosh)" in the pop-up the paper in a direction opposite to prevent paper abrasion. * Clear the ...
... top and bottom edges of the paper. Selecting the Prevent paper abrasion setting will widen the clearance between the Print Head and the loaded paper. Open the printer properties dialog box, and in Custom Settings in height. (A) Printing on -screen manual. For details on page 10.... To open the Canon IJ Printer Utility (Macintosh®), refer to "Opening the Canon IJ Printer Utility (Macintosh)" in the pop-up the paper in a direction opposite to prevent paper abrasion. * Clear the ...
Quick Start Guide
Page 94
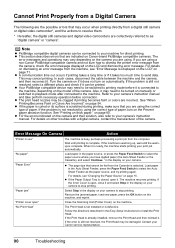
... z PictBridge compatible digital cameras can be clogged if printing becomes faint or colors are incorrect. z For the errors indicated on the camera and their solution, also refer to stop printing. "No Print Head" The Print Head is not installed or is complete. If the machine is warming up, wait... PictBridge compatible cameras. This may be printed. If the problem is open " Close the Scanning Unit (Printer Cover) on your camera to your Canon service representative. 90 Troubleshooting If the Inner Cover is still not resolved, select a different photo and check if it and select ...
... z PictBridge compatible digital cameras can be clogged if printing becomes faint or colors are incorrect. z For the errors indicated on the camera and their solution, also refer to stop printing. "No Print Head" The Print Head is not installed or is complete. If the machine is warming up, wait... PictBridge compatible cameras. This may be printed. If the problem is open " Close the Scanning Unit (Printer Cover) on your camera to your Canon service representative. 90 Troubleshooting If the Inner Cover is still not resolved, select a different photo and check if it and select ...

Quick Start Guide
Page 95
...ink absorber*2 full" This error message indicates that the ink absorber is installed. Printing with an ink tank that Canon shall not be advised that was once empty is nearly full. "Printer error" An error requiring servicing may not read the settings. After a while, plug the power cord of ...Disconnect the cable between the machine and the camera, turn on the machine instead of ink. Press and hold the ink used during Print Head Cleaning, for detecting the remaining ink level is displayed. Replace the ink tank. z Make sure the Platen Glass and the Photo Index ...
...ink absorber*2 full" This error message indicates that the ink absorber is installed. Printing with an ink tank that Canon shall not be advised that was once empty is nearly full. "Printer error" An error requiring servicing may not read the settings. After a while, plug the power cord of ...Disconnect the cable between the machine and the camera, turn on the machine instead of ink. Press and hold the ink used during Print Head Cleaning, for detecting the remaining ink level is displayed. Replace the ink tank. z Make sure the Platen Glass and the Photo Index ...
Easy Setup Instructions
Page 1
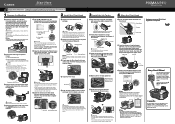
...button. Important If an unintended language is not removed completely, problems with printing may occur. appears, go to the center. If the orange-colored protective film is displayed on the LCD, press the Back button to return to the Language selection screen. b Twist off and ...to connect the machine with your product. a Remove the Print Head from the Print Head and discard it stops.The Print Head Lock Lever may be executed correctly, the message "Auto head align has failed." f Open the Scanning Unit (Printer Cover) until after the software is complete. Be careful not ...
...button. Important If an unintended language is not removed completely, problems with printing may occur. appears, go to the center. If the orange-colored protective film is displayed on the LCD, press the Back button to return to the Language selection screen. b Twist off and ...to connect the machine with your product. a Remove the Print Head from the Print Head and discard it stops.The Print Head Lock Lever may be executed correctly, the message "Auto head align has failed." f Open the Scanning Unit (Printer Cover) until after the software is complete. Be careful not ...


