
LV-X1 Brochure
Page 2
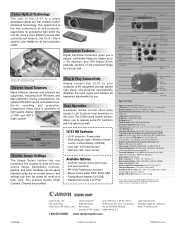
... Digital Keystone Correction gives you to operate some PC functions with mouse and laser functions • PR-200S Presentation Assistant • Mouse Control Cable, PS/2, Serial, ADB • Ceiling Mount Adapter (LV-CL06) • Replacement Lamp (LV-LP12) Input Button Menu Button Keystone Button Set Button Warning Temp Indicator Point (Volume) Button Ready Indicator Lamp Replace Indicator Lamp Indicator Specifications Type: Micro-portable LCD Projector LCD Panel: 0.7" polysilicon active matrix TFT x 3. 4:3 aspect ratio Number of Pixels: 786,432 1,024(H) x 768(V) Supported Display...
... Digital Keystone Correction gives you to operate some PC functions with mouse and laser functions • PR-200S Presentation Assistant • Mouse Control Cable, PS/2, Serial, ADB • Ceiling Mount Adapter (LV-CL06) • Replacement Lamp (LV-LP12) Input Button Menu Button Keystone Button Set Button Warning Temp Indicator Point (Volume) Button Ready Indicator Lamp Replace Indicator Lamp Indicator Specifications Type: Micro-portable LCD Projector LCD Panel: 0.7" polysilicon active matrix TFT x 3. 4:3 aspect ratio Number of Pixels: 786,432 1,024(H) x 768(V) Supported Display...

Owners Manual
Page 2
... AND KEEP THIS OWNER'S MANUAL FOR LATER USE. q If the projector is exhausted from the projection lens. REFER SERVICING TO QUALIFIED SERVICE PERSONNEL. SIDE and TOP 50cm 50cm REAR 50cm q Do not put any flammable object or spray can also be set in the way indicated. This projector provides many convenient features and functions. TO THE OWNER Before operating this projector, read this manual again, check operations and cable connections...
... AND KEEP THIS OWNER'S MANUAL FOR LATER USE. q If the projector is exhausted from the projection lens. REFER SERVICING TO QUALIFIED SERVICE PERSONNEL. SIDE and TOP 50cm 50cm REAR 50cm q Do not put any flammable object or spray can also be set in the way indicated. This projector provides many convenient features and functions. TO THE OWNER Before operating this projector, read this manual again, check operations and cable connections...

Owners Manual
Page 3
... materials, and the bottom opening or removing covers may cause hazards. Do not locate this projector, ask the service technician to perform routine safety checks to the projector during a lightning storm, or when it from overheating. e. If the projector has been dropped or the cabinet has been damaged. Read all warnings and instructions marked on the power cord. Do not use . For added protection to...
... materials, and the bottom opening or removing covers may cause hazards. Do not locate this projector, ask the service technician to perform routine safety checks to the projector during a lightning storm, or when it from overheating. e. If the projector has been dropped or the cabinet has been damaged. Read all warnings and instructions marked on the power cord. Do not use . For added protection to...
Owners Manual
Page 5
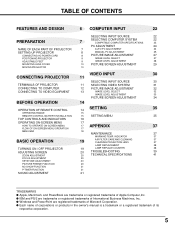
... PART OF PROJECTOR 7 AUTO PC ADJUSTMENT 24 SETTING-UP PROJECTOR 8 MANUAL PC ADJUSTMENT 25 CONNECTING AC POWER CORD 8 PICTURE IMAGE ADJUSTMENT 27 POSITIONING PROJECTOR 9 IMAGE LEVEL SELECT 27 ADJUSTABLE FEET 9 IMAGE LEVEL ADJUSTMENT 28 MOUNTING LENS COVER 10 PICTURE SCREEN ADJUSTMENT 29 MOVING PROJECTOR 10 VIDEO INPUT 30 CONNECTING PROJECTOR 11 SELECTING INPUT SOURCE 30 TERMINALS OF PROJECTOR 11 SELECTING VIDEO SYSTEM 31 CONNECTING TO COMPUTER 12 PICTURE IMAGE ADJUSTMENT 32 CONNECTING TO VIDEO EQUIPMENT 13 IMAGE LEVEL SELECT 32 IMAGE LEVEL ADJUSTMENT...
... PART OF PROJECTOR 7 AUTO PC ADJUSTMENT 24 SETTING-UP PROJECTOR 8 MANUAL PC ADJUSTMENT 25 CONNECTING AC POWER CORD 8 PICTURE IMAGE ADJUSTMENT 27 POSITIONING PROJECTOR 9 IMAGE LEVEL SELECT 27 ADJUSTABLE FEET 9 IMAGE LEVEL ADJUSTMENT 28 MOUNTING LENS COVER 10 PICTURE SCREEN ADJUSTMENT 29 MOVING PROJECTOR 10 VIDEO INPUT 30 CONNECTING PROJECTOR 11 SELECTING INPUT SOURCE 30 TERMINALS OF PROJECTOR 11 SELECTING VIDEO SYSTEM 31 CONNECTING TO COMPUTER 12 PICTURE IMAGE ADJUSTMENT 32 CONNECTING TO VIDEO EQUIPMENT 13 IMAGE LEVEL SELECT 32 IMAGE LEVEL ADJUSTMENT...
Owners Manual
Page 6
... be connected. x One-Touch Auto PC Adjustment Incoming computer video signals are recognized and the best adjustment is automatically set by digitally altering projection to reduce power consumption while a projector is not in ; x Compatibility This projector widely accepts various video and computer input signals including; When resolution of your computer is higher than 1280 x 1024, reset a computer output for portability, durability, and ease of screen size) or compress the image size...
... be connected. x One-Touch Auto PC Adjustment Incoming computer video signals are recognized and the best adjustment is automatically set by digitally altering projection to reduce power consumption while a projector is not in ; x Compatibility This projector widely accepts various video and computer input signals including; When resolution of your computer is higher than 1280 x 1024, reset a computer output for portability, durability, and ease of screen size) or compress the image size...
Owners Manual
Page 7
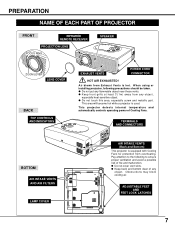
... area, especially screw and metallic part. Obstructions may block cooling air. TERMINALS AND CONNECTORS BOTTOM AIR INTAKE VENTS AND AIR FILTERS LAMP COVER AIR INTAKE VENTS (Back and Bottom) This projector is hot. When using or installing projector, following to ensure proper ventilation and avoid a possible risk of Cooling Fans. This area will become hot while a projector is used. This projector detects internal temperature and automatically controls operating power of fire...
... area, especially screw and metallic part. Obstructions may block cooling air. TERMINALS AND CONNECTORS BOTTOM AIR INTAKE VENTS AND AIR FILTERS LAMP COVER AIR INTAKE VENTS (Back and Bottom) This projector is hot. When using or installing projector, following to ensure proper ventilation and avoid a possible risk of Cooling Fans. This area will become hot while a projector is used. This projector detects internal temperature and automatically controls operating power of fire...

Owners Manual
Page 10
... to turn the projector off and disconnect AC Power cord from an AC outlet. 1 Secure Strap for Lens Cover through a courier or transport service, consult your dealer for best way. 10 LENS COVER STRAP FOR LENS COVER Secure to the lens and cabinet. PREPARATION MOUNTING LENS COVER When moving a projector, replace Lens Cover and retract Adjustable Feet to prevent damage to the hole with a screw. Before replacing Lens Cover, be damaged. CAUTION Carrying Bag (supplied...
... to turn the projector off and disconnect AC Power cord from an AC outlet. 1 Secure Strap for Lens Cover through a courier or transport service, consult your dealer for best way. 10 LENS COVER STRAP FOR LENS COVER Secure to the lens and cabinet. PREPARATION MOUNTING LENS COVER When moving a projector, replace Lens Cover and retract Adjustable Feet to prevent damage to the hole with a screw. Before replacing Lens Cover, be damaged. CAUTION Carrying Bag (supplied...

Owners Manual
Page 12
... ON OFF OFF Audio Input External Audio Equipment Audio Amplifier Audio Speaker (stereo) 12 RGB IN ANALOG CONTROL PORT VIDEO IN RESET Y -- AUDIO OUT Audio Cable (stereo) ✽ Terminals of the Projector x MAC ADAPTER (Not supplied) Set switches as shown in the table ON below . Audio Cable ✽ (stereo) USB Cable ✽ VGA Cable USB COMPUTER AUDIO IN Control Cable Control Cable Control Cable for Serial Port ✽ for PS/2 Port ✽ for ADB Port ✽ Terminal Terminal Terminal Use one of these Control Cables or USB Cable corresponding with this...
... ON OFF OFF Audio Input External Audio Equipment Audio Amplifier Audio Speaker (stereo) 12 RGB IN ANALOG CONTROL PORT VIDEO IN RESET Y -- AUDIO OUT Audio Cable (stereo) ✽ Terminals of the Projector x MAC ADAPTER (Not supplied) Set switches as shown in the table ON below . Audio Cable ✽ (stereo) USB Cable ✽ VGA Cable USB COMPUTER AUDIO IN Control Cable Control Cable Control Cable for Serial Port ✽ for PS/2 Port ✽ for ADB Port ✽ Terminal Terminal Terminal Use one of these Control Cables or USB Cable corresponding with this...

Owners Manual
Page 14
... the image in DIGITAL ZOOM mode. (P29) NO SHOW BUTTON Used to turn the projector on or off. (P19) D.ZOOM BUTTONS Used to select DIGITAL ZOOM mode and resize the image. (P29) KEYSTONE BUTTONS Used to correct the keystone distortion. (P20, 35) MENU BUTTON Used to select MENU operation. (P17, 18) SET BUTTON Used to execute the item selected or to moisture or heat. q For cleaning, use soft dry cloth. BEFORE OPERATION OPERATION OF REMOTE CONTROL Infrared signals transmitted from Remote Control Unit. T SET MENU NO SHOW FREEZE AUTO...
... the image in DIGITAL ZOOM mode. (P29) NO SHOW BUTTON Used to turn the projector on or off. (P19) D.ZOOM BUTTONS Used to select DIGITAL ZOOM mode and resize the image. (P29) KEYSTONE BUTTONS Used to correct the keystone distortion. (P20, 35) MENU BUTTON Used to select MENU operation. (P17, 18) SET BUTTON Used to execute the item selected or to moisture or heat. q For cleaning, use soft dry cloth. BEFORE OPERATION OPERATION OF REMOTE CONTROL Infrared signals transmitted from Remote Control Unit. T SET MENU NO SHOW FREEZE AUTO...
Owners Manual
Page 16
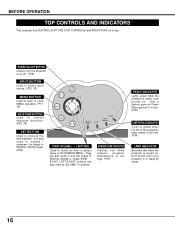
... mode. (P36) LAMP REPLACE INDICATOR Turns to yellow when the life of the projection lamp draws to an end. (P38) LAMP INDICATOR Becomes dim when the projector is also used as VOLUME +/- And it flashes green in ON-SCREEN MENU. POWER ON-OFF BUTTON Used to turn the projector on its top. BEFORE OPERATION TOP CONTROLS AND INDICATORS This projector has CONTROL BUTTONS (TOP CONTROLS) and INDICATORS on or off. (P19) INPUT BUTTON Used to select input source. (P22, 30) MENU BUTTON Used to open or close MENU operation. (P17, 18) KEYSTONE BUTTON Used...
... mode. (P36) LAMP REPLACE INDICATOR Turns to yellow when the life of the projection lamp draws to an end. (P38) LAMP INDICATOR Becomes dim when the projector is also used as VOLUME +/- And it flashes green in ON-SCREEN MENU. POWER ON-OFF BUTTON Used to turn the projector on its top. BEFORE OPERATION TOP CONTROLS AND INDICATORS This projector has CONTROL BUTTONS (TOP CONTROLS) and INDICATORS on or off. (P19) INPUT BUTTON Used to select input source. (P22, 30) MENU BUTTON Used to open or close MENU operation. (P17, 18) KEYSTONE BUTTON Used...
Owners Manual
Page 18
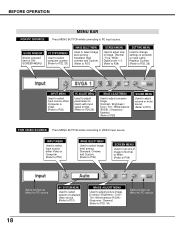
...) SCREEN MENU Used to adjust size of image. [Normal / True / Wide / Digital zoom +/-] (Refer to P29) SETTING MENU Used to change settings of ONSCREEN MENU. PC SYSTEM MENU Used to select computer system. (Refer to P22, 23) IMAGE SELECT MENU Used to VIDEO input source. BEFORE OPERATION FOR PC SOURCE MENU BAR Press MENU BUTTON while connecting to PC input source. GUIDE WINDOW Shows selected item of projector or reset Lamp Replace Counter. (Refer to P35, 36) INPUT MENU Used to select input source either Video or Computer. (Refer to P30) IMAGE SELECT MENU Used to...
...) SCREEN MENU Used to adjust size of image. [Normal / True / Wide / Digital zoom +/-] (Refer to P29) SETTING MENU Used to change settings of ONSCREEN MENU. PC SYSTEM MENU Used to select computer system. (Refer to P22, 23) IMAGE SELECT MENU Used to VIDEO input source. BEFORE OPERATION FOR PC SOURCE MENU BAR Press MENU BUTTON while connecting to PC input source. GUIDE WINDOW Shows selected item of projector or reset Lamp Replace Counter. (Refer to P35, 36) INPUT MENU Used to select input source either Video or Computer. (Refer to P30) IMAGE SELECT MENU Used to...

Owners Manual
Page 19
... Remote Control Unit, and a message "Power off ? When WARNING TEMP. Indicator continues to "Power Management" on page 36. Check Air Filters for 90 seconds). The signal from an AC outlet. 2. LAMP Indicator lights bright and READY Indicator turns off , Cooling Fans operate (for dust accumulation. 3. During this projector or service center. 19 Message disappears after 30 seconds. Refer to flash, follow procedures below: 1. When WARNING TEMP. After cooling down starts. TO MAINTAIN THE LIFE OF LAMP, ONCE YOU TURN PROJECTOR...
... Remote Control Unit, and a message "Power off ? When WARNING TEMP. Indicator continues to "Power Management" on page 36. Check Air Filters for 90 seconds). The signal from an AC outlet. 2. LAMP Indicator lights bright and READY Indicator turns off , Cooling Fans operate (for dust accumulation. 3. During this projector or service center. 19 Message disappears after 30 seconds. Refer to flash, follow procedures below: 1. When WARNING TEMP. After cooling down starts. TO MAINTAIN THE LIFE OF LAMP, ONCE YOU TURN PROJECTOR...

Owners Manual
Page 20
...BASIC OPERATION ADJUSTING SCREEN ZOOM ADJUSTMENT Move ZOOM LEVER upward to make the image smaller. Move ZOOM LEVER downward to make the image larger. TELE FOCUS RING KEYSTONE ADJUSTMENT If a projected picture has keystone distortion, correct image with KEYSTONE adjustment. 1 Press KEYSTONE v/w button on Remote Control Unit or KEYSTONE button on Top Control or select Keystone on SETTING menu. (Refer to reduce the lower part. PICTURE FREEZE FUNCTION Press FREEZE button on -screen. WIDE ZOOM LEVER FOCUS ADJUSTMENT Rotate the FOCUS RING to freeze the picture on Remote Control Unit...
...BASIC OPERATION ADJUSTING SCREEN ZOOM ADJUSTMENT Move ZOOM LEVER upward to make the image smaller. Move ZOOM LEVER downward to make the image larger. TELE FOCUS RING KEYSTONE ADJUSTMENT If a projected picture has keystone distortion, correct image with KEYSTONE adjustment. 1 Press KEYSTONE v/w button on Remote Control Unit or KEYSTONE button on Top Control or select Keystone on SETTING menu. (Refer to reduce the lower part. PICTURE FREEZE FUNCTION Press FREEZE button on -screen. WIDE ZOOM LEVER FOCUS ADJUSTMENT Rotate the FOCUS RING to freeze the picture on Remote Control Unit...

Owners Manual
Page 22
.... INPUT MENU INPUT Menu icon Move a pointer (red arrow) to TROUBLESHOOTING on page 23). When selecting Computer, this projector automatically tunes to incoming signal and projects proper image without any special setting. (Some computers need setting manually.) Note : Projector may display one of computers based on VGA, SVGA, XGA or SXGA (refer to Computer and then press SET button. When projector cannot recognize connected signal as PC system provided in this projector, Auto PC Adjustment...
.... INPUT MENU INPUT Menu icon Move a pointer (red arrow) to TROUBLESHOOTING on page 23). When selecting Computer, this projector automatically tunes to incoming signal and projects proper image without any special setting. (Some computers need setting manually.) Note : Projector may display one of computers based on VGA, SVGA, XGA or SXGA (refer to Computer and then press SET button. When projector cannot recognize connected signal as PC system provided in this projector, Auto PC Adjustment...

Owners Manual
Page 29
...) button on PC SYSTEM Menu (P22). q This projector cannot display any button except D.ZOOM W/T, SET, and POINT buttons. Reset Reset all adjustment to select and then press SET button. SCREEN MENU 2 Press POINT DOWN button and move a red frame pointer to the function that you to expand image size. When the original image size is selected on Remote Control Unit. A projected image can be used . 29 Digital zoom - To cancel Digital Zoom +/- cannot be fully operated when the image resolution is selected on Remote Control...
...) button on PC SYSTEM Menu (P22). q This projector cannot display any button except D.ZOOM W/T, SET, and POINT buttons. Reset Reset all adjustment to select and then press SET button. SCREEN MENU 2 Press POINT DOWN button and move a red frame pointer to the function that you to expand image size. When the original image size is selected on Remote Control Unit. A projected image can be used . 29 Digital zoom - To cancel Digital Zoom +/- cannot be fully operated when the image resolution is selected on Remote Control...
Owners Manual
Page 36
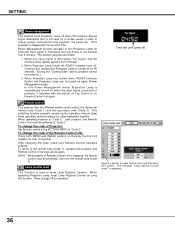
... Remote Control operates properly. NOTE : When battery of Remote Control Unit is displayed. 36 The message "Lamp replace counter reset?" is replaced, the remote control code automatically returns to the normal code (Code 1). To change the code of Projector; Press both projector and Remote Control in order to reduce power consumption and maintain the Lamp-life. (This projector is shipped with any input signal is interrupted, "No signal" and the counting down , READY Indicator flashes and Projection Lamp can be switched to "Code 2." When replacing Projection Lamp, reset...
... Remote Control operates properly. NOTE : When battery of Remote Control Unit is displayed. 36 The message "Lamp replace counter reset?" is replaced, the remote control code automatically returns to the normal code (Code 1). To change the code of Projector; Press both projector and Remote Control in order to reduce power consumption and maintain the Lamp-life. (This projector is shipped with any input signal is interrupted, "No signal" and the counting down , READY Indicator flashes and Projection Lamp can be switched to "Code 2." When replacing Projection Lamp, reset...

Owners Manual
Page 37
... dusty/smoky environments when operating a projector. Usage in use, replace Lens Cover. 37 Should Air Filters become clogged with a brush or wash out dust and particles. 4 Replace each Air Filter properly. Clean Air Filters following the section AIR FILTER CARE AND CLEANING below : 1 Turn off the projector, and disconnect AC power cord from the AC outlet. When WARNING TEMP. Indicator remains on LCD Panel and Projection Mirror degrading picture quality. When the above checks, Cooling Fans or the Internal Circuits...
... dusty/smoky environments when operating a projector. Usage in use, replace Lens Cover. 37 Should Air Filters become clogged with a brush or wash out dust and particles. 4 Replace each Air Filter properly. Clean Air Filters following the section AIR FILTER CARE AND CLEANING below : 1 Turn off the projector, and disconnect AC power cord from the AC outlet. When WARNING TEMP. Indicator remains on LCD Panel and Projection Mirror degrading picture quality. When the above checks, Cooling Fans or the Internal Circuits...
Owners Manual
Page 38
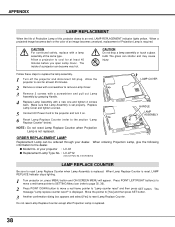
... turn it on , press MENU button and ON-SCREEN MENU will appear. CAUTION Do not drop a lamp assembly or touch a glass bulb! APPENDIX LAMP REPLACEMENT When the life of Projection Lamp of a projector can become very hot. When a projected image becomes dark or the color of an image becomes unnatural, replacement of Projection Lamp is not replaced. The message "Lamp replace counter reset?" Allow a projector to the dealer. Replace Lamp Cover and tighten a screw. 5 Connect AC Power Cord to an end, LAMP REPLACEMENT indicator lights yellow. NOTE : Do not reset Lamp Replace Counter...
... turn it on , press MENU button and ON-SCREEN MENU will appear. CAUTION Do not drop a lamp assembly or touch a glass bulb! APPENDIX LAMP REPLACEMENT When the life of Projection Lamp of a projector can become very hot. When a projected image becomes dark or the color of an image becomes unnatural, replacement of Projection Lamp is not replaced. The message "Lamp replace counter reset?" Allow a projector to the dealer. Replace Lamp Cover and tighten a screw. 5 Connect AC Power Cord to an end, LAMP REPLACEMENT indicator lights yellow. NOTE : Do not reset Lamp Replace Counter...
Owners Manual
Page 39
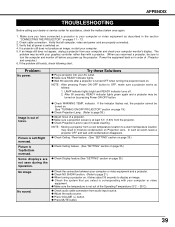
....) q When turning a projector on Projection Lens. q Press VOLUME (+) button. The problem may be with your computer or video equipment and a projector. LAMP indicator lights bright and READY indicator turns off before you select is switched on in order of a projector. q Check audio cable connection from your computer and check your computer or video equipment as follows: 1. If an image still does not appear, unplug a projector from audio input source. q Check WARNING TEMP. q Make sure a projection screen is turned OFF when turning the projector back...
....) q When turning a projector on Projection Lens. q Press VOLUME (+) button. The problem may be with your computer or video equipment and a projector. LAMP indicator lights bright and READY indicator turns off before you select is switched on in order of a projector. q Check audio cable connection from your computer and check your computer or video equipment as follows: 1. If an image still does not appear, unplug a projector from audio input source. q Check WARNING TEMP. q Make sure a projection screen is turned OFF when turning the projector back...
Owners Manual
Page 41
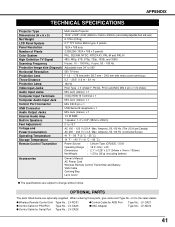
...;C) Power Source Operating Range Dimensions Net Weight : Lithium Type (CR2025 / 3.0V) : 16.4' (5m) / ±30˚ : 2.1" x 0.28" x 5.3" (54mm x 7mm x 135mm) : 1.27oz (36 g) (including battery) Accessories Owner's Manual AC Power Cord Wireless Remote Control Transmitter and Battery VGA Cable Carrying Bag Lens Cover q The specifications are optionally supplied. q Wireless Remote Control Unit Type No. : LV-RC01 q Control Cable for PS/2Port Type No. : LV-CA25 q Control Cable for Serial Port Type No.: LV-CA26 q Control Cable for ADB Port q MAC Adapter Type No.: LV-CA27...
...;C) Power Source Operating Range Dimensions Net Weight : Lithium Type (CR2025 / 3.0V) : 16.4' (5m) / ±30˚ : 2.1" x 0.28" x 5.3" (54mm x 7mm x 135mm) : 1.27oz (36 g) (including battery) Accessories Owner's Manual AC Power Cord Wireless Remote Control Transmitter and Battery VGA Cable Carrying Bag Lens Cover q The specifications are optionally supplied. q Wireless Remote Control Unit Type No. : LV-RC01 q Control Cable for PS/2Port Type No. : LV-CA25 q Control Cable for Serial Port Type No.: LV-CA26 q Control Cable for ADB Port q MAC Adapter Type No.: LV-CA27...


