
User Manual
Page 3
Verify Installation Location Turn on the projector. Note that the surrounding air temperature within 30 cm. Keep the inlet away from other ports like BNC, RCA; DO NOT remove the power cord during use. During the projector starting and operating process, DO NOT insert or remove the signal cable or the power cord to the projector. After the project enters STANDBY MODE status, press the AC power button to turn off the projector and remove the power cord. The shutdown process...
Verify Installation Location Turn on the projector. Note that the surrounding air temperature within 30 cm. Keep the inlet away from other ports like BNC, RCA; DO NOT remove the power cord during use. During the projector starting and operating process, DO NOT insert or remove the signal cable or the power cord to the projector. After the project enters STANDBY MODE status, press the AC power button to turn off the projector and remove the power cord. The shutdown process...
User Manual
Page 4
... the environment. Before replacing the lamp: Unplug the power cord. Allow the lamp to install and operate the DLP projector. If you inhale any gas emitted from the lamp or it will not be hazardous if done incorrectly. Power Safety Only use for this happens, immediately open the lamp cover or while you accidentally inhale or get pieces in use the supplied power cord. Do...
... the environment. Before replacing the lamp: Unplug the power cord. Allow the lamp to install and operate the DLP projector. If you inhale any gas emitted from the lamp or it will not be hazardous if done incorrectly. Power Safety Only use for this happens, immediately open the lamp cover or while you accidentally inhale or get pieces in use the supplied power cord. Do...
User Manual
Page 5
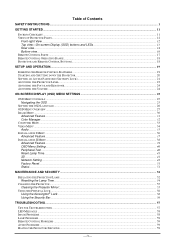
... ...37 INSTALLATION II MENU...38 Advanced Feature ...39 OSD Menu Setting ...40 Peripheral Test ...40 Reset Lamp Time ...41 3D ...41 Network Setting ...42 Factory Reset...51 Status ...51 MAINTENANCE AND SECURITY ...52 REPLACING THE PROJECTION LAMP...52 Resetting the Lamp Time ...54 CLEANING THE PROJECTOR...55 Cleaning the Projector Mirror:...55 USING THE PHYSICAL LOCK ...56 Using the Kensington® Lock ...56 Using the Security Bar ...56 TROUBLESHOOTING ...57 TIPS FOR TROUBLESHOOTING ...57 LED MESSAGES ...58 IMAGE PROBLEMS...58 LAMP PROBLEMS ...59 REMOTE CONTROL PROBLEMS ...59 AUDIO PROBLEMS...
... ...37 INSTALLATION II MENU...38 Advanced Feature ...39 OSD Menu Setting ...40 Peripheral Test ...40 Reset Lamp Time ...41 3D ...41 Network Setting ...42 Factory Reset...51 Status ...51 MAINTENANCE AND SECURITY ...52 REPLACING THE PROJECTION LAMP...52 Resetting the Lamp Time ...54 CLEANING THE PROJECTOR...55 Cleaning the Projector Mirror:...55 USING THE PHYSICAL LOCK ...56 Using the Kensington® Lock ...56 Using the Security Bar ...56 TROUBLESHOOTING ...57 TIPS FOR TROUBLESHOOTING ...57 LED MESSAGES ...58 IMAGE PROBLEMS...58 LAMP PROBLEMS ...59 REMOTE CONTROL PROBLEMS ...59 AUDIO PROBLEMS...
User Manual
Page 7
.... - 1- Operating the projector properly enables you to be operating properly, read this manual again, check operations and cable connections, and try the solutions in the "Troubleshooting" section in the Standard for many convenient features and functions. Improper operation may result in not only shortening the product life, but also malfunctions, fire hazards, or other countries. • HDMI, the HDMI logo and High-Definition Multimedia Interface...
.... - 1- Operating the projector properly enables you to be operating properly, read this manual again, check operations and cable connections, and try the solutions in the "Troubleshooting" section in the Standard for many convenient features and functions. Improper operation may result in not only shortening the product life, but also malfunctions, fire hazards, or other countries. • HDMI, the HDMI logo and High-Definition Multimedia Interface...

User Manual
Page 8
...OPEN - 2- Heat build-up can reduce the service life of time, unplug it may result in a proper position. DO NOT SET THE PROJECTOR IN GREASY, WET, OR SMOKY CONDITIONS SUCH AS IN A KITCHEN TO PREVENT A BREAKDOWN OR A DISASTER. Read all warnings and instructions marked on the DMD panel due to rain or use... projector produces intense light from the power outlet. • Do not project the same image for a long time. Do not stare directly into the beam. • Install the projector in a fire hazard. • Do not cover the ventilation slots on the projector. Use a damp cloth for cleaning....
...OPEN - 2- Heat build-up can reduce the service life of time, unplug it may result in a proper position. DO NOT SET THE PROJECTOR IN GREASY, WET, OR SMOKY CONDITIONS SUCH AS IN A KITCHEN TO PREVENT A BREAKDOWN OR A DISASTER. Read all warnings and instructions marked on the DMD panel due to rain or use... projector produces intense light from the power outlet. • Do not project the same image for a long time. Do not stare directly into the beam. • Install the projector in a fire hazard. • Do not cover the ventilation slots on the projector. Use a damp cloth for cleaning....
User Manual
Page 9
... operation of power supplied, contact the Canon Customer Support Center or local power company. When replacement parts are provided for servicing. Unauthorized substitutions may fall, causing serious injury to a child or adult, and serious damage to secure the projector. Upon completion of any kind onto the projector. This projector should be placed in a built-in installation such as a mounting kit to the projector. Do not locate...
... operation of power supplied, contact the Canon Customer Support Center or local power company. When replacement parts are provided for servicing. Unauthorized substitutions may fall, causing serious injury to a child or adult, and serious damage to secure the projector. Upon completion of any kind onto the projector. This projector should be placed in a built-in installation such as a mounting kit to the projector. Do not locate...

User Manual
Page 11
... equipment does cause harmful interference to radio or television reception, which can radiate radio frequency energy and, if not installed and used in accordance with the projector must accept any changes or modifications to radio communications. Canon U.S.A. To ensure safe use , always observe this manual. Federal Communication Commission Notice Multimedia Projector, Model: LV-WX300UST/LV-WX300USTi This device complies with the limits for help.
... equipment does cause harmful interference to radio or television reception, which can radiate radio frequency energy and, if not installed and used in accordance with the projector must accept any changes or modifications to radio communications. Canon U.S.A. To ensure safe use , always observe this manual. Federal Communication Commission Notice Multimedia Projector, Model: LV-WX300UST/LV-WX300USTi This device complies with the limits for help.

User Manual
Page 13
... cord attached to the outlet, make sure that are emitted while the projector is required, contact the Canon Customer Support Center. • Do not disassemble or modify the projector (including consumable parts) or the remote control. • Do not insert any object into vents in any metal objects into the projector lens. The interior of the projector while it is projecting an image...
... cord attached to the outlet, make sure that are emitted while the projector is required, contact the Canon Customer Support Center. • Do not disassemble or modify the projector (including consumable parts) or the remote control. • Do not insert any object into vents in any metal objects into the projector lens. The interior of the projector while it is projecting an image...
User Manual
Page 15
... discomfort with 3D content viewing. Precautions for an extended period of time or viewing them from an oblique angle can cause eye strain. • Parents should be level with ceiling-mounted projectors, the lamp may fall out when you open the windows and doors to provide ventilation to replace the lamp by yourself. Additionally, with the screen. - 9- If the lamp ruptures and you...
... discomfort with 3D content viewing. Precautions for an extended period of time or viewing them from an oblique angle can cause eye strain. • Parents should be level with ceiling-mounted projectors, the lamp may fall out when you open the windows and doors to provide ventilation to replace the lamp by yourself. Additionally, with the screen. - 9- If the lamp ruptures and you...

User Manual
Page 26
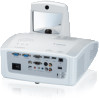
... video S-Video: Super video (Y/C separated) HDMI1/HDMI2: HDMI, DVI 5. The projector turns off. Starting and Shutting down . - 20- Ensure the POWER LED displays a solid green. Then press the POWER button of the remote and use ▲▼ to turn on the connected devices. 3. Caution: Do not unplug the power cord until the POWER LED solid green-indicating the projector has cooled down the Projector 1. Turn on the projector. Connect the other end to the projector. The projector splash screen displays and connected...
... video S-Video: Super video (Y/C separated) HDMI1/HDMI2: HDMI, DVI 5. The projector turns off. Starting and Shutting down . - 20- Ensure the POWER LED displays a solid green. Then press the POWER button of the remote and use ▲▼ to turn on the connected devices. 3. Caution: Do not unplug the power cord until the POWER LED solid green-indicating the projector has cooled down the Projector 1. Turn on the projector. Connect the other end to the projector. The projector splash screen displays and connected...
User Manual
Page 28
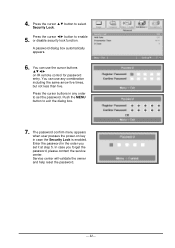
... password confirm menu appears when user presses the power-on IR remote control for password entry. You can use any order to enable 5. 4. Press the cursor buttons in case the Security Lock is enabled. Enter the password in the order you forget the password, please contact the service center. Press the cursor ◄► button to set it at step 5. Service center will validate the owner and help reset...
... password confirm menu appears when user presses the power-on IR remote control for password entry. You can use any order to enable 5. 4. Press the cursor buttons in case the Security Lock is enabled. Enter the password in the order you forget the password, please contact the service center. Press the cursor ◄► button to set it at step 5. Service center will validate the owner and help reset...

User Manual
Page 33
MAIN MENU SUB MENU Image Image Mode Brilliant Color Brightness Contrast Sharpness Gamma Advanced Reset Computer Horizontal Position Vertical Position Tracking Total Dots Auto PC Video / Audio Video AGC Video Saturation Video Tint Film Mode Video Overscan Closed Captioning Audio Reset Color Space Color Temperature Color Manager Red Green Blue Cyan Magenta Yellow White SETTINGS Standard, Presentation, sRGB, Movie, User 0~10 0~100 0~100 0~31 2.0, 2.2, 2.4, 2.6, 2.8 Auto, RGB, YUV Native, 6500K, 7500K, 8200K Hue, Saturation, Gain Hue, Saturation, Gain Hue, Saturation, Gain ...
MAIN MENU SUB MENU Image Image Mode Brilliant Color Brightness Contrast Sharpness Gamma Advanced Reset Computer Horizontal Position Vertical Position Tracking Total Dots Auto PC Video / Audio Video AGC Video Saturation Video Tint Film Mode Video Overscan Closed Captioning Audio Reset Color Space Color Temperature Color Manager Red Green Blue Cyan Magenta Yellow White SETTINGS Standard, Presentation, sRGB, Movie, User 0~10 0~100 0~100 0~31 2.0, 2.2, 2.4, 2.6, 2.8 Auto, RGB, YUV Native, 6500K, 7500K, 8200K Hue, Saturation, Gain Hue, Saturation, Gain Hue, Saturation, Gain ...

User Manual
Page 35
... MENU SETTINGS Installation II Auto Search Auto Power Off (min.) Direct Power On Fan Mode Lamp Mode Advanced OSD Menu Setting Peripheral Test Reset Lamp Time Low Power Mode 3D RS232 Network Setting Factory Reset Status Active Source Video Information Lamp Time (Power Saver, Full power) Firmware Version Menu Position Translucent Menu Menu Display Remote Control Test Color Test USB Test Off, On 0~180 Off, On Normal, High Altitude Full Power, Power Saver Center, Down, Up, Left, Right 0%, 25%, 50%, 75%, 100% 10~20 3D 3D Sync Invert 3D Format Network State DHCP IP Address...
... MENU SETTINGS Installation II Auto Search Auto Power Off (min.) Direct Power On Fan Mode Lamp Mode Advanced OSD Menu Setting Peripheral Test Reset Lamp Time Low Power Mode 3D RS232 Network Setting Factory Reset Status Active Source Video Information Lamp Time (Power Saver, Full power) Firmware Version Menu Position Translucent Menu Menu Display Remote Control Test Color Test USB Test Off, On 0~180 Off, On Normal, High Altitude Full Power, Power Saver Center, Down, Up, Left, Right 0%, 25%, 50%, 75%, 100% 10~20 3D 3D Sync Invert 3D Format Network State DHCP IP Address...

User Manual
Page 52
... Menu button on network web-page for the input-string in the IP address and Subnet mask, then click OK. 7. After getting into Network Setting, input the following IP address and fill in tools tab, the limitation for Input-Length is setup for example, Microsoft Internet Explorer with Adobe Flash Player 9.0 or higher). 12. Press OK / ►. The LAN/RJ45 function displays as follows. Open...
... Menu button on network web-page for the input-string in the IP address and Subnet mask, then click OK. 7. After getting into Network Setting, input the following IP address and fill in tools tab, the limitation for Input-Length is setup for example, Microsoft Internet Explorer with Adobe Flash Player 9.0 or higher). 12. Press OK / ►. The LAN/RJ45 function displays as follows. Open...

User Manual
Page 57
Lamp Time used information is displayed. ITEM DESCRIPTION Active Source Video Information Lamp Time (Power Saver, Full power) Firmware Version Display the activated source. Displays resolution/video information for RGB source and color standard for Video source. Showing system Firmware version. - 51- Status Press the cursor ▲▼ button to move up and down in the Installation II menu. Select the Factory Reset sub menu and press OK / ► to reset all the menu items to enter the Status sub menu. Select the...
Lamp Time used information is displayed. ITEM DESCRIPTION Active Source Video Information Lamp Time (Power Saver, Full power) Firmware Version Display the activated source. Displays resolution/video information for RGB source and color standard for Video source. Showing system Firmware version. - 51- Status Press the cursor ▲▼ button to move up and down in the Installation II menu. Select the Factory Reset sub menu and press OK / ► to reset all the menu items to enter the Status sub menu. Select the...
User Manual
Page 58
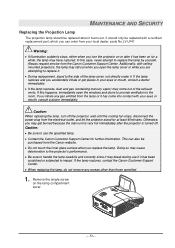
.... 1. Caution: When replacing the lamp, turn the projector on the lamp compartment cover. - 52- Otherwise, you may break during use the specified lamp. Contact the Canon Customer Support Center for at least 45minutes. It should be replaced when it burns out. Remove the single screw on or after the projector is turned off the projector, wait until the cooling fan stops, disconnect the power plug from the...
.... 1. Caution: When replacing the lamp, turn the projector on the lamp compartment cover. - 52- Otherwise, you may break during use the specified lamp. Contact the Canon Customer Support Center for at least 45minutes. It should be replaced when it burns out. Remove the single screw on or after the projector is turned off the projector, wait until the cooling fan stops, disconnect the power plug from the...
User Manual
Page 64
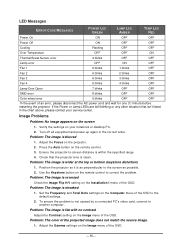
... Fan 1 6 blinks 1 blinks OFF Fan 2 6 blinks 2 blinks OFF Fan 3 6 blinks 3 blinks OFF Fan 4 6 blinks 4 blinks OFF Lamp Door Open 7 blinks OFF OFF DMD error 8 blinks OFF OFF Color wheel error 9 blinks OFF OFF In the event of the OSD to the default settings. 2. Check that isn't listed in the correct order. Position the projector so it is as perpendicular to another computer. Use the Keystone button on your service center. Problem: The image is blurred 1. Set the Frequency and Total Dots settings on the Computer menu...
... Fan 1 6 blinks 1 blinks OFF Fan 2 6 blinks 2 blinks OFF Fan 3 6 blinks 3 blinks OFF Fan 4 6 blinks 4 blinks OFF Lamp Door Open 7 blinks OFF OFF DMD error 8 blinks OFF OFF Color wheel error 9 blinks OFF OFF In the event of the OSD to the default settings. 2. Check that isn't listed in the correct order. Position the projector so it is as perpendicular to another computer. Use the Keystone button on your service center. Problem: The image is blurred 1. Set the Frequency and Total Dots settings on the Computer menu...
User Manual
Page 65
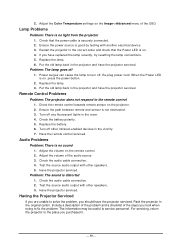
... check that the power cable is no light from the projector 1. Turn off 1. Adjust the Color Temperature settings on the remote control. 2. Lamp Problems Problem: There is on the projector. 2. Replace the lamp. 6. Put the old lamp back in the vicinity. 7. Re-plug power cord. When the Power LED is no sound 1. Replace the battery. 6. Adjust the volume on the Image->Advanced menu of the audio source. 3. Test the source audio output with other Infrared-enabled devices in the projector and have the projector serviced...
... check that the power cable is no light from the projector 1. Turn off 1. Adjust the Color Temperature settings on the remote control. 2. Lamp Problems Problem: There is on the projector. 2. Replace the lamp. 6. Put the old lamp back in the vicinity. 7. Re-plug power cord. When the Power LED is no sound 1. Replace the battery. 6. Adjust the volume on the Image->Advanced menu of the audio source. 3. Test the source audio output with other Infrared-enabled devices in the projector and have the projector serviced...
User Manual
Page 66
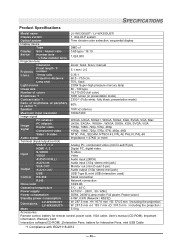
... Size / Aspect ratio LV-WX300UST / LV-WX300USTi 1 chip DLP system Time division color extraction, sequential display DMD x1 0.65 type / 16:10 device Number dots (=Total number dots) Projection lens Operation 1,024,000 Zoom: fixed, focus: manual Projectio n lens Focal length / F number Throw ratio Projection distance Lens shift Light source Image size Number of colors Brightness *1 Contrast ratio *1 5.1 mm / 2.5 0.35:1 60.5 - 70.5 cm 75%, fixed 230W Super-high pressure mercury lamp 80 - 100 type 16,770,000 (full color) 3000 lumen (in presentation mode) 2300:1 (Fully white...
... Size / Aspect ratio LV-WX300UST / LV-WX300USTi 1 chip DLP system Time division color extraction, sequential display DMD x1 0.65 type / 16:10 device Number dots (=Total number dots) Projection lens Operation 1,024,000 Zoom: fixed, focus: manual Projectio n lens Focal length / F number Throw ratio Projection distance Lens shift Light source Image size Number of colors Brightness *1 Contrast ratio *1 5.1 mm / 2.5 0.35:1 60.5 - 70.5 cm 75%, fixed 230W Super-high pressure mercury lamp 80 - 100 type 16,770,000 (full color) 3000 lumen (in presentation mode) 2300:1 (Fully white...

User Manual
Page 73
... Color Temperature Projection Mode Sharpness Set Data Range 0 ~ 100 0 ~ 100 0 ~ 100 0 ~ 100 0: Fill 1: 4:3 2: 16:9 3 :Letter Box 4 :Native 0 :Native 1: 6500K2:7500K 3: 8200K 0: Rear Table 1: Front Table 2: Rear Ceiling 3: Front Ceiling 0~31 Source ALL ALL Video/S-Video/Component Video/S-Video/Component ALL ALL ALL ALL Attention: Data range may be different for different models Example 1. Button's name UP arrow DOWN arrow LEFT arrow RIGHT arrow POWER EXIT INPUT AUTO KEYSTONE+ KEYSTONEMENU STATUS MUTE ZOOM...
... Color Temperature Projection Mode Sharpness Set Data Range 0 ~ 100 0 ~ 100 0 ~ 100 0 ~ 100 0: Fill 1: 4:3 2: 16:9 3 :Letter Box 4 :Native 0 :Native 1: 6500K2:7500K 3: 8200K 0: Rear Table 1: Front Table 2: Rear Ceiling 3: Front Ceiling 0~31 Source ALL ALL Video/S-Video/Component Video/S-Video/Component ALL ALL ALL ALL Attention: Data range may be different for different models Example 1. Button's name UP arrow DOWN arrow LEFT arrow RIGHT arrow POWER EXIT INPUT AUTO KEYSTONE+ KEYSTONEMENU STATUS MUTE ZOOM...


