i450 Quick Start Guide
Page 3
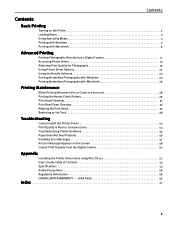
... Maintenance When Printing Becomes Faint or Colors are Incorrect 28 Printing the Nozzle Check Pattern 29 Print Head Cleaning 31 Print Head Deep Cleaning 33 Aligning the Print Head 35 Replacing an Ink Tank 38 Troubleshooting Cannot Install the Printer Driver 43 Print Quality is Poor ...Message Appears on the Screen 48 Cannot Print Properly from the Digital Camera 50 Appendix Installing the Printer Driver when using Mac OS 9.x 52 User's Guide Table of Contents 53 Specifications 54 Safety Precautions 56 Regulatory Information 58 CANON LIMITED WARRANTY --- (USA Only 59 Index 61 1
... Maintenance When Printing Becomes Faint or Colors are Incorrect 28 Printing the Nozzle Check Pattern 29 Print Head Cleaning 31 Print Head Deep Cleaning 33 Aligning the Print Head 35 Replacing an Ink Tank 38 Troubleshooting Cannot Install the Printer Driver 43 Print Quality is Poor ...Message Appears on the Screen 48 Cannot Print Properly from the Digital Camera 50 Appendix Installing the Printer Driver when using Mac OS 9.x 52 User's Guide Table of Contents 53 Specifications 54 Safety Precautions 56 Regulatory Information 58 CANON LIMITED WARRANTY --- (USA Only 59 Index 61 1

i450 Quick Start Guide
Page 40
Black: BCI-24 Black Color: BCI-24 Color „ Replacing an Ink Tank When an ink tank runs out of consumables. 38 Color Black Important z Handle ink tanks carefully to the local laws and regulations regarding disposal of ink, replace it using the following steps. 1 Ensure that the printer is used, or installed in the incorrect position. z Discard empty ink tanks according to avoid staining clothing...
Black: BCI-24 Black Color: BCI-24 Color „ Replacing an Ink Tank When an ink tank runs out of consumables. 38 Color Black Important z Handle ink tanks carefully to the local laws and regulations regarding disposal of ink, replace it using the following steps. 1 Ensure that the printer is used, or installed in the incorrect position. z Discard empty ink tanks according to avoid staining clothing...
i450 Quick Start Guide
Page 41
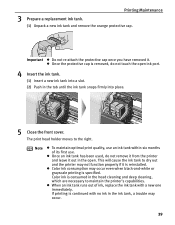
... cap is removed, do not remove it from the printer and leave it is specified. z When an ink tank runs out of its first use an ink tank within six months of ink, replace the ink tank with no ink in the head cleaning and deep cleaning, which are ... one immediately. The print head holder moves to maintain the printer's capabilities. z Color ink consumption may occur. 39 z Once an ink tank has been used, do not touch the open . 3 Prepare a replacement ink tank. Printing Maintenance (1) Unpack a new ink tank and remove the orange protective cap. Important z Do not...
... cap is removed, do not remove it from the printer and leave it is specified. z When an ink tank runs out of its first use an ink tank within six months of ink, replace the ink tank with no ink in the head cleaning and deep cleaning, which are ... one immediately. The print head holder moves to maintain the printer's capabilities. z Color ink consumption may occur. 39 z Once an ink tank has been used, do not touch the open . 3 Prepare a replacement ink tank. Printing Maintenance (1) Unpack a new ink tank and remove the orange protective cap. Important z Do not...

i450 Quick Start Guide
Page 42
Resetting the Ink Counter in Printer Properties dialog box: z When using Macintosh: 1. z When using Windows: 1. When both black and color ink tanks have not replaced the ink tank with a new one, click Cancel. Click Utilities and select Low Ink Warning Setting. 3. Select the newly installed ink tank, then click OK. Open the Page Setup dialog box. 2. Select the newly installed ink tank, then click OK...
Resetting the Ink Counter in Printer Properties dialog box: z When using Macintosh: 1. z When using Windows: 1. When both black and color ink tanks have not replaced the ink tank with a new one, click Cancel. Click Utilities and select Low Ink Warning Setting. 3. Select the newly installed ink tank, then click OK. Open the Page Setup dialog box. 2. Select the newly installed ink tank, then click OK...

i450 Quick Start Guide
Page 43
... will assume that the ink tank is full regardless of how much ink actually remains. The reset is the only way to be adjusted when it with an actual ink volume. shows a low ink level in use. BJ Status Monitor (Windows) BJ Status Dialog (Macintosh) The color ink becomes low. The Low Ink Warning has been preset to match...
... will assume that the ink tank is full regardless of how much ink actually remains. The reset is the only way to be adjusted when it with an actual ink volume. shows a low ink level in use. BJ Status Monitor (Windows) BJ Status Dialog (Macintosh) The color ink becomes low. The Low Ink Warning has been preset to match...
i450 Quick Start Guide
Page 46
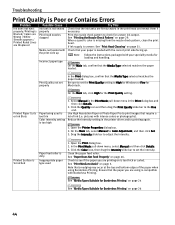
..."Print Media to print images that the ink tanks are printing on is too thick or curled. Note that your speciality media for the Print Quality setting. Use High Resolution Paper or Photo Paper Pro to Avoid" on page 24 See "Media Types Suitable for Color Adjustment, and then click Set. 3....44 On the Main tab, click High for loading and handling. Open the Printer Properties dialog box. 2. Check that smudging may occur at the top and bottom edges of ink (i.e. Printed Paper Curls or Ink Blots Paper being used 1. Print the nozzle check pattern to see if the paper you are...
..."Print Media to print images that the ink tanks are printing on is too thick or curled. Note that your speciality media for the Print Quality setting. Use High Resolution Paper or Photo Paper Pro to Avoid" on page 24 See "Media Types Suitable for Color Adjustment, and then click Set. 3....44 On the Main tab, click High for loading and handling. Open the Printer Properties dialog box. 2. Check that smudging may occur at the top and bottom edges of ink (i.e. Printed Paper Curls or Ink Blots Paper being used 1. Print the nozzle check pattern to see if the paper you are...
i450 Quick Start Guide
Page 49
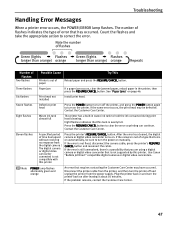
...this tank is not compatible with this printer. Eight flashes Waste ink tank almost full The printer has a built-in the printer, then press the RESUME/CANCEL button. Contact the Customer Care Center. Disconnect the printer cable from the printer, and then turn the printer off the printer, ... Customer Care Center. 47 Troubleshooting Handling Error Messages When a printer error occurs, the POWER/ERROR lamp flashes. Use Canon "Bubble Jet Direct" compatible digital cameras or digital video camcorders. Plug the printer back in and turn the power on manually. If the ...
...this tank is not compatible with this printer. Eight flashes Waste ink tank almost full The printer has a built-in the printer, then press the RESUME/CANCEL button. Contact the Customer Care Center. Disconnect the printer cable from the printer, and then turn the printer off the printer, ... Customer Care Center. 47 Troubleshooting Handling Error Messages When a printer error occurs, the POWER/ERROR lamp flashes. Use Canon "Bubble Jet Direct" compatible digital cameras or digital video camcorders. Plug the printer back in and turn the power on manually. If the ...
i450 Quick Start Guide
Page 52
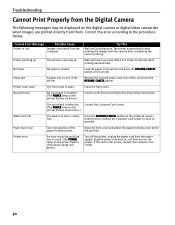
... to the left position. Close the front cover. Contact the Customer Care Center. (The POWER lamp on the printer flashes seven times.) Waste tank full The waste ink tank is open. Open the front cover and adjust the paper thickness lever to the procedure below. Try This Wait ...up ends. The print head is warning up The printer is defective. Camera Error Message Possible Cause Printer in the printer and press the RESUME/CANCEL button on the printer. Printer warming up . Wait until printing ends. Load the paper in use Images are printed directly from the power supply, ...
... to the left position. Close the front cover. Contact the Customer Care Center. (The POWER lamp on the printer flashes seven times.) Waste tank full The waste ink tank is open. Open the front cover and adjust the paper thickness lever to the procedure below. Try This Wait ...up ends. The print head is warning up The printer is defective. Camera Error Message Possible Cause Printer in the printer and press the RESUME/CANCEL button on the printer. Printer warming up . Wait until printing ends. Load the paper in use Images are printed directly from the power supply, ...

i450 Quick Start Guide
Page 59
...use an extension lead/ cord. AC 100-127 V, 50/60 Hz AC 220-240 V, 50/60 Hz Working around the power outlet is kept clear at both ends. Never touch the electrical contacts on the cord. Ensure that is printing. Do not shake print heads or ink tanks. When moving the printer, carry the printer... at all times so you purchased the printer. If any ink, consult a doctor immediately. Ink may be very hot and could cause burns. 57 To avoid the risk...
...use an extension lead/ cord. AC 100-127 V, 50/60 Hz AC 220-240 V, 50/60 Hz Working around the power outlet is kept clear at both ends. Never touch the electrical contacts on the cord. Ensure that is printing. Do not shake print heads or ink tanks. When moving the printer, carry the printer... at all times so you purchased the printer. If any ink, consult a doctor immediately. Ink may be very hot and could cause burns. 57 To avoid the risk...
i450 Quick Start Guide
Page 63
... BCI-24 Black 38 BCI-24 Color 38 BJ Print Monitor 45 BJ Printer Driver Systems Requirements 55 BJ Status ...Monitor 42, 45 Borderless (full 25, 27 Borderless Printing 22, 23, 24, 26, 44 Bubble Jet Direct 11 C Camera Direct Print 55 Camera Error Message 50 Cancelling Print Jobs 8 Cannot Print Properly from the Digital Camera 50 CANON... I ImageBrowser 23 Ink Counter Reset 40 Ink Tank 38 Installing the Printer Driver when using Mac OS 9.x ..... 52 L Load Limit Mark 4 Loading Paper 3 Low Ink Warning 41 Low Ink Warning Setting 49 ...
... BCI-24 Black 38 BCI-24 Color 38 BJ Print Monitor 45 BJ Printer Driver Systems Requirements 55 BJ Status ...Monitor 42, 45 Borderless (full 25, 27 Borderless Printing 22, 23, 24, 26, 44 Bubble Jet Direct 11 C Camera Direct Print 55 Camera Error Message 50 Cancelling Print Jobs 8 Cannot Print Properly from the Digital Camera 50 CANON... I ImageBrowser 23 Ink Counter Reset 40 Ink Tank 38 Installing the Printer Driver when using Mac OS 9.x ..... 52 L Load Limit Mark 4 Loading Paper 3 Low Ink Warning 41 Low Ink Warning Setting 49 ...
i450 Quick Start Guide
Page 64
... an Ink Tank 28, 38 Resetting the Ink Counter 40 RESUME/CANCEL button 8, 10 S Safety Precautions 56 Saving Driver Setting 20 Speciality Media 6 Specifications 54 T Technical support 60 Transparencies 6 Troubleshooting 42 T-Shirt Transfers 6 Turning on the Printer 2 U Uninstalling the printer driver 48 Using Speciality Media 5 V Vivid Photo 18 W Warranty 59 When Printing Becomes Faint or Colors are...
... an Ink Tank 28, 38 Resetting the Ink Counter 40 RESUME/CANCEL button 8, 10 S Safety Precautions 56 Saving Driver Setting 20 Speciality Media 6 Specifications 54 T Technical support 60 Transparencies 6 Troubleshooting 42 T-Shirt Transfers 6 Turning on the Printer 2 U Uninstalling the printer driver 48 Using Speciality Media 5 V Vivid Photo 18 W Warranty 59 When Printing Becomes Faint or Colors are...

i450 Quick Start Guide
Page 3
... details on cable specifications, refer to your Canon Authorized Dealer or Sales Representative. ‰ Printer ‰ Setup Software & User's Guide CD-ROM ‰ Quick Start Guide ‰ Print Head ‰ 2 Ink Tanks * A USB cable should be transmitted or copied in the box. Introduction This Quick Start Guide uses the following items are registered trademarks of...
... details on cable specifications, refer to your Canon Authorized Dealer or Sales Representative. ‰ Printer ‰ Setup Software & User's Guide CD-ROM ‰ Quick Start Guide ‰ Print Head ‰ 2 Ink Tanks * A USB cable should be transmitted or copied in the box. Introduction This Quick Start Guide uses the following items are registered trademarks of...

i450 Quick Start Guide
Page 8
...protective cap 2 Hold the ink tank as this may cause the ink to leak out and stain your clothes and hands. 1 Take out the black ink tank. Wait until it has been removed. ink port 3 Insert the black ink tank into place. 5 Use the same procedure to install the color ink tank in the diagram and ...remove the protective cap. • Do not touch the ink port. • Do not attempt ...
...protective cap 2 Hold the ink tank as this may cause the ink to leak out and stain your clothes and hands. 1 Take out the black ink tank. Wait until it has been removed. ink port 3 Insert the black ink tank into place. 5 Use the same procedure to install the color ink tank in the diagram and ...remove the protective cap. • Do not touch the ink port. • Do not attempt ...

i450 Quick Start Guide
Page 16
It takes about 60 seconds to use. 14 The printer is now ready to start printing. 7 After the pattern is printed, click Yes. If it is loaded in Column A, select the most even, least irregular ... click OK. This completes the printer setup. If the pattern is not printed successfully, open the front cover and ensure that paper is difficult to K, enter their numbers, and click OK. Less noticeable white stripes More noticeable white stripes 10 Click OK. 6 Check that the ink tanks are correctly installed. 8 Look at the...
It takes about 60 seconds to use. 14 The printer is now ready to start printing. 7 After the pattern is printed, click Yes. If it is loaded in Column A, select the most even, least irregular ... click OK. This completes the printer setup. If the pattern is not printed successfully, open the front cover and ensure that paper is difficult to K, enter their numbers, and click OK. Less noticeable white stripes More noticeable white stripes 10 Click OK. 6 Check that the ink tanks are correctly installed. 8 Look at the...


