User Manual
Page 3
... of electric or magnetic radiation. Pay particular attention to plugs and the point from the wall outlet before the product is grounded so as battery power, refer to the product, be read before cleaning. If an outside antenna is connected to instructions in the operating instructions should be ...respect to grounding electrodes, and requirements for future reference. 3 Heed Warnings - If the plug still fails to fit, contact your electrician to the Canon HD Camcorder HR10 A and all its accessories. 1 Read Instructions - Do not defeat the safety purpose of electric shock -
... of electric or magnetic radiation. Pay particular attention to plugs and the point from the wall outlet before the product is grounded so as battery power, refer to the product, be read before cleaning. If an outside antenna is connected to instructions in the operating instructions should be ...respect to grounding electrodes, and requirements for future reference. 3 Heed Warnings - If the plug still fails to fit, contact your electrician to the Canon HD Camcorder HR10 A and all its accessories. 1 Read Instructions - Do not defeat the safety purpose of electric shock -
User Manual
Page 4
... can result in fire, electric shock or other controls may result in a risk of other hazards. 20 Safety Check - Contact your nearest Canon Service Center for service. 19 Replacement Parts - Do not overload wall outlets and extension cords as opening or removing covers may touch dangerous voltage...damage to the product due to rain or water. When replacement of any kind into , the product. Refer all power sources including battery, and refer servicing to spill liquid of this can be sure the service technician has used replacement parts that are covered by a qualified...
... can result in fire, electric shock or other controls may result in a risk of other hazards. 20 Safety Check - Contact your nearest Canon Service Center for service. 19 Replacement Parts - Do not overload wall outlets and extension cords as opening or removing covers may touch dangerous voltage...damage to the product due to rain or water. When replacement of any kind into , the product. Refer all power sources including battery, and refer servicing to spill liquid of this can be sure the service technician has used replacement parts that are covered by a qualified...
User Manual
Page 10
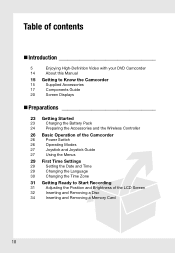
... 5 Enjoying High-Definition Video with your DVD Camcorder 14 About this Manual 15 Getting to Know the Camcorder 15 Supplied Accessories 17 Components Guide 20 Screen Displays „Preparations 23 Getting Started 23 Charging the Battery Pack 24 Preparing the Accessories and the Wireless... Controller 26 Basic Operation of the Camcorder 26 Power Switch 26 Operating Modes 27 Joystick and Joystick Guide 27 Using ...
... 5 Enjoying High-Definition Video with your DVD Camcorder 14 About this Manual 15 Getting to Know the Camcorder 15 Supplied Accessories 17 Components Guide 20 Screen Displays „Preparations 23 Getting Started 23 Charging the Battery Pack 24 Preparing the Accessories and the Wireless... Controller 26 Basic Operation of the Camcorder 26 Power Switch 26 Operating Modes 27 Joystick and Joystick Guide 27 Using ...

User Manual
Page 15
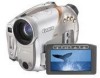
power cord) BP-214 Battery Pack WL-D86 Wireless Controller Lithium Button Battery CR2025 for Wireless Controller CTC-100/S Component Cable Red • Green • Blue plugs STV-100 Stereo Video Cable Yellow • Red • White plugs IFC-300PCU USB Cable Blank DVD-R Disc (8 cm Mini DVD) Software CD-ROM* DIGITAL VIDEO Solution Disk Software CD-ROM and User Manual Corel Application Disc * Includes the electronic version of the Digital Video Software instruction manual on PDF file. 15 Getting to Know the Camcorder Supplied Accessories CA-570 Compact Power Adapter (incl.
power cord) BP-214 Battery Pack WL-D86 Wireless Controller Lithium Button Battery CR2025 for Wireless Controller CTC-100/S Component Cable Red • Green • Blue plugs STV-100 Stereo Video Cable Yellow • Red • White plugs IFC-300PCU USB Cable Blank DVD-R Disc (8 cm Mini DVD) Software CD-ROM* DIGITAL VIDEO Solution Disk Software CD-ROM and User Manual Corel Application Disc * Includes the electronic version of the Digital Video Software instruction manual on PDF file. 15 Getting to Know the Camcorder Supplied Accessories CA-570 Compact Power Adapter (incl.
User Manual
Page 16
... on Canon new products and promotions. The serial number of this product can be found at www.registercanon.com Protect your product We will send you refer to this book as a permanent record of your product online at the battery attachment unit of an insurance claim such ... purchase to help you information on file to aid identification in the event of the camcorder. Write down the number and other information here and retain this information in case of Purchase: Model Name: HR10 A Purchased From: Serial No.: Dealer Address: Dealer Phone No.: 16 Introduction Online ...
... on Canon new products and promotions. The serial number of this product can be found at www.registercanon.com Protect your product We will send you refer to this book as a permanent record of your product online at the battery attachment unit of an insurance claim such ... purchase to help you information on file to aid identification in the event of the camcorder. Write down the number and other information here and retain this information in case of Purchase: Model Name: HR10 A Purchased From: Serial No.: Dealer Address: Dealer Phone No.: 16 Introduction Online ...
User Manual
Page 17
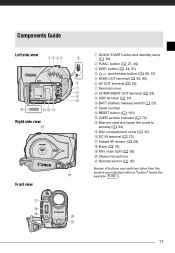
..., 81) (print/share) button ( 86, 97) HDMI OUT terminal ( 93, 95) AV OUT terminal ( 92) Terminal cover COMPONENT OUT terminal ( 93) USB terminal ( 97) BATT. (battery release) switch ( 23) Serial number RESET button ( 101) CARD access indicator ( 72) Memory card slot (open the cover to access) ( 34) Disc compartment cover ( 32...
..., 81) (print/share) button ( 86, 97) HDMI OUT terminal ( 93, 95) AV OUT terminal ( 92) Terminal cover COMPONENT OUT terminal ( 93) USB terminal ( 97) BATT. (battery release) switch ( 23) Serial number RESET button ( 101) CARD access indicator ( 72) Memory card slot (open the cover to access) ( 34) Disc compartment cover ( 32...
User Manual
Page 21
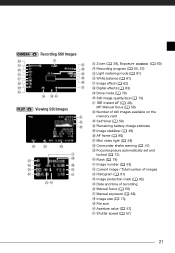
... AF ( 48), MF Manual focus ( 59) Number of still images available on the memory card Self timer ( 59) Remaining battery charge estimate Image stabilizer ( 49) AF frame ( 80) Mini video light ( 58) Camcorder shake warning ( 47) Focus/exposure automatically set and locked ( 72) Flash ( 78) Image number ( 53) Current image / Total number...
... AF ( 48), MF Manual focus ( 59) Number of still images available on the memory card Self timer ( 59) Remaining battery charge estimate Image stabilizer ( 49) AF frame ( 80) Mini video light ( 58) Camcorder shake warning ( 47) Focus/exposure automatically set and locked ( 72) Flash ( 78) Image number ( 53) Current image / Total number...
User Manual
Page 22
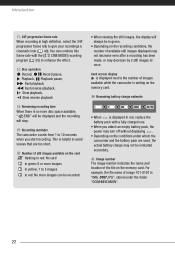
...start recording. You can be recorded • When viewing the still images, the display will stop. Recording reminder The camcorder counts from 1 to 10 seconds when you attach an empty battery pack, the power may decrease by 2 still images at once. Card access display is writing on the memory card.... Number of images available while the camcorder is displayed next to the number of still images available on the card...
...start recording. You can be recorded • When viewing the still images, the display will stop. Recording reminder The camcorder counts from 1 to 10 seconds when you attach an empty battery pack, the power may decrease by 2 still images at once. Card access display is writing on the memory card.... Number of images available while the camcorder is displayed next to the number of still images available on the card...
User Manual
Page 23
... Open the LCD panel. • Slide in the connector end of the battery pack in the direction of the battery pack will stay on page 117. switch 1 Turn off the camcorder. 2 Attach the battery pack to the camcorder's DC IN terminal. • The CHG (charge) indicator starts flashing. The... indicator will not be powered with a full battery pack, refer to help you learn more about your camcorder. Preparations This chapter describes basic operations, such as navigating the menus, and first time settings to the tables ...
... Open the LCD panel. • Slide in the connector end of the battery pack in the direction of the battery pack will stay on page 117. switch 1 Turn off the camcorder. 2 Attach the battery pack to the camcorder's DC IN terminal. • The CHG (charge) indicator starts flashing. The... indicator will not be powered with a full battery pack, refer to help you learn more about your camcorder. Preparations This chapter describes basic operations, such as navigating the menus, and first time settings to the tables ...
User Manual
Page 24
...power adapter to wait until the LCD display is completely off the camcorder before connecting or disconnecting the compact power adapter. Continuously on how to release the battery pack, and pull out the battery pack holding it from the power outlet and the compact power adapter...etc. Flashes approx. Preparing the Accessories and the Wireless Controller 1 Fasten the grip belt. Preparations ONCE THE BATTERY PACK IS FULLY CHARGED 1 Disconnect the compact power adapter from the camcorder. 2 Unplug the power cord from the ridge on its bottom part. NOTES • The CHG (charge)...
...power adapter to wait until the LCD display is completely off the camcorder before connecting or disconnecting the compact power adapter. Continuously on how to release the battery pack, and pull out the battery pack holding it from the power outlet and the compact power adapter...etc. Flashes approx. Preparing the Accessories and the Wireless Controller 1 Fasten the grip belt. Preparations ONCE THE BATTERY PACK IS FULLY CHARGED 1 Disconnect the compact power adapter from the camcorder. 2 Unplug the power cord from the ridge on its bottom part. NOTES • The CHG (charge)...
User Manual
Page 25
...screws longer than 5.5 mm (0.2 in the direction of the light by the lens). Otherwise, replace the battery. Point the wireless controller at the camcorder's remote sensor when you mount the camcorder on a tripod Do not leave the viewfinder exposed to direct sunlight as it may melt (due to ...concentration of the arrow and pull out the battery holder. 2 Place the lithium button battery with the + side facing up. 3 Insert the battery holder. Do not use tripods with your thumb. NOTES • The wireless controller may damage the camcorder. Doing so may not work , check that...
...screws longer than 5.5 mm (0.2 in the direction of the light by the lens). Otherwise, replace the battery. Point the wireless controller at the camcorder's remote sensor when you mount the camcorder on a tripod Do not leave the viewfinder exposed to direct sunlight as it may melt (due to ...concentration of the arrow and pull out the battery holder. 2 Place the lithium button battery with the + side facing up. 3 Insert the battery holder. Do not use tripods with your thumb. NOTES • The wireless controller may damage the camcorder. Doing so may not work , check that...
User Manual
Page 29
...change the date format ( 54). • You can start the clock and close the menu. The [DATE/TIME] screen will appear automatically when the camcorder's clock is not set the time zone, date and time again. Changing the Language When the [DATE/TIME] screen appears, the year will be lost...start using it. In subsequent screen displays the date and time will appear as month-day-year (for about 3 months, the built-in rechargeable lithium battery may discharge completely and the date and time setting may be displayed in orange and indicated with up/down arrows. 1 Change ( ) the year ...
...change the date format ( 54). • You can start the clock and close the menu. The [DATE/TIME] screen will appear automatically when the camcorder's clock is not set the time zone, date and time again. Changing the Language When the [DATE/TIME] screen appears, the year will be lost...start using it. In subsequent screen displays the date and time will appear as month-day-year (for about 3 months, the built-in rechargeable lithium battery may discharge completely and the date and time setting may be displayed in orange and indicated with up/down arrows. 1 Change ( ) the year ...
User Manual
Page 31
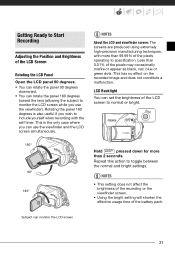
... 0.01% of the pixels may occasionally misfire or appear as black, red, blue or green dots. pressed down for more than 99.99% of the battery pack. Rotating the panel 180 degrees is the only case where you can rotate the panel 180 degrees toward the lens (allowing the subject to...
... 0.01% of the pixels may occasionally misfire or appear as black, red, blue or green dots. pressed down for more than 99.99% of the battery pack. Rotating the panel 180 degrees is the only case where you can rotate the panel 180 degrees toward the lens (allowing the subject to...
User Manual
Page 33
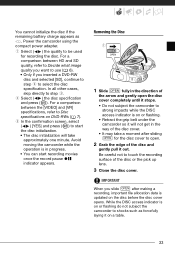
...operation is updated on or flashing do not subject the camcorder to select the disc specification. In the confirmation screen, select ( ) [YES] and press ( ) to open the disc cover completely until it out. You cannot initialize the disc if the remaining battery charge appears as forcefully laying it will take a ... direction of the arrow and gently open . 2 Grab the edge of the disc and gently pull it stops. • Do not subject the camcorder to strong impacts while the DISC access indicator is on the disc before the disc cover opens. In all other cases, skip directly to Disc...
...operation is updated on or flashing do not subject the camcorder to select the disc specification. In the confirmation screen, select ( ) [YES] and press ( ) to open the disc cover completely until it out. You cannot initialize the disc if the remaining battery charge appears as forcefully laying it will take a ... direction of the arrow and gently open . 2 Grab the edge of the disc and gently pull it stops. • Do not subject the camcorder to strong impacts while the DISC access indicator is on the disc before the disc cover opens. In all other cases, skip directly to Disc...

User Manual
Page 36
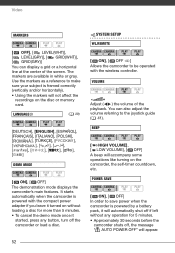
...if left without any operations for 5 minutes ( 52). NOTES • About the Power Save mode: To save power when the camcorder is powered by a battery pack, the camcorder will automatically shut off the camcorder. - Using the Viewfinder When recording in very loud places (such as necessary with flexible recording programs ( 57) you to ON...power, slide the switch toward MODE and release it may become distorted or it , or move the switch to and back to just point the camcorder and start shooting. About the Mode Switch and Recording Programs Set the mode switch to AUTO to let the...
...if left without any operations for 5 minutes ( 52). NOTES • About the Power Save mode: To save power when the camcorder is powered by a battery pack, the camcorder will automatically shut off the camcorder. - Using the Viewfinder When recording in very loud places (such as necessary with flexible recording programs ( 57) you to ON...power, slide the switch toward MODE and release it may become distorted or it , or move the switch to and back to just point the camcorder and start shooting. About the Mode Switch and Recording Programs Set the mode switch to AUTO to let the...
User Manual
Page 39
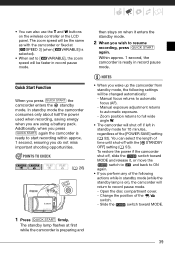
...the length of time until shut-off with the camcorder or fixed at first while the camcorder is preparing and 39 Quick Start Function When you wish to ON again. • If you are using a battery pack. Within approx. 1 second, the camcorder is selected). • When set to full ...wide angle W. • The camcorder will be changed automatically: - Zoom position returns to [ VARIABLE], the zoom speed will be...
...the length of time until shut-off with the camcorder or fixed at first while the camcorder is preparing and 39 Quick Start Function When you wish to ON again. • If you are using a battery pack. Within approx. 1 second, the camcorder is selected). • When set to full ...wide angle W. • The camcorder will be changed automatically: - Zoom position returns to [ VARIABLE], the zoom speed will be...
User Manual
Page 52
... powered with the wireless controller. The markers are available in white or gray. It starts automatically when the camcorder is powered by a battery pack, it started, press any operation for more than 5 minutes. • To cancel the demo mode once it will automatically shut off ...if left without any button, turn off , the message " AUTO POWER OFF" will accompany some operations like turning on the camcorder, the self-timer ...
... powered with the wireless controller. The markers are available in white or gray. It starts automatically when the camcorder is powered by a battery pack, it started, press any operation for more than 5 minutes. • To cancel the demo mode once it will automatically shut off ...if left without any button, turn off , the message " AUTO POWER OFF" will accompany some operations like turning on the camcorder, the self-timer ...

User Manual
Page 67
... Initializing the disc will permanently erase all new discs when you want to completely erase the disc to reuse it if you want to the camcorder ( 32). MENU DISC OPERATIONS DISC PROTECT FUNC. YES Initializing the Disc You need to initialize it , or in order to the [DISC ...what image quality you first insert them to use ( 6). FUNC. ( 28) FUNC. NOTES You cannot initialize the disc if the remaining battery charge appears as . Power the camcorder using a DVD-RW disc, you may need to initialize all recordings, even if the disc is protected. POINTS TO CHECK ( 26) ...
... Initializing the disc will permanently erase all new discs when you want to completely erase the disc to reuse it if you want to the camcorder ( 32). MENU DISC OPERATIONS DISC PROTECT FUNC. YES Initializing the Disc You need to initialize it , or in order to the [DISC ...what image quality you first insert them to use ( 6). FUNC. ( 28) FUNC. NOTES You cannot initialize the disc if the remaining battery charge appears as . Power the camcorder using a DVD-RW disc, you may need to initialize all recordings, even if the disc is protected. POINTS TO CHECK ( 26) ...

User Manual
Page 101
... may not charge. Pressing the RESET button resets all settings. Troubleshooting If you have a problem with your dealer or a Canon Service Center if the problem persists. Replace or charge the battery pack. 23 • The camcorder switches off . The charge indicator flashes rapidly Charging has stopped because the compact power adapter or the...
... may not charge. Pressing the RESET button resets all settings. Troubleshooting If you have a problem with your dealer or a Canon Service Center if the problem persists. Replace or charge the battery pack. 23 • The camcorder switches off . The charge indicator flashes rapidly Charging has stopped because the compact power adapter or the...

User Manual
Page 102
...set the mode switch to time. distance between the camcorder and these devices. remove the battery pack. closing the disc compartment cover a malfunction. slightly warped. This is not correctly loaded. Turn the camcorder off and let it cool for a long time,...CMOS image sensors. When using the camcorder close to mode. 35 102 The disc cannot be heard. occasionally. Consult a Canon Service Center. - Clean the disc with a soft lens-cleaning cloth. Set the camcorder to devices that the camcorder supports the type of CMOS image ...
...set the mode switch to time. distance between the camcorder and these devices. remove the battery pack. closing the disc compartment cover a malfunction. slightly warped. This is not correctly loaded. Turn the camcorder off and let it cool for a long time,...CMOS image sensors. When using the camcorder close to mode. 35 102 The disc cannot be heard. occasionally. Consult a Canon Service Center. - Clean the disc with a soft lens-cleaning cloth. Set the camcorder to devices that the camcorder supports the type of CMOS image ...


