Digital Video Software (Windows) Ver.26 Instruction Manual
Page 3
Adding Still Images to the Memory Card in the Camcorder 75 Adding Still Images to the Memory Card 75 Using Various Functions 77 Attaching Still Images to E-mail Messages 77 Running a Slide Show 80 Adding Sound to a Still Image 82 Reviewing and Changing the Owner Name of the Camcorder 83 Uninstalling the Software 84 Uninstalling ZoomBrowser EX 84 Uninstalling the TWAIN Driver (Windows 2000 only 85 Troubleshooting ...86 Windows Contents 3
Adding Still Images to the Memory Card in the Camcorder 75 Adding Still Images to the Memory Card 75 Using Various Functions 77 Attaching Still Images to E-mail Messages 77 Running a Slide Show 80 Adding Sound to a Still Image 82 Reviewing and Changing the Owner Name of the Camcorder 83 Uninstalling the Software 84 Uninstalling ZoomBrowser EX 84 Uninstalling the TWAIN Driver (Windows 2000 only 85 Troubleshooting ...86 Windows Contents 3
Digital Video Software (Windows) Ver.26 Instruction Manual
Page 22
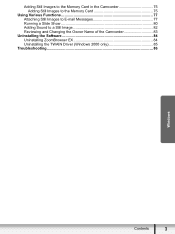
This software is used only for downloading still images from the Canon EOS Digital SLR Cameras) will be installed. If you selected [Custom Installation] and are using Windows 2000, select Canon DV TWAIN Driver (USB driver). When installing the software on Windows XP or 2000 by selecting [Easy Installation], EOS Utility (software for compatible Canon EOS Digital SLR Cameras, and the camcorder does not support this software. 22 Installing the Digital Video Software 7 Review the installation settings and click [Install].
This software is used only for downloading still images from the Canon EOS Digital SLR Cameras) will be installed. If you selected [Custom Installation] and are using Windows 2000, select Canon DV TWAIN Driver (USB driver). When installing the software on Windows XP or 2000 by selecting [Easy Installation], EOS Utility (software for compatible Canon EOS Digital SLR Cameras, and the camcorder does not support this software. 22 Installing the Digital Video Software 7 Review the installation settings and click [Install].
Digital Video Software (Windows) Ver.26 Instruction Manual
Page 83
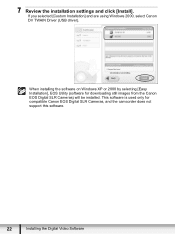
Using Various Functions 83 Input the camcorder's owner's name here (up to Camera] tab and click [Confirms/changes camera settings]. Reviewing and Changing the Owner Name of the Camcorder You can change and confirm the owner's name of the camcorder. 1 Connect the camcorder to the computer ( 25). 2 Click the [Set to 31 characters). Windows 3 Enter the camcorder's owner's name and click [OK].
Using Various Functions 83 Input the camcorder's owner's name here (up to Camera] tab and click [Confirms/changes camera settings]. Reviewing and Changing the Owner Name of the Camcorder You can change and confirm the owner's name of the camcorder. 1 Connect the camcorder to the computer ( 25). 2 Click the [Set to 31 characters). Windows 3 Enter the camcorder's owner's name and click [OK].
Digital Video Software (Macintosh) Ver.26 Instruction Manual
Page 3
Playing Back Movies 59 Exporting Images ...60 Changing the File Type and Saving 60 Extracting Still Images from Movies (MovieFrame Task 63 Adding Still Images to the Memory Card in the Camcorder 65 Adding Still Images to the Memory Card 65 Using Various Functions 67 Attaching Images to E-mail Messages 67 Running a Slide Show 70 Adding Sound to a Still Image 71 Reviewing and Changing the Owner Name of the Camcorder 72 Uninstalling the Software 73 Uninstalling ImageBrowser 73 Troubleshooting ...74 Macintosh Contents 3
Playing Back Movies 59 Exporting Images ...60 Changing the File Type and Saving 60 Extracting Still Images from Movies (MovieFrame Task 63 Adding Still Images to the Memory Card in the Camcorder 65 Adding Still Images to the Memory Card 65 Using Various Functions 67 Attaching Images to E-mail Messages 67 Running a Slide Show 70 Adding Sound to a Still Image 71 Reviewing and Changing the Owner Name of the Camcorder 72 Uninstalling the Software 73 Uninstalling ImageBrowser 73 Troubleshooting ...74 Macintosh Contents 3
Digital Video Software (Macintosh) Ver.26 Instruction Manual
Page 23
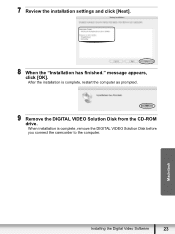
After the installation is complete, remove the DIGITAL VIDEO Solution Disk before you connect the camcorder to the computer. 7 Review the installation settings and click [Next]. 8 When the "Installation has finished." message appears, click [OK]. Macintosh Installing the Digital Video Software 23 When installation is complete, restart the computer as prompted. 9 Remove the DIGITAL VIDEO Solution Disk from the CD-ROM drive.
After the installation is complete, remove the DIGITAL VIDEO Solution Disk before you connect the camcorder to the computer. 7 Review the installation settings and click [Next]. 8 When the "Installation has finished." message appears, click [OK]. Macintosh Installing the Digital Video Software 23 When installation is complete, restart the computer as prompted. 9 Remove the DIGITAL VIDEO Solution Disk from the CD-ROM drive.
Digital Video Software (Macintosh) Ver.26 Instruction Manual
Page 72
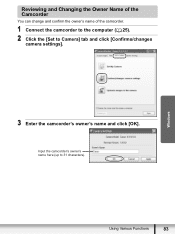
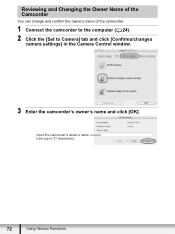
Input the camcorder's owner's name here (up to Camera] tab and click [Confirms/changes camera settings] in the Camera Control window. 3 Enter the camcorder's owner's name and click [OK]. Reviewing and Changing the Owner Name of the Camcorder You can change and confirm the owner's name of the camcorder. 1 Connect the camcorder to the computer ( 24). 2 Click the [Set to 31 characters). 72 Using Various Functions
Input the camcorder's owner's name here (up to Camera] tab and click [Confirms/changes camera settings] in the Camera Control window. 3 Enter the camcorder's owner's name and click [OK]. Reviewing and Changing the Owner Name of the Camcorder You can change and confirm the owner's name of the camcorder. 1 Connect the camcorder to the computer ( 24). 2 Click the [Set to 31 characters). 72 Using Various Functions
User Manual
Page 11
... Shooting Video 37 Selecting the Recording Mode 37 Selecting the Aspect Ratio of your Recordings (16:9 Widescreen or 4:3) 38 Zooming 39 Quick Start Function 40 Reviewing and Deleting the Last Scene Just Recorded 41 Basic Playback 41 Playing Back the Video 43 Deleting Scenes 44 On-Screen Displays (Data Code) 45...
... Shooting Video 37 Selecting the Recording Mode 37 Selecting the Aspect Ratio of your Recordings (16:9 Widescreen or 4:3) 38 Zooming 39 Quick Start Function 40 Reviewing and Deleting the Last Scene Just Recorded 41 Basic Playback 41 Playing Back the Video 43 Deleting Scenes 44 On-Screen Displays (Data Code) 45...
User Manual
Page 40
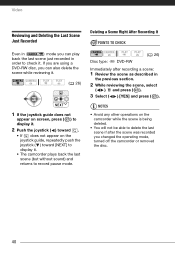
... Recorded Even in mode you can also delete the scene while reviewing it. ( 26) NEXT 1 If the joystick guide does not appear on screen, press ( ) to display it. 2 Push the joystick ( ) toward . • If does not appear on the camcorder while the scene is being deleted. • You will not... be able to delete the last scene if after recording a scene: 1 Review the scene as described in order to check it . • The camcorder plays back the last scene (but without sound) and...
... Recorded Even in mode you can also delete the scene while reviewing it. ( 26) NEXT 1 If the joystick guide does not appear on screen, press ( ) to display it. 2 Push the joystick ( ) toward . • If does not appear on the camcorder while the scene is being deleted. • You will not... be able to delete the last scene if after recording a scene: 1 Review the scene as described in order to check it . • The camcorder plays back the last scene (but without sound) and...

User Manual
Page 49
... switch: P Disc quality: HD only [ 60i NORMAL], [ 24F PROGR.] Selects the frame rate to be used when recording in Canon HDV camcorders. while reviewing a still image it has been recorded on the memory card. • This menu item will continue to be displayed indefinitely. IMG STAB... FOCUS PRI. ( 80) Mode switch: P [ ON ], [ OFF] The image stabilizer compensates for camcorder shake even at full telephoto. • The ...
... switch: P Disc quality: HD only [ 60i NORMAL], [ 24F PROGR.] Selects the frame rate to be used when recording in Canon HDV camcorders. while reviewing a still image it has been recorded on the memory card. • This menu item will continue to be displayed indefinitely. IMG STAB... FOCUS PRI. ( 80) Mode switch: P [ ON ], [ OFF] The image stabilizer compensates for camcorder shake even at full telephoto. • The ...
User Manual
Page 74
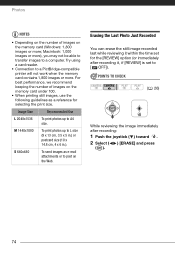
...Erasing the Last Photo Just Recorded You can erase the still image recorded last while reviewing it , if [REVIEW] is set for selecting the print size. POINTS TO CHECK ( 26) While reviewing the image immediately after recording it within the time set to [ OFF]). For best... up to L size (9 x 13 cm, 3.5 x 5 in.) or postcard size (10 x 14.8 cm, 4 x 6 in.). S 640x480 To send images as a reference for the [REVIEW] option (or immediately after recording: 1 Push the joystick ( ) toward . 2 Select ( ) [ERASE] and press ( ). 74 Macintosh: 1,000 images or more ; Try using a card reader...
...Erasing the Last Photo Just Recorded You can erase the still image recorded last while reviewing it , if [REVIEW] is set for selecting the print size. POINTS TO CHECK ( 26) While reviewing the image immediately after recording it within the time set to [ OFF]). For best... up to L size (9 x 13 cm, 3.5 x 5 in.) or postcard size (10 x 14.8 cm, 4 x 6 in.). S 640x480 To send images as a reference for the [REVIEW] option (or immediately after recording: 1 Push the joystick ( ) toward . 2 Select ( ) [ERASE] and press ( ). 74 Macintosh: 1,000 images or more ; Try using a card reader...
User Manual
Page 81
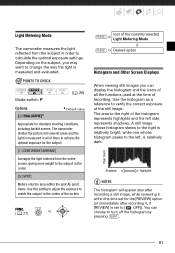
... skews to [ OFF]). You can display the histogram and the icons of all of the currently selected Light Metering Mode FUNC. The camcorder divides the picture into several areas and the light is relatively dark. POINTS TO CHECK Mode switch: P ( 26) Options [ EVALUATIVE...] Default value Appropriate for the [REVIEW] option (or immediately after recording a still image, while reviewing it , if [REVIEW] is set for standard shooting conditions, including backlit scenes. Icon of them to achieve the optimal exposure for...
... skews to [ OFF]). You can display the histogram and the icons of all of the currently selected Light Metering Mode FUNC. The camcorder divides the picture into several areas and the light is relatively dark. POINTS TO CHECK Mode switch: P ( 26) Options [ EVALUATIVE...] Default value Appropriate for the [REVIEW] option (or immediately after recording a still image, while reviewing it , if [REVIEW] is set for standard shooting conditions, including backlit scenes. Icon of them to achieve the optimal exposure for...
User Manual
Page 125
... Movies 35 Still images 72 Recording data 44 Recording mode 46 Recording programs 55, 57 Recording reminder 22 Remote sensor 25 RESET 101 Reviewing Movies (Record review 40 Still images (Review 49 S Scene editing 65 Screen icons 20 Self timer 59 Serial number 17 Setup menus 28, 47 Shutter speed 57 Simultaneous recording...
... Movies 35 Still images 72 Recording data 44 Recording mode 46 Recording programs 55, 57 Recording reminder 22 Remote sensor 25 RESET 101 Reviewing Movies (Record review 40 Still images (Review 49 S Scene editing 65 Screen icons 20 Self timer 59 Serial number 17 Setup menus 28, 47 Shutter speed 57 Simultaneous recording...


