FAXPHONE_L75_spec.pdf
Page 1
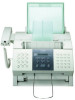
... With features such as a 30-sheet automatic document feeder, Super G3 facsimile technology, large fax memory, and a full FX3 cartridge included, the FAXPHONE L75 surpasses single function fax machines hands down. Convenience copying adds to Fax and Print at Your Desk For your small business or personal... desktop, the FAXPHONE L75 gives you the performance of a laser facsimile and a printer, with convenience copying. Its compact size and telephone handset make this space...
... With features such as a 30-sheet automatic document feeder, Super G3 facsimile technology, large fax memory, and a full FX3 cartridge included, the FAXPHONE L75 surpasses single function fax machines hands down. Convenience copying adds to Fax and Print at Your Desk For your small business or personal... desktop, the FAXPHONE L75 gives you the performance of a laser facsimile and a printer, with convenience copying. Its compact size and telephone handset make this space...
FAXPHONE_L75_spec.pdf
Page 2
... / SOFTWARE Interface Software OS Support USB Canon Windows® printer driver Windows 98/Me/2000/XP GENERAL SPECIFICATIONS Dimensions (with InstantExchange Program† FAXPHONE® L75 Laser Fax | Printer Ordering Information FAXPHONE Cartridge FAXPHONE L75 Canon FX3 * Specifications are subject to certain conditions and restrictions. Canon FX3 1 Year limited warranty with attachments) Weight Cartridge Warranty 17.5"(W) x 22.8"(D) x 15.9"(H) 22 lbs...
... / SOFTWARE Interface Software OS Support USB Canon Windows® printer driver Windows 98/Me/2000/XP GENERAL SPECIFICATIONS Dimensions (with InstantExchange Program† FAXPHONE® L75 Laser Fax | Printer Ordering Information FAXPHONE Cartridge FAXPHONE L75 Canon FX3 * Specifications are subject to certain conditions and restrictions. Canon FX3 1 Year limited warranty with attachments) Weight Cartridge Warranty 17.5"(W) x 22.8"(D) x 15.9"(H) 22 lbs...

Software User's Guide for FAXPHONE L75
Page 51
...by your high-resolution printer. Choose another font. Vertical white streaks may be stored in the printer driver settings. Gently rock the cartridge from RX TO MEMORY to evenly distribute the toner inside. Check that margins and paper size are low on toner, change the ...such as the print resolution, brightness, contrast, and toner saver. To resolve the situation, open the printer cover and remove the toner cartridge. If redistributing the toner does not resolve the situation, replace your printing application. Check the print settings, such as Adobe Type Manager or...
...by your high-resolution printer. Choose another font. Vertical white streaks may be stored in the printer driver settings. Gently rock the cartridge from RX TO MEMORY to evenly distribute the toner inside. Check that margins and paper size are low on toner, change the ...such as the print resolution, brightness, contrast, and toner saver. To resolve the situation, open the printer cover and remove the toner cartridge. If redistributing the toner does not resolve the situation, replace your printing application. Check the print settings, such as Adobe Type Manager or...
Setup Instructions for FAXPHONE L75
Page 1
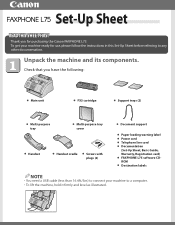
... cartridge G Support trays (2) G Multi-purpose tray G Multi-purpose tray cover G Handset G Handset cradle G Screws with plugs (2) G Document support G Paper loading warning label G Power cord G Telephone line cord G Documentation (Set-Up Sheet, Basic Guide, Warranty, Registration card) G FAXPHONE L75 ...software CDROM G Destination labels NOTE • You need a USB cable (less than 16.4ft./5m) to connect your machine ready for purchasing the Canon FAXPHONE L75. Unpack the machine and its components.
... cartridge G Support trays (2) G Multi-purpose tray G Multi-purpose tray cover G Handset G Handset cradle G Screws with plugs (2) G Document support G Paper loading warning label G Power cord G Telephone line cord G Documentation (Set-Up Sheet, Basic Guide, Warranty, Registration card) G FAXPHONE L75 ...software CDROM G Destination labels NOTE • You need a USB cable (less than 16.4ft./5m) to connect your machine ready for purchasing the Canon FAXPHONE L75. Unpack the machine and its components.

Setup Instructions for FAXPHONE L75
Page 4
... is plugged into the machine and into the wall outlet, the machine is turned on your wall. The LCD displays PLEASE WAIT, then PUT IN CARTRIDGE. Connect the cord to the standby display when you install the cartridge. Connect the power cord. Connect the handset and telephone line cord.
... is plugged into the machine and into the wall outlet, the machine is turned on your wall. The LCD displays PLEASE WAIT, then PUT IN CARTRIDGE. Connect the cord to the standby display when you install the cartridge. Connect the power cord. Connect the handset and telephone line cord.
Setup Instructions for FAXPHONE L75
Page 5
... • Use a firm, even pull to close the front cover. SIDE VIEW TOP VIEW PULL WITHIN THIS RANGE PULL WITHIN THIS RANGE 5 Hold the cartridge by its side tabs are aligned with the guides inside it will go, making sure that its handle and insert it into the machine as ... Print quality may be poor if the toner is unequally distributed. NOTE • Do not open the front cover. 2 Remove the cartridge from its protective bag. 3 Gently rock the cartridge from side to side a few times to distribute the toner evenly inside the machine. 6 Use both hands to remove the seal. Install...
... • Use a firm, even pull to close the front cover. SIDE VIEW TOP VIEW PULL WITHIN THIS RANGE PULL WITHIN THIS RANGE 5 Hold the cartridge by its side tabs are aligned with the guides inside it will go, making sure that its handle and insert it into the machine as ... Print quality may be poor if the toner is unequally distributed. NOTE • Do not open the front cover. 2 Remove the cartridge from its protective bag. 3 Gently rock the cartridge from side to side a few times to distribute the toner evenly inside the machine. 6 Use both hands to remove the seal. Install...
User Guide
Page 9
... the Telephone Line Cord and External Devices 2-8 Connecting the Power Cord 2-9 Connecting the FAXPHONE to Your PC 2-10 Main Components of the FAXPHONE 2-11 Operation Panel 2-12 Special Function Buttons 2-12 Installing the cartridge 2-13 Loading Paper...2-16 Testing the FAXPHONE 2-18 Chapter 3: Registering Information Guidelines for Entering Numbers, Letters, and Symbols 3-2 Correcting a Mistake...
... the Telephone Line Cord and External Devices 2-8 Connecting the Power Cord 2-9 Connecting the FAXPHONE to Your PC 2-10 Main Components of the FAXPHONE 2-11 Operation Panel 2-12 Special Function Buttons 2-12 Installing the cartridge 2-13 Loading Paper...2-16 Testing the FAXPHONE 2-18 Chapter 3: Registering Information Guidelines for Entering Numbers, Letters, and Symbols 3-2 Correcting a Mistake...
User Guide
Page 12
... 11-5 Chapter 12: Maintenance Periodic Cleaning 12-2 Cleaning the Machine's Exterior 12-2 Cleaning the Machine's Interior 12-2 Cleaning the Scanner Components 12-4 Replacing the FX3 cartridge 12-6 Chapter 13: Troubleshooting Clearing Jams...13-2 Jams in the ADF 13-2 Paper Jams...13-3 Jams in the Paper Delivery Slots 13-3 Jams Inside the...
... 11-5 Chapter 12: Maintenance Periodic Cleaning 12-2 Cleaning the Machine's Exterior 12-2 Cleaning the Machine's Interior 12-2 Cleaning the Scanner Components 12-4 Replacing the FX3 cartridge 12-6 Chapter 13: Troubleshooting Clearing Jams...13-2 Jams in the ADF 13-2 Paper Jams...13-3 Jams in the Paper Delivery Slots 13-3 Jams Inside the...
User Guide
Page 17
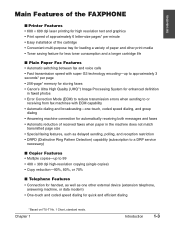
Introduction Main Features of the FAXPHONE s Printer Features • 600 ¥ 600 dpi laser printing for high resolution text and graphics • Print speed of approximately 6 letter-size pages* per minute • Easy installation of the cartridge • Convenient multi-purpose tray for loading a ... speed with super G3 technology encoding-up to approximately 3 seconds* per page • 256-page* memory for storing faxes • Canon's Ultra High Quality (UHQ™) Image Processing System for enhanced definition in faxed photos • Error Correction Mode (ECM) to reduce...
Introduction Main Features of the FAXPHONE s Printer Features • 600 ¥ 600 dpi laser printing for high resolution text and graphics • Print speed of approximately 6 letter-size pages* per minute • Easy installation of the cartridge • Convenient multi-purpose tray for loading a ... speed with super G3 technology encoding-up to approximately 3 seconds* per page • 256-page* memory for storing faxes • Canon's Ultra High Quality (UHQ™) Image Processing System for enhanced definition in faxed photos • Error Correction Mode (ECM) to reduce...
User Guide
Page 18
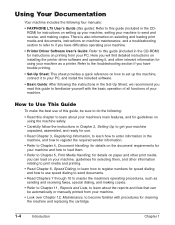
... Documentation Your machine includes the following four manuals: • FAXPHONE L75 User's Guide (this guide): Refer to this guide (included in the CDROM) for instructions on setting up the machine, connect it , and other relevant information for cleaning the machine and replacing the cartridge. 1-4 Introduction Chapter 1 Refer to the troubleshooting section if you...
... Documentation Your machine includes the following four manuals: • FAXPHONE L75 User's Guide (this guide): Refer to this guide (included in the CDROM) for instructions on setting up the machine, connect it , and other relevant information for cleaning the machine and replacing the cartridge. 1-4 Introduction Chapter 1 Refer to the troubleshooting section if you...
User Guide
Page 21
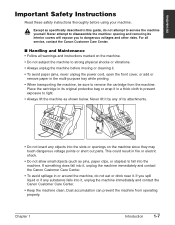
...dangerous voltage points or short out parts. If something does fall into it, unplug the machine immediately and contact the Canon Customer Care Center. • Keep the machine clean. Place the cartridge in its original protective bag or wrap it in a thick cloth to prevent exposure to remove the... cartridge from operating properly. Never lift it by any of its interior covers will expose you spill liquid or if any objects into it, unplug the machine immediately and contact the Canon Customer Care Center. • To avoid spillage in...
...dangerous voltage points or short out parts. If something does fall into it, unplug the machine immediately and contact the Canon Customer Care Center. • Keep the machine clean. Place the cartridge in its original protective bag or wrap it in a thick cloth to prevent exposure to remove the... cartridge from operating properly. Never lift it by any of its interior covers will expose you spill liquid or if any objects into it, unplug the machine immediately and contact the Canon Customer Care Center. • To avoid spillage in...
User Guide
Page 25
... necessary steps to get your machine, and learn how to Your PC 2-10 Main Components of the FAXPHONE 2-11 Operation Panel 2-12 Special Function Buttons 2-12 Installing the cartridge 2-13 Loading Paper 2-16 Testing the FAXPHONE 2-18 Chapter 2 Setting Up 2-1 Choosing a Location for use. You will find instructions for unpacking, assembling, and connecting...
... necessary steps to get your machine, and learn how to Your PC 2-10 Main Components of the FAXPHONE 2-11 Operation Panel 2-12 Special Function Buttons 2-12 Installing the cartridge 2-13 Loading Paper 2-16 Testing the FAXPHONE 2-18 Chapter 2 Setting Up 2-1 Choosing a Location for use. You will find instructions for unpacking, assembling, and connecting...

User Guide
Page 27
...You Have Everything? n When lifting the machine out of the box or when moving it, lift it from the box. Setting Up Unpacking the FAXPHONE Follow the directions below to unpack the machine properly and to transport the machine in case you hold the box while you have all the... following items: MAIN MACHINE FX3 CARTRIDGE SUPPORT TRAYS MULTI-PURPOSE TRAY MULTI-PURPOSE TRAY COVER DOCUMENT SUPPORT POWER CORD REGISTRATION CARD TELEPHONE LINE CORD WARRANTY DOCUMENTATIONS and LABELS FX3...
...You Have Everything? n When lifting the machine out of the box or when moving it, lift it from the box. Setting Up Unpacking the FAXPHONE Follow the directions below to unpack the machine properly and to transport the machine in case you hold the box while you have all the... following items: MAIN MACHINE FX3 CARTRIDGE SUPPORT TRAYS MULTI-PURPOSE TRAY MULTI-PURPOSE TRAY COVER DOCUMENT SUPPORT POWER CORD REGISTRATION CARD TELEPHONE LINE CORD WARRANTY DOCUMENTATIONS and LABELS FX3...
User Guide
Page 33
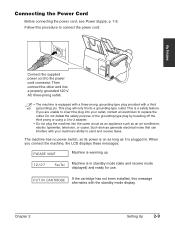
... a properly grounded 120 V AC three-prong outlet. This is plugged in standby mode (date and receive mode displayed) and ready for use. PUT IN CARTRIDGE If the cartridge has not been installed, this procedure to connect the power cord: Setting Up Connect the supplied power cord to replace the outlet. Follow this...
... a properly grounded 120 V AC three-prong outlet. This is plugged in standby mode (date and receive mode displayed) and ready for use. PUT IN CARTRIDGE If the cartridge has not been installed, this procedure to connect the power cord: Setting Up Connect the supplied power cord to replace the outlet. Follow this...
User Guide
Page 35
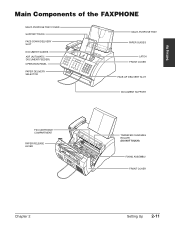
Setting Up Main Components of the FAXPHONE MULTI-PURPOSE TRAY COVER SUPPORT TRAYS FACE-DOWN DELIVERY SLOT DOCUMENT GUIDES ADF (AUTOMATIC DOCUMENT FEEDER) OPERATION PANEL PAPER DELIVERY SELECTOR MULTI-PURPOSE TRAY PAPER GUIDES LATCH FRONT COVER FACE-UP DELIVERY SLOT DOCUMENT SUPPORT FX3 CARTRIDGE COMPARTMENT PAPER RELEASE LEVER TRANSFER CHARGING ROLLER (DO NOT TOUCH) FIXING ASSEMBLY FRONT COVER Chapter 2 Setting Up 2-11
Setting Up Main Components of the FAXPHONE MULTI-PURPOSE TRAY COVER SUPPORT TRAYS FACE-DOWN DELIVERY SLOT DOCUMENT GUIDES ADF (AUTOMATIC DOCUMENT FEEDER) OPERATION PANEL PAPER DELIVERY SELECTOR MULTI-PURPOSE TRAY PAPER GUIDES LATCH FRONT COVER FACE-UP DELIVERY SLOT DOCUMENT SUPPORT FX3 CARTRIDGE COMPARTMENT PAPER RELEASE LEVER TRANSFER CHARGING ROLLER (DO NOT TOUCH) FIXING ASSEMBLY FRONT COVER Chapter 2 Setting Up 2-11
User Guide
Page 37
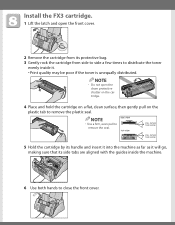
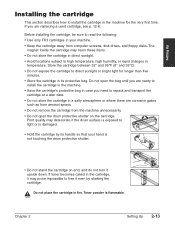
...the drum protective shutter on end, and do not turn it upside down. Store the cartridge between 32° and 95°F (0° and 35°C). • Do not expose the cartridge to direct sunlight or bright light for the very first time. If toner becomes caked in...to read the following: • Use only FX3 cartridges in temperature. Before installing the cartridge, be sure to install the cartridge in the machine. • Save the cartridge's protective bag in fire. Chapter 2 Setting Up 2-13 c Do not place the cartridge in case you are corrosive gases such as from ...
...the drum protective shutter on end, and do not turn it upside down. Store the cartridge between 32° and 95°F (0° and 35°C). • Do not expose the cartridge to direct sunlight or bright light for the very first time. If toner becomes caked in...to read the following: • Use only FX3 cartridges in temperature. Before installing the cartridge, be sure to install the cartridge in the machine. • Save the cartridge's protective bag in fire. Chapter 2 Setting Up 2-13 c Do not place the cartridge in case you are corrosive gases such as from ...
User Guide
Page 38
c Do not try to distribute the toner evenly inside it. • Poor print quality may damage your machine. 3 Remove the new FX3 cartridge from its protective bag. • Save the protective bag in . 2 Lift the latch and open the front cover without lifting the latch since this may ...result if the toner is unequally distributed. 2-14 Setting Up Chapter 2 Follow this procedure to install the cartridge in the machine: 1 Make sure the machine is plugged in case you need to repack the...
c Do not try to distribute the toner evenly inside it. • Poor print quality may damage your machine. 3 Remove the new FX3 cartridge from its protective bag. • Save the protective bag in . 2 Lift the latch and open the front cover without lifting the latch since this may ...result if the toner is unequally distributed. 2-14 Setting Up Chapter 2 Follow this procedure to install the cartridge in the machine: 1 Make sure the machine is plugged in case you need to repack the...
User Guide
Page 39
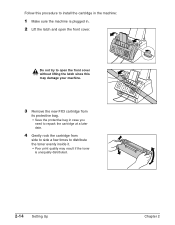
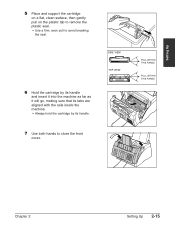
PULL WITHIN THIS RANGE PULL WITHIN THIS RANGE Chapter 2 Setting Up 2-15 Setting Up 5 Place and support the cartridge on a flat, clean surface, then gently pull on the plastic tab to remove the plastic seal. • Use a firm, even pull to close the front cover. SIDE VIEW TOP VIEW 6 Hold the cartridge by its handle and insert it into the machine as far as it will go, making sure that its tabs are aligned with the rails inside the machine. • Always hold the cartridge by its handle. 7 Use both hands to avoid breaking the seal.
PULL WITHIN THIS RANGE PULL WITHIN THIS RANGE Chapter 2 Setting Up 2-15 Setting Up 5 Place and support the cartridge on a flat, clean surface, then gently pull on the plastic tab to remove the plastic seal. • Use a firm, even pull to close the front cover. SIDE VIEW TOP VIEW 6 Hold the cartridge by its handle and insert it into the machine as far as it will go, making sure that its tabs are aligned with the rails inside the machine. • Always hold the cartridge by its handle. 7 Use both hands to avoid breaking the seal.
User Guide
Page 42
n For details on how to prevent dust accumulating inside the machine. 6 Adjust the paper delivery selector if necessary (1 p. 5-7). 5 Replace the multi-purpose tray cover. • Be sure to replace this cover to change the paper size setting, see Chapter 13. 2-18 Setting Up Chapter 2 If you have assembled your machine is printing properly by making several copies of a document (1 p. 10-2). Testing the FAXPHONE Once you can make sure your machine, installed the cartridge, and loaded paper, you have problems printing, see p.5-9.
n For details on how to prevent dust accumulating inside the machine. 6 Adjust the paper delivery selector if necessary (1 p. 5-7). 5 Replace the multi-purpose tray cover. • Be sure to replace this cover to change the paper size setting, see Chapter 13. 2-18 Setting Up Chapter 2 If you have assembled your machine is printing properly by making several copies of a document (1 p. 10-2). Testing the FAXPHONE Once you can make sure your machine, installed the cartridge, and loaded paper, you have problems printing, see p.5-9.
User Guide
Page 65
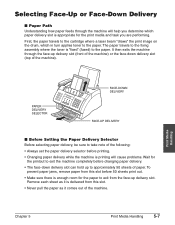
... paper delivery selector before printing. • Changing paper delivery while the machine is printing will help you are performing. First, the paper travels to the cartridge where a laser beam "draws" the print image on the drum, which paper delivery slot is appropriate for the printout to exit the machine completely before...
... paper delivery selector before printing. • Changing paper delivery while the machine is printing will help you are performing. First, the paper travels to the cartridge where a laser beam "draws" the print image on the drum, which paper delivery slot is appropriate for the printout to exit the machine completely before...


