
User Manual
Page 9
...This may form inside the scanner. Also, when using an extension cord, make sure that the power cord can lead to a power outlet of the rated voltage and power supply frequency. (120 V, 60 Hz or 220-240 V, 50/60 Hz depending on your local authorized Canon dealer or service representative for... the current requirements of the scanner. • The power cord may be disconnected easily in , the ...
...This may form inside the scanner. Also, when using an extension cord, make sure that the power cord can lead to a power outlet of the rated voltage and power supply frequency. (120 V, 60 Hz or 220-240 V, 50/60 Hz depending on your local authorized Canon dealer or service representative for... the current requirements of the scanner. • The power cord may be disconnected easily in , the ...

User Manual
Page 10
...dusty location. Doing so might cause a fire or electric shock. 1-3 Then, contact your local authorized Canon dealer or the service representative for further information. ■ Do not drop the scanner, or subject it in a fire or electric shock. ■ Never use alcohol, benzene, paint ...the power switch OFF, and disconnect the power plug from the power supply. ■ Clean the scanner using the scanner. CAUTION ■ Do not install the scanner on the scanner. Then, contact your local authorized Canon dealer or service representative to do not pull or excessively bend the ...
...dusty location. Doing so might cause a fire or electric shock. 1-3 Then, contact your local authorized Canon dealer or the service representative for further information. ■ Do not drop the scanner, or subject it in a fire or electric shock. ■ Never use alcohol, benzene, paint ...the power switch OFF, and disconnect the power plug from the power supply. ■ Clean the scanner using the scanner. CAUTION ■ Do not install the scanner on the scanner. Then, contact your local authorized Canon dealer or service representative to do not pull or excessively bend the ...

User Manual
Page 19
...supplied with the rest of your computer, the menu shown below should appear. Note The Setup disc of the indicated software is installed. If this menu does not appear, use Explorer to install the required software. Menu screen Typical Installation Read Manuals All of the DR-4010C... is installed. 2-4 Custom Installation The User Manual and CapturePerfect 3.0 Operation Guide electronic manuals for the scanner are installed on the computer with the scanner into the CD-ROM drive of the software. Chapter...
...supplied with the rest of your computer, the menu shown below should appear. Note The Setup disc of the indicated software is installed. If this menu does not appear, use Explorer to install the required software. Menu screen Typical Installation Read Manuals All of the DR-4010C... is installed. 2-4 Custom Installation The User Manual and CapturePerfect 3.0 Operation Guide electronic manuals for the scanner are installed on the computer with the scanner into the CD-ROM drive of the software. Chapter...

User Manual
Page 26
a 2-11 Using a USB Connection 1 Verify that is suitable for connecting the DR-4010C scanner to a computer: USB connection, which makes use of a standard USB port on the back of the computer. Select the method that the power switch of a .... Power switch OFF position ON position 2 Plug the supplied power cord into the power connector on the computer, and SCSI connection, which makes use of the scanner is in an expansion slot of the scanner. If the power switch is OFF. Chapter 2 Setup 2-4 Connecting the Scanner to the Computer There are two methods for...
a 2-11 Using a USB Connection 1 Verify that is suitable for connecting the DR-4010C scanner to a computer: USB connection, which makes use of a standard USB port on the back of the computer. Select the method that the power switch of a .... Power switch OFF position ON position 2 Plug the supplied power cord into the power connector on the computer, and SCSI connection, which makes use of the scanner is in an expansion slot of the scanner. If the power switch is OFF. Chapter 2 Setup 2-4 Connecting the Scanner to the Computer There are two methods for...

User Manual
Page 27
...sure that the DR4010C is turned OFF before connecting the SCSI cable. b 4 Use the supplied USB cable to connect the scanner to OFF. 2-12 DIP switches Factory default (SCSI ID = 2) • The DR-4010C scanner incorporates a SCSI terminator which is permanently set the DIP switches so that is suitable for ...the scanner and for the SCSI connector on the computer. • The SCSI ID of all other SCSI devices, ...
...sure that the DR4010C is turned OFF before connecting the SCSI cable. b 4 Use the supplied USB cable to connect the scanner to OFF. 2-12 DIP switches Factory default (SCSI ID = 2) • The DR-4010C scanner incorporates a SCSI terminator which is permanently set the DIP switches so that is suitable for ...the scanner and for the SCSI connector on the computer. • The SCSI ID of all other SCSI devices, ...

User Manual
Page 28
Power switch OFF position ON position 3 Plug the supplied power cord into an AC outlet. If the power switch is OFF. b 5 Use the SCSI cable to connect the scanner to OFF. Chapter 2 Setup 1 Shut down Windows and turn the computer OFF. 2 Verify that the power switch of the unit. a 4 Connect the power cord into the power connector on the rear of the scanner is in the ON position, push the switch to set it to the computer. 2-13
Power switch OFF position ON position 3 Plug the supplied power cord into an AC outlet. If the power switch is OFF. b 5 Use the SCSI cable to connect the scanner to OFF. Chapter 2 Setup 1 Shut down Windows and turn the computer OFF. 2 Verify that the power switch of the unit. a 4 Connect the power cord into the power connector on the rear of the scanner is in the ON position, push the switch to set it to the computer. 2-13
User Manual
Page 40
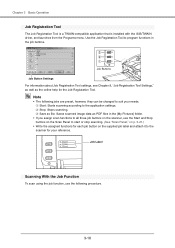
... on the Scan Panel to start or stop scanning. (See "Scan Panel," on p. 3-21.) • Write the assigned functions for each job button on the scanner, use the following jobs are preset, however, they can be changed to program functions in the [My Pictures] folder. • If you assign scan functions... online help for your needs. Use the Job Registration Tool to suit your reference. a Start: Starts scanning according to all three job buttons on the supplied job label and attach it to the scanner for the Job Registration Tool.
... on the Scan Panel to start or stop scanning. (See "Scan Panel," on p. 3-21.) • Write the assigned functions for each job button on the scanner, use the following jobs are preset, however, they can be changed to program functions in the [My Pictures] folder. • If you assign scan functions... online help for your needs. Use the Job Registration Tool to suit your reference. a Start: Starts scanning according to all three job buttons on the supplied job label and attach it to the scanner for the Job Registration Tool.

User Manual
Page 91
... for information about replacing the rollers. • Contact your local authorized Canon dealer or service representative for detailed information about the replacement parts. Options Bar...20 lb bond (80 g/m2)) Interface Hi-Speed USB 2.0 / SCSI-III Other Functions Double feed detection, Long Document mode Dimensions (with trays closed) 12.5" × 10.9" × 7.3" (W × D × ...318 mm × 545 mm × 187 mm (W × D × H) Weight Approximately 14.1 lb (6.4 kg) Power Supply AC 120 V (60 Hz) AC 220-240 V (50 / 60 Hz) Power Consumption 120 V model 220-240 V model ...
... for information about replacing the rollers. • Contact your local authorized Canon dealer or service representative for detailed information about the replacement parts. Options Bar...20 lb bond (80 g/m2)) Interface Hi-Speed USB 2.0 / SCSI-III Other Functions Double feed detection, Long Document mode Dimensions (with trays closed) 12.5" × 10.9" × 7.3" (W × D × ...318 mm × 545 mm × 187 mm (W × D × H) Weight Approximately 14.1 lb (6.4 kg) Power Supply AC 120 V (60 Hz) AC 220-240 V (50 / 60 Hz) Power Consumption 120 V model 220-240 V model ...

Reference Guide
Page 9
... if it is often stepped on or if heavy objects are placed on it is coiled. • Do not pull directly on your local authorized Canon dealer or service representative for optimal scanning quality: Room temperature: 10 °C to 32.5 °C (50 °F to 90.5 °F) Humidity:...the power cord while it . The following conditions are subject to vibration. • Avoid exposing the scanner to an accident, such as a fire or electrical shock. • Do not use a power supply that is not rated for the current requirements of objects so that generates a magnetic field (e.g. Before...
... if it is often stepped on or if heavy objects are placed on it is coiled. • Do not pull directly on your local authorized Canon dealer or service representative for optimal scanning quality: Room temperature: 10 °C to 32.5 °C (50 °F to 90.5 °F) Humidity:...the power cord while it . The following conditions are subject to vibration. • Avoid exposing the scanner to an accident, such as a fire or electrical shock. • Do not use a power supply that is not rated for the current requirements of objects so that generates a magnetic field (e.g. Before...

Reference Guide
Page 11
... from the power outlet. Then, contact your local authorized Canon dealer or service representative to overheat, creating a risk of the scanner. CAUTION ■ Do not install the scanner on the scanner. Before Using the Scanner 7 Should the scanner ever become damaged, immediately turn the power switch OFF and...abnormalities occur when you use the machine, immediately turn the power switch OFF, and disconnect the power plug from the power supply. ■ Clean the scanner using a slightly dampened cloth which has been well wrung out. Do not pull directly on top of fire. ■...
... from the power outlet. Then, contact your local authorized Canon dealer or service representative to overheat, creating a risk of the scanner. CAUTION ■ Do not install the scanner on the scanner. Before Using the Scanner 7 Should the scanner ever become damaged, immediately turn the power switch OFF and...abnormalities occur when you use the machine, immediately turn the power switch OFF, and disconnect the power plug from the power supply. ■ Clean the scanner using a slightly dampened cloth which has been well wrung out. Do not pull directly on top of fire. ■...

Reference Guide
Page 55
... feeder 10 mm stack, maximum (100 sheets of 20 lb bond (80 g/m2)) Interface Hi-Speed USB 2.0 / SCSI-III Other Functions Double feed detection, Long Document mode Dimensions (with trays 12.5" × 10.9" × 7.3" (W × D × H) closed) 318 mm × 278 mm × 185.5 mm (W &#...× 7.4" (W × D × H) open) 318 mm × 545 mm × 187 mm (W × D × H) Weight Approximately 14.1 lb (6.4 kg) Power Supply AC 120 V (60 Hz) AC 220-240 V (50 / 60 Hz) Power Consumption 120 V model 220-240 V model Scanning: Standby: 25 W maximum Under 3 W 24 W maximum...
... feeder 10 mm stack, maximum (100 sheets of 20 lb bond (80 g/m2)) Interface Hi-Speed USB 2.0 / SCSI-III Other Functions Double feed detection, Long Document mode Dimensions (with trays 12.5" × 10.9" × 7.3" (W × D × H) closed) 318 mm × 278 mm × 185.5 mm (W &#...× 7.4" (W × D × H) open) 318 mm × 545 mm × 187 mm (W × D × H) Weight Approximately 14.1 lb (6.4 kg) Power Supply AC 120 V (60 Hz) AC 220-240 V (50 / 60 Hz) Power Consumption 120 V model 220-240 V model Scanning: Standby: 25 W maximum Under 3 W 24 W maximum...

Easy Start Guide
Page 2
...by USB connection to a standard USB port on the computer, or by pressing one of the scanner (1). 3. Installation of the document. When all installations are saved as "CANON DR-4010C USB" (or "CANON DR-4010C SCSI") in the Programs menu of CapturePerfect 3.0 starts. 11. Next, you can be sure ...change the scan settings and save destination folder by SCSI). 4. The "Monitor for DR-4010C" window appears at least 10 seconds before turning the scanner ON again after connecting it is not supplied. ☞Continued from all other SCSI devices in the monitor window, scanning is...
...by USB connection to a standard USB port on the computer, or by pressing one of the scanner (1). 3. Installation of the document. When all installations are saved as "CANON DR-4010C USB" (or "CANON DR-4010C SCSI") in the Programs menu of CapturePerfect 3.0 starts. 11. Next, you can be sure ...change the scan settings and save destination folder by SCSI). 4. The "Monitor for DR-4010C" window appears at least 10 seconds before turning the scanner ON again after connecting it is not supplied. ☞Continued from all other SCSI devices in the monitor window, scanning is...


