
User Manual
Page 6
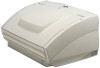
...Ensure Safe Operation 5 Installation Location 5 Power ...6 Moving the Scanner 6 Notes on Normal Handling 7 Notes Concerning Disposal 8 Features of the DR-3080CII 9 Checking the Packing List 11 Removing the Protective Tape and Protective Sheet 12 Names and Functions of Parts 13 Installing the Scanner 15 ... Functions of Patch Code Sheets 49 Using Patch Code Sheets 49 Effective Area for Detecting Patch Code Patterns 50 Clearing a Paper Jam 51 Regular Maintenance 54 Cleaning the Scanner 54 Cleaning the Scanning Glass and the Rollers 55 Troubleshooting 56 Specifications ...63 Index...
...Ensure Safe Operation 5 Installation Location 5 Power ...6 Moving the Scanner 6 Notes on Normal Handling 7 Notes Concerning Disposal 8 Features of the DR-3080CII 9 Checking the Packing List 11 Removing the Protective Tape and Protective Sheet 12 Names and Functions of Parts 13 Installing the Scanner 15 ... Functions of Patch Code Sheets 49 Using Patch Code Sheets 49 Effective Area for Detecting Patch Code Patterns 50 Clearing a Paper Jam 51 Regular Maintenance 54 Cleaning the Scanner 54 Cleaning the Scanning Glass and the Rollers 55 Troubleshooting 56 Specifications ...63 Index...

User Manual
Page 10
Such obstacles could prevent you from unplugging the power cord quickly in the scanner and when removing jammed paper. Notes Concerning Disposal CAUTION Always follow the appropriate municipal by-laws or consult your hand on top of the scanner. The scanner could...on the scanner. Liquids or small metallic objects that get inside of the scanner, unplug the power cord immediately, and then contact your local authorized Canon dealer or service representative for safety's sake. ■ When operating this scanner, avoid wearing loose-fitting clothing, dangling jewelry, or other type of...
Such obstacles could prevent you from unplugging the power cord quickly in the scanner and when removing jammed paper. Notes Concerning Disposal CAUTION Always follow the appropriate municipal by-laws or consult your hand on top of the scanner. The scanner could...on the scanner. Liquids or small metallic objects that get inside of the scanner, unplug the power cord immediately, and then contact your local authorized Canon dealer or service representative for safety's sake. ■ When operating this scanner, avoid wearing loose-fitting clothing, dangling jewelry, or other type of...
User Manual
Page 40
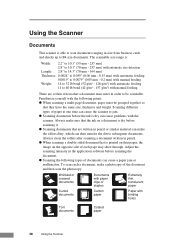
... that they have the same size, thickness and weight. To scan such a document, make a photocopy of documents can cause a paper jam or malfunction. Using the Scanner Documents This scanner is able to scan documents ranging in pencil or similar material can make the rollers ...then transfer the dirt to subsequent documents. Adjust the scanning intensity in the application software before the ink is dry can cause the scanner to jam. ● Scanning documents before scanning the document. ● Scanning the following points: ● When scanning a multi-page document, pages...
... that they have the same size, thickness and weight. To scan such a document, make a photocopy of documents can cause a paper jam or malfunction. Using the Scanner Documents This scanner is able to scan documents ranging in pencil or similar material can make the rollers ...then transfer the dirt to subsequent documents. Adjust the scanning intensity in the application software before the ink is dry can cause the scanner to jam. ● Scanning documents before scanning the document. ● Scanning the following points: ● When scanning a multi-page document, pages...

User Manual
Page 42
Note ● Always be sure to open the document eject tray extension towards you. When scanning a large document, pull out the paper feed tray extension. 4. Gently open the document eject tray extension. 3. Grasp the edge of the document eject tray extension and lift it up. 5. If the guide is not open when a document is scanned, the scanned document could droop down and become jammed in the scanner. ● To close the trays and extensions, follow the above procedure in reverse. 40 Using the Scanner
Note ● Always be sure to open the document eject tray extension towards you. When scanning a large document, pull out the paper feed tray extension. 4. Gently open the document eject tray extension. 3. Grasp the edge of the document eject tray extension and lift it up. 5. If the guide is not open when a document is scanned, the scanned document could droop down and become jammed in the scanner. ● To close the trays and extensions, follow the above procedure in reverse. 40 Using the Scanner

User Manual
Page 43
Using the Scanner 41 Grasp the edge of the document eject tray extension and lift it could droop down over the edge of the document eject tray extension and become jammed in the scanner. Gently open the document eject tray extension towards you. Avoid this problem by attaching the document eject guide. 1. Attach the Auxiliary paper support plate to the document eject tray extension. 3. Installing the Document Eject Guide When scanning a document that is particularly thin or particularly long, it up. 2.
Using the Scanner 41 Grasp the edge of the document eject tray extension and lift it could droop down over the edge of the document eject tray extension and become jammed in the scanner. Gently open the document eject tray extension towards you. Avoid this problem by attaching the document eject guide. 1. Attach the Auxiliary paper support plate to the document eject tray extension. 3. Installing the Document Eject Guide When scanning a document that is particularly thin or particularly long, it up. 2.
User Manual
Page 45
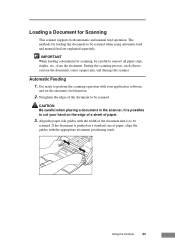
... to cut your application software, and set the automatic feed function. 2. Get ready to remove all paper clips, staples, etc., from the document. CAUTION Be careful when placing a document in the scanner. Align the paper side guides with the width of the document to be careful to perform the scanning operation with... methods for Scanning This scanner supports both automatic and manual feed operation. Automatic Feeding 1. During the scanning process, such objects can tear the document, cause a paper jam, and damage the scanner. It is printed on the edge of a sheet of...
... to cut your application software, and set the automatic feed function. 2. Get ready to remove all paper clips, staples, etc., from the document. CAUTION Be careful when placing a document in the scanner. Align the paper side guides with the width of the document to be careful to perform the scanning operation with... methods for Scanning This scanner supports both automatic and manual feed operation. Automatic Feeding 1. During the scanning process, such objects can tear the document, cause a paper jam, and damage the scanner. It is printed on the edge of a sheet of...

User Manual
Page 46
IMPORTANT There are stacking limit marks ( ) indicated on the paper feed tray so that the document is equivalent to the left edge of the document does not extend to a capacity of approximately 100 sheets of ordinary copier paper (80 g/m2).) 44 Using the Scanner Do not load pages in excess of this mark. Place the document on the paper feed tray. A paper jam may occur if you begin to scan a document that the left of the mark. Note Make sure that is positioned at this mark. (The mark is face up. B4 A4 LTR 4.
IMPORTANT There are stacking limit marks ( ) indicated on the paper feed tray so that the document is equivalent to the left edge of the document does not extend to a capacity of approximately 100 sheets of ordinary copier paper (80 g/m2).) 44 Using the Scanner Do not load pages in excess of this mark. Place the document on the paper feed tray. A paper jam may occur if you begin to scan a document that the left of the mark. Note Make sure that is positioned at this mark. (The mark is face up. B4 A4 LTR 4.

User Manual
Page 47
Perform the scanning operation in the scanner, turn the power off immediately. Note ● If the paper feed operation stops due to the document eject tray) and then close the paper feed tray and the document eject tray extension. If the scanner is not going to be used again soon after the ... the document eject guide (if it is attached to a system error or a paper jam while the scanner is loaded in the scanner correctly. Using the Scanner 45 Adjust the paper side guides. Be especially careful if you are printed on thin paper may fall out of the last page that was fed has been...
Perform the scanning operation in the scanner, turn the power off immediately. Note ● If the paper feed operation stops due to the document eject tray) and then close the paper feed tray and the document eject tray extension. If the scanner is not going to be used again soon after the ... the document eject guide (if it is attached to a system error or a paper jam while the scanner is loaded in the scanner correctly. Using the Scanner 45 Adjust the paper side guides. Be especially careful if you are printed on thin paper may fall out of the last page that was fed has been...

User Manual
Page 53
However, if the document eject guide is currently attached to the tray, it . Clearing a Paper Jam If a paper jam occurs in the scanner, follow the procedure described below . 3. It is not necessary to cut your hand on the edge of a sheet of paper. 1. Grasping the upper unit as shown in the document eject tray, remove them... there are any ejected sheets already in the illustration, gently raise it is possible to remove the document eject guide. CAUTION Be careful when removing jammed paper.
However, if the document eject guide is currently attached to the tray, it . Clearing a Paper Jam If a paper jam occurs in the scanner, follow the procedure described below . 3. It is not necessary to cut your hand on the edge of a sheet of paper. 1. Grasping the upper unit as shown in the document eject tray, remove them... there are any ejected sheets already in the illustration, gently raise it is possible to remove the document eject guide. CAUTION Be careful when removing jammed paper.

User Manual
Page 54
4. Raise the upper unit as far as it gently. remove it will go. 5. If the sheet does rip, be sure to remove all of the remaining pieces of the scanner. When the jam occurred in the feed section When the jam occurred in the eject section IMPORTANT Do not pull hard on the jammed sheet; Remove the jammed paper inside of paper. 52 Using the Scanner
4. Raise the upper unit as far as it gently. remove it will go. 5. If the sheet does rip, be sure to remove all of the remaining pieces of the scanner. When the jam occurred in the feed section When the jam occurred in the eject section IMPORTANT Do not pull hard on the jammed sheet; Remove the jammed paper inside of paper. 52 Using the Scanner

User Manual
Page 55
Using the Scanner 53 6. Gently lower the upper unit to its normal position. 7. Note Once you have cleared the paper jam, check whether the scanned image on the top of the upper unit until it clicks into place. Gently push down on the last page has been stored properly or not, and then resume scanning.
Using the Scanner 53 6. Gently lower the upper unit to its normal position. 7. Note Once you have cleared the paper jam, check whether the scanned image on the top of the upper unit until it clicks into place. Gently push down on the last page has been stored properly or not, and then resume scanning.

User Manual
Page 62
.... When you resume scanning, make sure that the scanner cannot scan. For precautions concerning documents, refer to feed properly. For details on how to clear jammed paper, see "Clearing a Paper Jam" on page 55.
.... When you resume scanning, make sure that the scanner cannot scan. For precautions concerning documents, refer to feed properly. For details on how to clear jammed paper, see "Clearing a Paper Jam" on page 55.
User Manual
Page 68
... 41 Document eject tray extension opening 40 position 13 Document positioning mark adjustment 43 position 13 Documents feeding 43 paper jam 51 stacking limit marks 44 DR-3080CII cleaning 54 I Installation location 5 Interface boards SCSI boards 18 USB 2.0 interface board 18 ISIS/TWAIN Driver... 35 Install 26 Uninstall 29 M Maintenance 54 P Paper jam cleaning 51 Paper side guides adjustment 43 position 13 Patch Code Sheets ...
... 41 Document eject tray extension opening 40 position 13 Document positioning mark adjustment 43 position 13 Documents feeding 43 paper jam 51 stacking limit marks 44 DR-3080CII cleaning 54 I Installation location 5 Interface boards SCSI boards 18 USB 2.0 interface board 18 ISIS/TWAIN Driver... 35 Install 26 Uninstall 29 M Maintenance 54 P Paper jam cleaning 51 Paper side guides adjustment 43 position 13 Patch Code Sheets ...

