
BJC-8200 Setup
Page 2
... on to Step 3, make sure your computer. USB Connection Parallel Connection 2 Then, connect the cable to the printer. Printer High Resolution Paper HR-101 (3) BJ Print Head BC-50 (1) Ink Tanks (6) Roller Cleaning Plate Quick Start Guide Note: You will need a parallel or USB cable. 2 Remove and discard all items from the...
... on to Step 3, make sure your computer. USB Connection Parallel Connection 2 Then, connect the cable to the printer. Printer High Resolution Paper HR-101 (3) BJ Print Head BC-50 (1) Ink Tanks (6) Roller Cleaning Plate Quick Start Guide Note: You will need a parallel or USB cable. 2 Remove and discard all items from the...
BJC-8200 Setup
Page 4
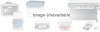
The printer automatically performs the print head cleaning. This procedure takes approximately 40 seconds. The BJ tanks must be inserted in the order shown on the blue lever.) 7 Close the front cover. 6 Insert the BJ Individual Tanks 1 Pick up the yellow ink tank (BCI-5Y). 5 Press down until the BJ tank snaps into the correct slot. (Refer to the color guide on the color guide label. 3 Twist off and discard the orange plastic cap. 4 Insert the ink tank into place. 2 Pull up the orange tab and remove and discard the plastic film. 6 Insert the remaining BJ tanks.
The printer automatically performs the print head cleaning. This procedure takes approximately 40 seconds. The BJ tanks must be inserted in the order shown on the blue lever.) 7 Close the front cover. 6 Insert the BJ Individual Tanks 1 Pick up the yellow ink tank (BCI-5Y). 5 Press down until the BJ tank snaps into the correct slot. (Refer to the color guide on the color guide label. 3 Twist off and discard the orange plastic cap. 4 Insert the ink tank into place. 2 Pull up the orange tab and remove and discard the plastic film. 6 Insert the remaining BJ tanks.

BJC-8200 Setup
Page 5
... of your CD-ROM drive). Click the Maintenance tab then click the (Print Head Alignment) icon. In the software application, from the File menu, select Page Setup. If you see the New Hardware Wizard, insert the Canon Creative CD-ROM into your CD-ROM drive and follow the on -screen... instructions to select Test Print. nected, then turn on the computer. 2 If you do not see the New Hardware Wizard, wait until Windows completes booting up. b. nected, then turn on the computer. 2 Double-click on the Canon BJC-8200 icon. 3 Follow the on the Windows taskbar and...
... of your CD-ROM drive). Click the Maintenance tab then click the (Print Head Alignment) icon. In the software application, from the File menu, select Page Setup. If you see the New Hardware Wizard, insert the Canon Creative CD-ROM into your CD-ROM drive and follow the on -screen... instructions to select Test Print. nected, then turn on the computer. 2 If you do not see the New Hardware Wizard, wait until Windows completes booting up. b. nected, then turn on the computer. 2 Double-click on the Canon BJC-8200 icon. 3 Follow the on the Windows taskbar and...

BJC-8200 Setup
Page 6
...or trademarks of your printout. All print speeds based on system configuration, software, document complexity, print mode and page coverage. As an Energy Star® partner, Canon U.S.A., Inc. d. Click the (Print Head Alignment) icon. Click! Click! 3 To print an alignment page, click OK when ...hour, toll-free Fax Retrieval System (1-800-526-4345) Your device drivers for warranty details. Canon, BJ, BJC and Design Essentials are registered trademarks, BCI, Bubble Jet, Canon Think Tank System, Drop Modulatio Technology, PhotoRealism, "See What We Mean" and WebRecord are ...
...or trademarks of your printout. All print speeds based on system configuration, software, document complexity, print mode and page coverage. As an Energy Star® partner, Canon U.S.A., Inc. d. Click the (Print Head Alignment) icon. Click! Click! 3 To print an alignment page, click OK when ...hour, toll-free Fax Retrieval System (1-800-526-4345) Your device drivers for warranty details. Canon, BJ, BJC and Design Essentials are registered trademarks, BCI, Bubble Jet, Canon Think Tank System, Drop Modulatio Technology, PhotoRealism, "See What We Mean" and WebRecord are ...
User Manual
Page 7
...United Kingdom This equipment is approved under approval number NS/G/12345/J/100003 for indirect connection to leak and stain clothing. Never touch the print head or electrical contacts on and off by a fluorescent lamp placed too close to the printer could cause minor burns. If you ... limits for use the POWER button to switch the printer on a BJ Print Head immediately after removing it from the power outlet. Using the Printer Safety BJ Print Head and ink tanks For safety always store BJ Print Head and ink tanks out of the reach of a qualified engineer. Ü...
...United Kingdom This equipment is approved under approval number NS/G/12345/J/100003 for indirect connection to leak and stain clothing. Never touch the print head or electrical contacts on and off by a fluorescent lamp placed too close to the printer could cause minor burns. If you ... limits for use the POWER button to switch the printer on a BJ Print Head immediately after removing it from the power outlet. Using the Printer Safety BJ Print Head and ink tanks For safety always store BJ Print Head and ink tanks out of the reach of a qualified engineer. Ü...
User Manual
Page 9
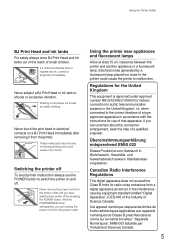
...Changing the printer driver settings 60 Aligning the print head 62 Reading the print head alignment pattern 65 Adjusting color 66 A printout is unclear, faded 67 Printing a nozzle check pattern 68 Cleaning the print head 70 Deep cleaning the print head 72 Replacing an ink tank 74 Color ...is strange 75 Scanner Cartridge does not operate correctly 76 When connected via USB 76 Replacing the BJ Print Head 77 Appendices 79 Specifications 79 Canon Technical...
...Changing the printer driver settings 60 Aligning the print head 62 Reading the print head alignment pattern 65 Adjusting color 66 A printout is unclear, faded 67 Printing a nozzle check pattern 68 Cleaning the print head 70 Deep cleaning the print head 72 Replacing an ink tank 74 Color ...is strange 75 Scanner Cartridge does not operate correctly 76 When connected via USB 76 Replacing the BJ Print Head 77 Appendices 79 Specifications 79 Canon Technical...

User Manual
Page 10
...will know how to print a photograph and know most of the procedures for the daily operation of all the procedures for future reference. Read this User's Guide as soon as you have a question. Here is a brief summary of the printer. About your guides With the BJC-8200 you are provided with... the printer. Read the "Quick Start Guide" to the "Reference Guide" or on-line Help when you will need the "Quick Start Guide" if you can find it for setting up the printer, including installing and aligning the print head, connecting the ...
...will know how to print a photograph and know most of the procedures for the daily operation of all the procedures for future reference. Read this User's Guide as soon as you have a question. Here is a brief summary of the printer. About your guides With the BJC-8200 you are provided with... the printer. Read the "Quick Start Guide" to the "Reference Guide" or on-line Help when you will need the "Quick Start Guide" if you can find it for setting up the printer, including installing and aligning the print head, connecting the ...

User Manual
Page 12
...up after removing the problem so the printer can occur or meaningless characters could print. Before you begin, make sure that you switch on the operation panel. qBJ Print Head and ink tanks installed? qHas the print head been aligned? If the POWER/ERROR lamp flashes or lights orange, an ...qw e 1 POWER button Press to the printer and computer? Have you need. ON When the printer is warming up printer and align the print head. Call for manually operating the printer are located on the printer, the POWER/ERROR lamp lights, green. Make sure that the printer has been...
...up after removing the problem so the printer can occur or meaningless characters could print. Before you begin, make sure that you switch on the operation panel. qBJ Print Head and ink tanks installed? qHas the print head been aligned? If the POWER/ERROR lamp flashes or lights orange, an ...qw e 1 POWER button Press to the printer and computer? Have you need. ON When the printer is warming up printer and align the print head. Call for manually operating the printer are located on the printer, the POWER/ERROR lamp lights, green. Make sure that the printer has been...
User Manual
Page 18
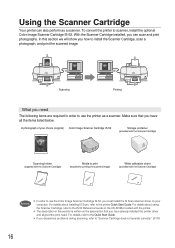
...Cartridge IS-52 Storage container (provided with the Scanner Cartridge) Scanning holder (supplied with the Scanner Cartridge) Media to print (required for printing the scanned image) White calibration sheet (provided with the Scanner Cartridge) Reference • In order to use the ... the printer to the printer Quick Start Guide. Scanning Printing What you have already installed the printer driver and aligned the print head. A photograph of your computer. Using the Scanner Cartridge Your printer can scan and print photographs. For details, refer to "Scanner Cartridge does ...
...Cartridge IS-52 Storage container (provided with the Scanner Cartridge) Scanning holder (supplied with the Scanner Cartridge) Media to print (required for printing the scanned image) White calibration sheet (provided with the Scanner Cartridge) Reference • In order to use the ... the printer to the printer Quick Start Guide. Scanning Printing What you have already installed the printer driver and aligned the print head. A photograph of your computer. Using the Scanner Cartridge Your printer can scan and print photographs. For details, refer to "Scanner Cartridge does ...

User Manual
Page 19
Printing Using the Scanner Cartridge Summary of the scanning procedures Here is a brief summary of the general steps required to convert the printer into a scanner, scan an original, and print it ! 17 Now let's scan a photograph and print it . 1 Install the Scanner Cartridge in the printer. 2 Perform white level calibration. 3 Scan the original photograph. 4 Save the scanned image. 5 Install the BJ Print Head and print the scanned image.
Printing Using the Scanner Cartridge Summary of the scanning procedures Here is a brief summary of the general steps required to convert the printer into a scanner, scan an original, and print it ! 17 Now let's scan a photograph and print it . 1 Install the Scanner Cartridge in the printer. 2 Perform white level calibration. 3 Scan the original photograph. 4 Save the scanned image. 5 Install the BJ Print Head and print the scanned image.

User Manual
Page 20
.... 1 Raise the lock lever and remove the BJ Print Head. 2 Place the BJ Print Head in the storage container. • To prevent the print head from becoming dirty or drying out, place the BJ Print Head in a storage container immediately after removing it from the printer and install the BJ Print Head in place. Caution • To avoid personal injury...
.... 1 Raise the lock lever and remove the BJ Print Head. 2 Place the BJ Print Head in the storage container. • To prevent the print head from becoming dirty or drying out, place the BJ Print Head in a storage container immediately after removing it from the printer and install the BJ Print Head in place. Caution • To avoid personal injury...

User Manual
Page 23
... box. 2. Click! 5 Install the BJ Print Head and print the image To print the scanned image, you selected in the storage container. 3. Install the BJ Print Head. 1 Install the BJ Print Head in place. 4. If you want to lock the BJ Print Head in the BJ Print Head holder where you can select a portion of ... Enter a name for the file and click the Save button. • The area you must remove the Scanner Cartridge and re-install the BJ Print Head. 1. Remove the Scanner Cartridge and store it , and save . Click the Save button. • The Save As dialog box opens. 3. Open...
... box. 2. Click! 5 Install the BJ Print Head and print the image To print the scanned image, you selected in the storage container. 3. Install the BJ Print Head. 1 Install the BJ Print Head in place. 4. If you want to lock the BJ Print Head in the BJ Print Head holder where you can select a portion of ... Enter a name for the file and click the Save button. • The area you must remove the Scanner Cartridge and re-install the BJ Print Head. 1. Remove the Scanner Cartridge and store it , and save . Click the Save button. • The Save As dialog box opens. 3. Open...

User Manual
Page 27
Select the portion of the scanned image that you want to save. 3. Click! 4. Click! 5 Install the BJ Print Head and print the image To print the scanned image, you selected in Step 1 is saved to the file. Click the Save button. • The dialog box opens so you can select a... storage container. 25 Enter a file name and click the Save button. • The area you must remove the Scanner Cartridge and re-install the BJ Print Head. 1. Open the front cover. • The Scanner Cartridge moves to close IS Scan. Remove the Scanner Cartridge and store it , and save to save. ...
Select the portion of the scanned image that you want to save. 3. Click! 4. Click! 5 Install the BJ Print Head and print the image To print the scanned image, you selected in Step 1 is saved to the file. Click the Save button. • The dialog box opens so you can select a... storage container. 25 Enter a file name and click the Save button. • The area you must remove the Scanner Cartridge and re-install the BJ Print Head. 1. Open the front cover. • The Scanner Cartridge moves to close IS Scan. Remove the Scanner Cartridge and store it , and save to save. ...

User Manual
Page 28
... cover. 5. Click! Set the media in the printer. • For details about loading paper in place. 4. 3. Close the software application. 26 Click! Install the BJ Print Head. 1 Install the BJ Print Head in the BJ Print Head holder where you set in the printer. 5 Make sure that the POWER/ERROR lamp lights green, then click the...
... cover. 5. Click! Set the media in the printer. • For details about loading paper in place. 4. 3. Close the software application. 26 Click! Install the BJ Print Head. 1 Install the BJ Print Head in the BJ Print Head holder where you set in the printer. 5 Make sure that the POWER/ERROR lamp lights green, then click the...

User Manual
Page 34
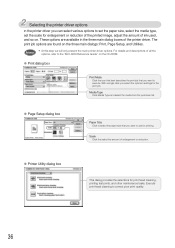
... from the pull-down list. q Maintenance tab Print Head Cleaning Click the first icon to start print head cleaning and click the second icon to start print head alignment, and click the second icon to the "BJC-8200 Reference Guide" on . Printing Type Select an option for enlargement or reduction of the printed image, adjust quality and the amount of...
... from the pull-down list. q Maintenance tab Print Head Cleaning Click the first icon to start print head cleaning and click the second icon to start print head alignment, and click the second icon to the "BJC-8200 Reference Guide" on . Printing Type Select an option for enlargement or reduction of the printed image, adjust quality and the amount of...
User Manual
Page 38
... the optimum settings for print head cleaning, printing test prints, and other maintenance tasks. Media Type Click Media Type and select the media from the pull-down list. q Page Setup dialog box Paper Size Click to select the paper size that you want to the "BJC-8200 Reference Guide" on .... Scale Click the select the amount of the printer driver. q Printer Utility dialog box This dialog provides the selections for the print job. q Print dialog box Print Mode Click the icon that best describes the print job that you want to...
... the optimum settings for print head cleaning, printing test prints, and other maintenance tasks. Media Type Click Media Type and select the media from the pull-down list. q Page Setup dialog box Paper Size Click to select the paper size that you want to the "BJC-8200 Reference Guide" on .... Scale Click the select the amount of the printer driver. q Printer Utility dialog box This dialog provides the selections for the print job. q Print dialog box Print Mode Click the icon that best describes the print job that you want to...
User Manual
Page 51
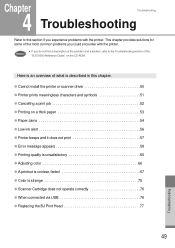
Chapter Troubleshooting 4 Troubleshooting Refer to this chapter. q Cannot install the printer or scanner driver 50 q Printer prints meaningless characters and symbols 51 q Cancelling a print job 52 q Printing on the CD-ROM. Here is an overview of the Reference "BJC-8200 Reference Guide" on a thick paper 53 q Paper Jams 54 q Low ink alert 56 q Printer beeps and..., refer to the Troubleshooting section of what is strange 75 q Scanner Cartridge does not operate correctly 76 q When connected via USB 76 q Replacing the BJ Print Head 77 Troubleshooting 49
Chapter Troubleshooting 4 Troubleshooting Refer to this chapter. q Cannot install the printer or scanner driver 50 q Printer prints meaningless characters and symbols 51 q Cancelling a print job 52 q Printing on the CD-ROM. Here is an overview of the Reference "BJC-8200 Reference Guide" on a thick paper 53 q Paper Jams 54 q Low ink alert 56 q Printer beeps and..., refer to the Troubleshooting section of what is strange 75 q Scanner Cartridge does not operate correctly 76 q When connected via USB 76 q Replacing the BJ Print Head 77 Troubleshooting 49
User Manual
Page 58
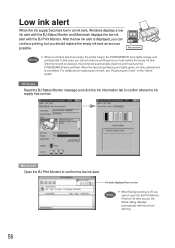
...tank replacement is replaced, the printer will automatically clean the print head and the POWER/ERROR lamp will flash. Ink tanks displayed here run low. If the low ink alert occurs, the Status dialog displays automatically with the BJ Print Monitor. In this "User's Guide". Reference • ... ink alert When the ink supply becomes low in this case, you cannot continue printing and you cannot open the BJ Print Monitor. Memo • When Backgrounding is displayed, you can continue printing, but you should replace the empty ink tank as soon as possible. Macintosh Open...
...tank replacement is replaced, the printer will automatically clean the print head and the POWER/ERROR lamp will flash. Ink tanks displayed here run low. If the low ink alert occurs, the Status dialog displays automatically with the BJ Print Monitor. In this "User's Guide". Reference • ... ink alert When the ink supply becomes low in this case, you cannot continue printing and you cannot open the BJ Print Monitor. Memo • When Backgrounding is displayed, you can continue printing, but you should replace the empty ink tank as soon as possible. Macintosh Open...
User Manual
Page 59
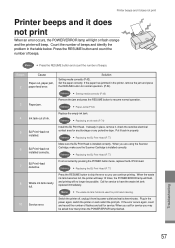
..., remove it back in the table below. Reference • Replacing the BJ Print Head (P.77) BJ Print Head 7 defective If not corrected by pressing the POWER button twice, replace the BJ Print Head. Install the BJ Print Head. When you may be possible. Call for normal operation. (P.54) Reference &#... beeps. Beeps 2 Cause Paper out, paper jam, paper feed error. Reference • Replacing an ink tank (P.74) 5 BJ Print Head not installed. Put it , check the sensitive electrical contact area for service you are using the Scanner Cartridge, make sure the Scanner...
..., remove it back in the table below. Reference • Replacing the BJ Print Head (P.77) BJ Print Head 7 defective If not corrected by pressing the POWER button twice, replace the BJ Print Head. Install the BJ Print Head. When you may be possible. Call for normal operation. (P.54) Reference &#... beeps. Beeps 2 Cause Paper out, paper jam, paper feed error. Reference • Replacing an ink tank (P.74) 5 BJ Print Head not installed. Put it , check the sensitive electrical contact area for service you are using the Scanner Cartridge, make sure the Scanner...

User Manual
Page 64
Before aligning the print head After aligning the print head Before aligning the print head After aligning the print head Windows Macintosh 62 P. 63 P. 64 To align the print head correctly, you will need one sheet of High Resolution Paper. Aligning the print head If the printed image appears blurred or uneven, aligning the print head could solve the problem.
Before aligning the print head After aligning the print head Before aligning the print head After aligning the print head Windows Macintosh 62 P. 63 P. 64 To align the print head correctly, you will need one sheet of High Resolution Paper. Aligning the print head If the printed image appears blurred or uneven, aligning the print head could solve the problem.


