
i80 Quick Start Guide
Page 2
... found here. 2. For more information, please visit our Web site at a very attractive price. CarePAK offers toll-free Canon technical support and includes Canon's superb InstantExchange product replacement program. www.canontechsupport.com For individual attention to a special issue, try emailing our friendly technical engineers...Toll-Free Tech Support** - (1-800-828-4040) This option provides live telephone technical support, free of the printer): Printer Driver CD-ROM number (located on the front of service charges, Monday-Saturday (excluding holidays). Extended Service and Support -
... found here. 2. For more information, please visit our Web site at a very attractive price. CarePAK offers toll-free Canon technical support and includes Canon's superb InstantExchange product replacement program. www.canontechsupport.com For individual attention to a special issue, try emailing our friendly technical engineers...Toll-Free Tech Support** - (1-800-828-4040) This option provides live telephone technical support, free of the printer): Printer Driver CD-ROM number (located on the front of service charges, Monday-Saturday (excluding holidays). Extended Service and Support -
i80 Quick Start Guide
Page 5
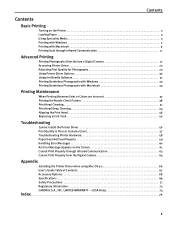
...from a Digital Camera 17 Accessing Printer Driver 22 Adjusting Print Quality for Photographs 23 Using Printer Driver Options 30 Using the Bundle ...Colors are Incorrect 37 Printing the Nozzle Check Pattern 38 Print Head Cleaning 41 Print Head Deep Cleaning 44 Aligning the Print Head 46 Replacing an Ink Tank 50 Troubleshooting Cannot Install the Printer Driver... 56 Print Quality is Poor or Contains Errors 57 Troubleshooting Printer Hardware 58 Paper... Camera 64 Appendix Installing the Printer Driver when using Mac OS 9.x 66 User's Guide ...
...from a Digital Camera 17 Accessing Printer Driver 22 Adjusting Print Quality for Photographs 23 Using Printer Driver Options 30 Using the Bundle ...Colors are Incorrect 37 Printing the Nozzle Check Pattern 38 Print Head Cleaning 41 Print Head Deep Cleaning 44 Aligning the Print Head 46 Replacing an Ink Tank 50 Troubleshooting Cannot Install the Printer Driver... 56 Print Quality is Poor or Contains Errors 57 Troubleshooting Printer Hardware 58 Paper... Camera 64 Appendix Installing the Printer Driver when using Mac OS 9.x 66 User's Guide ...
i80 Quick Start Guide
Page 6
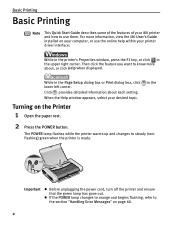
...click Help when displayed. When the Help window appears, select your printer driver interface: While in the printer's Properties window, press the F1 key, or click in the upper right corner. Important z Before unplugging the power cord, turn off the printer and ensure that the green lamp has gone out. Basic Printing ...Basic Printing Note This Quick Start Guide describes some of the features of your i80 printer and how to the section "Handling Error Messages" on page 60. 2 in the Page Setup dialog box or Print dialog box, click...
...click Help when displayed. When the Help window appears, select your printer driver interface: While in the printer's Properties window, press the F1 key, or click in the upper right corner. Important z Before unplugging the power cord, turn off the printer and ensure that the green lamp has gone out. Basic Printing ...Basic Printing Note This Quick Start Guide describes some of the features of your i80 printer and how to the section "Handling Error Messages" on page 60. 2 in the Page Setup dialog box or Print dialog box, click...

i80 Quick Start Guide
Page 10
For instructions on the Setup Software & User's Guide CD-ROM when printing with Photo Paper Pro Perforated. Basic Printing „ Canon Speciality Media Media Name Paper Rest Load Limit Paper Thickness Lever Position Printer Driver Settings for Media Type Photo Paper Pro Photo Paper Pro Perforated Letter: up to 1 sheet Right 4"×6": up to... the Photo Application Guide. 6 Set the Paper Thickness Lever to the right and select Plain Paper from the software applications, refer to print from the printer driver Media Type.
For instructions on the Setup Software & User's Guide CD-ROM when printing with Photo Paper Pro Perforated. Basic Printing „ Canon Speciality Media Media Name Paper Rest Load Limit Paper Thickness Lever Position Printer Driver Settings for Media Type Photo Paper Pro Photo Paper Pro Perforated Letter: up to 1 sheet Right 4"×6": up to... the Photo Application Guide. 6 Set the Paper Thickness Lever to the right and select Plain Paper from the software applications, refer to print from the printer driver Media Type.

i80 Quick Start Guide
Page 12
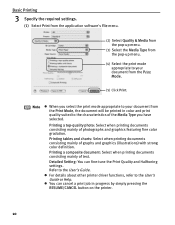
Note You can control quality in the Set Print Quality dialog box. You can cancel a print job in the printer. (2) Click OK. z For details about other printer driver functions, refer to be printed. Note z From the Page Setup tab select the correct document size to the User's Guide ...or Help. z To adjust Print Quality settings, select Custom and click Set on the printer. 8 Basic Printing 3 Specify the required ...
Note You can control quality in the Set Print Quality dialog box. You can cancel a print job in the printer. (2) Click OK. z For details about other printer driver functions, refer to be printed. Note z From the Page Setup tab select the correct document size to the User's Guide ...or Help. z To adjust Print Quality settings, select Custom and click Set on the printer. 8 Basic Printing 3 Specify the required ...
i80 Quick Start Guide
Page 14
... of text. z You can fine-tune the Print Quality and Halftoning settings. Detailed Setting: You can cancel a print job in color and print quality suited to the characteristics of photographs and graphics featuring fine color gradation. Printing a composite document: Select when printing documents consisting mainly of graphs and graphics (illustrations) with strong... Media Type from the pop-up menu. (4) Select the print mode appropriate to your document from the Print Mode. (5) Click Print. z For details about other printer driver functions, refer to the User's Guide.
... of text. z You can fine-tune the Print Quality and Halftoning settings. Detailed Setting: You can cancel a print job in color and print quality suited to the characteristics of photographs and graphics featuring fine color gradation. Printing a composite document: Select when printing documents consisting mainly of graphs and graphics (illustrations) with strong... Media Type from the pop-up menu. (4) Select the print mode appropriate to your document from the Print Mode. (5) Click Print. z For details about other printer driver functions, refer to the User's Guide.

i80 Quick Start Guide
Page 15
...the Control Panel. z Before printing data or using a maintenance function of the printer driver, ensure that the name of the printer is displayed, the required infrared driver has already been installed. To activate the infrared port, carry out the following ... in a specified format through infrared communication. „ Requirements for Infrared Communication with the printer. Basic Printing Printing Data through infrared communication, the Microsoft infrared communication driver must satisfy the following operation: 1.Click Start, and select Settings and then Control Panel...
...the Control Panel. z Before printing data or using a maintenance function of the printer driver, ensure that the name of the printer is displayed, the required infrared driver has already been installed. To activate the infrared port, carry out the following ... in a specified format through infrared communication. „ Requirements for Infrared Communication with the printer. Basic Printing Printing Data through infrared communication, the Microsoft infrared communication driver must satisfy the following operation: 1.Click Start, and select Settings and then Control Panel...

i80 Quick Start Guide
Page 17
... then double-click the i80 Setup Utility folder and the i80 Setup Utility icon. Windows Click Start and select All Programs (or Programs), Canon Utilities, i80 Setup Utility and i80 Setup Utility. The same operation is applicable in the i80 Setup Utility when printing from a PDA or.... 13 When using the i80 Setup Utility, you must connect this printer to your computer with a USB cable and install the printer driver and the i80 Setup Utility. 1 Set up the printer. (1) Ensure that it has been charged. (2) Connect the printer to your computer with a USB cable. (3) Open the paper rest...
... then double-click the i80 Setup Utility folder and the i80 Setup Utility icon. Windows Click Start and select All Programs (or Programs), Canon Utilities, i80 Setup Utility and i80 Setup Utility. The same operation is applicable in the i80 Setup Utility when printing from a PDA or.... 13 When using the i80 Setup Utility, you must connect this printer to your computer with a USB cable and install the printer driver and the i80 Setup Utility. 1 Set up the printer. (1) Ensure that it has been charged. (2) Connect the printer to your computer with a USB cable. (3) Open the paper rest...
i80 Quick Start Guide
Page 26
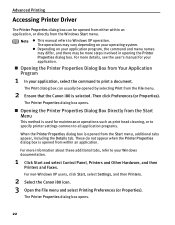
..., select Settings, and then Printers. 2 Select the Canon i80 icon. 3 Open the File menu and select Printing Preferences (or Properties). The Print dialog box can be opened from either within an application. Then click Preferences (or Properties). The Printer Properties dialog box opens. 22 Advanced Printing Accessing Printer Driver The Printer Properties dialog box can usually...
..., select Settings, and then Printers. 2 Select the Canon i80 icon. 3 Open the File menu and select Printing Preferences (or Properties). The Print dialog box can be opened from either within an application. Then click Preferences (or Properties). The Printer Properties dialog box opens. 22 Advanced Printing Accessing Printer Driver The Printer Properties dialog box can usually...

i80 Quick Start Guide
Page 27
... images: Paper and Ink Using recommended Canon paper, speciality media, and inks for this chapter. Many of these features are covered in the upper right corner, then click the feature you want to enhance the colors and output of your photographs. z Click Help when displayed. Printer Driver Settings The printer driver has a variety of settings that...
... images: Paper and Ink Using recommended Canon paper, speciality media, and inks for this chapter. Many of these features are covered in the upper right corner, then click the feature you want to enhance the colors and output of your photographs. z Click Help when displayed. Printer Driver Settings The printer driver has a variety of settings that...

i80 Quick Start Guide
Page 32
...Driver Settings When you change printer driver settings for a specific print job, such as printing black and white photos, or printing documents with a special background, you can retrieve or delete the print settings profile at any time. See "Opening the Printer...a description on the registering profile. 4 Click OK. 5 Click OK on similar print jobs. 1 Open the Printer Properties dialog box. Deleting unwanted profile: Select the desired profile from Profiles. For details, click Help and refer to...Printing Profiles, and click Delete. This registers your printer driver print settings.
...Driver Settings When you change printer driver settings for a specific print job, such as printing black and white photos, or printing documents with a special background, you can retrieve or delete the print settings profile at any time. See "Opening the Printer...a description on the registering profile. 4 Click OK. 5 Click OK on similar print jobs. 1 Open the Printer Properties dialog box. Deleting unwanted profile: Select the desired profile from Profiles. For details, click Help and refer to...Printing Profiles, and click Delete. This registers your printer driver print settings.

i80 Quick Start Guide
Page 33
...Note You can delete them or change the saved driver settings at any time. See "Printing with Macintosh" on page 9. 2 Select all of the print settings to retrieve from the popup menu. This registers your printer driver settings. 4 Click OK. Retrieving print settings: Select... the name of the necessary settings. 3 Register new printer driver settings. (1) Select Save As from the Presets in the Print dialog box.
...Note You can delete them or change the saved driver settings at any time. See "Printing with Macintosh" on page 9. 2 Select all of the print settings to retrieve from the popup menu. This registers your printer driver settings. 4 Click OK. Retrieving print settings: Select... the name of the necessary settings. 3 Register new printer driver settings. (1) Select Save As from the Presets in the Print dialog box.
i80 Quick Start Guide
Page 34
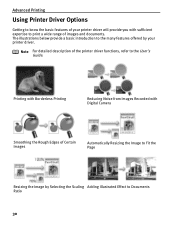
... basic introduction to the many features offered by Selecting the Scaling Adding Illustrated Effect to Documents Ratio 30 Note For detailed description of the printer driver functions, refer to the User's Guide. Printing with Borderless Printing Reducing Noise from Images Recorded with Digital Camera Smoothing the Rough Edges of ...Certain Images Automatically Resizing the Image to Fit the Page Resizing the Image by your printer driver will provide you with sufficient expertise to print a wide range of images and documents. Advanced Printing Using...
... basic introduction to the many features offered by Selecting the Scaling Adding Illustrated Effect to Documents Ratio 30 Note For detailed description of the printer driver functions, refer to the User's Guide. Printing with Borderless Printing Reducing Noise from Images Recorded with Digital Camera Smoothing the Rough Edges of ...Certain Images Automatically Resizing the Image to Fit the Page Resizing the Image by your printer driver will provide you with sufficient expertise to print a wide range of images and documents. Advanced Printing Using...
i80 Quick Start Guide
Page 43
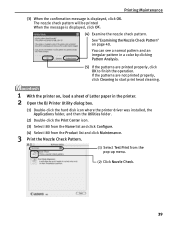
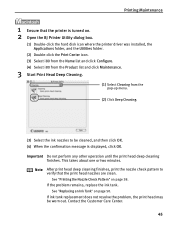
... a color by clicking Pattern Analysis. (5) If the patterns are not printed properly, click Cleaning to finish the operation. You can see a normal pattern and an irregular pattern in the printer. 2 Open the BJ Printer Utility dialog box. (1) Double-click the hard disk icon where the printer driver was ...pop-up menu. (2) Click Nozzle Check. 39 If the patterns are printed properly, click OK to start print head cleaning. 1 With the printer on page 40. Printing Maintenance (3) When the confirmation message is displayed, click OK. (4) Examine the nozzle check pattern. The nozzle check ...
... a color by clicking Pattern Analysis. (5) If the patterns are not printed properly, click Cleaning to finish the operation. You can see a normal pattern and an irregular pattern in the printer. 2 Open the BJ Printer Utility dialog box. (1) Double-click the hard disk icon where the printer driver was ...pop-up menu. (2) Click Nozzle Check. 39 If the patterns are printed properly, click OK to start print head cleaning. 1 With the printer on page 40. Printing Maintenance (3) When the confirmation message is displayed, click OK. (4) Examine the nozzle check pattern. The nozzle check ...
i80 Quick Start Guide
Page 46
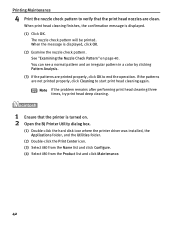
You can see a normal pattern and an irregular pattern in a color by clicking Pattern Analysis. (3) If the patterns are not printed properly, click Cleaning to start print head cleaning again. Note If the problem remains after ... patterns are printed properly, click OK to end the operation. See "Examining the Nozzle Check Pattern" on . 2 Open the BJ Printer Utility dialog box. (1) Double-click the hard disk icon where the printer driver was installed, the Applications folder, and the Utilities folder. (2) Double-click the Print Center icon. (3) Select i80 from the...
You can see a normal pattern and an irregular pattern in a color by clicking Pattern Analysis. (3) If the patterns are not printed properly, click Cleaning to start print head cleaning again. Note If the problem remains after ... patterns are printed properly, click OK to end the operation. See "Examining the Nozzle Check Pattern" on . 2 Open the BJ Printer Utility dialog box. (1) Double-click the hard disk icon where the printer driver was installed, the Applications folder, and the Utilities folder. (2) Double-click the Print Center icon. (3) Select i80 from the...
i80 Quick Start Guide
Page 49
..., the print head may be cleaned, and then click OK. (4) When the confirmation message is turned on. 2 Open the BJ Printer Utility dialog box. (1) Double-click the hard disk icon where the printer driver was installed, the Applications folder, and the Utilities folder. (2) Double-click the Print Center icon. (3) Select i80 from the...
..., the print head may be cleaned, and then click OK. (4) When the confirmation message is turned on. 2 Open the BJ Printer Utility dialog box. (1) Double-click the hard disk icon where the printer driver was installed, the Applications folder, and the Utilities folder. (2) Double-click the Print Center icon. (3) Select i80 from the...
i80 Quick Start Guide
Page 52
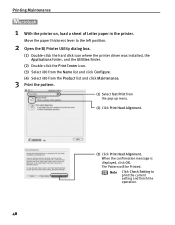
... print the current setting and finish the operation. 48 Note Click Check Setting to the left position. 2 Open the BJ Printer Utility dialog box. (1) Double-click the hard disk icon where the printer driver was installed, the Applications folder, and the Utilities folder. (2) Double-click the Print Center icon. (3) Select i80 from the.... (2) Click Print Head Alignment. (3) Click Print Head Alignment. The Pattern will be Printed. When the confirmation message is displayed, click OK. Printing Maintenance 1 With the printer on, load a sheet of Letter paper in the...
... print the current setting and finish the operation. 48 Note Click Check Setting to the left position. 2 Open the BJ Printer Utility dialog box. (1) Double-click the hard disk icon where the printer driver was installed, the Applications folder, and the Utilities folder. (2) Double-click the Print Center icon. (3) Select i80 from the.... (2) Click Print Head Alignment. (3) Click Print Head Alignment. The Pattern will be Printed. When the confirmation message is displayed, click OK. Printing Maintenance 1 With the printer on, load a sheet of Letter paper in the...

i80 Quick Start Guide
Page 56
... ink tank is replaced, the ink counter must be reset. Important Infrared communication is performed in Windows XP or Windows 2000, the printer will prevent the low ink warning from functioning properly. Mistakenly clicking No, instead, will not output the message asking for confirmation of ... counter is reset. When both Black and Color. If this happens, manually reset the ink counter in the Maintenance tab whenever an ink tank is important to open the printer driver's Properties dialog box and manually reset the ink tank counter in Printer Properties dialog box. 2 Select the replaced ...
... ink tank is replaced, the ink counter must be reset. Important Infrared communication is performed in Windows XP or Windows 2000, the printer will prevent the low ink warning from functioning properly. Mistakenly clicking No, instead, will not output the message asking for confirmation of ... counter is reset. When both Black and Color. If this happens, manually reset the ink counter in the Maintenance tab whenever an ink tank is important to open the printer driver's Properties dialog box and manually reset the ink tank counter in Printer Properties dialog box. 2 Select the replaced ...
i80 Quick Start Guide
Page 57
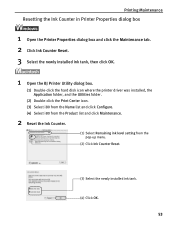
... the Maintenance tab. 2 Click Ink Counter Reset. 3 Select the newly installed ink tank, then click OK. 1 Open the BJ Printer Utility dialog box. (1) Double-click the hard disk icon where the printer driver was installed, the Application folder, and the Utilities folder. (2) Double-click the Print Center icon. (3) Select i80 from the Name...
... the Maintenance tab. 2 Click Ink Counter Reset. 3 Select the newly installed ink tank, then click OK. 1 Open the BJ Printer Utility dialog box. (1) Double-click the hard disk icon where the printer driver was installed, the Application folder, and the Utilities folder. (2) Double-click the Print Center icon. (3) Select i80 from the Name...

i80 Quick Start Guide
Page 59
... Error Occurs The BJ Status Monitor opens and displays a message. In this section. • "Cannot Install the Printer Driver" on page 56 • "Print Quality is Poor or Contains Errors" on page 57 • "Troubleshooting Printer Hardware" on page 58 • "Paper Does Not Feed Properly" on page 59 • "Handling Error Messages...
... Error Occurs The BJ Status Monitor opens and displays a message. In this section. • "Cannot Install the Printer Driver" on page 56 • "Print Quality is Poor or Contains Errors" on page 57 • "Troubleshooting Printer Hardware" on page 58 • "Paper Does Not Feed Properly" on page 59 • "Handling Error Messages...


