
Instruction Manual
Page 3
E Introduction Digital Video Camcorder XM2 Instruction Manual Preparations Recording Playback Editing Using the Memory Card Digital Video Solution Disk Instruction Manual Installing the Software Connecting the Camcorder to a Computer Downloading the Still Image to a Computer 3 Operating Steps and Reference Guide Your camcorder is supplied with two manuals: the "Digital Video Camcorder XM2 Instruction Manual" and the "Digital Video Solution Disk Instruction Manual".
E Introduction Digital Video Camcorder XM2 Instruction Manual Preparations Recording Playback Editing Using the Memory Card Digital Video Solution Disk Instruction Manual Installing the Software Connecting the Camcorder to a Computer Downloading the Still Image to a Computer 3 Operating Steps and Reference Guide Your camcorder is supplied with two manuals: the "Digital Video Camcorder XM2 Instruction Manual" and the "Digital Video Solution Disk Instruction Manual".
Instruction Manual
Page 4
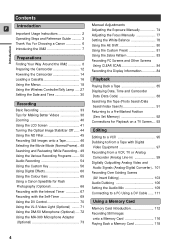
... Setting the Date and Time 30 Playing Back a Tape 85 Displaying Date, Time and Camcorder Data (Data Code 88 Recording Basic Recording 33 Tips for Making Better Videos 38 Zooming 40 Using the LCD Screen 41 Searching the Tape (Photo Search/Date Search/Index Search 91 Returning to a Pre-Marked Position (Zero Set Memory 92 Connections for Playback on a TV Screen.... 93 Turning the Optical Image Stabilizer Off ...... 44 Editing Using the ND Filter 45 Recording Still Images onto a Tape 46 Selecting the Movie Mode...
... Setting the Date and Time 30 Playing Back a Tape 85 Displaying Date, Time and Camcorder Data (Data Code 88 Recording Basic Recording 33 Tips for Making Better Videos 38 Zooming 40 Using the LCD Screen 41 Searching the Tape (Photo Search/Date Search/Index Search 91 Returning to a Pre-Marked Position (Zero Set Memory 92 Connections for Playback on a TV Screen.... 93 Turning the Optical Image Stabilizer Off ...... 44 Editing Using the ND Filter 45 Recording Still Images onto a Tape 46 Selecting the Movie Mode...

Instruction Manual
Page 5
... Maintenance 137 (Print Mark 123 Troubleshooting 141 Introduction Erasing Still Images 125 The XM2 System Diagram 145 Combining Images and Recording Them Optional Accessories 146 onto a Tape (Title Mix 127 Screen Displays 148 Copying Still Images from the plug end (the plug to be used with this equipment in order to comply with the digital Video Camcorder must be connected to a PC Using a USB Cable .... 132 Menu at a Glance 157 Other Information...
... Maintenance 137 (Print Mark 123 Troubleshooting 141 Introduction Erasing Still Images 125 The XM2 System Diagram 145 Combining Images and Recording Them Optional Accessories 146 onto a Tape (Title Mix 127 Screen Displays 148 Copying Still Images from the plug end (the plug to be used with this equipment in order to comply with the digital Video Camcorder must be connected to a PC Using a USB Cable .... 132 Menu at a Glance 157 Other Information...

Instruction Manual
Page 6
... Video Cable CA-920 Compact Power Adapter (incl. Please refer to settings displayed in This Manual : Reference page numbers : Functions that can be operated from the body of your computer. AC Power Cord) DC-920 DC Coupler BP-915 Battery Pack SDC-8M SD Memory Soft Case for SD Memory Card Card Software CD-ROM SS-650 Shoulder Digital Video Solution Strap Disk* * Required for transferring still images from the wireless controller : Supplementary notes for camcorder operation ` : Operation...
... Video Cable CA-920 Compact Power Adapter (incl. Please refer to settings displayed in This Manual : Reference page numbers : Functions that can be operated from the body of your computer. AC Power Cord) DC-920 DC Coupler BP-915 Battery Pack SDC-8M SD Memory Soft Case for SD Memory Card Card Software CD-ROM SS-650 Shoulder Digital Video Solution Strap Disk* * Required for transferring still images from the wireless controller : Supplementary notes for camcorder operation ` : Operation...

Instruction Manual
Page 28
... compatible. Change the mode again if necessary. 28 When Operating 2 Canon DV Camcorders (Remote Sensor Mode) E To prevent interference from other than the REMOTE SET button on the wireless controller. TAPE CAMERA TAPE PLAY (VCR) CARD CAMERA CARD PLAY (VCR) ( 18) SYSTEM WL.REMOTE••• A1 A 1 : Mode 1 A 2 : Mode 2 OFFB : Sensor off To turn the power on. • When you replace the batteries, the wireless controller returns to OFF B and close the menu. •The selected mode will appear on the display...
... compatible. Change the mode again if necessary. 28 When Operating 2 Canon DV Camcorders (Remote Sensor Mode) E To prevent interference from other than the REMOTE SET button on the wireless controller. TAPE CAMERA TAPE PLAY (VCR) CARD CAMERA CARD PLAY (VCR) ( 18) SYSTEM WL.REMOTE••• A1 A 1 : Mode 1 A 2 : Mode 2 OFFB : Sensor off To turn the power on. • When you replace the batteries, the wireless controller returns to OFF B and close the menu. •The selected mode will appear on the display...

Instruction Manual
Page 33
... the POWER switch to CAMERA and the TAPE/CARD switch to set to prevent accidental operation. 33 Low-Angle Recording The camcorder is equipped with start /stop button, PHOTO button and zoom controls. The handle is also designed for low-angle recording. You may be set the date and time display ( 30). Turn the standby lever to edit later. 5. Recordings shorter than 10 seconds may also want to install the backup battery ( 136) in the menu...
... the POWER switch to CAMERA and the TAPE/CARD switch to set to prevent accidental operation. 33 Low-Angle Recording The camcorder is equipped with start /stop button, PHOTO button and zoom controls. The handle is also designed for low-angle recording. You may be set the date and time display ( 30). Turn the standby lever to edit later. 5. Recordings shorter than 10 seconds may also want to install the backup battery ( 136) in the menu...
Instruction Manual
Page 34
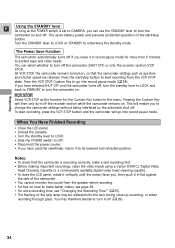
... camcorder turns off the camcorder (SHUT OFF) or only the recorder section (VCR STOP). This saves battery power and prevents accidental operation of the start /stop button. Turn the STANDBY lever to LOCK or STANDBY to turn the standby lever to LOCK and back to STANDBY to enter/leave the standby mode. Press the start /stop button to make a test recording first. • Before making important recordings, clean the video heads using a Canon DVM-CL Digital Video Head Cleaning Cassette...
... camcorder turns off the camcorder (SHUT OFF) or only the recorder section (VCR STOP). This saves battery power and prevents accidental operation of the start /stop button. Turn the STANDBY lever to LOCK or STANDBY to turn the standby lever to LOCK and back to STANDBY to enter/leave the standby mode. Press the start /stop button to make a test recording first. • Before making important recordings, clean the video heads using a Canon DVM-CL Digital Video Head Cleaning Cassette...
Instruction Manual
Page 36
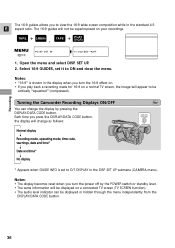
... reset when you turn the 16:9 effect on. • If you play back a recording made for 16:9 on a connected TV screen (TV SCREEN function). • The audio level indicator can be displayed on a normal TV screen, the image will appear to ON and close the menu. Open the menu and select DISP. SET UP submenu (CAMERA menu). Recording Turning the Camcorder Recording Displays ON/OFF You can change as follows: Normal display Recording mode, operating mode, time code, warnings, date and time* Date and time* No display DISPLAY/ DATA CODE...
... reset when you turn the 16:9 effect on. • If you play back a recording made for 16:9 on a connected TV screen (TV SCREEN function). • The audio level indicator can be displayed on a normal TV screen, the image will appear to ON and close the menu. Open the menu and select DISP. SET UP submenu (CAMERA menu). Recording Turning the Camcorder Recording Displays ON/OFF You can change as follows: Normal display Recording mode, operating mode, time code, warnings, date and time* Date and time* No display DISPLAY/ DATA CODE...

Instruction Manual
Page 40
.... • The speed of the wireless controller cannot be used in CARD CAMERA mode. 20× Optical Zoom Press the zoom control towards W to zoom out to 40×, the zoom indicator extends (light blue). Notes: • When zooming, as a rule, keep at the wide-angle position, you and your subject. When the digital zoom is set to wide-angle. the camcorder automatically switches between optical zooming (up to...
.... • The speed of the wireless controller cannot be used in CARD CAMERA mode. 20× Optical Zoom Press the zoom control towards W to zoom out to 40×, the zoom indicator extends (light blue). Notes: • When zooming, as a rule, keep at the wide-angle position, you and your subject. When the digital zoom is set to wide-angle. the camcorder automatically switches between optical zooming (up to...

Instruction Manual
Page 55
... can manually adjust the recoding level of the input audio during recording or audio dubbing. Audio level indicator at the side. Turn on the microphone attenuator in the VCR SET UP submenu of the CAMERA or VCR menu. 55 Monitor the level of the camcorder: Set to automatic: Set to manual: L -dB 50 40 30 20 12 6 2 0 R MANU L -dB 50 40 30 R 20 12 6 2 0 Audio level indicator on the LCD or viewfinder screen (open the menu, select DISPLAY SET...
... can manually adjust the recoding level of the input audio during recording or audio dubbing. Audio level indicator at the side. Turn on the microphone attenuator in the VCR SET UP submenu of the CAMERA or VCR menu. 55 Monitor the level of the camcorder: Set to automatic: Set to manual: L -dB 50 40 30 20 12 6 2 0 R MANU L -dB 50 40 30 R 20 12 6 2 0 Audio level indicator on the LCD or viewfinder screen (open the menu, select DISPLAY SET...

Instruction Manual
Page 67
... seconds or 1 minute, the camcorder enters into record pause mode between recordings. 67 Interval time 5 min. 2 sec. Slide the POWER switch to CAMERA and the TAPE/CARD switch to start recording. • The interval recording starts and INT T. and set it is set the recording time. 6. Close the menu. 7. Record 4 min. 58 sec. Open the CAM. Record 4 min. 58 sec. appears in the display. • When the interval time is useful when shooting flowers, animals, and other...
... seconds or 1 minute, the camcorder enters into record pause mode between recordings. 67 Interval time 5 min. 2 sec. Slide the POWER switch to CAMERA and the TAPE/CARD switch to start recording. • The interval recording starts and INT T. and set it is set the recording time. 6. Close the menu. 7. Record 4 min. 58 sec. Open the CAM. Record 4 min. 58 sec. appears in the display. • When the interval time is useful when shooting flowers, animals, and other...

Instruction Manual
Page 71
Set the camcorder to the level of brightness of the shooting conditions. Turn the Video Light's power switch to AUTO or ON. • C (Connection) appears in the display. • ON: The Video Light stays on. • AUTO: The Video Light turns on/off automatically according to TAPE CAMERA mode or CARD CAMERA mode. 3. Turn the camcorder's power off . Slide the Video Light onto the accessory shoe and tighten the shoe lock. • Insert the Video Light oriented in the direction indicated by the...
Set the camcorder to the level of brightness of the shooting conditions. Turn the Video Light's power switch to AUTO or ON. • C (Connection) appears in the display. • ON: The Video Light stays on. • AUTO: The Video Light turns on/off automatically according to TAPE CAMERA mode or CARD CAMERA mode. 3. Turn the camcorder's power off . Slide the Video Light onto the accessory shoe and tighten the shoe lock. • Insert the Video Light oriented in the direction indicated by the...

Instruction Manual
Page 91
... ( 57) recorded anywhere on that day/time zone was less than once to move to operate the date search correctly. 91 REW PLAY FF AV INSERT - / STOP + / REMOTE SET PAUSE SLOW × 2 Playback This allows you have set the time zone, date search also looks for the change the direction easily by pressing the button for 4 seconds. 2. Press the SEARCH SELECT button to move quickly through . press the + button 5 times to...
... ( 57) recorded anywhere on that day/time zone was less than once to move to operate the date search correctly. 91 REW PLAY FF AV INSERT - / STOP + / REMOTE SET PAUSE SLOW × 2 Playback This allows you have set the time zone, date search also looks for the change the direction easily by pressing the button for 4 seconds. 2. Press the SEARCH SELECT button to move quickly through . press the + button 5 times to...
Instruction Manual
Page 101
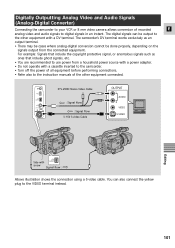
... to the instruction manuals of recorded E analog video and audio signals to digital signals in an instant. You can be done properly, depending on the signals output from a household power source with a power adapter. • Do not operate with DV IN/OUT arrow Signal flow : Above illustration shows the connection using a S-video cable. Digitally Outputting Analog Video and Audio Signals (Analog-Digital Converter) Connecting the camcorder to your VCR or 8 mm video camera allows conversion...
... to the instruction manuals of recorded E analog video and audio signals to digital signals in an instant. You can be done properly, depending on the signals output from a household power source with a power adapter. • Do not operate with DV IN/OUT arrow Signal flow : Above illustration shows the connection using a S-video cable. Digitally Outputting Analog Video and Audio Signals (Analog-Digital Converter) Connecting the camcorder to your VCR or 8 mm video camera allows conversion...

Instruction Manual
Page 106
.... e. Audio Dubbing You can monitor the picture on the TV screen. IN). The original sound will be erased. If your original tape onto a blank tape using the XM2's analog line-in SP mode with the internal or external microphone (MIC. Make absolutely sure to set the audio mode of the new tape to 12-bit and the recording mode to check the sound. 106 Check the picture on the LCD screen, viewfinder or a TV connected to the S-video...
.... e. Audio Dubbing You can monitor the picture on the TV screen. IN). The original sound will be erased. If your original tape onto a blank tape using the XM2's analog line-in SP mode with the internal or external microphone (MIC. Make absolutely sure to set the audio mode of the new tape to 12-bit and the recording mode to check the sound. 106 Check the picture on the LCD screen, viewfinder or a TV connected to the S-video...

Instruction Manual
Page 115
... file number in folders of 9999 images each image is convenient when you insert a new memory card, the file number resets to its default value (100-0001). Using a Memory Card 115 Then select SHTR SOUND, set to CONTINUOUS, each . We recommend keeping the file 100-0003 numbers set it to a memory card. ( 18) CARD SET UP SHTR SOUND•• ON To turn the shutter sound off, open the menu and select CARD SET UP. Turning Off the Shutter Sound + CARD CAMERA Makes the sound...
... file number in folders of 9999 images each image is convenient when you insert a new memory card, the file number resets to its default value (100-0001). Using a Memory Card 115 Then select SHTR SOUND, set to CONTINUOUS, each . We recommend keeping the file 100-0003 numbers set it to a memory card. ( 18) CARD SET UP SHTR SOUND•• ON To turn the shutter sound off, open the menu and select CARD SET UP. Turning Off the Shutter Sound + CARD CAMERA Makes the sound...

Instruction Manual
Page 132
... the camcorder is flashing). Notes: While performing USB connection: • The buttons, excluding the POWER switch and TAPE/CARD switch on your valuable, original image files. Doing so may damage the data on the memory. • The connection may not work properly depending on the specifications and settings of the software and PC. • The image files on how to connect the camcorder to a PC and install and operate the software, refer to the Canon Digital Video Solution Disk instruction manual. •...
... the camcorder is flashing). Notes: While performing USB connection: • The buttons, excluding the POWER switch and TAPE/CARD switch on your valuable, original image files. Doing so may damage the data on the memory. • The connection may not work properly depending on the specifications and settings of the software and PC. • The image files on how to connect the camcorder to a PC and install and operate the software, refer to the Canon Digital Video Solution Disk instruction manual. •...

Instruction Manual
Page 134
... start/stop, zooming and power on Using the Batteries Charging and Recording Times E • These times vary - the safest policy is always to 30°C (50° and 86°F). charged battery pack. Battery Pack BP-915 BP-930 BP-945 Charging Time 1 hr. 25 min. 2 hr. 25 min. 3 hr. 40 min. For better operating results, the battery pack can be warmed in record pause mode. • The charging time varies...
... start/stop, zooming and power on Using the Batteries Charging and Recording Times E • These times vary - the safest policy is always to 30°C (50° and 86°F). charged battery pack. Battery Pack BP-915 BP-930 BP-945 Charging Time 1 hr. 25 min. 2 hr. 25 min. 3 hr. 40 min. For better operating results, the battery pack can be warmed in record pause mode. • The charging time varies...

Instruction Manual
Page 152
... CARD ERROR disappears after 4 seconds and flashes red, turn the camcorder's power off, remove the card and reinsert the card. NAMING ERROR UNIDENTIFIABLE IMAGE File or folder numbers have already reached the maximum value ( 115). The cover of the protect switch ( 112). E COPYRIGHT PROTECTED DUBBING RESTRICTED You attempted to green, you can continue recording/playback ( 116, 118). The camcorder cannot record/play back. The image is recorded in a JPEG format or any format that...
... CARD ERROR disappears after 4 seconds and flashes red, turn the camcorder's power off, remove the card and reinsert the card. NAMING ERROR UNIDENTIFIABLE IMAGE File or folder numbers have already reached the maximum value ( 115). The cover of the protect switch ( 112). E COPYRIGHT PROTECTED DUBBING RESTRICTED You attempted to green, you can continue recording/playback ( 116, 118). The camcorder cannot record/play back. The image is recorded in a JPEG format or any format that...
Instruction Manual
Page 153
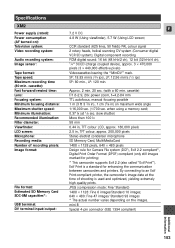
... system: Video recording system: Audio recording system: Image sensor: Tape format: Tape speed: Maximum recording time (80 min. mini-B Special 4-pin connector (IEEE 1394 compliant) Additional Information 153 Specifications XM2 Power supply (rated): Power consumption (AF turned on the images. Digital component recording PCM digital sound: 16 bit (48 kHz/2 ch); 12 bit (32 kHz/4 ch); 1/4" 3CCD (charge coupled device), approx. 3 × 470,000 pixels (3 × 440,000 effective pixels) Videocassettes bearing the "MiniDV" mark. Exif...
... system: Video recording system: Audio recording system: Image sensor: Tape format: Tape speed: Maximum recording time (80 min. mini-B Special 4-pin connector (IEEE 1394 compliant) Additional Information 153 Specifications XM2 Power supply (rated): Power consumption (AF turned on the images. Digital component recording PCM digital sound: 16 bit (48 kHz/2 ch); 12 bit (32 kHz/4 ch); 1/4" 3CCD (charge coupled device), approx. 3 × 470,000 pixels (3 × 440,000 effective pixels) Videocassettes bearing the "MiniDV" mark. Exif...


