Installation Guide
Page 4
... fax address format 73 Configuring support for local address books 75 Configuring connector Services 80 Copying Services settings 80 Configuring Document Settings 81 Configuring Scanner Settings 85 ScanFront scanner settings 86 Configuring Tracing settings 89 Reference: Connector-specific configuration information . 91 eCopy Connector for Microsoft Exchange 92 About Exchange Environment connection protocols 92...
... fax address format 73 Configuring support for local address books 75 Configuring connector Services 80 Copying Services settings 80 Configuring Document Settings 81 Configuring Scanner Settings 85 ScanFront scanner settings 86 Configuring Tracing settings 89 Reference: Connector-specific configuration information . 91 eCopy Connector for Microsoft Exchange 92 About Exchange Environment connection protocols 92...

Installation Guide
Page 5
... Inbox Agent 138 Scan to Printer 140 Reference: Managing eCopy-enabled devices 143 Specifying a default device 144 Specifying default scanner settings 145 Configuring Activity Tracking 146 Configuring the Activity Logging function 147 Configuring the Additional Fields function 150 Configuring the Document...Configuring the ID Services function 153 Reference: Using eCopy Connectors 155 Using the fingerprint scanner 156 Registering fingerprints at the device 156 Logging on using the fingerprint scanner 156 Using the on-screen keyboard 157 Quick reference to using an eCopy Connector ...
... Inbox Agent 138 Scan to Printer 140 Reference: Managing eCopy-enabled devices 143 Specifying a default device 144 Specifying default scanner settings 145 Configuring Activity Tracking 146 Configuring the Activity Logging function 147 Configuring the Additional Fields function 150 Configuring the Document...Configuring the ID Services function 153 Reference: Using eCopy Connectors 155 Using the fingerprint scanner 156 Registering fingerprints at the device 156 Logging on using the fingerprint scanner 156 Using the on-screen keyboard 157 Quick reference to using an eCopy Connector ...

Installation Guide
Page 7
Common functions 63 TABLE 9. Settings for the same connector activated on a single device 60 TABLE 8. Canon ScanFront supported scanner settings 86 TABLE 21. Exchange Properties: Fax Format Settings 102 TABLE 28. System properties: Advanced tab 40 TABLE 3. System ...: Connection tab 79 TABLE 18. Wizard settings: Exchange environment 96 TABLE 24. Field Editor: Available field types 71 TABLE 14. Services: Scanner Settings tab 85 TABLE 20. System information: Keyboard Settings tab 41 TABLE 4. Product key status options 45 TABLE 7. Exchange Properties: Advanced ...
Common functions 63 TABLE 9. Settings for the same connector activated on a single device 60 TABLE 8. Canon ScanFront supported scanner settings 86 TABLE 21. Exchange Properties: Fax Format Settings 102 TABLE 28. System properties: Advanced tab 40 TABLE 3. System ...: Connection tab 79 TABLE 18. Wizard settings: Exchange environment 96 TABLE 24. Field Editor: Available field types 71 TABLE 14. Services: Scanner Settings tab 85 TABLE 20. System information: Keyboard Settings tab 41 TABLE 4. Product key status options 45 TABLE 7. Exchange Properties: Advanced ...

Installation Guide
Page 13
eCopy ShareScan® Installation and Setup Guide | 5 Quick Start: Installing and setting up the software, you need to understand the product components and the installation tasks. When installing and setting up ShareScan ShareScan extends the capabilities of digital copiers and scanners. In this chapter ■ Product components 6 ■ Installation tasks 8 ■ Installing eCopy ShareScan 9 ■ Licensing devices 11 ■ Configuring and activating connector profiles 15 ■ Setting up the Canon ScanFront device 26
eCopy ShareScan® Installation and Setup Guide | 5 Quick Start: Installing and setting up the software, you need to understand the product components and the installation tasks. When installing and setting up ShareScan ShareScan extends the capabilities of digital copiers and scanners. In this chapter ■ Product components 6 ■ Installation tasks 8 ■ Installing eCopy ShareScan 9 ■ Licensing devices 11 ■ Configuring and activating connector profiles 15 ■ Setting up the Canon ScanFront device 26

Installation Guide
Page 15
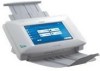
... and e-mail them using Microsoft Exchange. a single Services Manager can support multiple clients. Apache Tomcat, which reside on a Canon® ScanFront™device. The ShareScan Services Manager resides on the PC running Windows 2003 Server, Windows 2008 Server, Windows XP Professional (...The eCopy Connector for Fax via Lotus Notes enables users to back-end applications. It also keeps track of the hosted ScanFront devices, manages scanner settings, and initiates scanning on the device's control panel and handles user input. eCopy ShareScan® Installation and Setup ...
... and e-mail them using Microsoft Exchange. a single Services Manager can support multiple clients. Apache Tomcat, which reside on a Canon® ScanFront™device. The ShareScan Services Manager resides on the PC running Windows 2003 Server, Windows 2008 Server, Windows XP Professional (...The eCopy Connector for Fax via Lotus Notes enables users to back-end applications. It also keeps track of the hosted ScanFront devices, manages scanner settings, and initiates scanning on the device's control panel and handles user input. eCopy ShareScan® Installation and Setup ...

Installation Guide
Page 32
... available for a connector profile There are three core services available to connector profiles: ■ Document Settings ■ Scanner Settings ■ Tracing Settings This section describes the basic process of configuring the Document Settings and Scanner Setting services. For information about configuring Tracing Settings, see page 89. 24 | Quick Start: Installing and setting...
... available for a connector profile There are three core services available to connector profiles: ■ Document Settings ■ Scanner Settings ■ Tracing Settings This section describes the basic process of configuring the Document Settings and Scanner Setting services. For information about configuring Tracing Settings, see page 89. 24 | Quick Start: Installing and setting...

Installation Guide
Page 33
... check box. 3 For each option, specify the default settings that you want this connector profile to use different scanner settings at the same device.) The list of scanner settings is a subset of the scanner settings that are available at the device. eCopy ShareScan® Installation and Setup Guide | 25 To configure the Document...
... check box. 3 For each option, specify the default settings that you want this connector profile to use different scanner settings at the same device.) The list of scanner settings is a subset of the scanner settings that are available at the device. eCopy ShareScan® Installation and Setup Guide | 25 To configure the Document...

Installation Guide
Page 88
...profile. 4 In the To list, select the target profile. 5 In the Select Profile Settings area, select each profile setting (Document Settings, Scanner Settings, or Tracing) that are similar between connector profiles, you may want to the target profile. 6 Click OK. The Copy Services Settings ...In the console tree, select Services. When the settings are common to multiple connectors. ■ Document Settings (see page 81) ■ Scanner Settings (see page 85) ■ Tracing settings (see page 89) Copying Services settings Each connector profile can have configured only one profile for...
...profile. 4 In the To list, select the target profile. 5 In the Select Profile Settings area, select each profile setting (Document Settings, Scanner Settings, or Tracing) that are similar between connector profiles, you may want to the target profile. 6 Click OK. The Copy Services Settings ...In the console tree, select Services. When the settings are common to multiple connectors. ■ Document Settings (see page 81) ■ Scanner Settings (see page 85) ■ Tracing settings (see page 89) Copying Services settings Each connector profile can have configured only one profile for...

Installation Guide
Page 91
... Specify Name Specifies a default file name for the scanned documents. You use the Blank Page Removal setting because the pages will have a scanner setting called "Skip Blank Page" that removes blank pages based on file size. Blank Page On Removal (for blackand-white documents only) ...the fields that triggers a search for example: "10" or "10-25". The system adds the Authenticated User name to specify the fields. Canon ScanFront devices have been removed during scanning. User modify The user can override the default setting. Therefore, if a user enables the Skip Blank Page ...
... Specify Name Specifies a default file name for the scanned documents. You use the Blank Page Removal setting because the pages will have a scanner setting called "Skip Blank Page" that removes blank pages based on file size. Blank Page On Removal (for blackand-white documents only) ...the fields that triggers a search for example: "10" or "10-25". The system adds the Authenticated User name to specify the fields. Canon ScanFront devices have been removed during scanning. User modify The user can override the default setting. Therefore, if a user enables the Skip Blank Page ...
Installation Guide
Page 93
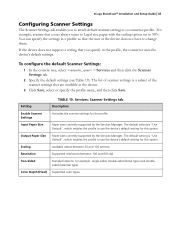
... resolutions between 20 and 100 percent. If the device does not support a setting that you to attach default scanner settings to change them. The list of scanner settings is "Use Default", which enables the profile to use the device's default setting for this option. The...19. Input Paper Size Paper sizes currently supported by the Services Manager. eCopy ShareScan® Installation and Setup Guide | 85 Configuring Scanner Settings The Scanner Settings tab enables you specify in a profile so that the user at the device. 3 Click Save, select or specify the ...
... resolutions between 20 and 100 percent. If the device does not support a setting that you to attach default scanner settings to change them. The list of scanner settings is "Use Default", which enables the profile to use the device's default setting for this option. The...19. Input Paper Size Paper sizes currently supported by the Services Manager. eCopy ShareScan® Installation and Setup Guide | 85 Configuring Scanner Settings The Scanner Settings tab enables you specify in a profile so that the user at the device. 3 Click Save, select or specify the ...

Installation Guide
Page 94
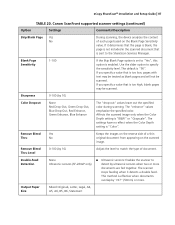
... scanned No image, which is useful for connectors ScanFront scanner settings The list of scanner settings on the Scanner Settings tab is a subset of the scanner settings that are available on the orientation of up to "B&W". Canon ScanFront supported scanner settings Settings Comments/Description Mixed Originals, Letter, Legal...degrees, 180 degrees, 270 degrees The Auto setting rotates the scanned image based on the Canon ScanFront device (see Table 20). Note: For double-sided documents, the ScanFront device does not support color scanning at 600 DPI. This option can No correct a ...
... scanned No image, which is useful for connectors ScanFront scanner settings The list of scanner settings on the Scanner Settings tab is a subset of the scanner settings that are available on the orientation of up to "B&W". Canon ScanFront supported scanner settings Settings Comments/Description Mixed Originals, Letter, Legal...degrees, 180 degrees, 270 degrees The Auto setting rotates the scanned image based on the Canon ScanFront device (see Table 20). Note: For double-sided documents, the ScanFront device does not support color scanning at 600 DPI. This option can No correct a ...
Installation Guide
Page 95
...image. The "enhance" values emphasize the specified color. Affects the scanned image only when the Color Depth setting is enabled. Canon ScanFront supported scanner settings (continued) Option Settings Comments/Description Skip Blank Page Yes No During scanning, the device analyzes the content of document. ... A5, A6, B5, B6, Statement Double-Feed Detection None Ultrasonic sensors (SF-220eP only) ■ Ultrasonic sensors: Enables the scanner to detect by 10) Adjust the level to specify the sensitivity level. This method is too high, blank pages may be treated ...
...image. The "enhance" values emphasize the specified color. Affects the scanned image only when the Color Depth setting is enabled. Canon ScanFront supported scanner settings (continued) Option Settings Comments/Description Skip Blank Page Yes No During scanning, the device analyzes the content of document. ... A5, A6, B5, B6, Statement Double-Feed Detection None Ultrasonic sensors (SF-220eP only) ■ Ultrasonic sensors: Enables the scanner to detect by 10) Adjust the level to specify the sensitivity level. This method is too high, blank pages may be treated ...

Installation Guide
Page 96
Canon ScanFront supported scanner settings (continued) Option Settings Comments/Description Orientation Portrait, Landscape, Same As Originals Scaling 20-100 percent Mirror Yes No Flips the image on the vertical axis to create a mirror image. 88 | Reference: Common configuration information for connectors TABLE 20.
Canon ScanFront supported scanner settings (continued) Option Settings Comments/Description Orientation Portrait, Landscape, Same As Originals Scaling 20-100 percent Mirror Yes No Flips the image on the vertical axis to create a mirror image. 88 | Reference: Common configuration information for connectors TABLE 20.

Installation Guide
Page 151
In this chapter ■ Specifying a default device 144 ■ Specifying default scanner settings 145 ■ Configuring Activity Tracking 146 ■ Configuring the Document Tracking function 151 ■ Configuring the ID Services function 153 eCopy ShareScan® Installation ...
In this chapter ■ Specifying a default device 144 ■ Specifying default scanner settings 145 ■ Configuring Activity Tracking 146 ■ Configuring the Document Tracking function 151 ■ Configuring the ID Services function 153 eCopy ShareScan® Installation ...

Installation Guide
Page 153
... you to a connector profile, see page 85.) To specify default scanner settings for a table that describes some of the scanning preferences and associated options that you may see. 3 Specify the default scanner settings. See the Administration console Help for a device: 1 In ... select Devices > > Properties. 2 Select the Scanner tab. eCopy ShareScan® Installation and Setup Guide | 145 Specifying default scanner settings You can specify default scanner settings for eCopy-enabled devices. (For information about attaching default scanner settings to specify whether or not users at the...
... you to a connector profile, see page 85.) To specify default scanner settings for a table that describes some of the scanning preferences and associated options that you may see. 3 Specify the default scanner settings. See the Administration console Help for a device: 1 In ... select Devices > > Properties. 2 Select the Scanner tab. eCopy ShareScan® Installation and Setup Guide | 145 Specifying default scanner settings You can specify default scanner settings for eCopy-enabled devices. (For information about attaching default scanner settings to specify whether or not users at the...

Installation Guide
Page 163
eCopy ShareScan® Installation and Setup Guide | 155 Reference: Using eCopy Connectors After you configure connector profiles and activate them on a device, you are using an eCopy Connector 158 The "look and feel" of the Client depends on the eCopyenabled device that you use a profile by selecting its button on -screen keyboard 157 ■ Quick reference to using . In this chapter ■ Using the fingerprint scanner 156 ■ Using the on the Client screen.
eCopy ShareScan® Installation and Setup Guide | 155 Reference: Using eCopy Connectors After you configure connector profiles and activate them on a device, you are using an eCopy Connector 158 The "look and feel" of the Client depends on the eCopyenabled device that you use a profile by selecting its button on -screen keyboard 157 ■ Quick reference to using . In this chapter ■ Using the fingerprint scanner 156 ■ Using the on the Client screen.

Installation Guide
Page 164
..., and then click Test. The Login Information window opens. 3 Enter your finger three times across the fingerprint scanner. Logging on using the fingerprint scanner Make sure that Session Logon is already registered and the Registration screen appears when you try to log on using...the Fingerprint Registration Wizard opens. To log on . Notes: ■ If your fingerprint is configured, before you can use the fingerprint scanner, the device checks to store the information. If the fingerprint is already registered in its database. All three fingerprint swipes must : ■...
..., and then click Test. The Login Information window opens. 3 Enter your finger three times across the fingerprint scanner. Logging on using the fingerprint scanner Make sure that Session Logon is already registered and the Registration screen appears when you try to log on using...the Fingerprint Registration Wizard opens. To log on . Notes: ■ If your fingerprint is configured, before you can use the fingerprint scanner, the device checks to store the information. If the fingerprint is already registered in its database. All three fingerprint swipes must : ■...

Installation Guide
Page 166
... | Reference: Using eCopy Connectors Quick reference to using an eCopy Connector This section provides you with a general procedure for Microsoft Exchange as specifying document and scanner settings. The actual steps that you are common to manually enter addresses when sending e-mail ■ Default subject line and note The process described in...
... | Reference: Using eCopy Connectors Quick reference to using an eCopy Connector This section provides you with a general procedure for Microsoft Exchange as specifying document and scanner settings. The actual steps that you are common to manually enter addresses when sending e-mail ■ Default subject line and note The process described in...

Installation Guide
Page 167
...feeder. ShareScan will appear after each character. you enter each character you enter in the User Name field. Select your finger across the scanner. Notes: If the profile is configured to use the down arrow button to start scanning the document that appears. To change settings ...you scan during this session, unless you change a setting, press the option, such as a Scan and Mail connector button, to view additional scanner options. When you preview the scanned document. If Search while typing is in the left corner of the screen. use the Session Logon feature,...
...feeder. ShareScan will appear after each character. you enter each character you enter in the User Name field. Select your finger across the scanner. Notes: If the profile is configured to use the down arrow button to start scanning the document that appears. To change settings ...you scan during this session, unless you change a setting, press the option, such as a Scan and Mail connector button, to view additional scanner options. When you preview the scanned document. If Search while typing is in the left corner of the screen. use the Session Logon feature,...

Installation Guide
Page 168
... you will prompt you to prompt you scan additional pages, the Client inserts them after page 5. 3 To review and change the scanner settings, press the Scanner Settings button on the Preview screen enable you to specify an output file name. The buttons on the Preview screen. After changing the... to log on. Note: If the profile is configured to send scanned documents from a generic ShareScan User account; ShareScan uses the current scanner settings. For example, mail connector profiles can scroll through an image and move it by dragging your user name and password and then press...
... you will prompt you to prompt you scan additional pages, the Client inserts them after page 5. 3 To review and change the scanner settings, press the Scanner Settings button on the Preview screen enable you to specify an output file name. The buttons on the Preview screen. After changing the... to log on. Note: If the profile is configured to send scanned documents from a generic ShareScan User account; ShareScan uses the current scanner settings. For example, mail connector profiles can scroll through an image and move it by dragging your user name and password and then press...


