Installation Guide
Page 3
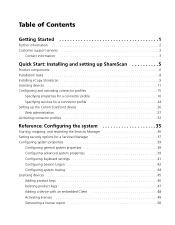
... Getting Started 1 Further information 2 Customer support services 3 Contact information 3 Quick Start: Installing and setting up ShareScan 5 Product components 6 Installation tasks 8 Installing eCopy ShareScan 9 Licensing devices 11 Configuring and activating connector profiles 15 Specifying properties for a connector profile 16 Specifying services for a connector profile 24 Setting up the Canon ScanFront device 26 Web administration 27 Activating connector profiles 32 Reference: Configuring the system 35 Starting, stopping, and restarting the Services Manager 36 Setting...
... Getting Started 1 Further information 2 Customer support services 3 Contact information 3 Quick Start: Installing and setting up ShareScan 5 Product components 6 Installation tasks 8 Installing eCopy ShareScan 9 Licensing devices 11 Configuring and activating connector profiles 15 Specifying properties for a connector profile 16 Specifying services for a connector profile 24 Setting up the Canon ScanFront device 26 Web administration 27 Activating connector profiles 32 Reference: Configuring the system 35 Starting, stopping, and restarting the Services Manager 36 Setting...

Installation Guide
Page 15
... ShareScan Services Manager resides on the device's control panel and handles user input. a single Services Manager can support multiple clients. The Administration console is installed on the PC running Windows 2003 Server, Windows 2008 Server, Windows XP Professional (Service Pack 3), or Microsoft Vista (Business and Enterprise, Service Pack 1). It displays the user interface on a network computer running the ShareScan Services Manager. It also keeps track of the hosted ScanFront devices, manages scanner settings, and initiates scanning...
... ShareScan Services Manager resides on the device's control panel and handles user input. a single Services Manager can support multiple clients. The Administration console is installed on the PC running Windows 2003 Server, Windows 2008 Server, Windows XP Professional (Service Pack 3), or Microsoft Vista (Business and Enterprise, Service Pack 1). It displays the user interface on a network computer running the ShareScan Services Manager. It also keeps track of the hosted ScanFront devices, manages scanner settings, and initiates scanning...

Installation Guide
Page 43
... console automatically detects the Services Managers on your network and lets you select the one that you install ShareScan, the Administration console, an MMC (Microsoft Management Console) snap-in, is installed along with the Services Manager and any selected eCopy connectors. The Services Manager supports multiple devices running ShareScan Embedded software. In this chapter ■ Starting, stopping, and restarting the Services Manager 36 ■ Setting security options for a Services Manager 37 ■ Configuring...
... console automatically detects the Services Managers on your network and lets you select the one that you install ShareScan, the Administration console, an MMC (Microsoft Management Console) snap-in, is installed along with the Services Manager and any selected eCopy connectors. The Services Manager supports multiple devices running ShareScan Embedded software. In this chapter ■ Starting, stopping, and restarting the Services Manager 36 ■ Setting security options for a Services Manager 37 ■ Configuring...

Installation Guide
Page 45
... Display Security Options button on the console toolbar. In a ShareScan Embedded environment, you might want to set the security options for a specific Services Manager to allow other Services Managers: 1 In the console tree, select the name of devices option. eCopy ShareScan® Installation and Setup Guide | 37 Setting security options for a Services Manager The Security Options function, which you can configure for each Services Manager, enables you...
... Display Security Options button on the console toolbar. In a ShareScan Embedded environment, you might want to set the security options for a specific Services Manager to allow other Services Managers: 1 In the console tree, select the name of devices option. eCopy ShareScan® Installation and Setup Guide | 37 Setting security options for a Services Manager The Security Options function, which you can configure for each Services Manager, enables you...

Installation Guide
Page 63
... console toolbar. ■ Right-click the Services Manager and then click Display user list. A domain administrator must grant access rights to anyone else who needs remote access to domain administrators. eCopy ShareScan® Installation and Setup Guide | 55 Remote administration When the Services Manager, the Administration console, and all available connectors are those who will configure system and device properties. The Select Users window opens.
... console toolbar. ■ Right-click the Services Manager and then click Display user list. A domain administrator must grant access rights to anyone else who needs remote access to domain administrators. eCopy ShareScan® Installation and Setup Guide | 55 Remote administration When the Services Manager, the Administration console, and all available connectors are those who will configure system and device properties. The Select Users window opens.

Installation Guide
Page 66
Depending on the installation CD (see the instructions provided with the ShareScan installation CD that you did not install during the initial installation of ShareScan, you use the Program Maintenance option. The Program Maintenance window opens. 4 Click Modify and then click Next. For more information on downloading connectors please see page 9). To install a connector from the ShareScan CD after initial installation: 1 In Control Panel, select Add or Remove Programs. 2 Select eCopy...
Depending on the installation CD (see the instructions provided with the ShareScan installation CD that you did not install during the initial installation of ShareScan, you use the Program Maintenance option. The Program Maintenance window opens. 4 Click Modify and then click Next. For more information on downloading connectors please see page 9). To install a connector from the ShareScan CD after initial installation: 1 In Control Panel, select Add or Remove Programs. 2 Select eCopy...
Installation Guide
Page 95
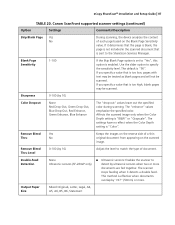
... setting is enabled. Double-Feed Detection None Ultrasonic sensors (SF-220eP only) ■ Ultrasonic sensors: Enables the scanner to the ShareScan Services Manager. This method is "90". Remove Bleed Yes Thru No Keeps the images on the reverse side of a thin original document from appearing on the Blank Page Sensitivity value. Use the slider option to match the type of each page based on the scanned image. The scanner stops feeding...
... setting is enabled. Double-Feed Detection None Ultrasonic sensors (SF-220eP only) ■ Ultrasonic sensors: Enables the scanner to the ShareScan Services Manager. This method is "90". Remove Bleed Yes Thru No Keeps the images on the reverse side of a thin original document from appearing on the Blank Page Sensitivity value. Use the slider option to match the type of each page based on the scanned image. The scanner stops feeding...

Installation Guide
Page 131
... format required by default. The recipient's fax number is sent to the SMTP server as a MIME-formatted mail message. eCopy ShareScan® Installation and Setup Guide | 123 eCopy Connector for Fax via SMTP The eCopy Connector for Fax via SMTP enables users to scan and fax documents from a generic account as your User Logon setting (see Table 35). 5 Use the connector Wizard...
... format required by default. The recipient's fax number is sent to the SMTP server as a MIME-formatted mail message. eCopy ShareScan® Installation and Setup Guide | 123 eCopy Connector for Fax via SMTP The eCopy Connector for Fax via SMTP enables users to scan and fax documents from a generic account as your User Logon setting (see Table 35). 5 Use the connector Wizard...

Installation Guide
Page 135
... configure a Scan to eCopy Desktop connector profile to scan to Self and Authenticate Users options. Sample scan inbox locations Domain Inbox path Windows Active User1 Directory Single domain mode (recommended) \\Server\Inbox_Root\User1 Windows Active User1 Directory Multiple domain mode \\Server\Inbox_Root\xyz.com\\User1 Novell (NDS) Cn=testuser ou=engineering 0=eCopy Use user ID for folder \\Server\Inbox_Root\.testuser.engineering.e names (recommended) copy Novell...
... configure a Scan to eCopy Desktop connector profile to scan to Self and Authenticate Users options. Sample scan inbox locations Domain Inbox path Windows Active User1 Directory Single domain mode (recommended) \\Server\Inbox_Root\User1 Windows Active User1 Directory Multiple domain mode \\Server\Inbox_Root\xyz.com\\User1 Novell (NDS) Cn=testuser ou=engineering 0=eCopy Use user ID for folder \\Server\Inbox_Root\.testuser.engineering.e names (recommended) copy Novell...
Installation Guide
Page 162
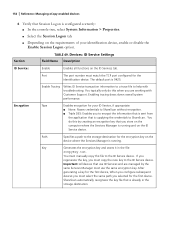
... tracing slows down overall system performance. Devices: ID Service Settings Field Name Description ID Services Enable Enables all functions on the ID Service device. You typically only do this by the same Services Manager must select the same path you must manually copy this when you are managed by creating an encryption key that you must use ID Services and are working with troubleshooting. 154 | Reference: Managing...
... tracing slows down overall system performance. Devices: ID Service Settings Field Name Description ID Services Enable Enables all functions on the ID Service device. You typically only do this by the same Services Manager must select the same path you must manually copy this when you are managed by creating an encryption key that you must use ID Services and are working with troubleshooting. 154 | Reference: Managing...

Installation Guide
Page 168
... ShareScan User account; 160 | Reference: Using eCopy Connectors Preview 1 When the connector finishes scanning the document, review the scanned images. After changing the scanner settings, press OK. 4 To review and change the scanner settings, press the Scanner Settings button on the Preview screen. you will prompt you scan additional pages, the Client inserts them after page 5. 3 To review and change the document settings, press the Document Settings button on . ShareScan uses the current scanner settings. For example, if the Client is configured...
... ShareScan User account; 160 | Reference: Using eCopy Connectors Preview 1 When the connector finishes scanning the document, review the scanned images. After changing the scanner settings, press OK. 4 To review and change the scanner settings, press the Scanner Settings button on the Preview screen. you will prompt you scan additional pages, the Client inserts them after page 5. 3 To review and change the document settings, press the Document Settings button on . ShareScan uses the current scanner settings. For example, if the Client is configured...

Installation Guide
Page 189
... of scanned documents disabling list of (LDAP/SMTP) 121 selecting 161 recovering product keys 50 refreshing list of connectors 58 remembering recently used by Inbox Agent (Scan to eCopy Desktop) 138 opening 171 SMTP server 121 post-scanning options 161 Preferred tree field 175 Preview screen 160 printers scanning and printing to Printer Connector 140 configuring 140 ScanFront fingerprint scanner 156 scanner settings changing at device 159 configuring 85 for ScanFront 86 specifying defaults...
... of scanned documents disabling list of (LDAP/SMTP) 121 selecting 161 recovering product keys 50 refreshing list of connectors 58 remembering recently used by Inbox Agent (Scan to eCopy Desktop) 138 opening 171 SMTP server 121 post-scanning options 161 Preferred tree field 175 Preview screen 160 printers scanning and printing to Printer Connector 140 configuring 140 ScanFront fingerprint scanner 156 scanner settings changing at device 159 configuring 85 for ScanFront 86 specifying defaults...

Installation Guide
Page 190
... starting and stopping 36 Session Logon configuring 42 document naming and 83 Express function and 67 See also logon settings (ScanStation), Services Manager setting up ScanFront device 26 ShareScan Administrator group 126 ShareScan Embedded See also ScanStation ShareScan Host Address 26 ShareScan User account 98, 108, 112 ShareScan, installing 9 sharing configuration files 53 single forest environment (Exchange) 96 size of searches 43, 116, 119 SCSI drive...
... starting and stopping 36 Session Logon configuring 42 document naming and 83 Express function and 67 See also logon settings (ScanStation), Services Manager setting up ScanFront device 26 ShareScan Administrator group 126 ShareScan Embedded See also ScanStation ShareScan Host Address 26 ShareScan User account 98, 108, 112 ShareScan, installing 9 sharing configuration files 53 single forest environment (Exchange) 96 size of searches 43, 116, 119 SCSI drive...

Administrator's Guide
Page 11
Before installing eCopy Quick Connect, make sure that the ShareScan software is complete, click Finish. eCopy Connector for details. To install the connector: 1 Double-click the Setup.exe file. 2 Click Install Connector to the eCopy ShareScan Installation and Setup Guide for Quick Connect Administrator's Guide | 7 Installing the connector Important! Refer to start the installation. 3 Follow the on-screen instructions 4 When the installation is installed and functioning correctly.
Before installing eCopy Quick Connect, make sure that the ShareScan software is complete, click Finish. eCopy Connector for details. To install the connector: 1 Double-click the Setup.exe file. 2 Click Install Connector to the eCopy ShareScan Installation and Setup Guide for Quick Connect Administrator's Guide | 7 Installing the connector Important! Refer to start the installation. 3 Follow the on-screen instructions 4 When the installation is installed and functioning correctly.

Administrator's Guide
Page 12
... want to scan and send the document by simply pressing the connector button at the device, you can create multiple buttons and configure each user in a different destination. You can set up an Express connector profile that are important to store documents in the log file. Depending on each time they use the device. For more information, see "Defining a scanning destination" on page 11. ■...
... want to scan and send the document by simply pressing the connector button at the device, you can create multiple buttons and configure each user in a different destination. You can set up an Express connector profile that are important to store documents in the log file. Depending on each time they use the device. For more information, see "Defining a scanning destination" on page 11. ■...

Administrator's Guide
Page 33
... values. Follow the instructions for configuring a new data source. You do not want to the field in a database, values that are associated with a Quick Connect field, users will have not previously configured a data source, the Configure Data Source window opens. The Field Editor or Index Field Editor window opens (see page 31). The user at the device can then select from the list. The Configure Data Source window opens. If the database...
... values. Follow the instructions for configuring a new data source. You do not want to the field in a database, values that are associated with a Quick Connect field, users will have not previously configured a data source, the Configure Data Source window opens. The Field Editor or Index Field Editor window opens (see page 31). The user at the device can then select from the list. The Configure Data Source window opens. If the database...

Administrator's Guide
Page 41
... scanned images. use the down arrow button to allow navigation, the Folder Navigation screen appears. The Scanner Settings... Navigate If you are ready to store the document, press Next. 5 If the Logon screen appears, enter your user credentials, then press Next. After changing the scanner settings, select OK. 3 To review and change a setting, select the option, such as "Paper size" and then select the setting on the Preview screen. After changing the document settings...
... scanned images. use the down arrow button to allow navigation, the Folder Navigation screen appears. The Scanner Settings... Navigate If you are ready to store the document, press Next. 5 If the Logon screen appears, enter your user credentials, then press Next. After changing the scanner settings, select OK. 3 To review and change a setting, select the option, such as "Paper size" and then select the setting on the Preview screen. After changing the document settings...
Setup Guide
Page 8
...) Use the power switch to turn the device ON, and press [Power off] on the ScanFront 220e/220eP and eCopy ShareScan Services Manager to turn it OFF. 7. Placing Documents (See p. 30) This section describes how to the desired installation site, and connect the AC adaptor and network cable. 6. This section describes how to configure settings on the touch panel to establish a connection. 8. Removing the Packing Materials and Attaching the Feed Roller (See p. 13) Remove...
...) Use the power switch to turn the device ON, and press [Power off] on the ScanFront 220e/220eP and eCopy ShareScan Services Manager to turn it OFF. 7. Placing Documents (See p. 30) This section describes how to the desired installation site, and connect the AC adaptor and network cable. 6. This section describes how to configure settings on the touch panel to establish a connection. 8. Removing the Packing Materials and Attaching the Feed Roller (See p. 13) Remove...

Setup Guide
Page 13
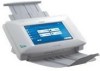
... this when there is a paper jam or to operate the ScanFront. i Fingerprint Authentication Sensor (Only Available with the ScanFront 220eP) This fingerprint sensor is ON. b Power Indicator Lights when the power is for documents. 9 c Lock Lever Locks the panel unit. 2. f Panel Unit Open this screen to perform maintenance. If scanned documents are shown below. ❏ Front and Document Feed and Eject Trays ScanFront 220e ScanFront 220eP a Power Switch Use this to match the width of the document. Pull the lever toward you...
... this when there is a paper jam or to operate the ScanFront. i Fingerprint Authentication Sensor (Only Available with the ScanFront 220eP) This fingerprint sensor is ON. b Power Indicator Lights when the power is for documents. 9 c Lock Lever Locks the panel unit. 2. f Panel Unit Open this screen to perform maintenance. If scanned documents are shown below. ❏ Front and Document Feed and Eject Trays ScanFront 220e ScanFront 220eP a Power Switch Use this to match the width of the document. Pull the lever toward you...
Setup Guide
Page 16
... Europe ScanFront 220e (standard model) ScanFront 220eP (model with fingerprint sensor) Feed Roller The feed roller must be attached to the device during installation. (See p. 13.) AC Adapter* (Cord length: 4.9 ft. (1.5 m)) Power Cord* (Cord length: 3.3 ft. (1 m)) Setup Guide (this manual) eCopy ShareScan 4.5 Setup CD-ROM** eCopy Desktop Setup CD-ROM** Information sheet on how to obtain the eCopy ShareScan Product Key Clear Binder Before Use * Make sure to use only the supplied AC adapter and power cord. ** The PDF files stored on the CD-ROM require Adobe...
... Europe ScanFront 220e (standard model) ScanFront 220eP (model with fingerprint sensor) Feed Roller The feed roller must be attached to the device during installation. (See p. 13.) AC Adapter* (Cord length: 4.9 ft. (1.5 m)) Power Cord* (Cord length: 3.3 ft. (1 m)) Setup Guide (this manual) eCopy ShareScan 4.5 Setup CD-ROM** eCopy Desktop Setup CD-ROM** Information sheet on how to obtain the eCopy ShareScan Product Key Clear Binder Before Use * Make sure to use only the supplied AC adapter and power cord. ** The PDF files stored on the CD-ROM require Adobe...


