Quick Start Guide
Page 1
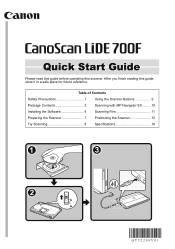
After you finish reading this scanner. Quick Start Guide Please read this guide before operating this guide, store it in a safe place for future reference. Table of Contents Safety Precautions 1 Using the Scanner Buttons 9 Package Contents 3 Scanning with MP Navigator EX......... 10 Installing the Software 4 Scanning Film 11 Preparing the Scanner 7 Positioning the Scanner 15 Try Scanning 8 Specifications 16
After you finish reading this scanner. Quick Start Guide Please read this guide before operating this guide, store it in a safe place for future reference. Table of Contents Safety Precautions 1 Using the Scanner Buttons 9 Package Contents 3 Scanning with MP Navigator EX......... 10 Installing the Software 4 Scanning Film 11 Preparing the Scanner 7 Positioning the Scanner 15 Try Scanning 8 Specifications 16
Quick Start Guide
Page 3
.... CAUTION • When unplugging the USB cable, always pull on shaky stands, unstable surfaces or surfaces subject to frequent vibrations. If the scanner has heat, it is not plugged in your doctor. Fire or electrical shock may result. • If lightning strikes in completely, fire ...or electrical shock may lead to injury to persons or damage to the scanner. Lightning strikes could cause a fire, electric shock, or damage to property if not performed correctly. Fire or electrical shock may result. •...
.... CAUTION • When unplugging the USB cable, always pull on shaky stands, unstable surfaces or surfaces subject to frequent vibrations. If the scanner has heat, it is not plugged in your doctor. Fire or electrical shock may result. • If lightning strikes in completely, fire ...or electrical shock may lead to injury to persons or damage to the scanner. Lightning strikes could cause a fire, electric shock, or damage to property if not performed correctly. Fire or electrical shock may result. •...
Quick Start Guide
Page 4
...immediately unplug the USB cable and contact your retailer or Canon Customer Support Help Desk. CAUTION • Do not release the document cover until it may result. • When transporting the scanner, always unplug the cables. Leave the scanner enough time to gradually adapt to high temperature areas. ...Continued use may break and injure you have to place the scanner in direct sunlight, make sure to pinch your retailer or Canon Customer Support Help Desk. Do not spill water or liquids into the scanner. Wipe with a soft dry cloth. The document glass may result in...
...immediately unplug the USB cable and contact your retailer or Canon Customer Support Help Desk. CAUTION • Do not release the document cover until it may result. • When transporting the scanner, always unplug the cables. Leave the scanner enough time to gradually adapt to high temperature areas. ...Continued use may break and injure you have to place the scanner in direct sunlight, make sure to pinch your retailer or Canon Customer Support Help Desk. Do not spill water or liquids into the scanner. Wipe with a soft dry cloth. The document glass may result in...
Quick Start Guide
Page 5
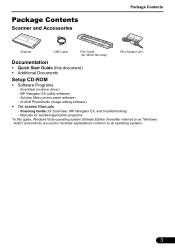
... for bundled application programs *In this document) • Additional Documents Setup CD-ROM • Software Programs - MP Navigator EX (utility software) - Package Contents Scanner and Accessories Package Contents Scanner USB Cable Film Guide (for 35mm film strip) Film Adapter Unit Documentation • Quick Start Guide (this guide, Windows Vista operating system Ultimate...
... for bundled application programs *In this document) • Additional Documents Setup CD-ROM • Software Programs - MP Navigator EX (utility software) - Package Contents Scanner and Accessories Package Contents Scanner USB Cable Film Guide (for 35mm film strip) Film Adapter Unit Documentation • Quick Start Guide (this guide, Windows Vista operating system Ultimate...

Quick Start Guide
Page 6
... install the software. • Do not switch users during the installation process. 1 Place the Setup CD-ROM in the drive. If you connect the scanner and the Found New Hardware screen appears, unplug the USB cable from Windows XP to Windows Vista, first uninstall software bundled with the... Canon scanner. • Log in as an administrator to proceed when the User Account Control dialog box appears. 3 If prompted, select your language and place of residence,...
... install the software. • Do not switch users during the installation process. 1 Place the Setup CD-ROM in the drive. If you connect the scanner and the Found New Hardware screen appears, unplug the USB cable from Windows XP to Windows Vista, first uninstall software bundled with the... Canon scanner. • Log in as an administrator to proceed when the User Account Control dialog box appears. 3 If prompted, select your language and place of residence,...
Quick Start Guide
Page 9
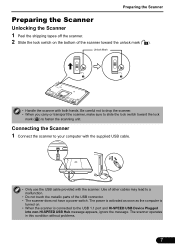
... cables may lead to a malfunction. • Do not touch the metallic parts of the scanner toward the lock mark ( ) to fasten the scanning unit. Connecting the Scanner 1 Connect the scanner to your computer with the supplied USB cable. • Only use the USB cable provided with... both hands. Unlock Mark • Handle the scanner with the scanner. Preparing the Scanner Preparing the Scanner Unlocking the Scanner 1 Peel the shipping tapes off the scanner. 2 Slide the lock switch on . • When the scanner is connected to the USB 1.1 port and HI-SPEED USB Device...
... cables may lead to a malfunction. • Do not touch the metallic parts of the scanner toward the lock mark ( ) to fasten the scanning unit. Connecting the Scanner 1 Connect the scanner to your computer with the supplied USB cable. • Only use the USB cable provided with... both hands. Unlock Mark • Handle the scanner with the scanner. Preparing the Scanner Preparing the Scanner Unlocking the Scanner 1 Peel the shipping tapes off the scanner. 2 Slide the lock switch on . • When the scanner is connected to the USB 1.1 port and HI-SPEED USB Device...
Quick Start Guide
Page 10
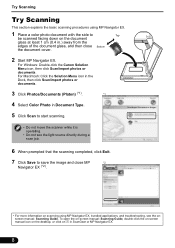
..., then click Scan/import photos or documents. 3 Click Photos/Documents (Platen) (*1). *1 4 Select Color Photo in ScanGear or MP Navigator EX. 8 For Windows: Double-click the Canon Solution Menu icon, then click Scan/import photos or documents. To open the on-screen manual: Scanning Guide, double-click the on-screen manual icon... the light source directly during a scan job. 6 When prompted that the scanning completed, click Exit. 7 Click Save to start scanning. • Do not move the scanner while it is operating. • Do not see the onscreen manual: Scanning Guide.
..., then click Scan/import photos or documents. 3 Click Photos/Documents (Platen) (*1). *1 4 Select Color Photo in ScanGear or MP Navigator EX. 8 For Windows: Double-click the Canon Solution Menu icon, then click Scan/import photos or documents. To open the on-screen manual: Scanning Guide, double-click the on-screen manual icon... the light source directly during a scan job. 6 When prompted that the scanning completed, click Exit. 7 Click Save to start scanning. • Do not move the scanner while it is operating. • Do not see the onscreen manual: Scanning Guide.

Quick Start Guide
Page 11
... automatically, then scans and saves it with a press of a button. Using the Scanner Buttons Using the Scanner Buttons Scanner buttons allow you need to set Image Capture (in Application to launch when scanner button is pressed. COPY Button Prints (copies) the scanned image with a printer. ...images in PDF format with appropriate settings. See "Setup CD-ROM" on -screen manual: Scanning Guide. Simply place your computer using scanner buttons, make sure that the required software programs for the required function. Start Image Capture, and then click Options and select MP Navigator...
... automatically, then scans and saves it with a press of a button. Using the Scanner Buttons Using the Scanner Buttons Scanner buttons allow you need to set Image Capture (in Application to launch when scanner button is pressed. COPY Button Prints (copies) the scanned image with a printer. ...images in PDF format with appropriate settings. See "Setup CD-ROM" on -screen manual: Scanning Guide. Simply place your computer using scanner buttons, make sure that the required software programs for the required function. Start Image Capture, and then click Options and select MP Navigator...
Quick Start Guide
Page 12
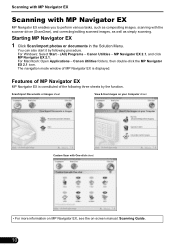
For Windows: Select Start - (All) Programs - Canon Utilities folders, then double-click the MP Navigator EX 2.1 icon. The navigation mode window of the following three sheets by following procedure. Features of MP ... information on MP Navigator EX, see the on your Computer sheet Custom Scan with the scanner driver (ScanGear), and correcting/editing scanned images, as well as simply scanning. MP Navigator EX 2.1, and click MP Navigator EX 2.1. Canon Utilities - Starting MP Navigator EX 1 Click Scan/import photos or documents in the Solution Menu...
For Windows: Select Start - (All) Programs - Canon Utilities folders, then double-click the MP Navigator EX 2.1 icon. The navigation mode window of the following three sheets by following procedure. Features of MP ... information on MP Navigator EX, see the on your Computer sheet Custom Scan with the scanner driver (ScanGear), and correcting/editing scanned images, as well as simply scanning. MP Navigator EX 2.1, and click MP Navigator EX 2.1. Canon Utilities - Starting MP Navigator EX 1 Click Scan/import photos or documents in the Solution Menu...
Quick Start Guide
Page 13
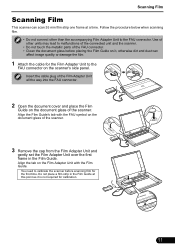
... Film Guide's tab with the Film Guide. Align the tab on the Film Adapter Unit with the FAU symbol on the document glass of the scanner. 3 Remove the cap from the Film Adapter Unit and gently set the Film Adapter Unit over the first frame in the Film Guide at a time... Guide on the document glass of the FAU connector. • Clean the document glass before scanning film for calibration. 11 You need to calibrate the scanner before placing the Film Guide on it is not required for the first time. Follow the procedure below when scanning film. • Do not connect...
... Film Guide's tab with the Film Guide. Align the tab on the Film Adapter Unit with the FAU symbol on the document glass of the scanner. 3 Remove the cap from the Film Adapter Unit and gently set the Film Adapter Unit over the first frame in the Film Guide at a time... Guide on the document glass of the FAU connector. • Clean the document glass before scanning film for calibration. 11 You need to calibrate the scanner before placing the Film Guide on it is not required for the first time. Follow the procedure below when scanning film. • Do not connect...

Quick Start Guide
Page 14
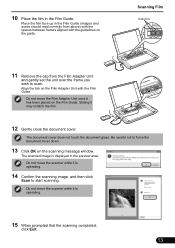
Scanning Film 4 Gently close the document cover. 5 Start MP Navigator EX. Do not move the scanner while it is operating. 9 When the scanning message window appears, open the document cover, remove the Film Adapter Unit, and then attach the cap to the unit. 12 Follow the step 2 in "Try Scanning" on page 8. 6 Click Film. 7 Click Scan. 8 Click OK on the calibration message window.
Scanning Film 4 Gently close the document cover. 5 Start MP Navigator EX. Do not move the scanner while it is operating. 9 When the scanning message window appears, open the document cover, remove the Film Adapter Unit, and then attach the cap to the unit. 12 Follow the step 2 in "Try Scanning" on page 8. 6 Click Film. 7 Click Scan. 8 Click OK on the calibration message window.
Quick Start Guide
Page 15
... it is displayed in the preview area. Sliding it has been placed on the Film Guide. Do not move the scanner while it is operating. 15 When prompted that the scanning completed, click Exit. 13 The document cover does not touch the document glass. The scanned ...
... it is displayed in the preview area. Sliding it has been placed on the Film Guide. Do not move the scanner while it is operating. 15 When prompted that the scanning completed, click Exit. 13 The document cover does not touch the document glass. The scanned ...
Quick Start Guide
Page 17
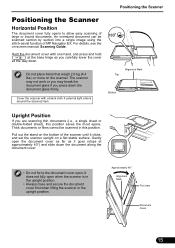
...a single image using the stitch-assist function of large or bound documents. Approximately 40° Alignment Mark Thin Item Document Cover 15 The scanner may not work or you may break the document glass if you are scanning thin documents (i.e., a single sheet or double-folded sheet),... this position. it goes (stops at the base hinge as it does not fully open ; Positioning the Scanner Positioning the Scanner Horizontal Position The document cover fully opens to allow easy scanning of MP Navigator EX. Hold the document cover with a black cloth ...
...a single image using the stitch-assist function of large or bound documents. Approximately 40° Alignment Mark Thin Item Document Cover 15 The scanner may not work or you may break the document glass if you are scanning thin documents (i.e., a single sheet or double-folded sheet),... this position. it goes (stops at the base hinge as it does not fully open ; Positioning the Scanner Positioning the Scanner Horizontal Position The document cover fully opens to allow easy scanning of MP Navigator EX. Hold the document cover with a black cloth ...
Quick Start Guide
Page 18
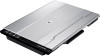
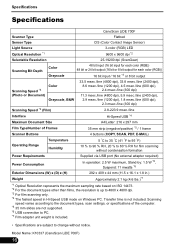
Specifications Specifications CanoScan LiDE 700F Scanner Type Flatbed Sensor Type CIS (Color Contact Image Sensor) Light Source 3-color (RGB) LED Optical Resolution *1 9600 x 9600 dpi *2 Selectable Resolution 25-19200 dpi (ScanGear) ...: K10337 (CanoScan LiDE 700F) 16 Scanning speed varies according to the document types, scan settings, or specifications of Frames 35 mm strip (negative/positive) *5 / 1 frame Scanner Buttons 4 buttons (COPY, SCAN, PDF, E-MAIL) Operating Range Temperature Humidity 5 °C to 35 °C (41 °F to 95 °F) 10 % to 90 % RH, 20 % to...
Specifications Specifications CanoScan LiDE 700F Scanner Type Flatbed Sensor Type CIS (Color Contact Image Sensor) Light Source 3-color (RGB) LED Optical Resolution *1 9600 x 9600 dpi *2 Selectable Resolution 25-19200 dpi (ScanGear) ...: K10337 (CanoScan LiDE 700F) 16 Scanning speed varies according to the document types, scan settings, or specifications of Frames 35 mm strip (negative/positive) *5 / 1 frame Scanner Buttons 4 buttons (COPY, SCAN, PDF, E-MAIL) Operating Range Temperature Humidity 5 °C to 35 °C (41 °F to 95 °F) 10 % to 90 % RH, 20 % to...


